|
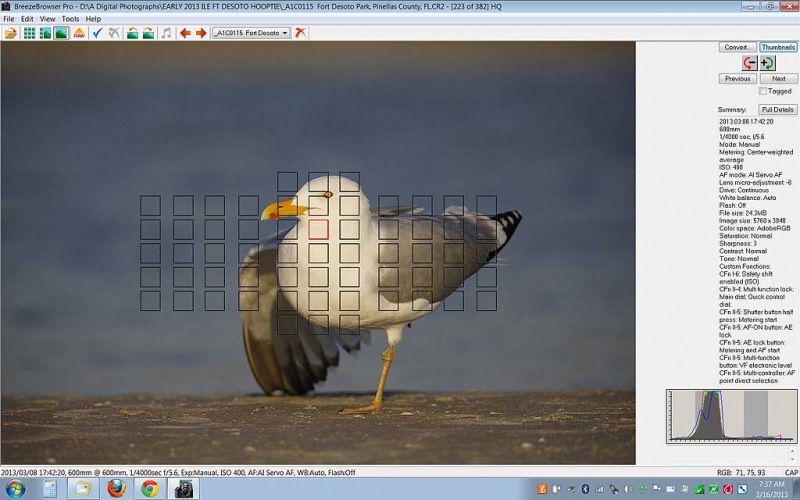
This image was made on March 8 at Fort Desoto on the Fort Desoto/Hooptie Deux Short Notice IPT with the hand held Canon EF 300mm f/2.8L IS II USM Telephoto Lens, the Canon 2x EF Extender III (Teleconverter), and the Canon EOS 5D Mark III Digital Camera (Body Only). ISO 400; 1/4000 sec. at f/5.6 in Manual mode was a slight underexposure. Rig supported by my left knee-pod. One sensor above the central sensor/AI Servo Surround/Rear Focus AF on the bird’s neck active at the moment of exposure. Click here if you missed the Rear Focus Tutorial. Click on the image for a larger version. |
Proper Hand Holding Technique
Above is a BreezeBrowser Main View screen capture. The illuminated red square on the bird’s neck indicates that AF was active at the moment of exposure. Make sure to check Show Focus Points under View to activate this feature. To see the focus points in DPP check AF Point under View or hit Alt L.
Regular readers know that I use and depend on BreezeBrowser every day of the year. It allows me to sort my keepers and deletes the rejects faster than any other browsing program. We use it on the main computer in the home office to catalog our images file-drawer style. And the companion program, Downloader Pro allows me to download my images quickly and conveniently. It automatically adds my IPTC data and the shooting location. I have it set up to create a folder named by the Month/date/year. The Breezebrowser/Downloader Pro combo saves me many hours each week. To learn earn more or to purchase this great PC only program, click here.
|
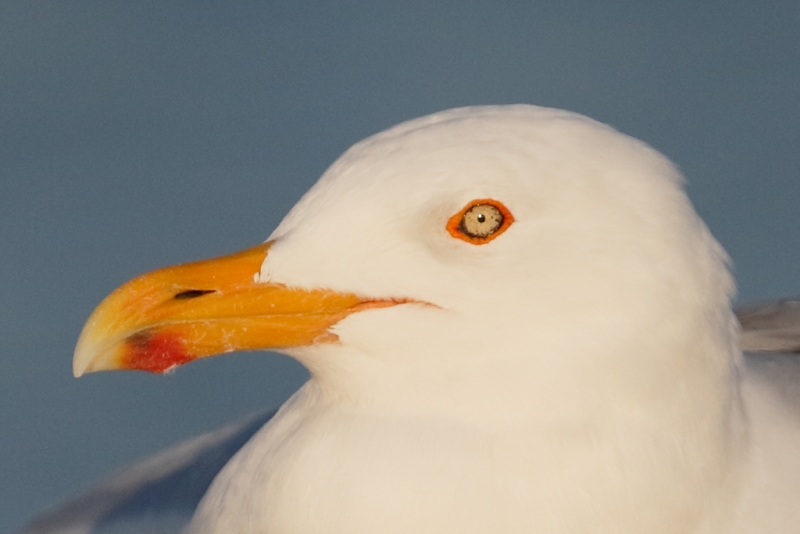
This is a roughly 100% unsharpened tight crop of the head of the bird in the screen capture above. The sharpness is satisfactory. |
Doing Things Right
When you do things correctly the resulting image is sharp. With AF active at the moment of exposure while working in AI Servo as I always do with rear focus, the system maintains accurate focus even if the bird moves its head or, even if the photographer, that would be me, shifts position even slightly.
Behavior Note
If a bird that you are photographing stretches its far wing it is pretty much a given that it will stretch its near wing within the next few minutes. Knowing that I was excited….
|
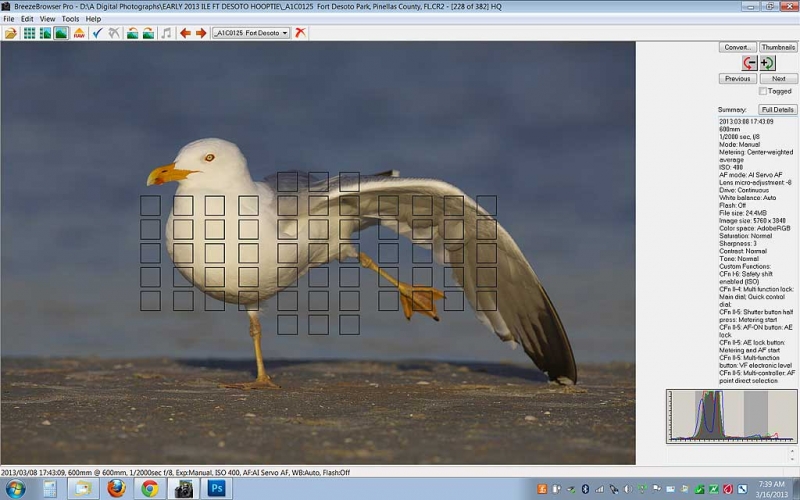
This image was made on March 8 at Fort Desoto on the Fort Desoto/Hooptie Deux Short Notice IPT minutes after the image above was created, both of course with the hand held Canon EF 300mm f/2.8L IS II USM Telephoto Lens, the Canon 2x EF Extender III (Teleconverter), and the Canon EOS 5D Mark III Digital Camera (Body Only). ISO 400: 1/2000 sec. at f/8 in Manual mode was a slight underexposure. Rig supported by my left knee-pod. Central sensor/AI Servo Surround/Rear Focus AF on the bird’s eye and re-compose. Click here if you missed the Rear Focus Tutorial. Click on the image for a larger version. |
Doing Things Wrong
Note in the Breezebrowser screen capture above that no focus points were active at the moment of exposure. Had one or more been active, it/they would have been illuminated in red.
|
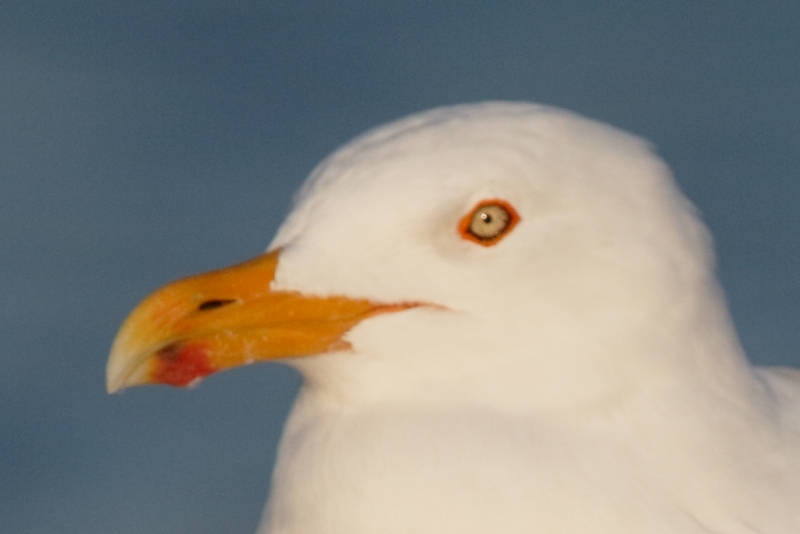
This is a roughly 100% unsharpened tight crop of the head of the bird in the screen capture above. The sharpness is quite unsatisfactory. |
What Happened?
What happened was that in my excitement, while recomposing, I shifted position enough to throw off accurate focus. Remember, for the second image AF was not active at the moment of exposure.
The Lesson
When hand holding, it is best to have AI Servo AF active at the moment of exposure with the active sensor on the bird’s eye, face, or neck. Doing so will ensure the creation of a sharp image. If that is not possible it is imperative that neither you nor the subject move after focusing. All of the above is true whether you are using Rear Focus or using the shutter button for AF.
The 2nd New Concept IPT: the Fort Desoto/Hooptie Deux–Roseate Spoonbill Short Notice IPT/April 3-7, 2013/5 DAYS: $2399. Strict limit: six photographers/ openings 5.
Early April can be superb at Alafia Banks. Early April is almost always superb at Fort DeSoto. Click here for complete details.
EOS-5D Mark III User’s Guide
In the EOS-5D Mark III User’s Guide You can learn everything that I know about the following important topics: 5D III exposure fine points, handling the WHITEs, the top LCD and all camera control buttons, 5D Mark III drive modes, how to manually select an AF sensor, choosing an AF Area Selection Mode, and Menu Item access. Coverage of almost all Menu Items and Custom Functions including: Image Quality, Auto Lighting Optimizer, Highlight Tone Priority, AF Configuration Tool (includes details on the custom Case setting that I use), Acceleration/deceleration tracking, Tracking sensitivity, Lens drive when AF impossible, Orientation linked AF point (I love this feature on the 5D III!), Highlight alert, Histogram display, Auto rotate, Custom Shooting Mode set-up, Safety shift, using the Q button, and setting up rear focus.Plus detailed instructions on how to set up for both in-camera HDR and in-camera multiple exposures.
The guide is–of course–written in my informal, easy-to-follow style. Learn more or purchase here.
Typos
On all blog posts, feel free to e-mail or leave a comment regarding any typos, wrong words, misspellings, omissions, or grammatical errors. Just be right. 🙂
Support the BAA Blog. Support the BAA Bulletins: Shop B&H here!
We want and need to keep providing you with the latest free information, photography and Photoshop lessons, and all manner of related information. Show your appreciation by making your purchases immediately after clicking on any of our B&H or Amazon Affiliate links in this blog post. Remember, B&H ain’t just photography!
Support the BAA Blog. Support the BAA Bulletins: Shop Amazon here!
And from the BAA On-line Store:
LensCoats. I have a LensCoat on each of my big lenses to protect them from nicks and thus increase their re-sales value. All my big lens LensCoat stuff is in Hardwood Snow pattern.
LegCoat Tripod Leg Covers. I have four tripods active and each has a Hardwood Snow LegCoat on it to help prevent further damage to my tender shoulders :) And you will love them in mega-cold weather....
Gitzo GT3532 LS CF Tripod. This one replaces the GT3530LS Tripod and will last you a lifetime. Learn more about this great tripod here.
Mongoose M3.6 Tripod Head. Right now this is the best tripod head around for use with lenses that weigh less than 9 pounds. For heavier lenses, check out the Wimberley V2 head.
Double Bubble Level. You will find one in my camera's hot shoe whenever I am not using flash.
The Lens Align Mark II. I use the Lens Align Mark II pretty much religiously to micro-adjust all of my gear an average of once a month and always before a major trip. Enjoy our free comprehensive tutorial here.
BreezeBrowser. I do not see how any digital photographer can exist without this program.
Delkin Flash Cards. I use and depend on Delkin compact Flash Cards and card readers most every day. Learn more about their great 700X and 1000X cards here or about my favorite Delkin card here.


Hey Artie, Your AI-Servo hand holding tip is especially critical when hand holding big glass for small subjects at near minimum focus. At times I hand hold the 500mm for warblers at Magee Marsh. This of course results in paper thin depth of field. I find my upper body shifts forward and back fractions of an inch no matter how steady I try to be. Soft images are all but guaranteed in one shot AF mode. Good Shooting!
Hey Bud. We are on the same page. Thanks for the confirmation. What body are you using now? artie
ps: love to the horses….
Glad you like the horses, we have two foals on the way in the next few weeks. Currently using the 1D4, though I did rent the 1Dx a few weeks ago. As you know AF and high ISO performance is sick. ISO 10,000 post sun set was cleaner than 1600 with the 1D4.
BLZ, I did not say I love horses I said to send them my love :). Yes, the 1D X is an amazing, amazing camera body. If you get one please remember to use our link. Good luck this May! Which week has been the best the past few years for warblers at Mcgee?? Have you been to Pelee?
My bad, missed the “to” the horses part. I thought you had seen my horse photos on the web. Will do on the 1Dx purchase. McGee is on NCIS 🙂 Magee is best (weather dependent as you know) from about May 7-14th. Great days can be had earlier but they can be few and far between. Leaf out makes later in May a real challenge. Have not been to Pelee in years.
Thanks on using the link. There are product specific links everywhere, blog and Bulletins. Thanks for the Magee info–about what I figured. I knew I was spelling it wrong as I typed 🙂 later and love, artie ps: do post a link to your horsey images here in a new comment.
Thank you for the behavior tip:
“If a bird that you are photographing stretches its far wing it is pretty much a given that it will stretch its near wing within the next few minutes.”
That is very useful! I am curious to know how you know to open up the aperture when the bird switches wings. In the first photo, where the back wing was stretched back, you were at f/5.6. In the second photo, the front wing was stretched forward, and you moved up to f/8. It does not appear as though the lighting changed, and I can’t tell how far forward the wing is from its eye…but apparently you needed the extra DOF. Are there any cues you use to help you determine how much depth of field you need? I think this is one of the biggest things I struggle with lately. All too often I get home thinking I had some great shots, only to find out when I focused on the bird’s neck, its eye was just slightly out of focus. Bleh.
I recently purchased ABP (I & II…Fantastic books, BTW!), and I am reading through ABP I right now. If you already have tips in there about DOF, then great! I’ll probably read it soon. If not, I would love to know how you determine what aperture to use to ensure your whole subject is in focus for little things like this.
Regarding AF, I switched to using back-button AF and AI-Servo for pretty much everything when I first started reading your blog. Best thing I think I ever did for my photography! Thanks!
Hi Jon, Thanks for your purchases. Enjoy them and be sure to study them hard. They do not work by osmosis.
Yes to needing more d-of for a near-wing stretch. Please note that when you need more depth of field you close down (not open up as you suggested….)
I generally I am not overly concerned with d-o-f as when working with super-teles near MFD it is measured in mere fractions of an inch. Most of the time I simply focus on the eye and work wide open or 1/3 or possibly 1 stop closed down….
With over the shoulder portraits, two birds on different planes, and near-wing stretches I will usually go for a bit of extra d-o-f if I have the time.
Note also, when I stopped down from f/5.6 to f/8 I needed a one stop slower shutter speed to ensure the same correct exposure….
Thanks Art! Sounds pretty simple. I did notice the shutter changed from 1/4000th to 1/2000th, which is why I figured the lighting did not change. It looks like birds are starting to arrive again, and I plan to photograph gulls over the weekend to practice my exposure. Up till now I’ve always had trouble exposing light colored and white feathers. I am very confident now I’ll be able to handle them every time.
I read the chapter on exposure in ABP 1 (actually, first thing I read)…I must say, I never solidly understood exposure well before…you are an amazing teacher. I never really understood the difference between applying the Sunny 16 rule and how you decide to change exposure settings vs. using in-camera metering and how you decide *in a different way* to change exposure settings. It’s helped immensely, and you have my thanks! I can’t wait to read the rest of the book.
(BTW, sorry about the terminology…I know its “stop down”…not sure why I said “move up”.)
Artie, I would comment on the misspelled words, but I can’t spell myself. I did notice on the list on the 5D information there was no mention of micro adjusting. You used to include this information on your image information. Has something changed on this subject?
Ty Ivey Macon, Ga
Just laziness 🙂 And always being swamped.
I have been using Photo Mechanic for years. For a while, I was using Aperture, from Apple. However, the lack of any type of consistent version release has me back to Photo Mechanic and Lightroom. I hope this helps.
Hi Arthur,
Useful tips, thank you.
I noticed a few typos:
“Regular readers know that that use and depend on BreezeBrowser” and
” We use it on the main computer in the home office to to catalog our images file-drawer style.”
“All of the above is true whether you are using Rear Focus or shutter button for AF. This is true whether you are using Rear Focus or shutter button AF.”
Hope this helps.
Good catches. You are hired! Thanks. artie
Do you know of an equivalent BreezeBrowser program for the Mac?? I switched from a PC platform three years ago. Thanks! And thanks for all the wonderful lessons over the years. I am a better photographer today, thanks to the materials I have purchased from BirdsAsArt and those I have read on your site. Eve
I use Photo Mechanic for Mac and am very happy with it…
Thanks for your kind words. There is a blog post here on running Breezebrowser on a mac. A search should it up. Otherwise I understand that Photo Mechanic is pretty good but I have no personal knowledge of that.