What’s Up?
Anita North and I enjoyed a wonderful private instructional day with my good friend Bill Schneider. We enjoyed lots of sand blast-offs (see below) and lots of birds feasting on the tons of bait in the water. And I saw another tarpon jump clear out of the water; no pix this time. We ordered take out for dinner from Neptune Grill in Gulfport — their grilled fish tacos are still scrumptious-beyond-compare. Today is Friday 2 OCT 2020; we will be meeting Bill for Day 2 at 7am.
Thanks to the many who have used the BAA Topaz affiliate link and the discount code (ARTHUR15) and getting into the Topaz Plug-ins with help from the Getting Started with Topaz e-Guide. I gotta say that all feedback on the plug-ins and on the guide has been positive.
All are invited to leave a comment letting us know which of today’s four featured images is their favorite (and why).
Wanted to Buy
I have yet another reader looking to purchase a used Canon EF 180mm f/3.5L Macro USM lens. If you have one that you would like to sell, please get in touch via e-mail.
Great Topaz News (Corrected)!
Folks who use the BAA Topaz link to purchase Sharpen AI, DeNoise AI, or the Utility Bundle (or any other Topaz plugins) will receive a 15% discount by entering the ARTHUR15 code at checkout. To get the discount you must use my link and you must enter the discount code. Be sure to start with this link.
Topaz Stuff
As I said on Sunday and have said often many times before, I should have listened sooner. If you, like me, are new to the Topaz party, please use this link to purchase. Right now I can wholeheartedly recommend both Topaz Sharpen AI and Topaz DeNoise AI. Though I have not yet worked with JPEGtoRAW AI or Gigapixel AI, I have installed both of these plug-ins and look forward to trying them on some I-Phone 11 images fairly soon. If you are thinking like me, consider the Utility Bundle that includes all four plug-ins mentioned above at a money-saving price.
Again, those who purchase Sharpen AI or DeNoise AI using my link, can e-mail to request a short Getting Started with Topaz e-Guide. I had a bit of trouble getting the two plug-ins installed and having them appear in the Photoshop Filter Menu. In addition, I will explain how to best learn about the two plug-ins by applying them on a Layer (in Photoshop). I amazed myself yesterday by completing this guide in the car on the way to and from Sebastian. Huge thanks to Anita for doing the driving. Please include a copy of your Topaz order when requesting the guide.
Levered-Clamp FlexShooter Pro back in stock!
We received a dozen Levered-Clamp FlexShooter Pros via DHL. We ordered twenty … Anita North has been using one and said, “With my weak fingers, the Levered-Clamp is a Godsend.
RawDigger e-Guide and Video Advance Copy Available
Save $10 Now
The RawDigger e-Guide and Video is almost finished. It will sell for $51.00. If you are anxious to get started with RawDigger, learn to mega-Expose to the Right, and wind up with the highest quality image files, you can save $10.00 and have a chance to review a pre-publication copy of the guide by sending a PayPal for $41.00 to birdsasart@verizon.net with the words RawDigger e-Guide and Video Pre-publication Copy cut and pasted into the Subject line.
You will of course receive a link for the completed PDF when the guide is finished.
Please Remember
If you enjoy and learn from the blog, please remember to use one of my two affiliate programs when purchasing new gear. Doing so will not cost you a single penny and if you use Bedfords and remember to enter the BIRDSASART code at checkout, you will save at least $50.00 on all orders greater than $1000.00. In these crazy times — I am out at least forty to sixty thousand dollars so far due to COVID 19 (with lots more to come) — remembering to use my B&H link or to shop at Bedfords will help me out a ton and will be greatly appreciated. Overseas folks who cannot order from the US because of import fees, duties, and taxes can always help out by clicking here if they see fit.
BIRDS AS ART is registered in the U.S. Patent and Trademark Office
The BAA Used Gear Page
Right now, the Used Gear page is red hot! It is BAA Used Gear Page is the place to sell your used photographic equipment. We will help you to get your gear sold quickly for 20 to 60% or more than what the big guys are offering … Doubt me? Check out the Recent Sales list at the bottom of the page.
New and Better Bedfords Discount Policy!
You can now save 3% on all of your Bedfords photo gear purchases by entering the BIRDSASART coupon code at checkout. Your discount will be applied to your pre-tax total. In addition, by using the code you will get 2nd day air shipping via Fed Ex.
Grab a Nikon AF-S Teleconverter TC-14E III and save $14.99. Purchase a Canon EOS R5 and your discount will be $116.97. Purchase a Sony FE 600mm f/4 GM OSS lens and save a remarkable $389.94! Your Bedford’s purchase no longer needs to be greater than $1,000.00 for you to receive a discount. The more you spend, the more you save.
Money Saving Reminder
Many have learned that if you need a hot photo item that is out of stock at B&H and would enjoy free overnight shipping, your best bet is to click here, place an order with Bedfords, and enter the coupon code BIRDSASART at checkout. If an item is out of stock, contact Steve Elkins via e-mail or on his cell phone at (479) 381-2592 (Eastern time). Be sure to mention the BIRDSASART coupon code and use it for your online order. Steve has been great at getting folks the hot items that are out of stock at B&H and everywhere else. The wait lists at the big stores can be a year or longer for the hard to get items. Steve will surely get you your gear long before that. For the past year, he has been helping BAA Blog folks get their hands on items like the SONY a9 ii, the SONY 200-600 G OSS lens, the Canon EOS R5, the Canon RF 100-500mm lens, and the Nikon 500mm PF. Steve is personable, helpful, and eager to please.
SONY e-Guide Discount Program
Purchase a (new) qualifying SONY camera body (a7r iii, a7r iv, a9, a9 ii) from Bedfords or using a BIRDS AS ART B&H affiliate link, and you will receive a $40 discount on the SONY e-guide. Purchase a (new) SONY 200-600mm G lens from Bedfords or using a BIRDS AS ART B&H affiliate link, and you will receive a $25 discount on the SONY e-guide. Purchase a (new) SONY 600mm f/4 GM lens from Bedfords or using a BIRDS AS ART B&H affiliate link, and you will receive a free SONY e-guide with one or two videos.
Please send your Bedford’s or B&H receipts to me via e-mail to receive your discount and your ordering instructions. Folks purchasing from Bedfords and using the BIRDSASART code will save 3% on all orders. Folks sending their B&H receipts may need to wait a few days to have their purchases confirmed. Folks using Bedfords will have their purchases confirmed immediately.
|
|
|
114 sold to rave reviews. The SONY e-Guide by Patrick Sparkman and Arthur Morris |
The Sony Camera User’s e-Guide (and Videos)
Click here to purchase the guide with one Camera Set-up Video. Be sure to e-mail us by clicking here to specify your camera body so that we can send you a link for the correct video.
Click here to purchase the guide with two Camera Set-up Videos. Be sure to e-mail us by clicking here to specify your two camera bodies so that we can send you links for the correct videos.
Click here to learn more about the SONY e-Guide.


Gear Questions and Advice
Too many folks attending BAA IPTs and dozens of photographers whom I see in the field and on BPN, are–out of ignorance–using the wrong gear especially when it comes to tripods and more especially, tripod heads… Please know that I am always glad to answer your gear questions via e-mail. Those questions might deal with systems, camera bodies, accessories, and/or lens choices and decisions.
|
|
|
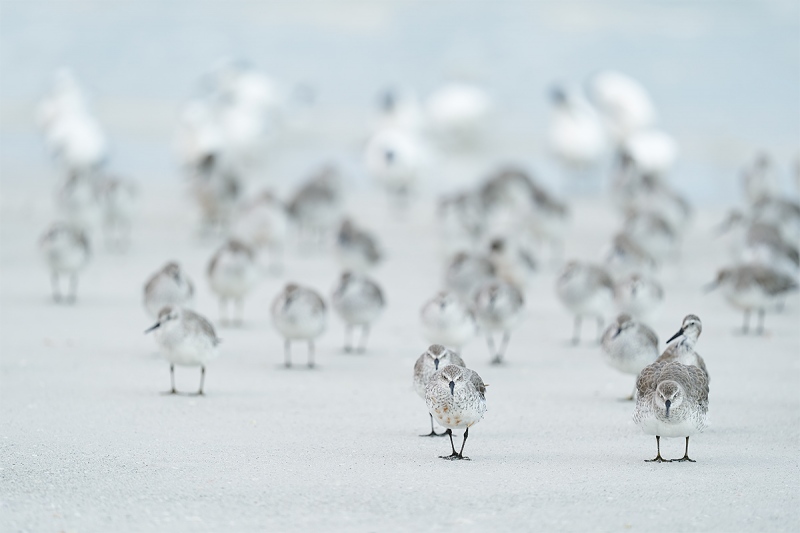
This image was created on 1 OCT 2020 on the sandbar at Fort DeSoto Park. I used the Induro GIT 404L/Levered-Clamp FlexShooter Pro-mounted Sony FE 600mm f/4 GM OSS lens and the blazingly fast AF King, the Sony Alpha a9 II Mirrorless Digital Camera Body. Exposure determined by Zebras with Exposure Compensation on the rear dial/+2.3 stops: 1/125 sec. at f/4 in Shutter Priority. AUTO ISO > 800. The exposure was confirmed as perfect by RawDigger. AWB at 7:42am on dark, cloudy morning. Tracking Flexible Spot (M) Continuous AF was active at the moment of exposure and performed to perfection; the AF point was on the closest bird — the ruffling bird in the lower right corner. Click the image to see a larger version. Image #1: Red Knot flock on the beach with terns in the background |
The Advantage of Shutter Priority (S) mode with Exposure Compensation and AUTO ISO
When working in potential blast-off situations in low light where all of the backgrounds are light gray, I find that working in Shutter Priority with Exposure Compensation (EC) and AUTO ISO has many advantages. (Let’s call this method “S/EC/AUTO ISO.”
I had been at 1/30 sec. while waiting for a blastoff when I noticed that the birds in the knot flock presented some very nice looking arrangements. All that I needed to do was increase the shutter speed to something that I was sure would make a sharp image. In this case, that was 1/125 sec. I also had to reduce the EC from +2 2/3 stops to +2 1/3 stop to reduce the Zebras on the breasts of the terns in the background.)
So with basically a single change (choice of shutter speed) I was able to create the sharp image that I wanted. Had I been working in Manual (M) exposure mode as I do more than 95% of the time, I would have had to make many changes and those changes would have involved many clicks. Raising the ISO from 100 where I was doing the blurs to 800 that I needed to make a sharp image alone would have required nine clicks.
So when working with relatively consistent backgrounds in low light, S/EC/AUTO ISO is much faster than M.
Image #1
This image was a small crop from below and our left to tighten things up. I ran DeNoise AI on a layer using Auto. Because the exposure was mega-exposed to the right Auto set virtually no noise reduction. The sharpening that is part of DeNoise was a definite improvement.
My two favorite birds in this image are the ruffling knot in the lower right corner and the curious-looking bird right behind that one. Notice that the bird in the front just to our left of those two shows remnants of breeding plumage.
|
|
|
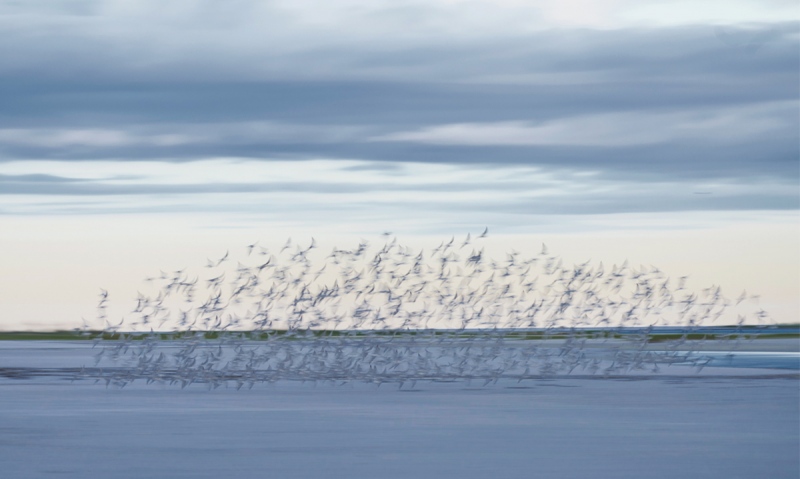
This image was created on 1 OCT 2020 on the sandbar at Fort DeSoto Park by Anita North. She used the handheld Sony FE 200-600mm f/5.6-6.3 G OSS lens (at 200mm) and the 61-MP monster, the Sony Alpha a7R IV Mirrorless digital camera body.. ISO 100. Exposure determined by Zebras with ISO on the rear wheel: 1/40 sec. at f/6.3 in Manual mode. AWB at 7:45am on dark, cloudy morning. Center Zone Continuous AF was active at the moment of exposure. Image #2: Red Knot pano blur |
Blurs in Manual Mode
For image #2, Anita was in Manual mode when she created the beautiful image above. She had set up the 200-600 G with the a7r iv for blurs only and did well with the exposure. She also had her 600 GM on a tripod with an a9 ii along. If she wanted to change to sharp with the 2-6, the necessary changes would have taken her about 20-30 seconds.
Do understand that in general, zoom lenses are better for creating pleasing blurs than fixed focal length lenses.
|
|
|
This image was also created on 1 OCT 2020 on the sandbar at Fort DeSoto Park. Again I used the Induro GIT 404L/Levered-Clamp FlexShooter Pro-mounted Sony FE 600mm f/4 GM OSS lens and the blazingly fast AF King, the Sony Alpha a9 II Mirrorless Digital Camera Body. Exposure determined by Zebras with Exposure Compensation on the rear dial/+2.3 stops: 1/30 sec. at f/4.5 in Shutter Priority. AUTO ISO > 100. In RawDigger I learned that the exposure was about 2/3-stop too dark. AWB at 7:48am on dark, cloudy morning. Tracking Flexible Spot (M) Continuous AF was active at the moment of exposure and performed just fine; the AF point was just below center. Click the image to see a larger version. Image #3: Mixed flock blur |
Changing Shutter Speeds Quickly
To switch from low-light sharp to the settings needed to create the pleasing blur above, all that I needed to do was reduce the shutter speed from 1/125 sec. to 1/30 sec — six quick clicks. I also has to increase the EC by 1/3 stop, i.e., one click. Those changes took no more than two seconds. The S/EC/AUTO ISO method eliminated the nine clicks that I would have needed to get to the right ISO …
When I am in S mode it is fast and easy to change your shutter speed; that’s why they call it Shutter Priority.
I have used this method with Canon, Nikon, and SONY.
With SONY, I need to make a few menu changes when switching from Manual to S/EC/AUTO ISO. Those changes are detailed on page 10 of the Sony e-Guide in the section entitled Using Zebras to Get the Right Exposure in Shutter (or Aperture) Priority. (Note: This works only with the a7r iv, the a9, and the a9 ii. You cannot assign Exposure Compensation to the Control Wheel on the a7r iii) Item 6 in the list of directions catches most folks at one time or another. It snagged Bill yesterday. Scroll up for more info on the SONY e-Guide.
Image #3
While I love the degree of blurring in this image and I love that all the birds were turning right and pretty much on the same plane, I wish that I had been using the 200-600 so that I could have zoomed out, perhaps enough to get a clean upper edge. As this pleasing blur was created at ISO 100 there was no need to bring it into DeNoise AI.
The birds in this flock are Black Skimmers, a smattering of terns (likely Sandwich, Common, and Forster’s), and shorebirds (almost all Red Knots with perhaps some Sanderlings and a few peeps as well).
|
|
|
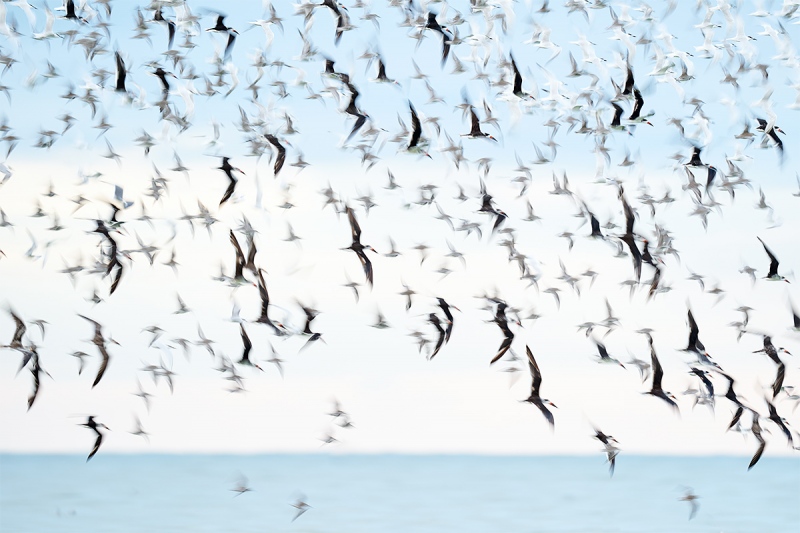
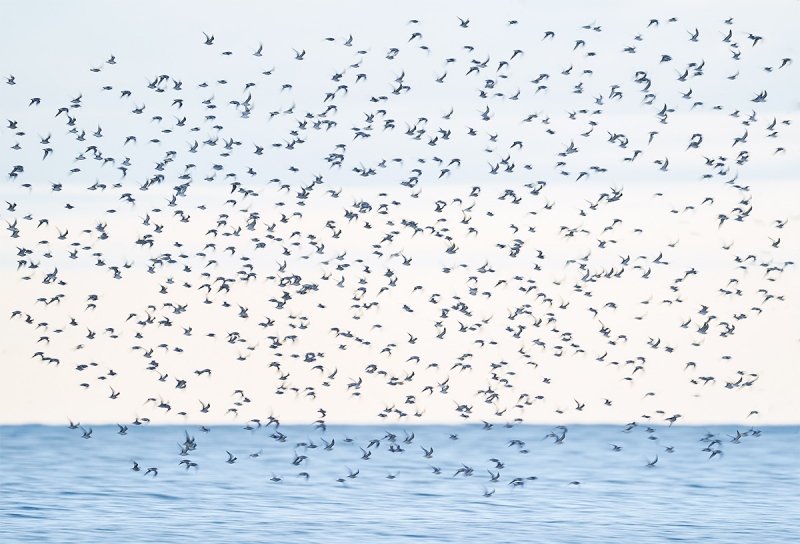
This image was also created on 1 OCT 2020 on the sandbar at Fort DeSoto Park, once again with the Induro GIT 404L/Levered-Clamp FlexShooter Pro-mounted Sony FE 600mm f/4 GM OSS lens and the blazingly fast AF King, the Sony Alpha a9 II Mirrorless Digital Camera Body. Exposure determined by Zebras with Exposure Compensation on the rear dial/+3 stops: 1/60 sec. at f/4 in Shutter Priority. The exposure was confirmed as perfect by RawDigger. AWB at 7:52am on dark, cloudy morning. Tracking Flexible Spot (M) Continuous AF was active at the moment of exposure and performed to perfection; the AF point was just below center. Click the image to see a larger version. Image #4: Red Knot flock flight blur |
1/60 second — Right on the Edge
With good technique, you can make sharp images of birds on the ground at 1/60 sec., and in addition, it is not a bad blur speed especially with single birds flying by at close range. On Saturday morning, I will go a lot slower with my blur shutter speeds; I am planning on playing with 1/8, 1/13, and 1/15 secs. When creating pleasing blurs at extremely slow shutter speeds like 1/4 and 1/8 sec., you will wind up with far fewer keepers but have more chance of creating a stunning contest winner. Heck, you just may wind up deleting all of them. But gambling can be fun.
|
|
A Guide to Pleasing Blurs
Learn everything there is to know about creating pleasingly blurred images in A Guide to Pleasing Blurs by Denise Ippolito and yours truly. This 20,585 word, 271 page PDF is illustrated with 144 different, exciting, and artistic images. The guide covers the basics of creating pleasingly blurred images, the factors that influence the degree of blurring, the use of filters in creating pleasing blurs, and a great variety of both in-the-field and Photoshop techniques that can be used to create pleasingly blurred images.
Artie and Denise teach you many different ways to move your lens during the exposure to create a variety of pleasingly blurred images of flowers and trees and water and landscapes. They will teach you to recognize situations where subject movement can be used to your advantage to create pan blurs, wind blurs, and moving water blurs. They will teach you to create zoom-blurs both in the field and during post-processing. Artie shares the techniques that he has used and developed for making blurred images of flocks of geese in flight at his beloved Bosque del Apache and Denise shares her flower blur magic as well as a variety of creative Photoshop techniques that she has developed.
With the advent of digital capture creating blurred images has become a great and inexpensive way to go out with your camera and have fun. And while many folks think that making successful blurred images is the result of being a sloppy photographer, nothing could be further from the truth. In “A Guide to Pleasing Blurs” Artie and Denise will help you to unleash your creative self.
Typos
In all blog posts and Bulletins, feel free to e-mail or to leave a comment regarding any typos or errors. Just be right :).




Thank you, Artie and the others for responding to my denoise question. I already have a couple of Topaz products, but not Denoise. Looks like I will be getting more Topaz plug-ins.
Arthur,
Would you please comment on using Topaz Denoise AI vs NeatImage. In the past, you’ve spoken highly of NeatImage. Have you compared the two, and do you now recommend Topaz Denoise AI rather than Neat?
Great question, Lorvey. For me, NeatImage is now a thing of the past. DeNoise ie easier to use and the results are far better. In most cases, the AI (artificial intelligence) in Topaz DeNoise allows you to run NR one the whole image with great results; so far I have not had to make a selection of the subject, protect it, and apply different amounts of noise the the background (more NR), and less noise reduction to the subject.
with love, artie
Latest NeatImage is amazing. I’d be interested in what Arash Hazeghi thinks between the two.
I got to say though, AI Sharpen looks impressive from what I’ve seen here and in some Alan Murphy examples. I’d maybe be interested in trying both.
If you know what your doing, NeatImage is excellent NR plug-in for Photoshop.
BP, I will stick with what I said. DeNoise AI kills NeatImage period. As far as Arash, he once said, “SONY is garbage. Ha ha.” Now he is shooting the 600 GM handheld with the 2X TC and the a9 ii for flight photography!
with love, a