What’s Up?
With help from several blog regulars, especially Ryan Sanderson and Joe Subolefsky, I continue to learn more about my Canon loaner gear, the Canon RF 100-500mm f/4.5-7.1L IS USM lens with the Canon Extender RF 1.4x, and the highly touted 45MP Canon EOS R5 Mirrorless Digital camera body. I had planned on publishing the big comparative blog post on the Canon gear above with the SONY 200-600/a9 ii/1.4X TC, but with the stuff I learned yesterday I need to do additional work on that post. I decided to share some of what I have learned with you here in a blog post that will set the stage for some of the information to be presented in the next blog post.
Below, I evaluate the performance of the R5’s Face detection + Tracking/AI Servo AF by way of ten images created on my first outing with the Canon loaner gear. Be sure to read down to my somewhat surprising conclusions. Questions and comments are welcome as always. And appreciated.
I dropped Anita North off at the Orlando Airport yesterday before noon for her flight back to Toronto. She hopes to make it to San Diego in January. All in all we had a great time and enjoyed some really good photography.
Most Important
As always, if what you read or learn here inspires or convinces you to purchase an R5 or 6, and/or the RF 100-500 lens, please use my B&H affiliate links or get in touch with Steve Elkins at Bedford to save 3% on your new gear and get it a lot quicker …
DPP4 (Digital Photo Professional 4.13.10 for macOS) Installation Successful! (for the most part …)
Huge thanks to the many who offered suggestions, especially Joel Eade and Patricia Hyde. None of their suggestions worked, but I tried them all and all were appreciated. And then I received an e-mail from (the very accomplished) British Professor, Sir Alan Fersht,https://en.wikipedia.org/wiki/Alan_Fersht FRS FMedSci/Gonville and Caius College, Cambridge, UK. He wrote:
The Canon Installer doesn’t work on some Macs because it doesn’t let the computer check for malware. The way to do it is to install it on another Mac which is compatible, and then copy the app onto a drive and transfer to your MacBook Pro.
Alternatively, I can upload you my copy to wetransfer.com and you can download it.
Alan
While he was following up on the latter, I tried the former. I downloaded the installer for the Catalina version of DPP4 to my old MacBook Pro (Mojave). That went off without a hitch. Fortunately, there was a copy of an older version of DPP4 on the old laptop. Once I successfully installed DPP4 (Version 4.13.10 for macOS) I tried to AirDrop the entire Canon Utilities folder to my new laptop, but the old laptop could not see my new laptop. So I AirDropped the folder to Anita’s MacBook Pro and she AirDropped it to my new machine.
Problem solved? Not quite yet, but I had hope. Anita successfully guided me through the installation, security settings, and permissions maze, and in short order I had the latest version of DPP 4 up and running on my current MacBook Pro. Hooray. Being able to Show Focus Points had me feeling like the proverbial kid in the candy store. See the R5 Face Detection + Tracking AF feature below to see what I learned. Huge thanks to both Alan and Anita.
I just learned that the installation was not 100% successful as a compatible version of the EOS Lens Registration Tool did not install. None-the-less, I am thrilled to be able to see the RF focus points and AF data.
Please Remember
With income from IPTs approaching zero, please, if you enjoy and learn from the blog, remember to use one of my two affiliate programs when purchasing new gear. Doing so just might make it possible for me to avoid having to try to get a job as a Walmart greeter and will not cost you a single penny more. And if you use Bedfords and remember to enter the BIRDSASART code at checkout, you will save 3% on every order and enjoy free second-day air shipping. In these crazy times — I am out at least forty to sixty thousand dollars so far due to COVID 19 (with lots more to come) — remembering to use my B&H link or to shop at Bedfords will help me out a ton and be greatly appreciated. Overseas folks who cannot order from the US because of import fees, duties, and taxes can always help out by clicking here if they see fit.
Back in Stock
We now have eighteen of the hugely popular Levered-Clamp FlexShooter Pro tripod heads in stock. Click on the preceding link to learn more about this amazing head, the ballhead that thinks its a gimbal head and — thanks to the amazing county-balanced spring mechanism — works great with any rig from the longest, heaviest super-telephoto lens to a camera-body-mounted wide angle. The latter is possible because of the bi-directional clamp; it is no longer necessary to travel with a gimbal head for long lens photography and a ballhead for scenic photography. And after just a moment’s adjustment, the double ball enables you to ensure that every image you take is on the level.
Topaz Still on Sale!
Right now Topaz is offering price reductions on the Utility Bundle and the Creator Bundle. The former normally sells for $359.96. It is on sale now for $249.95. Click here, scroll all the way down to the sale, and enter the ARTHUR15 code at checkout to save an additional 15%! The Creator Bundle usually sells for #279.97 and is now on sale for $149.99. Using the ARTHUR15 code at checkout brings the price down to $127.49!
The BAA Used Gear Page
The Used Gear page continues to be red hot! It is BAA Used Gear Page is the place to sell your used photographic equipment. We will help you to get your gear sold quickly for 20 to 60% or more than what the big guys are offering … Doubt me? Check out the Recent Sales list for the past ten months at the bottom of the page.
BIRDS AS ART is registered in the U.S. Patent and Trademark Office
Great Topaz News!
Folks who use the BAA Topaz link to purchase Sharpen AI, DeNoise AI, or the Utility Bundle (or any other Topaz plugins) will receive a 15% discount by entering the ARTHUR15 code at checkout. To get the discount you must use my link and you must enter the discount code. Be sure to start with this link.
Topaz Stuff
As I said just a while back and have said often many times before, I should have listened sooner. If you, like me, are new to the Topaz party, please use this link to purchase. Right now I can wholeheartedly recommend both Topaz Sharpen AI and Topaz DeNoise AI. Though I have not yet worked with JPEGtoRAW AI or Gigapixel AI, I have installed both of these plug-ins and look forward to trying them on some I-Phone 11 images fairly soon. If you are thinking like me, consider the Utility Bundle that includes all four plug-ins mentioned above at a money-saving price.
Again, those who purchase Sharpen AI or DeNoise AI using my link, can e-mail to request a short Getting Started with Topaz e-Guide. I had a bit of trouble getting the two plug-ins installed and having them appear in the Photoshop Filter Menu. In addition, I will explain how to best learn about the two plug-ins by applying them on a Layer (in Photoshop). I amazed myself yesterday by completing this guide in the car on the way to and from Sebastian. Huge thanks to Anita for doing the driving. Please include a copy of your Topaz order when requesting the guide.
New and Better Bedfords Discount Policy!
You can now save 3% on all of your Bedfords photo gear purchases by entering the BIRDSASART coupon code at checkout. Your discount will be applied to your pre-tax total. In addition, by using the code you will get 2nd day air shipping via Fed Ex.
Grab a Nikon AF-S Teleconverter TC-14E III and save $14.99. Purchase a Canon EOS R5 and your discount will be $116.97. Purchase a Sony FE 600mm f/4 GM OSS lens and save a remarkable $389.94! Your Bedford’s purchase no longer needs to be greater than $1,000.00 for you to receive a discount. The more you spend, the more you save.
|
|
|
124 sold to rave reviews. The SONY e-Guide by Patrick Sparkman and Arthur Morris |
The Sony Camera User’s e-Guide (and Videos)
Click here to purchase the guide with one Camera Set-up Video. Be sure to e-mail us by clicking here to specify your camera body so that we can send you a link for the correct video.
Click here to purchase the guide with two Camera Set-up Videos. Be sure to e-mail us by clicking here to specify your two camera bodies so that we can send you links for the correct videos.
Click here to learn more about the SONY e-Guide.
Money Saving Reminder
Many have learned that if you need a hot photo item that is out of stock at B&H and would enjoy free overnight shipping, your best bet is to click here, place an order with Bedfords, and enter the coupon code BIRDSASART at checkout. If an item is out of stock, contact Steve Elkins via e-mail or on his cell phone at (479) 381-2592 (Eastern time). Be sure to mention the BIRDSASART coupon code and use it for your online order. Steve has been great at getting folks the hot items that are out of stock at B&H and everywhere else. The wait lists at the big stores can be a year or longer for the hard to get items. Steve will surely get you your gear long before that. For the past year, he has been helping BAA Blog folks get their hands on items like the SONY a9 ii, the SONY 200-600 G OSS lens, the Canon EOS R5, the Canon RF 100-500mm lens, and the Nikon 500mm PF. Steve is personable, helpful, and eager to please.


Gear Questions and Advice
Too many folks attending BAA IPTs and dozens of photographers whom I see in the field and on BPN, are–out of ignorance–using the wrong gear especially when it comes to tripods and more especially, tripod heads… Please know that I am always glad to answer your gear questions via e-mail. Those questions might deal with systems, camera bodies, accessories, and/or lens choices and decisions.
Puns for the Educated
Thanks to many multiple IPT veteran and dear friend John Dupps for sharing this internet pass-along with me via e-mail. The only one that I’d heard before is the one about the vulture and its carry-on. If you know any others or wish to share your favorite from the list below, please feel free to leave a comment. My favorites are 3, 19, and 25. And 11. And 16. Heck, they are all funny and very clever.
1. The fattest knight at King Arthur’s round table was Sir Cumference. He acquired his size from too much pi.
2. I thought I saw an eye doctor on an Alaskan island, but it turned out to be an optical Aleutian.
3. She was only a whiskey maker, but he loved her still.
4. A rubber band pistol was confiscated from algebra class, because it was a weapon of math disruption.
5. No matter how much you push the envelope, it’ll still be stationery.
6. A dog gave birth to puppies near the road and was cited for littering.
7. A grenade thrown into a kitchen in France would result in Linoleum Blownapart.
8. Two silk worms had a race. They ended up in a tie.
9. A hole has been found in the nudist camp wall. The police are looking into it.
10. Time flies like an arrow. Fruit flies like a banana.
11. Atheism is a non-prophet organization.
12. Two hats were hanging on a hat rack in the hallway. One hat said to the other: ‘You stay here; I’ll go on a head.’
13. I wondered why the baseball kept getting bigger. Then it hit me.
14. A sign on the lawn at a drug rehab center said: ‘Keep off the Grass.’
15. The midget fortune-teller who escaped from prison was a small medium at large.
16. The soldier who survived mustard gas and pepper spray is now a seasoned veteran.
17. A backward poet writes inverse.
18. In a democracy it’s your vote that counts. In feudalism it’s your count that votes.
19. When cannibals ate a missionary, they got a taste of religion.
20. If you jumped off the bridge in Paris, you’d be in Seine .
21. A vulture boards an airplane, carrying two dead raccoons. The stewardess looks at him and says, ‘I’m sorry, sir, only one carrion allowed per passenger.’
22. Two fish swim into a concrete wall. One turns to the other and says ‘Dam!’
23. Two Eskimos sitting in a kayak were chilly, so they lit a fire in the craft. Unsurprisingly it sank, proving once again that you can’t have your kayak and heat it too.
24. Two hydrogen atoms meet. One says, ‘I’ve lost my electron.’ The other says ‘Are you sure?’ The first replies, ‘Yes, I’m positive.
25. Did you hear about the Buddhist who refused Novocain during a root canal? His goal: transcend dental medication.
26. There was the person who sent ten puns to friends, with the hope that at least one of the puns would make them laugh. No pun in ten did.
My Misunderstanding of Focus Breathing
What is Focus Breathing?
From the PhotographyLife.com article here.
Focus breathing is a term that describes the change in focal length that occurs as a result of adjusting the focusing distance of a lens. It is a common issue that occurs on many photographic lenses. As focus is adjusted from close focus to infinity, focus breathing causes noticeable changes in both angle of view and magnification.
These changes are often clearly visible to the photographer during the process of focusing, with different lenses exhibiting varying levels of focal length changes. Focus breathing issues can occur on both prime and zoom lenses.
I e-mailed this to Patrick Sparkman:
The quote below is from the article here.
“(It is) normal is for the composition to change size in the frame (sometimes significantly) as focus is pulled from one extent to the other. This is referred to as focus breathing, a change in focal length resulting from a change in focus distance. Focus breathing negatively impacts photographers intending to use focus stacking techniques, videographers pulling focus, and anyone very-critically framing while adjusting focus. This Canon RF 100-500 shows a moderate amount of focus breathing.”
That totally screws up what I thought was my correct understanding of focus breathing; I though that lenses that change the physical length when zooming did NOT suffer from focus breathing …
Patrick replied:
All lenses have focus breathing to some extent, and zooms generally have more of it. It all depends on what the designers prioritized. Like most things, designing a lens is full of compromises, especially with zoom lenses. Allowing the lens to change length while focusing might help focus breathing, but brings other compromises like mechanical complexity and cost as well the potential for lens elements to move out of alignment while moving. So to say a lens that changes length does not have focus breathing is incorrect. The designer might have made that decision for many reasons and the lens might still have focus breathing.
The Truth About R5 (and R6) Face Detection + Tracking AF (as I see It after my first session)
For as long as anyone has been photographing birds with the Canon R5 and R6, I have been hearing great things about Face Detection + Tracking AF. “It works perfectly every time. It is totally amazing. It never fails; ever!” I thought to myself, All of that would be great if it were true. Finding out how true these statements are is one of the many reasons that I wanted to get to field test an R5, and the main reason I wanted to get DPP4 up and running.
|
|
|
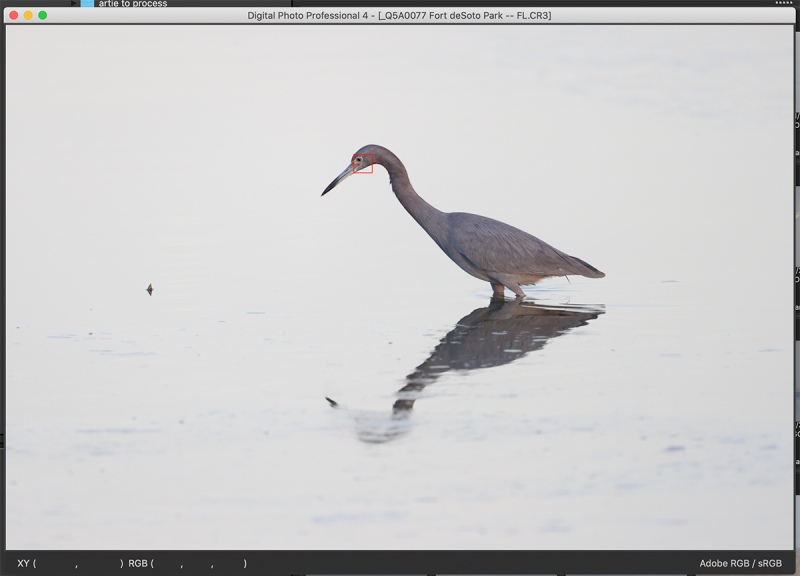
Face detection + Tracking/AI Servo AF was active at the moment of exposure. Click on the image to see a larger version. Image #1: Little Blue Heron in pre-dawn light |
The First Bird …
This is the first bird that I photographed with the R5. Light and contrast were low. When the AF point grabbed the relatively-small-in-the-frame subject’s eye and held onto it, I was very impressed. Could everything I had heard have been true?
Note that in each of today’s images that the red box signifies the AF point or area that was active at the moment of exposure.
|
|
|
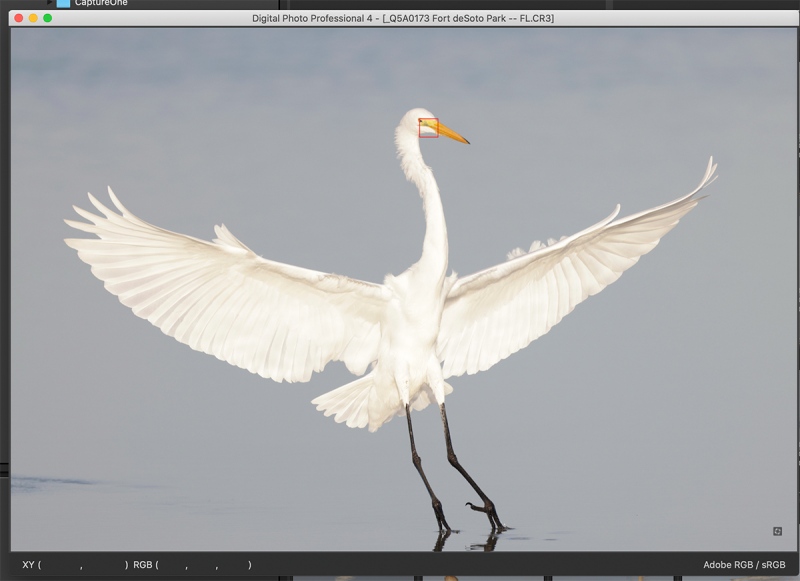
Face detection + Tracking/AI Servo AF was active at the moment of exposure. Click on the image to see a larger version. Image #2: Great Egret landing |
The Second Bird
This is the 2nd bird that I photographed with the Canon loaner gear. Image #2 is one of a four keepers from a seven-frame sequence. All of the images suffered from motion blur. Three of the images had the wings clipped. Learn more about this situation in the next blog post. When I saw that the AF point was on the bird’s face or eye in all six frames, I could barely believe it …
|
|
|
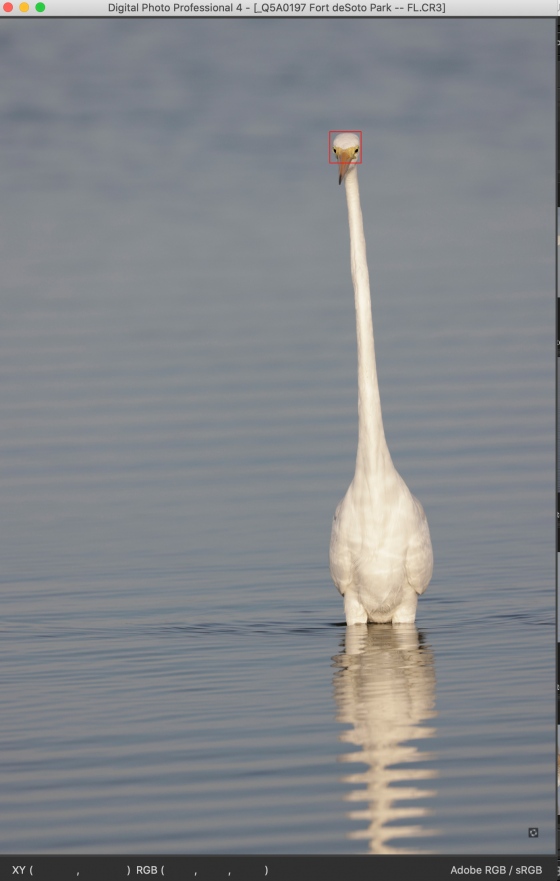
Face detection + Tracking/AI Servo AF was active at the moment of exposure. Click on the image to see a larger version. Image #3: Great Egret vertical |
The Same Bird
The bird in Image #3 is the same bird as the bird in Image #2. If you were not impressed by the first two examples, this one should floor you.
|
|
|
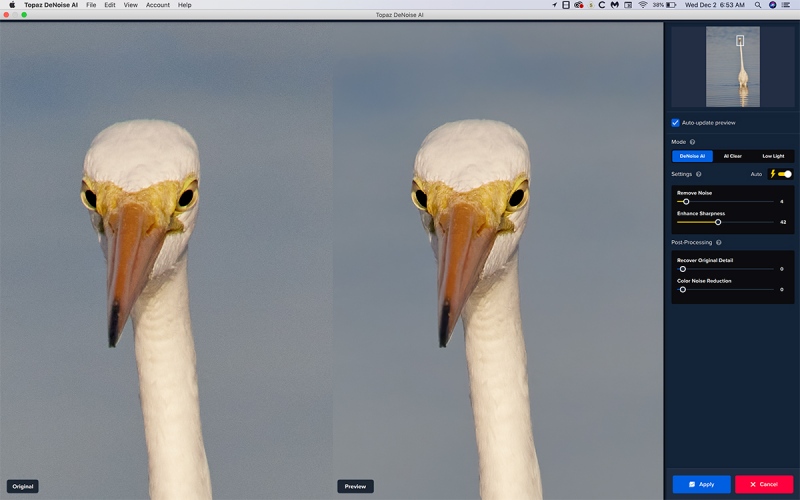
Be sure to click on the image to better see the noise reduction on the water background. Image #3A: Topaz DeNoise AI on Auto on the Great Egret vertical at 100% |
Topaz DeNoise AI on the Great Egret vertical image
I included this here in part to dispel the myth that R5 images are close to being noise free. As expected, you can see what I call “small pixel” noise in the before image on the left. Small pixel noise is a given with high megapixel cameras like the R5 (45 MP). Then note how beautifully Topaz DeNoise AI completely removed the noise from the blue water background and sharpened the image non-destructively as well.
Note also in the 100% view that Face detection + Tracking/AI Servo AF performed absolutely perfectly in a somewhat difficult situation. This image shows face detection at its best.
|
|
|
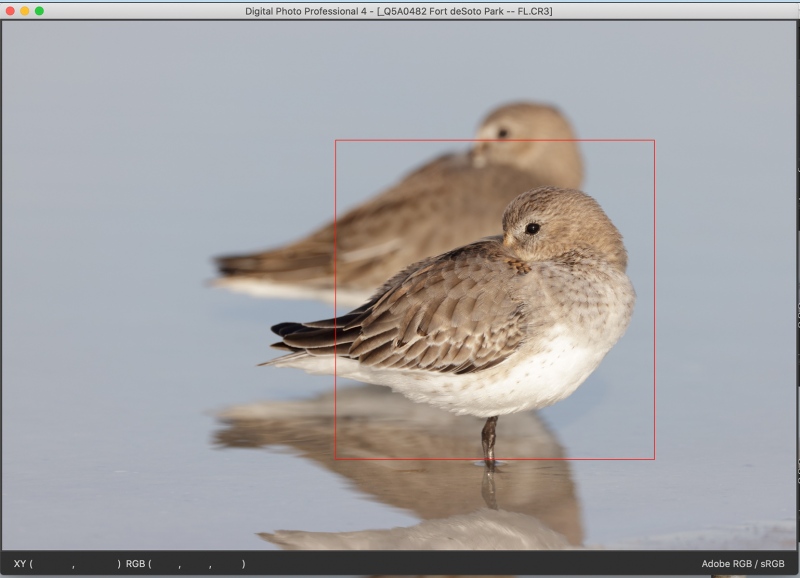
Face detection + Tracking/AI Servo AF was active at the moment of exposure. Click on the image to see a larger version. Image #4: Two Dunlin resting |
The First Chink in the Armor?
Here is was using Face detection + Tracking/AI Servo AF but the system inexplicably could not pick up the birds eye. The AF system reverted to a large box. The image is very sharp on the eye. Do understand that for this AF mode to perform perfectly, the operator needs to keep the AF point right on the eye while recomposing. At times with the R5, the AF point slips off the eye and reverts to one of several larger squares or rectangles.
|
|
|
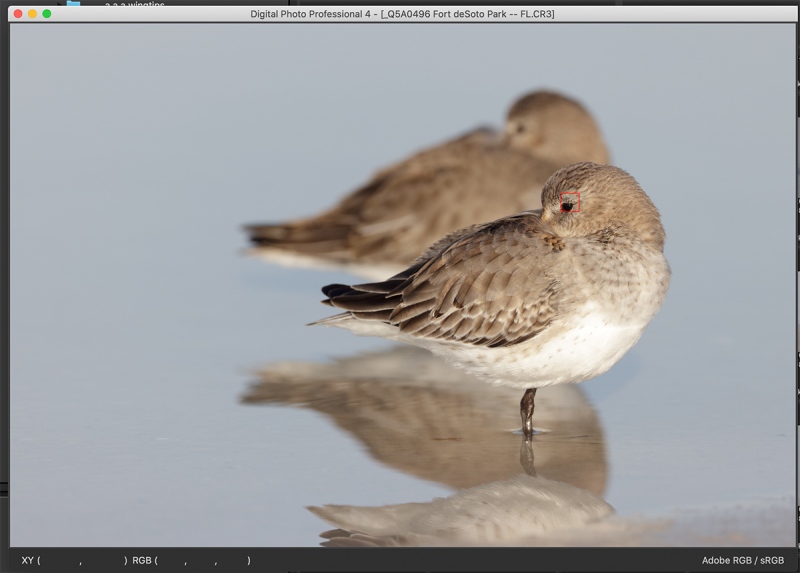
Face detection + Tracking/AI Servo AF was active at the moment of exposure. Click on the image to see a larger version. Image #5: Two Dunlin resting |
Nineteen Seconds Later …
Nineteen seconds later, with the same two resting birds, the same photographer, and the same AF settings, Face detection + Tracking/AI Servo AF performed perfectly. Note: the bird’s face in Image #4 was more square to the sensor than the bird’s face in Image #5. This should have made it easier for the AF system to “see” the eye. But it did not.
|
|
|
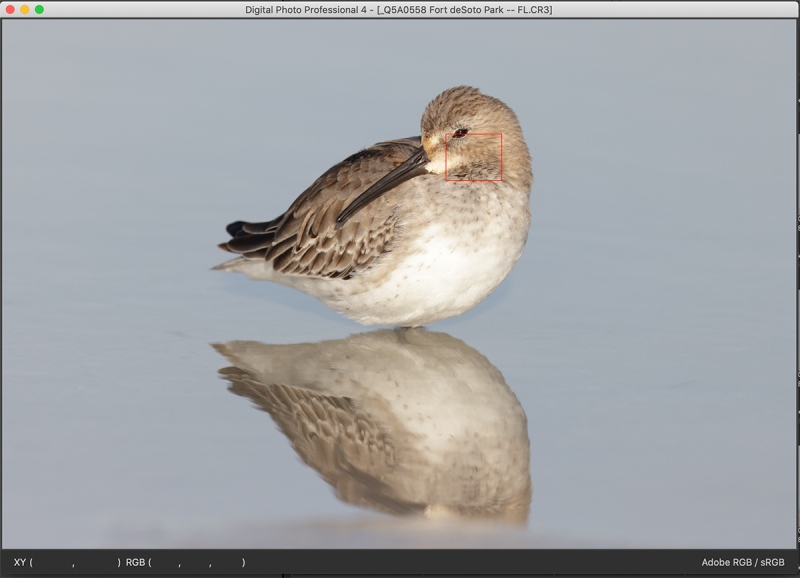
1-point/AI Servo AF was active at the moment of exposure. Click on the image to see a larger version. Image #6: Dunlin resting |
Frustrated with Face detection + Tracking/AI Servo AF
At one point, while I was working with the tame dunlin, I became somewhat frustrated with the inability of Face detection + Tracking/AI Servo AF to see and track the bird’s eye so I switched to 1-point AF. I was easily able to move the AF point but in this case should have moved it farther to the right …
|
|
|
Face detection + Tracking/AI Servo AF was active at the moment of exposure. Click on the image to see a larger version. Image #7: American Oystercatcher standing in surf |
Another Failure
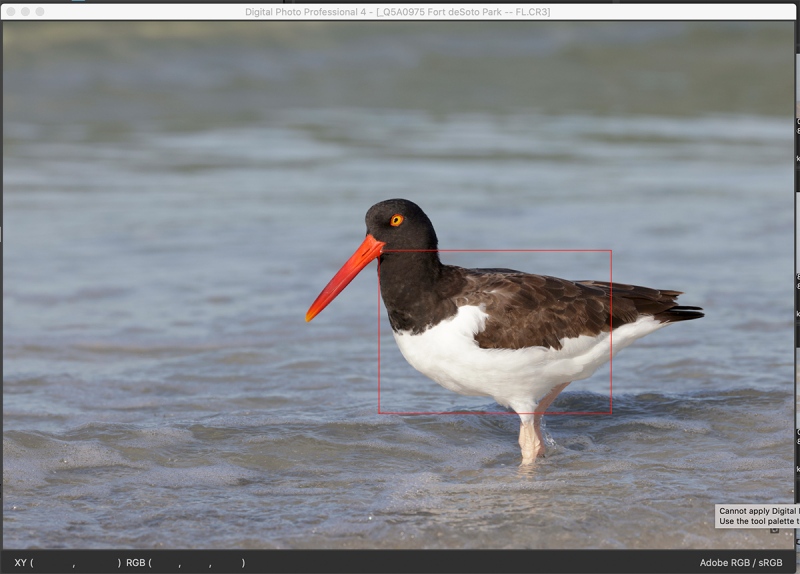
Here, with the eye plainly visible, the system again failed to track the eye properly. As expected, the focus on the eye is a bit off because the fold of the wing is closer to the sensor than the bird’s eye. It is highly likely that Topaz Sharpen AI could save this one.
|
|
|
Face detection + Tracking/AI Servo AF was active at the moment of exposure. Click on the image to see a larger version. Image #8: American Oystercatcher striding in surf |
Back to Perfection
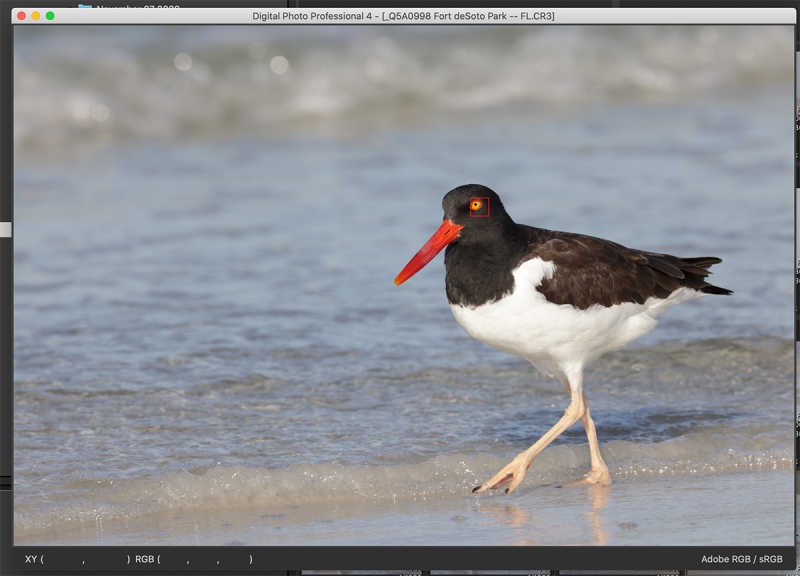
Six seconds later, with the bird now in motion, the AF system properly tracked the eye and rendered it perfectly sharp with the nice crispy eye skin that I love.
|
|
|
Face detection + Tracking/AI Servo AF was active at the moment of exposure. Click on the image to see a larger version. Image #9: Red Knot in surf |
More of the Same
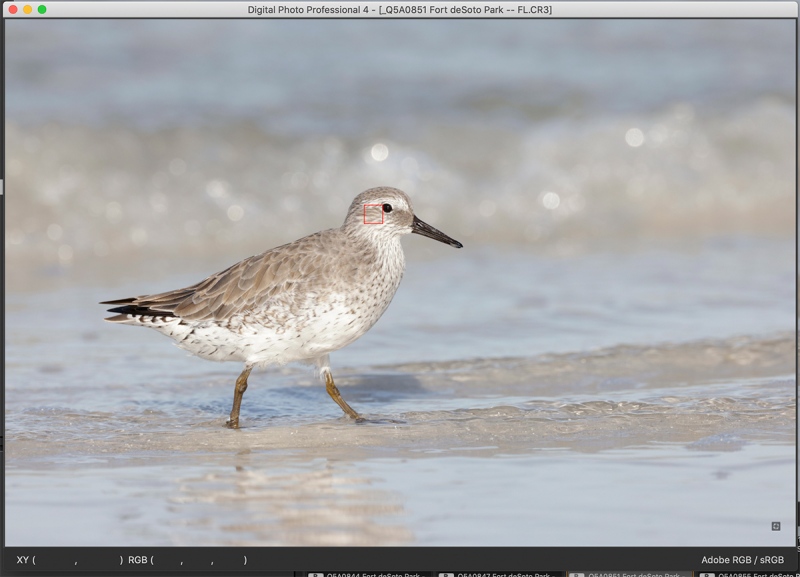
With this image, the system failed to recognize and track the subject’s eye, despite the fact that it was in plain sight. IAC, the bird’s eye is perfectly sharp because the knot’s face was on the same plane as its eye. In the next frame, the AF system tracked perfectly with a tiny box right on the subject’s eye just as in Images #5 and 7.
|
|
|
Face detection + Tracking/AI Servo AF was active at the moment of exposure. Click on the image to see a larger version. Image #10: Willet landing |
Total Failure
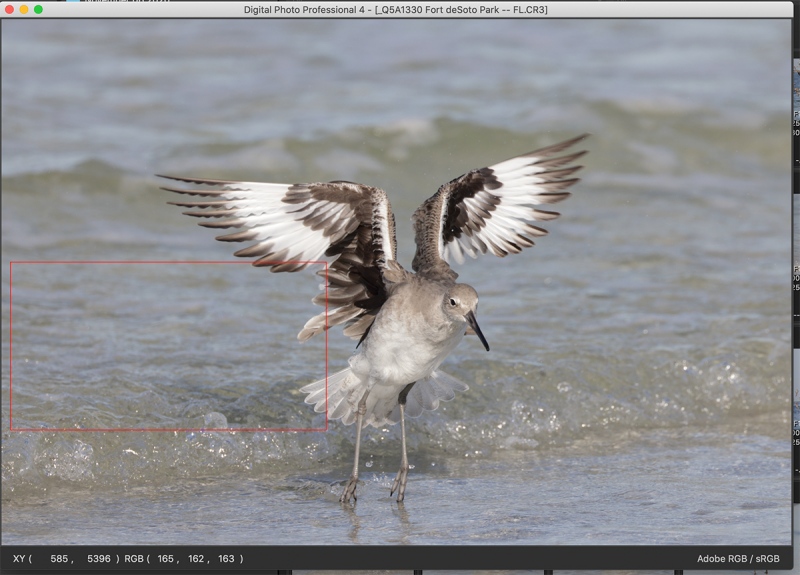
Here, Face detection + Tracking/AI Servo AF failed completely; sharpest focus is on the leading edge of the inner portion of the bird’s right wing. I am pretty sure that the a9 ii in Center Zone AF-C would have nailed this one.
R5 (and R6) Face Detection + Tracking AF; the Somewhat Surprising (?) Conclusions
First off, realize that the images in this blog post were all created in a single (not very good) session at Fort DeSoto. That session was my first with the R5/RF 100-500/RF 1.4X Extender. I would fully expect that with more time in the field with this rig (an with possibly a few tweaks in the settings) that I will do better with Face detection + Tracking/AI Servo AF. In addition, I had very few opportunities to photograph birds in flight.
That said, I can state with confidence, that Face Detection + Tracking AF with the R5 is the best eye-tracking system I have ever run across. When it worked — which it did much but not all of the time — it performed superbly. Is it as perfect as enthusiastic folks have been saying? Absolutely not. But after decades of not having a camera that could consistently focus on birds in flight, I can understand their excitement.
SONY Face/Eye Priority by as compared to Face Detection + Tracking AF with the R5 is simply not very good. Here is what Patrick and I had to say about it in the Sony Camera User’s e-Guide:
When using any Tracking AF Area, we recommend that you set Face/Eye AF Set > Face/Eye Priority in AF to Off and that Subject Detection is set to Human. With a7 series bodies, if you have Subject Detection set to Animal Eye you will not be able to choose or use any Tracking Flexible Spot even if Face/Eye AF Set > Face/Eye Priority in AF is set to Off. With the a9 series bodies, if you have Face/Eye AF Set > Face/Eye Priority in AF set to On and Subject Detection set to Animal, Flexible Tracking Spot AF will often become quite erratic.
Right now I plan to continue to field test the Canon gear and am excited about doing so. I would think that at this point, the chances of my switching back to Canon completely are still less than 1%. But the chances of my purchasing a Canon RF 100-500mm f/4.5-7.1L IS USM lens/Canon Extender RF 1.4x/Canon EOS R5 Mirrorless Digital camera body outfit have risen to about 51%. If I do buy this Canon rig, I will definitely be doing an R5/R6 guide.
If you are interested in an R5, an R6, and RF lens, or the EOS R adapters (that are needed to link your EOS R series bodies to your EF lenses), you will want to check out the Canon Comeback Fueled By Mirrorless Bodies & Lenses. The skinny on everything that you wanted to know about Canon Mirrorless but were afraid to ask … blog post (and especially the Comments) here.
If you’ve read this far, be sure to stay tuned for the big blog post comparing the Canon gear above to the SONY 200-600G/a9ii rig. It is coming soon.
Shame on SONY
Shame on SONY for not enabling users to show focus points or even determine the AF Area Mode after the fact. This has been and continues to be a glaring problem that prevents folks from learning the SONY AF system. I have written them several times over the past year but my pleas to rectify this situation have fallen on deaf ears.
Typos
In all blog posts and Bulletins, feel free to e-mail or to leave a comment regarding any typos or errors. Just be right :).




To All,
I tried Geoff’s suggestion for improving Face detection + Tracking AF on Friday morning doing cranes and vultures in low light and there was a big improvement.
Huge thanks to Geoff,
artie
YAW
IME In My Eyes?
Another possible one for your list – “16 Sodium atoms walk into a bar followed by a caped crusader…….”
Hi Arthur.
I too would like Sony to show AF points within it’s Edge Viewer/Edit software, or at least make them available in EXIF. There is a piece of software that does it [ https://www.soens.de/index.html ] but it is hit and miss and annoyingly not within the Sony software. When i had Canon, seeing the AF point/s was invaluable in learning ‘what I did wrong..’ etc.
Cheers.
Richard.
Hi Richard,
Thanks for your comments. I must admit sheepishly that I am not smart enough to get your pun …
You are of course, correct on the absence of AF Info with the SONY gear. It should be embarrassing and could easily be fixed with a firmware update. I wrote to Mark Weir, a SONY rep, in March 2019 and followed that up with additional e-mails. Same old same old.
with love, artie
hi Arthur.
Sorry, it was a tad nerdy.
” Na Na Na Na Na Na Na Na Na Na Na Na Na Na Na Na Batmaaan!! ”
i have been in email correspondence with soens.de and they are pulling some improvements into the Mac version – the Windows version runs fine on my Parallels Win10 setup, however I should dearly like it in the Sony software and firmware. I suppose we will have to wait….. 🙁
I have found the Animal AF less than useful on my A7R4, but to be honest, on my A9 I don’t need it, I find the tracking [when i do use it] latches onto a head/eye ‘pattern’ and keeps hold of it. I normally attack BiF with Wide or Zone w/o tracking.
Cheers anyway – keep up the excellent work – you are a mine of information and a bright light in the torrid, horrid Covid19-world we are in at the moment.
Cheers.
Richard.
Artie
Geof use no auto, Warren use auto…you tested both and which is , in accordance with your experience, the best ?
Gio
Please buy the R5. Mine is coming next week and I am worried about the learning curve and would love a guide just for bird photographers!
Mazel tov. I am pretty sure that you will love the R5. Be sure to see the next R5 blog post. And all the ones after that. There is a chance that I might do an R5 guide based on the loaner gear if I can extend the loan period …
with love, artie
Buy it. I’d love a BAA guide for these cameras:)
Obviously, I posted this well after I wrote it and before I read the other responses. I obviously need to try the auto setting again with better subjects..
Good plan. But never be concerned about experimenting with new gear and going with what works for you.
with love, artie
Warren, the only reason I switched off of using the user-selected point that you are using is I found I was always missing putting it on the flying birds. For perched birds it was a good method. For larger birds IF you can get it reliably on the bird. But recently I’ve been doing Buffleheads and Hooded Mergansers IF and there is no way I can get that small square on the bird reliably, if you miss then it starts tracking the background and your opportunity is lost.
But as Artie says, if it is working for you then that is all that matters.
There is a way (a little convoluted and hard to explain) where you can have both Auto and User-selected modes available with alternate buttons. You need to assign AF-ON (or AE-L) to the custom button option that looks like an eye with AF on top of it. That way always does Auto select Eye-Detect when you push it no matter what you have selected in AF5. Then you can use Face/Tracking with AF5 set to User-selected start point on the shutter button or an alternative back button.
Continued thanks, Geoff, for sharing your R5 insights with us here.
with love, artie
Thanks Geoff! I have been playing with the customized options, as the manual does not seem to explain them well. I did not know the eye AF custom setting, which is what I use on AE-L button uses Auto regardless of menu setting. I use a point or zone on AF-on button as primary focus choice and quickly switch between point and zone. (all tracking using face tracking on AE-L button)
Art,
I am also using the R5. I have not had a lot of good opportunities to shoot birds in flight, but I did learn 1 key setting for auto face/eye detect that may initial acquisition much better. You probably already have this set correctly, but you have to change it from the default “auto” setting.
The setting is on the AF menu, page 5 – “Initial Servo AF pt for tracking.” In the default “auto” it tries to detect the face or eye automatically. I have changed it to “AF pt set for …” which will give you a focus box. Once you activate autofocus, it selects the face/eye to detect/track from that location.
I leave the box in the center of the frame, get focus tracking, then recompose while it is tracking. It seamed to get the face or eye much more consistently. (though I would never say “always nails focus, etc.)
Again, you probably already have that set up correctly, but maybe this will help someone else…
Take Care…
Thanks, Warren. As I have always said, if it works for you, keep at it. I will be experimenting with Auto for both static and flying birds.
with love, a
So glad you are up and running with DPP4. The R5 image quality looks wonderful. Did you notice any difference in eye detection with and without the the 1.4 extender?
I used the set-up without the TC only once …
with love, artie
A three legged dog walks into a saloon…as the room goes silent the bartender asks “What are you doin’ in here?” The dog says ” I’m lookin’ for the man what shot my paw”
:). Another good one.
with love, a
Are you using Auto detect for Face/Tracking/Eye-AF or User-selected (square that you can move around)? It sounds like you are using User-selected based on you mentioning moving the point towards the head and then engaging Face/Tracking/Eye AF.
I was using the latter. Ryan advised me recently to switch that to Auto and I have done that. Now I need to get back out there to check it out.
Having 2 months of R5 shooting under my belt now and otherwise being a Sony shooter (A9II, A7RIV, 600GM, 200-600), I have found that Eye-AF works best in Auto mode. I was previously running a setup of custom buttons that allowed one back button to do Auto and another back button to do User-selected but I’ve since gone away from that setup in favour of what IME is a better one.
What is IME? For me, having to press this or that back button and hold it in is a 100% deal-breaker for me. Heck, I know it is a popular approach but it seems cumbersome at best to me. With SONY I use Center Zone for flight and have more than 95% of flight shots sharp on the eye.
My latest setup that I’m liking is to have Face/Tracking with Eye-Detect ON set as your primary AF mode (I use shutter button AF) set in AF1 menu. And you set AF5 (first item) to Auto …
I am with you so far.
then you get to see the white squares before engaging AF.
I am confused by what you write above. Do you have Continuous AF enabled??? If not, the don’t you need to half press the shutter button to see the white squares?
The white squares tell you if the AF system is recognizing a body, head or eye and even gives you arrows to switch between multiple subjects if it can detect multiple subjects. If you see the white square over the head/eye of your intended bird then you engage AF and you are golden.
I am confused again by “engage AF.”
If you don’t see the white square over the intended subject then I have AF-ON set to do Zone (works very similar to Sony’s Zone) for subjects in clear surroundings and I have AE-L (*) set to do Spot AF for subjects in more cluttered environments. I will hone in on my intended subject with one of those two AF modes, then the Eye-AF white square often shows up and you can go back to Eye-AF to allow recomposing easier OR just take the shots with Zone or Spot AF. The only downside to this setup is you have no way to move the Spot or Zone around the frame. Because I can usually get Eye-AF to engage after a quick focus bump with Spot or Zone it hasn’t really affected me much but I could see it becoming an issue with birds really filling the frame.
Again, that is a deal-breaker for me. By the time you activate Spot or Zone it seems that you would miss the shot most of the time. Furthermore, as far as I know, it is possible to move all of the R5 AF points or zones around in the frame using the Joystick …
Also if you are reach limited and the bird will only end up in the APS-C area of the sensor anyways, Eye-Detect works better if you are in APS-C mode. I have a button set to quickly switch between FF and APS-C (1.6x).
That is something else I would not do. I want and need to be able to press the shutter button to focus and make images. Just as I do with SONY.
Final thought….in many situations Zone mode is more effective…when bird is flying towards you and smaller in the frame, Zone is way better than using Face/Tracking. For your last image above, Zone would have nailed that just as you say Sony’s Center Zone would have nailed it. It has taken me 2 months to really figure out when to use the Face/Tracking and as you’ve been experiencing it is not the be all, end all….it needs to be used when appropriate. But setting it up as I described earlier does get you the benefit of knowing when it is working behind the scenes before you engage AF and I find that to be a powerful benefit.
Again I am confused by the last part above (unless you have enabled Continuous AF …). I hope that I am not coming off as combative or defensive here, I am just trying to learn and to understand. It seems that R5 (and 6) users might want to try more Zone stuff. So many thanks and much love, artie
+1 for Geoff’s comments. Zone should be used for BIF or distant subjects (I prefer large horizontal) while Face/tracking+eye is fine for non-flying birds at around 100 yards or less (depending on the lens).
I am not sure that that is exactly what he is saying. I think that he is saying that he uses Face detection + Tracking/AI Servo AF for most flight and only switches to Zone if that does not work … I could very well be wrong 🙂
Occasionally, as you’ve illustrated Face/tracking+eye has some problems detecting the eye and there are several ways around this. One is to reacquire or “pump” the af button and another way is to program the BF button to: Face/tracking+eye detect in AF5 to “AF pt set for Spot AF1-point AFExpand AF areaExpand AF area” (Servo AF starts from the AF point that was set manually before switching from Spot AF, 1-point AF, or Expand AF area (manual selection Expand AF area) or Expand AF area (manual selection: surround) to [Auto selection AF] or [Face+Tracking]. Useful for starting Servo AF from the AF point set before switching to [Auto selection AF] or [Face+Tracking].)
Far too many complications for me 🙂
This allows the user to start manually in spot focus and then Face/Tracking+eye will acquire from there. I’ve used this successfully in circumstances where there might be bright specular reflections which confuse the sensor or in cases where there are a lot of distracting elements. Generally, I don’t need this as the Face/tracking + eye is generally fairly good and with more experience one accommodates to the deficiencies.
Again, I am totally averse to such an approach 🙂
Shooting in APS-C mode as Geoff mentioned is another tactic and this limits the area of the sensor that looks for eye like structures. It’s certainly valid though one I don’t use routinely I appreciate the larger FOV of full frame, memory is cheap, and I appreciate having the additional frame area for cloning or other PP.
That is another thing that I would not do. Am I a pain or what?
Great observations Artie!
Thanks on all counts, Adam.
with love, artie
I’ll try to clarify…
IME just means “In my experience”
Thanks. That is a new TLA for me 🙂
I don’t have continuous AF enabled…first thing I made sure was off when I got the camera.
What I mean by the white squares is that only if you have Face/Tracking as your main AF mode (set under AF1 menu) and have it set to AUTO then you will notice white boxes showing up without pushing anything (as long as EVF is awake).
I did not think that that was possible but you are correct. I was pointing the lens at my TV, and I saw the little white squares. I can’t wait to try it on birds 🙂
You don’t see these boxes in any other mode or when User-selected point is used for Face/Tracking. These white boxes are basically showing you what the R5 is calculating but no actual AF is taking place. If you see the white box where you want it then I half press the shutter to start AF and take the shot when ready (or for AF-ON back button users you press your AF-ON button).
Sounds like a good plan.
For the FF/APS-C that is just to toggle between them. So if I have a situation where the bird is going to be smaller in the frame then I often just switch over to APS-C (1.6x) mode to improve the Eye-Detect. It has no affect on how you use the shutter button to focus, that is all the same. I don’t do it on the fly when quickly reacting to things, just when I know I’m going to be in a situation where the bird isn’t going to be filling the frame for awhile. Of course that is just one suggestion and totally optional but I have seen it find the eye as soon as I change to APS-C where it wasn’t finding it a moment before in FF view.
That makes sense too. SONY will focus on anything no matter how tiny in the frame.
As per using alternative buttons to recall other AF modes that is again a choice you have to make. If you don’t like doing that then that is fine. For me it is basically just going back to how I used to do back-button AF (like you used to do also), push in AF-ON, it does AF via Zone (at least how I have it setup) and then push the shutter to fire. Not as fast as just using Shutter button but still not too hard once you re-train your muscle memory.
My brain, fingers, and memory — muscle and otherwise, would not be up to that. Plus, I have a problem with having to use back buttons to acquire focus more quickly when SONY does it right out of the box. I am glad that it is working for you and for many others.
If you don’t want to do the AF-ON or * to do alternative AF modes, I found the quickest way to switch AF modes was to assign the SET button to switch AF modes. Then I limit the selectable AF modes to just Face/Tracking, Zone and Spot AF (you can limit even more or include more as you wish).
I figured that out already — it is a great tip. We do the same thing with SONY.
Then just pushing SET toggles to the next mode.
I thought that I had that set up correctly but with what I did, when I customize Set to AF Point selection I still need to hit the MFn button to go through the AF areas … What have I done wrong?
That could be a fast way to go between Zone and Face/Tracking. If you limit selectable AF modes to just those two then it is just a straight toggle back and forth every time you hit Select.
It is not possible to limit it to only those two as it is not possible to un-check 1-point AF …
(other buttons can be used for this other than SET but I found SET to be easiest to find and push without looking at the camera).
Let me know if there is anything else I can help clarify.
Many thanks. Just the above stuff for now. with love, artie
For my SET button I’m using the item called “Direct AF Method Selection” under the Customize Buttons menu. With that set it is just a push of the SET button to toggle to the next active AF mode. That is working the same way as I have on my Sony bodies.
And yes you are correct (I had forgot) that you can’t deselect Single Point so if you want Spot you will need to toggle Spot, Single, Tracking.
As for the 1.6x mode vs FF…..It is only Eye-Detect that really benefits (as far as I can tell) from using the crop mode. If you use Zone on R5 it will focus just like Sony Zone. And Zone AF is pretty much as reliable on the R5 as it is on the A9II.
Great stuff, Geoff. I am looking forward to getting into some good flight photography so I can try Zone. Also, by limiting the AF modes in either system, your “Direct AF Method Selection” method becomes even more powerful.
Huge thanks, much love.
a
Did you notice any difference when switching to AUTO selection of initial AF point vs user defined initial AF point selection? All of your images shared should have been perfectly fine for AUTO AF point selection for face tracking.
Agreed
Ryan, You were kind to share that tip with me but that happened after my two shooting sessions with SONY. I have switched to that and look forward to getting out with some birds soon and reporting back 🙂
with love, artie
I particularly like #11 in the puns: “Atheism is a non-prophet organization.”
Me too 🙂
with love, a