What’s Up?
Tuesday morning was mega-foggy. Working with the handheld RF/RF 100-500, I played around with HDR flight and deleted them all. I kept a few images of a dewy spider web and a few of an aquatic plant. I got lots more done on both the BAA Canon EOS R5 Camera User’s e-Guide and the update of the BAA R5/R6 AF e-Guide. The latter should be completed in a very few days.
The sky was gorgeous last night and there was very little wind. I glanced at that folder this morning and was thrilled to see a few very good ones. And even more near-misses … All with the SONY 600 GM, the 2X TC, and the a9 ii. It is amazing that we have come to the point that flight photography with SONY at 1200mm is just another day at the office.
Today is Wednesday 10 February 2021. The forecast for this morning is calling for partly cloudy skies with gentle winds from the southeast. I will be heading down to the lake early, probably with the refrigerated armadillo in the cooler.
I peeked out of my office door at 7:07am to see another totally foggy morning.
This post took about 2 hours to prepare and makes fifty-three days in a row with a new one. Please remember …
Please Remember
With income from IPTs now at zero, please, if you enjoy and learn from the blog, remember to use one of my two affiliate programs when purchasing new gear. Doing so just might make it possible for me to avoid having to try to get a job as a Walmart greeter and will not cost you a single penny more. And if you use Bedfords and remember to enter the BIRDSASART code at checkout, you will save 3% on every order and enjoy free second-day air shipping. In these crazy times — I am out at least forty to sixty thousand dollars so far due to COVID 19 (with lots more to come) — remembering to use my B&H link or to shop at Bedfords will help me out a ton and be greatly appreciated. Overseas folks who cannot order from the US because of import fees, duties, and taxes, are invited to help out by clicking here to leave a blog thank you gift if they see fit.
Canon R5/R6 AF e-Guide Info
So far, 104 folks have sent PayPals for their copy of the Canon R5/R6 AF e-Guide. And 33 who used my affiliate links to purchase their R5 have e-mailed for and received their free copy of the guide. If you e-mailed your Bedford receipt or sent a PayPal and did not receive your guide, please LMK immediately via e-mail.
Feedback has been overwhelmingly positive so far. Three folks wrote stating that they had a better way of setting up AF on their R5s. When I wrote back explaining why they were in error, two of them back-tracked. One stubborn guy is still doing it his way — less efficiently. Be sure to scroll down to read about my plans for a Canon R5/R6 User’s e-Guide. Understand that the info in the BAA Canon R5/R6 Autofocus e-Guide is so important that I opted to publish the AF guide immediately as the R5/R6 User’s Guide will take at least another month to finish.
|
|
BAA Canon R5/R6 Autofocus e-Guide |
BAA Canon R5/R6 Autofocus e-Guide
Twenty-one pages. 3,452 words. 28-DPP4 screen captures showing the R5’s vaunted AF system in action. Note: the AF system of the R5 is identical to the AF system of the R6.
You will learn:
1- The two most useful AF Methods for general bird photography and for birds in flight.
2- How to set up your R5/R6 AF Menus.
3- What boxes to check (and un-check) under Limit AF Methods.
4- How to change the AF Method quickly, easily, and efficiently. Note: the default way of doing this is clunky, cumbersome, and inefficient at best. One person replied that this tip alone was worth the price of admission.
5- The only setting that should be used for Initial Servo AF pt for Face Detection + Tracking.
I you are currently using multiple back buttons either for general bird photography or for birds in flight, what you learn in this guide will change your life. For the better.
Here are the first three paragraphs of this e-Guide:
From the moment I learned about the new Canon mirrorless bodies, I read about using two or three back-buttons to focus using different AF methods. The word on the street said that the way to go for birds in flight was to use one button to acquire focus with Zone AF or with Large Zone: Horizontal AF and then switch to another button to activate Face Detection + Tracking AF and then use the shutter button to make an image. My immediate thought was, “This is insanity! There has got to be a better way.” In short, there is a far superior way to set up AF on your R5 or R6.
Remember that I got away from any form of back-button or rear focusing many years ago after finally realizing that it is always easier to do one thing (press the shutter button), than it is to do two things (press a back button and then press the shutter button).
The default method of switching AF Methods with the R5/R6 bodies is cumbersome at best. It involves first pressing the grid button (my name) on the upper right back of the camera and then pressing the hard-to-access M-Fn button to toggle through the AF Methods. This method is so bad that it will not be mentioned again in this guide.
The guide is free to all who have ordered an R5 or an R6 using my B&H affiliate link or from Steve Elkins/Bedfords using the BIRDSASART coupon code at checkout. Please send your receipt to me via e-mail. It will take me a few days to a week to verify the B&H purchases. Bedfords folks should expect their free e-Guides fairly quickly.
To purchase your copy of the e-Guide, please click here or send a PayPal for $25.00 to birdsasart@verizon.net and be sure to include the words R5/R6 AF Guide in your PayPal e-mail.
Everyone who gets the guide will receive a free update no later than the first week in February.
Canon EOS R5 Camera User’s e-Guide
As regular readers know, I am working on a complete Canon R5 Camera User’s e-Guide. This will require a lot of research, a lot of time, and a lot of effort. I am hoping to have it complete by late February. As always, folks who use the BAA affiliate links to purchase their Canon gear will receive a substantial discount.
Understand that the info in the BAA Canon R5/R6 Autofocus e-Guide is so important that I opted to publish the AF guide right off the bat to help folks get started with their new camera bodies. I may soon offer a pre-publication version of the User’s e-Guide … With a small discount, of course.
New and Better Bedfords Discount Policy!
You can now save 3% on all of your Bedfords photo gear purchases by entering the BIRDSASART coupon code at checkout. Your discount will be applied to your pre-tax total. In addition, by using the code you will get 2nd day air shipping via Fed Ex.
Grab a Nikon AF-S Teleconverter TC-14E III and save $14.99. Purchase a Canon EOS R5 and your discount will be $116.97. Purchase a Sony FE 600mm f/4 GM OSS lens and save a remarkable $389.94! Your Bedford’s purchase no longer needs to be greater than $1,000.00 for you to receive a discount. The more you spend, the more you save.
Money Saving Reminder
Many have learned that if you need a hot photo item that is out of stock at B&H and would enjoy free overnight shipping, your best bet is to click here, place an order with Bedfords, and enter the coupon code BIRDSASART at checkout. If an item is out of stock, contact Steve Elkins via e-mail or on his cell phone at (479) 381-2592 (Central time). Be sure to mention the BIRDSASART coupon code and use it for your online order to save 3% and enjoy free 2nd-day air shipping. Steve has been great at getting folks the hot items that are out of stock at B&H and everywhere else. The wait lists at the big stores can be a year or longer for the hard to get items. Steve will surely get you your gear long before that. For the past year, he has been helping BAA Blog folks get their hands on items like the SONY a9 ii, the SONY 200-600 G OSS lens, the Canon EOS R5, the Canon RF 100-500mm lens, and the Nikon 500mm PF. Steve is personable, helpful, and eager to please.


Gear Questions and Advice
Too many folks attending BAA IPTs (remember those?) and dozens of photographers whom I see in the field and on BPN, are–out of ignorance–using the wrong gear especially when it comes to tripods and more especially, tripod heads… Please know that I am always glad to answer your gear questions via e-mail. Those questions might deal with systems, camera bodies, accessories, and/or lens choices and decisions.
|
|
Screen Capture #1 |
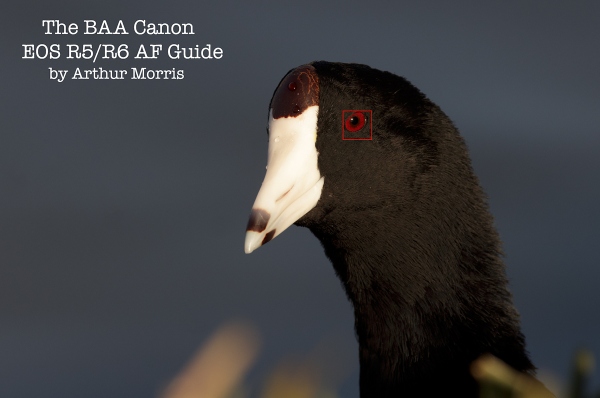
AF Performs Perfectly
Click on the screen capture above to enlarge it and note that Face Detection + Tracking AF-C with the handheld R5/RF 100-500 performed perfectly by nailing the bird’s eye. But …
|
|
Screen Capture #2 |
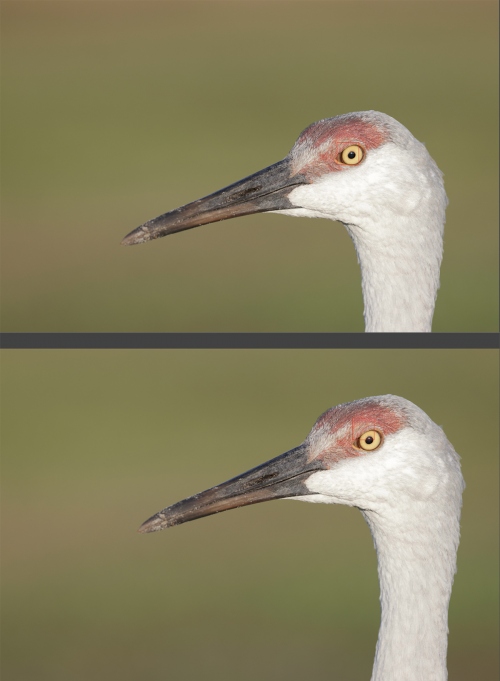
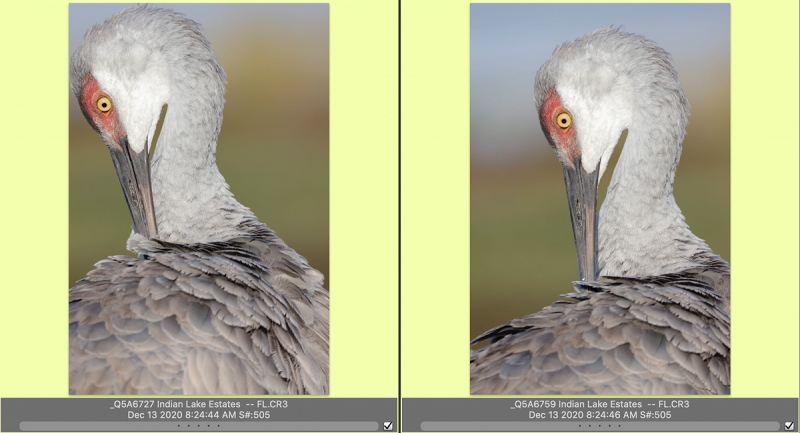
Operator Error Prevails (at First)
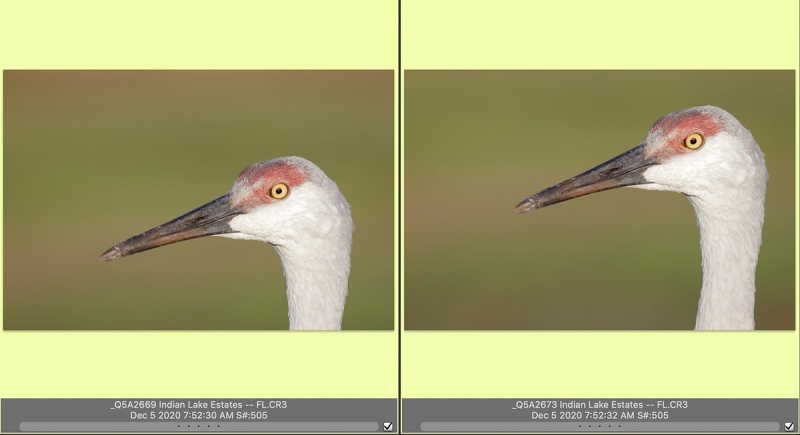
The image design of the photo on our left is very poor at best as the bird is too low in the frame with lots of unbalanced dead space above the bird’s head. The image on our right is much stronger with the bird well up and well back in the frame. Same situation. Same photographer. Getting these head portrait compositions down pat has been a big challenge for more than a year. That despite the fact that SONY’s Zone AF, Tracking Flexible Spot (M), and Tracking Expand Flexible Spot perform perfectly more than nine times out of ten. And the same can be said about the Canon R5’s Face Detection + Tracking AF-C system.
As I have stated here often and written in all of the relevant e-Guides, the photographer must take great care in framing the images to come up with a pleasing image design. And that is true whether you are hand-holding or work on a tripod with a FlexShooter head.
|
|
Screen Capture #3 |
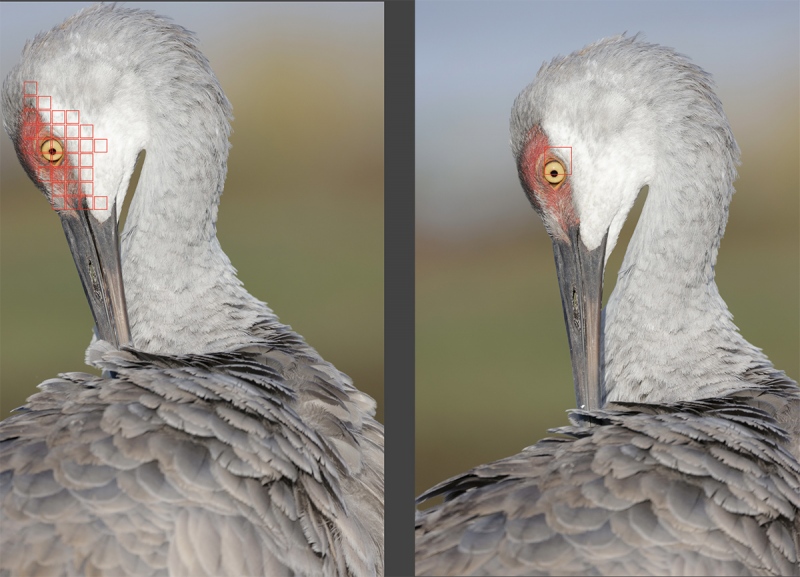
Again, AF Performs Perfectly
As explained in the BAA R5/R6 AF e-Guide, Face Detection + Tracking AF-C will often revert to various-sized squares or rectangles or perform like Zone AF (as we see with the image on our left). No matter — the dancing AF points have painted the bird’s face and the image is perfectly sharp on the bird’s eye. In the image on our right, Face Detection + Tracking AF-C nailed the bird’s eye. But …
|
|
Screen Capture #4 |
And Again, Operator Error Prevails (at First)
Despite the fact that the AF system performed more-than-adequately with the R5/RF 100-500 image on our left, the image is a total failure; the subject was mis-framed by the operator, moi. The top of the bird’s head is almost touching the left frame-edge. I did get things right with the image on our right by centering the bird from side to side. Note also that by crouching a bit and getting lower, I brought more blue into the upper background.
The point here remains that the design of the image is 100% in the hands of the person holding the lens. No matter how accurate, sophisticated, and amazing the AF systems have become, only the operator can create a pleasing image design.
|
|
Screen Capture #5 |
The SONY AF System is Equally Amazing
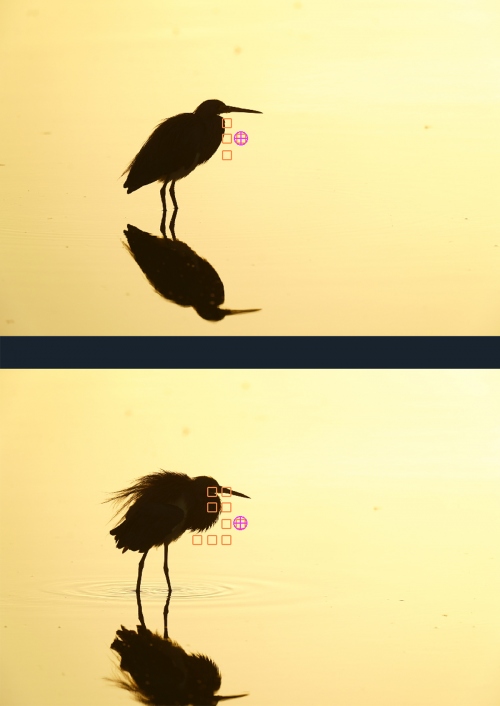
Above, working on Black Point Drive at Merritt Island NWR with the tripod-mounted SONY 600 GM, the 1.4X TC, and the a9 ii, Center Zone AF-C performed 100% perfectly. Can we say the same about the operator?
|
|
Screen Capture #6 |
The Operator Fails at the Decisive Moment …
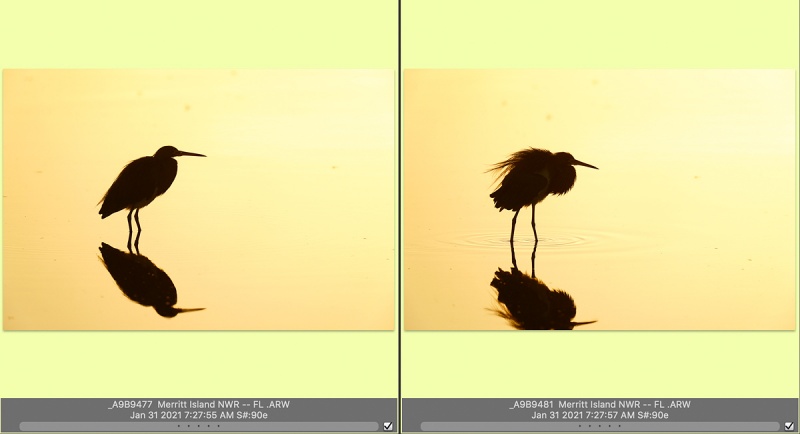
Can we say that the operator performed perfectly when he clicked the shutter for the image on our right? No. The operator failed at the decisive moment despite the AF system performing perfectly. The image on our left is framed perfectly as it includes the complete reflection of the subject. When the bird leaned forward to ruffle, the AF system continued to perform perfectly, but the operator did not. I failed to point the lens down a bit as I should have. Had I done that, the image made at the decisive moment would have included the complete reflection of the subject. I kicked myself at the time as I knew what I had done.
Though I am pretty sure that Center Zone AF would have held focus and allowed me to include the entire reflection, Wide AF would surely have been a better choice. Learning as always, I have begun using Wide for my sunset sessions down at the lake so that I can enjoy more compositional freedom as I try to nail the birds above the reeds and below the far shoreline. Remember that Patrick Sparkman prefers Wide over Zone …
Image Question
Would it be possible to save the Tricolored Heron image on our right, _A9B9481? If yes, how?
Typos
In all blog posts and Bulletins, feel free to e-mail or to leave a comment regarding any typos or errors.




Seems like and I don’t have any post processing skills, you could clone/cut/copy the head from the actual bird. flip it over/invert it then paste/copy/attach to the reflection. Please show us your result as I’m sure with all your skills, software & mojo you’ll have a picture and we would never had known you manipulated it if you hadn’t shown us. 🙂
Typo –
The image design of the photo on our left is very poor at best as there is the bird is too low in the frame with lots of unbalanced dead space above the bird’s head…
s/b
The image design of the photo on our left is very poor at best as the bird is too low in the frame with lots of unbalanced dead space above the bird’s head…
Thanks and fixed. Finally.
with love, a
You could use photoshop using your clone/patch techniques, and also adding canvas to the bottom. You probably captured 20 other shots that are perfectly composed, so why bother.
Because the mis-framed image with the bird ruffling is best by far.
a
Artie
May i ask in screen #5 and #6 are you using (tracking) center zone and (tracking) wide or just Center zone and Wide without tracking for static birds.
What did I write? What does it say in the guide about Tracking Zone and Tracking Wide?
But yet there moving when the bird moved forward to ruffle.
I do not understand your sentence above.
I know you do not have the word tracking in your explanation as above below #3 so i am asking.
Bob, here is what you are missing: Both Wide and Zone (on the first AF line of choices) will track moving subjects perfectly though you did not select them on the second AF line, the one with the official designation of Tracking with a capital “T”.
I’m learning so hopefully it is not a dumb question and if so please feel free to say so.
One thing to understand and remember is that aside from the occasional screw-up, wrong word, or brain typo, I try to be precise in my writing. So unless I write the word Tracking with a capital “T,” I am not talking about any of the AF choices on the second line.
I cannot honestly say how to save the right image in #6 because i do not know how to but i am sure with all your shortcut tips and ability in expanding canvas that it is possible as you fix wing tips etc. along with many more.
I am trying 🙂 with love, a
Always with love
Bob
Could you invert the picture and superimpose it on the missing part?
Sort of 🙂
with love, a