What’s Up?
Wednesday dawned totally overcast and dark. It brightened up by 8:00am, so I grabbed the macro lens and tooled around in the butterfly garden for a while without much success. So I headed to the front yard and spent a half hour sitting on the wet grass with the White-mouthed Dayflowers. I worked on the Speedy Picking Your Keepers in Photo Mechanic Video, and — after sending out e-mail #17 to the Alpha 1 Info and Updates Group, began work on #18. I did my bursts and my swim and another cool walk after another late thunderstorm.
I was thrilled to learn that Owen Schmidt sold his Canon EOS-1DX Mark III for the full asking price of $3999.00 one hour after it was listed.
The forecast for today is mostly cloudy and still with more afternoon thunderstorms. As it has been raining long and hard almost everyday, I will be staying away from the lake in fear of getting stuck in the soft, rain-slicked fields. I am getting excited about heading up to Jacksonville on Sunday for the sold-out 4-DAY JAX Mini IPT. I am expecting great things, as long as we do not get stuck in the sand! Wherever you are, and whatever you are doing, I hope that you too have a great day.
This blog post took more than two hours to prepare and makes 180 consecutive days with a new one. Please remember that if an item — a Delkin flash card, or a tripod head — for example, that is available from B&H and/or Bedfords and is also available in the BAA Online Store, it would be great if you opt to purchase from us. We will match any price. Please remember also to use my B&H affiliate links or to save 3% at Bedfords by using the BIRDSASART discount code at checkout. Doing either often earns you free guides and/or discounts. And doing so always earns my great appreciation.
The SONY 200-600 G Lens in Low Light! Part II
Follow along in today’s blog post to see how I used many of the great plug-ins, programs, and Photoshop features to pretty much create a useable image from a pretty bad, high ISO original … Again, the 2-6 has advantages even in low light; those include: light weight, ease of use, hand hold-ability, and great versatility. Not to mentiion that it kills on sunny days as well.
|
|
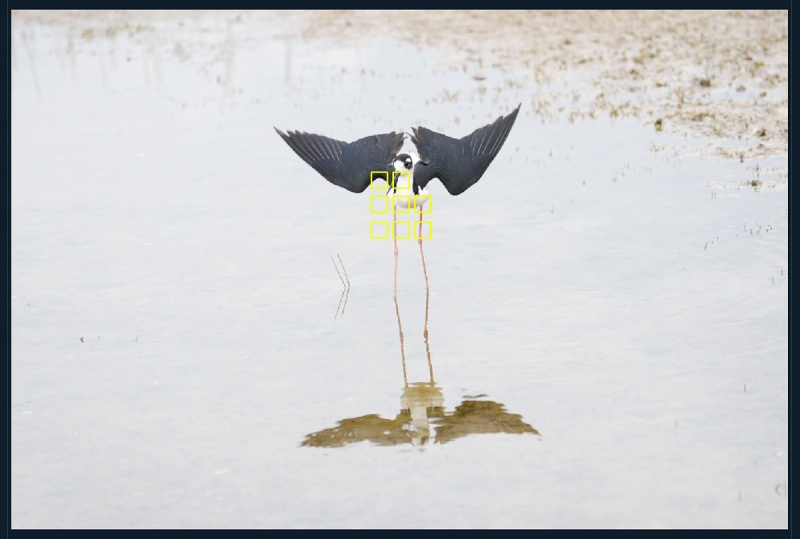
Image #1: Active AF points screen capture for the Black-necked Still nest distraction display image |
Alpha a1 AF
As detailed in the Alpha a1 Info and Updates e-mails, Wide AF will sometimes revert to zone-like AF when it cannot detect a bird’s eye or face. That is what happened here with excellent results.
Sony Alpha a1 AF
Barring operator error, the performance of the Sony Alpha a1 AF system at any focal length — including at 1200mm as seen in recent blog posts — is, when the a1 is set up properly as detailed in the in e-mails to the Sony Alpha a1 Info & Updates group, more than remarkable. Early on, there was lots of discussion within the group with many preferring multiple back button approaches. For me a simple shutter button approach with the right AF settings that yield 99% sharp-on-the-eye images is best. By far. It is super-simple and mega-effective. In recent SONY Alpha a1 Set-up and Info Group e-mails, I shared what I have learned as to when and it what situations it is best to abandon Wide. And with what. The group has already learned to limit the AF Area choices and to switch AF Areas quickly and conveniently. The default method of switching AF points with the C2 button is both slow and cumbersome. In addition, recent e-mails have detailed the best program to use to pick your a1 keepers and the big problem with the Camera Set. Memory menu item.
SONY Alpha a1 Set-up and Info Group
For me, today’s featured image would not have been possible without my Sony Alpha a1. The speed of initial focusing acquisition is amazingly quick as is the tracking accuracy. And all of that will be even truer for tomorrow’s featured image.
The SONY Alpha a1 Set-up and Info Group is going great guns as folks chime in with thoughtful questions and experience-based advice. We are now up to an astounding 60 blessed folks! Early on, we discussed the myriad AF options. I gave my opinion as to the best one for flight and general bird photography. More recently, we have been in contact with folks at SONY sharing our thoughts, experiences, and frustrations with the EVF blackout problem.
All who purchased their Alpha a1 bodies via a BAA affiliate link will receive a free subscription to the Sony Alpha a1 Set-Up and Info Updates after shooting me their receipts via e-mail. (Note: it may take me several days to confirm B&H orders.) This same service may be purchased by anyone with an a1 body via a $150.00 PayPal sent to birdsasart@verizon.net indicating payment for Alpha a1 Info Updates. Alternatively, folks can call Jim weekdays at 1-863-692-0906 to pay via credit card. New members will receive composite e-mails that summarize all previous discussions.
|
|
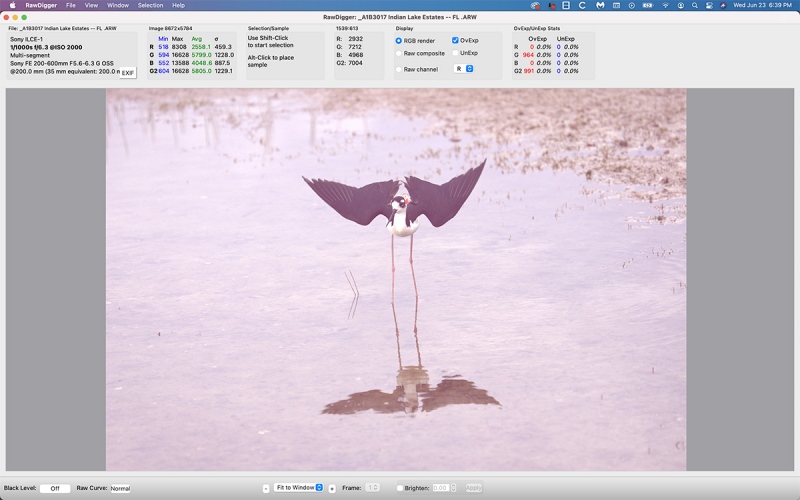
Image #1A: RawDigger screen capture for the Black-necked Still nest distraction display image |
Another Small Over-exposure
The RawDigger screen capture shows a total of 1991 OvExp pixels in the two G channels. You can see the PINK Ov-Exp warning on a small area of the bird’s tail. I tried the suggestions that Cliff Beittel left as a comment on the blog post here, but they did not exactly work. The RGB #s in the over-exposed areas showed well less than 255, 255, 255, but there was no detail at all. The WHITEs were just greyed out. I am sure that his suggestion would work well in some situations. Keep reading to learn how I dealt with the small area of detail-less, over-exposed WHITE feathers.
Via e-Mail from Geri George
Hi Artie, Thanks for the RawDigger e-Guide. With many of my flower images, DPP 4 shows lots of over-exposure on the petals, but RawDigger shows only a smattering (less than a hundred). They all converted perfectly in DPP 4 simply by pulling down the Highlight slider a bit. RawDigger has some really cool stuff!
Thanks and best, Geri
|
|
RawDigger e-Guide with Two Videos |
The RawDigger e-Guide with Two Videos
by Arthur Morris with Patrick Sparkman
The RawDigger e-Guide was created only for serious photographers who wish to get the absolute most out of their raw files. It is not for the faint-of-heart who are happy to go through life under-exposing every raw file they create.
Patrick and I began work on the guide in July 2020. At first we struggled. We asked questions. We learned about Max-G values. We puzzled as to why the Max G values for different cameras were different. IPT veteran Bart Deamer asked lots of questions that we could not answer. We got help from RawDigger creator Iliah Borg. We learned. In December, Patrick came up with an Adapted Histogram that allows us to evaluate the exposures and raw file brightness for all images created with all digital camera bodies from the last two decades. What we learned prompted three complete beginning to end re-writes.
The point of the guide is to teach you to truly mega-Expose-to-the-Right so that you will minimize noise, maximize image quality, best utilize your camera’s dynamic range, and attain the highest possible level of shadow detail in your RAW files in every situation. In addition, your properly exposed RAW files will contain more tonal information and feature the smoothest possible transitions between tones. And your optimized images will feature rich, accurate color.
We teach you why the GREEN channel is almost always the first to over-expose. We save you money by advising you which version of RawDigger you need. We teach you how to interpret the Max G values for your Canon, Nikon, and SONY camera bodies. It is very likely that the Shock-your-World section will shock you. And lastly — thanks to the technical and practical brilliance of Patrick Sparkman — we teach you a simple way to quickly and easily evaluate your exposures and raw file brightness using an Adapted RawDigger histogram.
The flower video takes you through a session where artie edits a folder of images in Capture One while checking the exposures and Max-G values in RawDigger. The Adapted Histogram video examines a series of recent images with the pink histograms and covers lots of fine points including and especially how to deal with specular highlights. The directions for setting up the Adapted Histogram are in the text.
If we priced this guide based on how much effort we put into it, it would sell it for $999.00. But as this guide will be purchased only by a limited number of serious photographers, we have priced it at $51.00. You can order yours here in the BAA Online Store.
|
|
|
This image was created on 30 May 2021 in the marsh at the lake near my home at Indian Lake Estates. I used the hand held Sony FE 200-600mm f/5.6-6.3 G OSS lens (at 200mm) and The One, the Sony Alpha 1 Mirrorless digital camera. ISO 2000. Exposure determined via Zebras with ISO on the rear dial: 1/1000 sec. at f/6.3 (wide open) in Manual mode. AWB at 4:40pm on a very cloudy afternoon. Wide/AF-C was active at the moment of exposure and performed very well. See the AF point screen capture below. Image #1B: The original before rotation and cropping for the Black-necked Still nest distraction display image |
Image Rotation Trick from Digital Basics II
Scroll Down for DB II Details
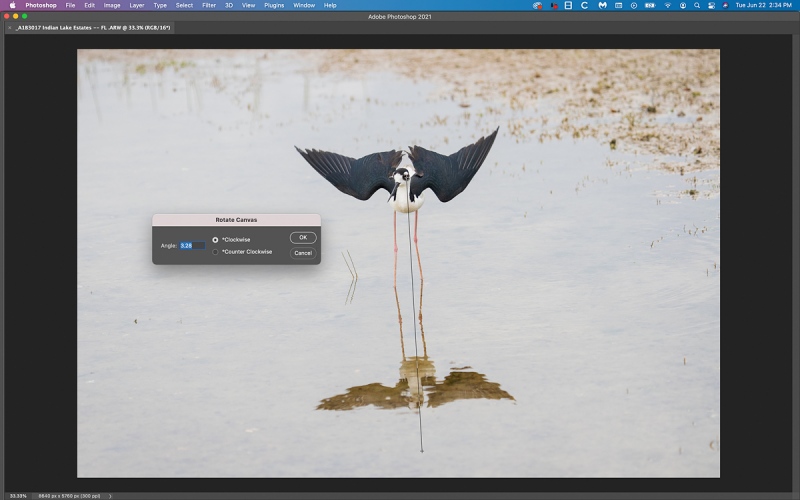
I used the Ruler Tool to draw a line from the center of the bird’s eye through the center of the bird’s eye in the (very dingy) reflection. Then I used to Keyboard Shortcut to bring up Rotation > Arbitrary. That showed that I needed 3.28 degrees of CW rotation. I knew that I would be executing a big crop to eliminate the very ugly reflection. After the crop, I needed to fill in a small triangle of canvas upper right. I did that using John Heado Content-Aware Fill. Yes, I know that that should be done automatically using Content-Aware Crop, but sometimes it does not work so I had do it the old-fashioned way.
Considering the original, I think that you must agree that it is pretty bad. The light was horrific, the background like dishwater, and the bird’s eye barely visible. Did I forget to mention the YELLOW color cast?
|
|
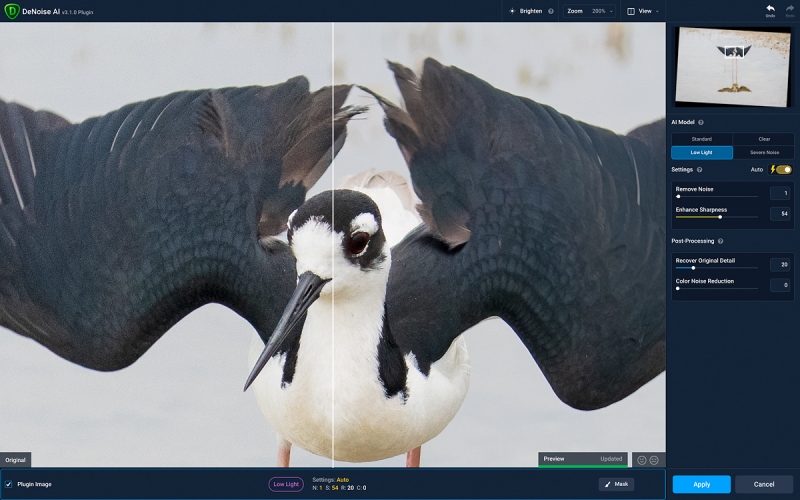
Image #1C: Topaz DeNoise on the Black-necked Still nest distraction display image |
Topaz DeNoise
Be sure to click on the screen capture and note the superb job of eliminating the noise in the dark, almost black wing in the after version on your right while retaining feather detail. I run DeNoise after leveling and cropping on virtually every image that I process. By cropping first with the box for “Delete Cropped Pixels” checked, there is less work for DeNoise to do. As with most images created in lousy light, I used Low Light on Auto. Note also that the entire eye was very dark with little sign of the ruby red iris you would see on a sunny day. More on that below.
Great Topaz News!
Folks who use the BAA Topaz link to purchase Sharpen AI, DeNoise AI, or the Utility Bundle (or any other Topaz plug-ins), will receive a 15% discount by entering the ARTHUR15 code at checkout. If the stuff is on sale (as it usually is), you save 15% off of the sale price! To get the discount you must use my link and you must enter the discount code. Be sure to start with this link.
Those who purchase Sharpen AI, DeNoise AI, or any other Topaz plug-ins using my link and then entering the ARTHUR15 code at checkout can e-mail to request a short Getting Started with Topaz e-Guide. Please include a copy of your Topaz receipt that shows the discount. Aside from the basics, the guide explains how to install the plug-ins so that they appear in the Photoshop Filter Menu.
|
|
|
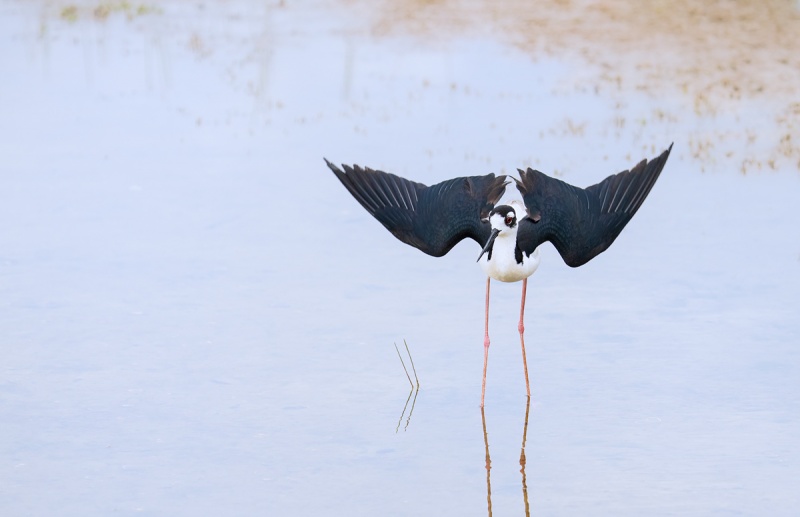
This image was created on 30 May 2021 in the marsh at the lake near my home at Indian Lake Estates. I used the hand held Sony FE 200-600mm f/5.6-6.3 G OSS lens (at 200mm) and The One, the Sony Alpha 1 Mirrorless digital camera. ISO 2000. Exposure determined via Zebras with ISO on the rear dial: 1/1000 sec. at f/6.3 (wide open) in Manual mode. AWB at 4:40pm on a very cloudy afternoon. Wide/AF-C was active at the moment of exposure and performed very well. See the AF point screen capture below. Image #1D: This is the optimized version of the Black-necked Stilt nest distraction display image |
The Optimized Version
After DeNoise, I brought the image into Viveza, brightened the water, and got it looking somewhat blue. Anyhoo, it is a huge improvement over the original. Next was some extensive Eye Doctor work. That involved lightening and saturating the iris. I eliminated some of the crud in the water, ran a Gaussian Blur on the whole image, covered that with a Black (Inverse or Hide-All Mask), and painted the effect in as needed, mostly on the upper background. Last, I needed to add some detail to a small section of over-exposed WHITEs. I did the via a small, transformed Quick Mask of an area of detailed breast feathers.
Is this image a prize winner? Not by any means. But it is a decent image that shows some neat behavior and is fine for web presentation.
The Situation
I checked the 4-egg nest with my binoculars from the South Field. The bird was not on the nest. I got close enough to see that the four eggs were intact and headed South in the marsh. One of the adults landed in front of me and performed a nest distraction display to lead me away from the nest. I kept walking slowly to the south. When I turned around I was pleased to see the bird on the nest incubating its eggs.
|
|
The BIRDS AS ART Current Workflow e-Guide (Digital Basics II).You can order your copy from the BAA Online Store here, by sending a PayPal for $40 here, or by calling Jim or Jennifer weekdays at 863-692-0906 with your credit card in hand. Be sure to specify Digital Basics II. |
The BIRDS AS ART Current Workflow e-Guide (Digital Basics II)
Everything mentioned above and dozens more Photoshop tips and techniques — along with all of my personalized Keyboard Shortcuts — are covered in detail in the BIRDS AS ART Current Workflow e-Guide (Digital Basics II), an instructional PDF that is sent via e-mail. Learn more and check out the free excerpt in the blog post here. While the new e-Guide reflects my MacBook Pro/Photo Mechanic/DPP 4/Photoshop workflow, folks using a PC and/or BreezeBrowser will also benefit greatly by studying the material on DB II. Note: folks working on a PC and/or those who do not want to miss anything Photoshop may wish to purchase the original Digital Basics along with DB II while saving $15 by clicking here to buy the DB Bundle.
Folks who learn well by following along rather than by reading can check out the complete collection of MP 4 Photoshop Tutorial Videos by clicking here. Note: all of the videos are now priced at an amazingly low $5.00 each.
You can learn how and why I converted all of my Canon digital RAW files in DPP 4 in the DPP 4 RAW Conversion Guide here. More recently, I became proficient at converting my Nikon RAW (NEF) files in Adobe Camera Raw. About two years ago I began converting my Nikon and Sony RAW files in Capture One Pro 12 and continue to do so today.
To purchase Capture One, please use this link. Then you can learn more about Capture One in the Capture One Pro 12 Simplified MP4 Video here. The next step would be to get a copy of Arash Hazeghi’s “The Nikon Photographers’ Guide to Phase One Capture One Pro e-Guide” in the blog post here.
You can learn advanced Quick Masking and advanced Layer Masking techniques in APTATS I & II. You can save $15 by purchasing the pair.
Typos
With all blog posts, feel free to e-mail or to leave a comment regarding any typos or errors.




I love black necked stilts but, without the usual rains in April/May, our water retention pond remained dry. No stilts — or anything else either!
Is there water now? It has been pouring here everyday for two weeks.
with love, artie
I ordered Raw Digger and the Raw Digger guide. It takes some time to read the guide, take some images and evaluate the histograms in Raw Digger. I am getting better but not there yet. It is a different type of evaluating the histogram your camera is showing.
As it says in the promos, mastering exposure with what you learn in RawDigger does require some study.
with love, a
I would love it if you could explain to us what RawDigger is and why you use it.
Welcome John,
I have been talking about RawDigger on the blog for a while. In short, it allows you to evaluate the exposure of any raw file after the fact. Most folks are under-exposing 99% of what the images that they create. You take what you learn back into the field with you and adjust your exposure strategies as needed. To learn a ton more type the word RawDigger into the little white search box on the upper right of each blog page. Then hit enter and follow the links.There will be many dozens of them.
with love, artie
What great optimizing!!
Nice redemption! BTW, Still should be Stilt
Thanks, and fixed. with love, a