My Sony 600mm f/4 Repair Story
In mid-August of this year, I discovered that I could not remove the drop-in filter on my Sony 600mm f/4. It needs to be cleaned every few weeks. So, with some trepidation, I sent the lens to Sony repair in LA in late August. Other than the stuck filter, the lens had been working perfectly. I was pleased to note that Sony picked up the round-trip, overnight Fed Ex shipping charges as part of my Sony Pro Support membership ($100.00/year).
In early September they told me that the filter was stuck because “of sand getting into the unit.” Understandable. They stated that they had cleaned the entire lens as it was “full of sand.” Again understandable. Two weeks later I received another e-mail: they had discovered a problem with the AF system and needed a part that was out of stock. Several weeks after that, they told me that the part had come in, but when they began the repair, they discovered that they needed another part that was of course out of stock. At that point I decided to grab a loaner. While I love the 400mm f/2.8, there are times when I need and depend on the 600, especially at Sebastian Inlet.
On October 23, I got an e-mail stating that the lens would be returned to me in perfect working condition. The first time that I attached an a-1 to the lens it was obvious that the lens was inoperable. The camera could not read the lens; all I saw in the EVF was “f-” instead of the aperture. Unfortunately, I had returned the loaner before checking the lens.
I returned the lens to Sony and grabbed another loaner. I immediately got an e-mail asking if I had taken the lens to the beach as it was again “full of sand.” I wrote back stating that I had not taken the lens into the field and that sand they had found must have been leftover from the first “cleaning.”
The next e-mail said that the unit needed a new motherboard that was, of course, out of stock. On November 22, just about three months to the day that I sent it in, I got my lens back.
The first thing that I did when when testing the lens was shoot it with the 2X. Checking out today’s featured images you will see that the sharpness at 1200mm is spot on; I am very happy with the repairs.
Used Gear Updates
Canon EOS 7D Mark II with Extras
Good friend and many multiple IPT veteran Indranil Sircar is offering a Canon EOS 7D Mark II in excellent plus condition with several extras for a very low $449.00. The shutter count is 31001. The sale includes the Canon Battery Grip BG-E16 (a roughly $69.00 value), two Canon batteries, the original box, the cables and software and manuals, the battery charger, the front body cap, Canon Remote Release RS-80N3 (a roughly $50.00 value) and insured ground shipping via UPS to lower-48 US addresses only.
Please contact Indranil via e-mail.
If you are looking to get started with a Canon dSLR, Indranil’s 7DII is perfect for you. Both Patrick Sparkman and I used and loved the 7D Mark II bodies until about ten years ago when we both committed to using full-frame Canon bodies. We both made some truly great images with it. Two of my three 2016 Nature’s Best honored entries were created with the 7D II, one still, and one video. The 7D Mark II remains one of the greatest-ever values in a digital camera body. artie
Canon EOS 5D Mark IV with Extras
Good friend and many multiple IPT veteran Indranil Sircar is offering a Canon EOS 5D Mark IV in excellent plus condition with several extras for a very low $999.00. The sale includes the Canon Battery Grip BG-E20 (a roughly $229.00 value), two Canon batteries, the original box, the cables and software and manuals, the battery charger, the front body cap, and insured ground shipping via UPS to lower-48 US addresses only.
Please contact Indranil via e-mail.
What can I say? The 5D IV was my favorite-ever Canon digital dSLR. I owned and used three of them while my 1DX II and a 1DX III sat on the shelf in my garage. A new 5D Mark IV, with its 30.4MP full-frame CMOS sensor, sells new for $$2,699. If you have been dreaming of a 5D IV, grab Indranil’s 5D IV right now and save an astounding $1,700.00. artie
Canon EF 135mm f/2.0L USM Autofocus Telephoto Lens
BAA Record-low Price!
John Nelson is offering a Canon EF 135mm f/2.0L USM autofocus telephoto lens in excellent condition for a BIRDS AS ART record-low $599.00. The sale includes the soft pouch, the hood, the front and rear lens caps, and insured ground shipping via major courier to lower-48 US addresses only. Your item will not ship until your check clears unless other arrangements are made.
Please contact John via e-mail.
Ideal for portraiture, the EF 135mm f/2L USM is a medium telephoto prime and a member of Canon’s L-series of lenses. The long focal length coupled with the f/2 maximum aperture afford a great deal of control over depth of field for isolating subject matter and using selective focus, and the bright aperture also benefits shooting handheld in low-light conditions. In regard to the optical design, the lens uses two ultra-low dispersion elements to control chromatic aberrations and color fringing for high clarity, and a Super Spectra coating has also been applied to suppress flare and ghosting for increased contrast and color accuracy. Complementing the imaging attributes, a ring-type USM is employed to deliver quick and quiet autofocus performance along with full-time manual focus. It is compatible with both the EF 1.4X and EF 2X teleconverters. B&H and Canon.
Canon EOS-1DX Mark II Digital SLR Camera with Extras!
BAA Record-low Price!
Price reduced $200.00 on 25 November 2023
John Nelson is offering a Canon EOS-1DX Mark II dSLR camera in excellent condition for a BIRDS AS ART record low $1399.00 (was $1599.00). The sale includes the original box, one battery, the charger, the front body cap, four (4) 128 128GB CFast memory cards, cfast cards, and insured ground shipping via major courier to lower-48 US addresses only. Your item will not ship until your check clears unless other arrangements are made.
Please contact John via e-mail.
The 1DX Mark II is a rugged, fast Canon professional digital camera body. It features an excellent AF system and high quality image files with great dynamic range. When he used Canon, it was the first choice of Arash Hazeghi, the world’s premier photographer of birds in flight.Two iDX II served as my workhorse bodies for several years. And I loved them. artie
|
|
|
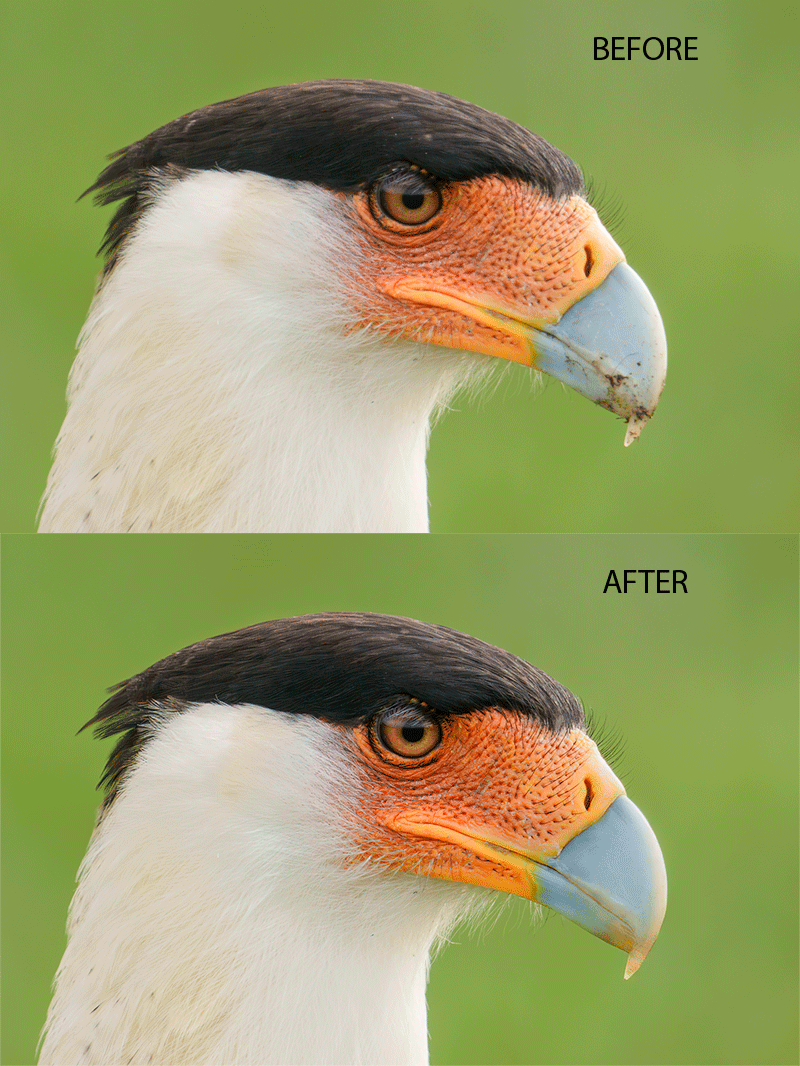
This image was created on 24 November 2023 down by the lake near my home at Indian Lake Estates, FL. Working from the driver’s seat of my SUV, I used the BLUBB-supported Sony FE 600mm f/4 GM OSS lens, the Sony FE 2.0x Teleconverter, and The One, the Sony Alpha 1 Mirrorless Digital Camera). The exposure was determined via Zebra technology with ISO on the thumb dial. ISO 2000. 1/500 sec. at f/8 (wide open) in Manual mode. When evaluated in RawDigger, the raw file exposure was determined to be dead-solid perfect. AWB at 8:31:59am in the shade, gently backlit on a sunny morning. Tracking: Expand Spot/AF-C with Bird Face/Eye detection enabled performed perfectly even at 1200mm. Be sure to click on the image to enjoy a high-res version. Image #1: Crested Caracara adult head and neck portrait |
The ILE Caracara Situation
A pair of Crested Caracaras is building a nest in the same tree that they used last year. For the past few mornings, the pair has been feeding on the lawn in front of a home on Palmetto Drive along with a dozen or so Cattle Egrets.
Remember that if your super-telephoto lens has a Direct Manual Focus (DMF) switch, you need to set it to Off when you are working on a beanbag so that you do not inadvertently throw off the focus when framing or re-composing. Then you need to remember to turn it back on when you go back to normal use.

|
The Color Work and the Bill Clean-up
Using the new Luminance Targeted Adjustment Tool (L-TAT) makes it child’s play to adjust the Luminance and Saturation of the colors in each and every image. For the extensive bill clean-up, I used a variety of Photoshop tools, but the new Remove Tool was the most valuable. I will include this image in a future Volume I video. The Volume 1/#2 video will be distributed this coming Tuesday.
Be sure also to check out the Eye Doctor work.
|
|
The Digital Basics III Video Series |
The Digital Basics III Video Series
I realized about a year ago that my digital workflow had changed significantly and was toying with the idea of writing a Digital Basics III. More recently, I have learned and begun working with two great new Photoshop Tools, the Remove Tool and the Luminance Targeted Adjustment Tool (L-TAT). The former is like a smarter Spot Healing Brush Tool on steroids and the latter is a huge step up from the fabulous Color Mixer Tool. During that same time frame, I came up with a new and improved 2-step noise reduction technique. I still use Divide and Conquer, Quick Masks, Layer Masks, an expanded array of personalized keyboard shortcuts, and tons of other stuff from both versions of Digital Basics.
As soon as I realized that I did not want to take on another large writing project, I realized that by creating a series of videos I could much more easily share all the details of my current digital workflow and much more easily incorporate additional new tips, techniques, and tools as I went. And so, The Digital Basics III Video Series was born. You can check out Volume I/#1 here or at the bottom of this blog post.
You might opt to purchase single videos or to subscribe to Volume I and save $26 by ordering the first five videos in one fell swoop. You can purchase the five videos in Volume I by clicking here. If you are a new subscriber to the series you will receive Volume I/#1 no later than tomorrow and Volume I/#2 on Tuesday.
The videos will be most valuable for folks using the latest version of Photoshop (2024) or Lightroom along with Topaz DeNoise AI and Topaz Sharpen AI.
|
|
|
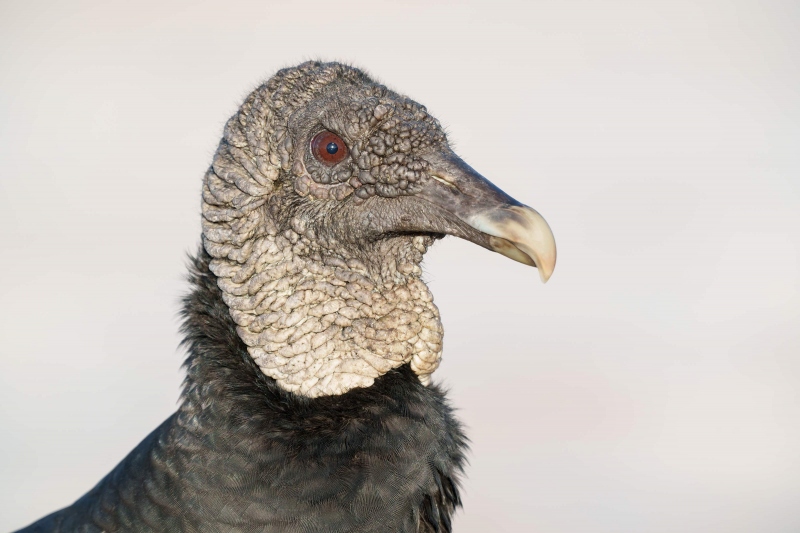
This image was created on 9 November 2023 down by the lake near my home at Indian Lake Estates, FL. Working from the driver’s seat of my SUV, I used the BLUBB-supported Sony FE 600mm f/4 GM OSS lens, the Sony FE 2.0x Teleconverter, and The One, the Sony Alpha 1 Mirrorless Digital Camera). The exposure was determined via Zebra technology with ISO on the thumb dial. ISO 1000. 1/500 sec. at f/9 (stopped down 1/3-stop) in Manual mode. When evaluated in RawDigger, the raw file exposure was determined to be dead-solid perfect. AWB at 8:56:14am on bright sunny morning. Tracking: Expand Spot/AF-C with Bird Face/Eye detection enabled performed perfectly even at 1200mm. Be sure to click on the image to enjoy a high-res version. Image #2: Black Vulture adult portrait |
Looking Quite Regal
This handsome adult Black Vulture posed for a 1200mm head portrait against the white sand of the Indian Lake Estates Beach. The “beach” is actually a sand pit to the left of the pier. Though it cost a pretty penny to build, the birds are the only creatures I have seen using it.
The New Remove Tool
There were about a zillion specks of whitewash on this handsome vulture’s face and several more on its feathers. For the extensive clean-up, I used a special technique with new Remove Tool. I will be including that technique in a future Volume I video. The Volume 1/#2 video will be distributed this coming Tuesday.
|
|
|
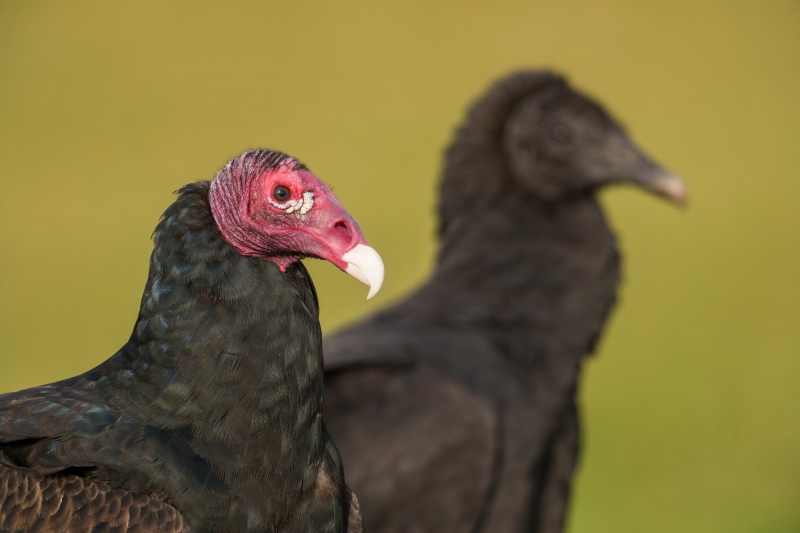
This image was created on 24 November 2023 down by the lake near my home at Indian Lake Estates, FL. Working from the driver’s seat of my SUV, I used the BLUBB-supported Sony FE 600mm f/4 GM OSS lens, the Sony FE 2.0x Teleconverter, and The One, the Sony Alpha 1 Mirrorless Digital Camera). The exposure was determined via Zebra technology with ISO on the thumb dial. ISO 1000. 1/1250 sec. at f/8 (wide open) in Manual mode. When evaluated in RawDigger, the raw file exposure was determined to be perfect. AWB at 8:51:12am on sunny morning. Tracking: Expand Spot/AF-C with Bird Face/Eye detection enabled performed perfectly even at 1200mm. Be sure to click on the image to enjoy a high-res version. Image #3: Turkey Vulture adult and Black Vulture juvenile head portrait juxtaposition |
A Comparative Juxtaposition
Tight head shots of both species of vultures when working at 1200mm at ILE are easy peasy. When I saw a TV and a BV perfectly aligned atop a small rise adjacent to the parking circle near the pier, I placed the lens on the BLUBB before I began my approach. Then I slowly and carefully drove my vehicle into just the right spot.
The birds remained nicely juxtaposed for about two minutes. I created about two dozen images, kept two slightly different ones, and optimized just the one above.
Car-As-Blind Technique Question
When working from a vehicle, why do you need to place the lens on the BLUBB before making a close approach?
Typos
With all blog posts, feel free to e-mail or to leave a comment regarding any typos or errors.


Leave a Reply