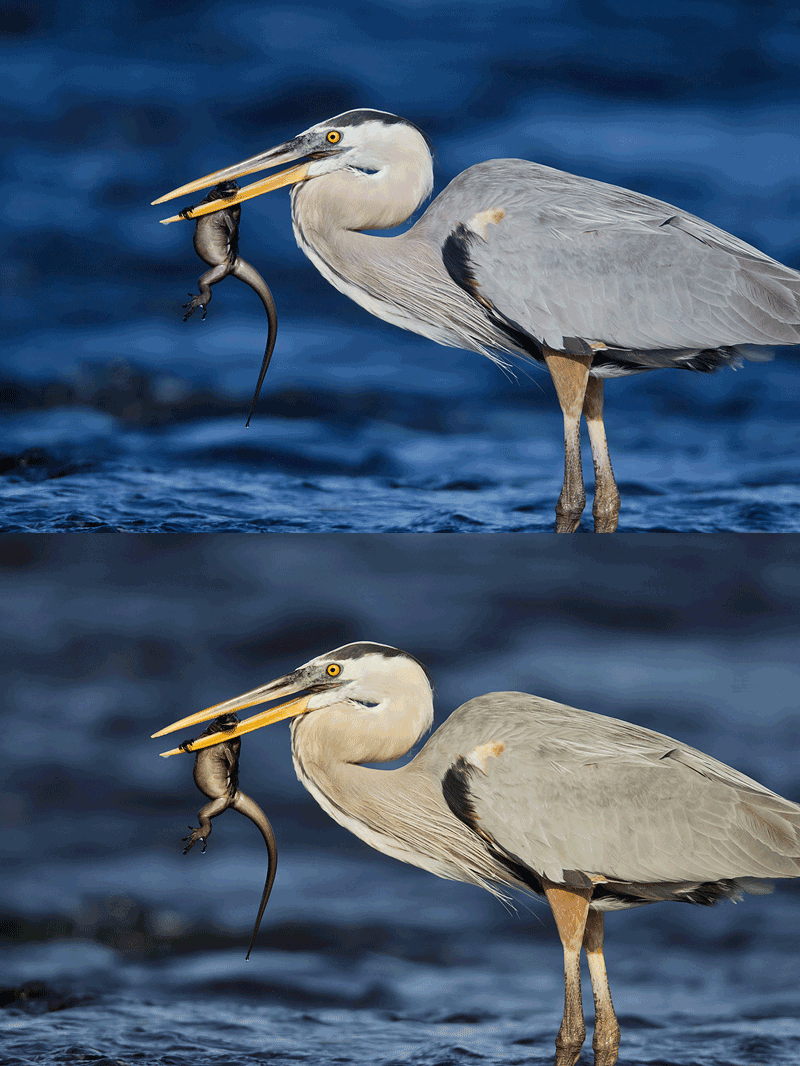
Give the animated GIF a few moments to play and note the elimination of the huge BLUE cast. The image, which features a Great Blue Heron eating a baby Marine Iguana was created at Punta Espinoza, Fernandina Island with the the tripod-mounted Canon 800mm f/5.6L IS lens, the 1.4X III TC, and the EOS-1D Mark IV. ISO 400. Evaluative metering at zero: 1/1600 sec. at f/8 in Av mode. Lens/TC/Camera Body Micro-Adjustment: +10. |
Dealing With the Blues
When I sent an advance copy of yesterday’s Bulletin to Denise Ippolito for a quick read, she remarked that the Great Blue Heron image (that was featured in the Bulletin as the lead image) had a strong BLUE cast. (Thanks again Denise.) I had been so excited by the image that I had completely missed the color cast. I ran a Robert O’Toole Average Blur Color Balance at 100%. (Page 67 in Digital Basics.) Now that is a color cast! (I usually reduce the opacity to about 20-50%.) I use Robert’s great color balancing trick so often that I have set it up as an action.
You can learn how to run an Average Blur Color Balance in our Digital Basics File, an e-mailable PDF. Digital Basics also includes my complete digital workflow, detailed instructions on creating actions, and dozens of other great Photoshop tips.
Here are some of my comments on Average Blur Color Balancing from Digital Basics.
While fiddling around, Robert came up with a brilliant solution to the color balance challenge that is faster than anything that I have ever encountered. While I have seen other version of this method, Robert’s is the simplest and the fastest and usually gives great results. And best yet, it is simple and easy to fine-tune the results by varying the opacity. (In rare instances the results may range from weird to too gaudy to downright insane; in those cases simply pull the corresponding Curves Adjustment layer into the trash.
Lots of images feature color casts with BLUE, RED, MAGENTA, and CYAN being the most common culprits. As you will learn by reading on, there are lots of ways to deal with color casts.

This Land Iguana image, also featured in BAA Bulletin 378, was created at Dragon Hill with the tripod-mounted Canon 70-200mm f/2.8L IS II lens (at 250mm) with the the 1.4X III TC and the Canon EOS-1D Mark IV. ISO 400. Evaluative metering +1 stop: 1/100 sec. at f/5.6 in Av mode. Lens/TC/Camera Body Micro-Adjustment: +2. Note that the artifacting in the background in both the before and after images here resulted from the creation of the GIF as the artifacting does not appear in the image as presented in the Bulletin. |
Again, let the animated GIF run; note the large BLUE cast in the shadows on the back of the lizard in the before image. It is common knowledge that subjects or parts of subjects in the shade will take on a BLUE cast. To remove this BLUE color cast I put the entire image on its own layer and hit Control U (Hue-Saturation on a Layer). Then I selected the BLUE channel from the dropdown menu and moved the Saturation slider all the way to the left to -100. I wound up setting the opacity to 90%. I did not need to add a Layer Mask as I was happy with the BLUE that was eliminated from the side of the creature’s face. (The whole thing was in the shade.) In the after version the back is rendered the same pleasing grey that it was in life.
Color casts can be eliminated in a variety of ways. Above we learned of using Robert O’Toole’s Average Blur Color Balance Trick or a Hue-Saturation adjustment to get rid of a color cast. Other techniques for doing so include making Selective Color or Color Balance adjustments, using Auto Color Corrections in Levels, or by making a Curves adjustment (by pulling down the curve after selecting R, G, or B from the dropdown menu). Slighly more time-consuming but very accurate is learning to set the white and black points in an image. All of these techniques are explained in detail in Digital Basics.
BIRDS AS ART Bulletin 378
BIRDS AS ART Bulletin 378 is on-line and can be viewed here.
FEATURES
- THE GALAPAGOS 2011 PHOTO-CRUISE REPORT
- JOIN ME NEXT YEAR
- THE BLOG IS THE BOMB!
- E.J. PEIKER’S “Ducks of North America; the Photographer’s Guide”
- ALAN MURPHY’S “Guide to Songbird Set-up Photography”
- SHOPPER’S GUIDE
- IPT UPDATES
Shopper’s Guide
Below is a list of the gear used to create the images in this blog post. Thanks a stack to all who have used the Shopper’s Guide links to purchase their gear as a thank you for all the free information that we bring you on the Blog and in the Bulletins. Before you purchase anything be sure to check out the advice in our Shopper’s Guide.
Support both the Bulletins and the Blog by making all your B & H purchases here.
Canon 800mm f/5.L IS lens. Right now this is my all time favorite super-telephoto lens.
Canon 70-200mm f/2.8L IS II lens. Man, I am loving this lens on my shoulder with the 2X III teleconverter. I also use it a lot with the 1.4X III TC which is designed to work best with the new Series II super-telephoto lenses.
Canon EOS-1D Mark IV professional digital camera body. My two Mark IVs are my workhorse digital camera bodies.
And from the BAA On-line Store:
Gitzo GT3530LS Tripod. This one will last you a lifetime.
Mongoose M3.6 Tripod Head. Right now this is the best tripod head around for use with lenses that weigh less than 9 pounds. For heavier lenses, check out the Wimberley V2 head.
CR-80 Replacement Foot for Canon 800. When using the 800 on a Mongoose as I do, replacing the lens foot with this accessory lets the lens sit like a dog whether pointed up or down and prevents wind-blown spinning of your lens on breezy days by centering the lens directly over the tripod.
Double Bubble Level. You will find one in my camera’s hot shoe whenever I am not using flash.
Be sure to check out our camera body User’s Guides here.
The Lens Align Mark II. I use the Lens Align Mark II pretty much religiously to micro-adjust all of my gear an average of once a month and always before a major trip. Enjoy our free comprehensive tutorial here.
Delkin 32gb e-Film Pro Compact Flash Card. These high capacity cards are fast and dependable. Clicking on the link below will bring you to the Delkin web site. There is lots of great stuff there. If you see a product that we do not carry let us know via e-mail; we will be glad to have it drop-shipped to you and save you a few bucks in the process.
I pack my 800 and tons of other gear in my ThinkTank Airport SecurityTM V2.0 rolling bag for all of my air travel and recommend the slightly smaller Airport InternationalTM V2.0 for most folks. These high capacity bags are well constructed and protect my gear when I have to gate check it on short-hops and puddle jumpers. Each will protect your gear just as well. By clicking on either link or the logo below, you will receive a free gift with each order over $50.


I prefer the blue one too – in fact if I’d seen the blue and “fixed” version side-by-side without knowing the preamble, I’d have suggested that the latter one had an orangey cast.
But then, I’ve always preferred my own images towards the blue, too.
Yeah – I like the blue too. You can be too correct, I feel.
Hi Artie, I have been a disciple of yours since 1998 from your first book, even bought a fellow bird photographer friend a copy, BUT all the digital jargon and techniques that have followed on your first book is at times a mystery, I never know if you mention something in your writings whether I have it or not, eg APTATS 1 Aptats 2 digital basics etc, is there a place where I can check what has been published or supplied,so i an check if I have it or not, Keep up the tireless never ending [especially now digital], magnificent quest of ” Art of Bird photography” Regards Loukie
I like the blue too, being complementary to orange it sets off the orange iguana rather well! Of course the grey is good too.
You did a great job removing the color cast!
Nice Heron shot…..one of the nicest I’ve seen. I could take either color, but it really does change the mood and feel of the light when it was warmed up.
Is this a time when we might curtsey toward subjectivity? I like the blue!