|
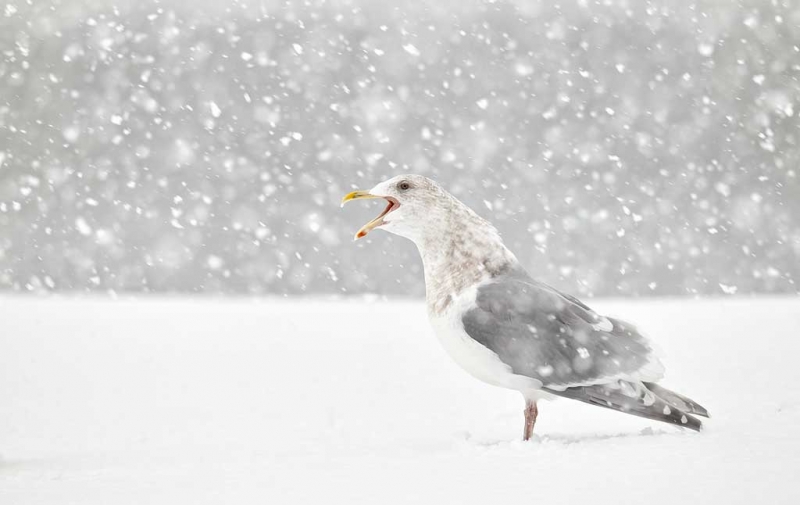
This image of a screaming, winter plumage adult Glaucous-winged Gull was created on the recently concluded Homer Bald Eagle IPT during a snow squall. (What can I say? I love gulls and I love snow.) I used the tripod-mounted Canon 800mm f/5.6L IS lens and the EOS-1D Mark IV. ISO 800. Evaluative metering +3 stops off the snow: 1/320 sec. at f/8. Central Sensor/AI Servo Rear Focus and recompose. In this mega low contrast situation it was necessary to focus on the legs and then re-compose. Click here if you missed the Rear Focus Tutorial. Lens/camera body Micro-adjustment: +2. For a greater appreciation of the image, click on the photo. Then click on the enlarged version to close it. |
Image Optimization Magic Part I
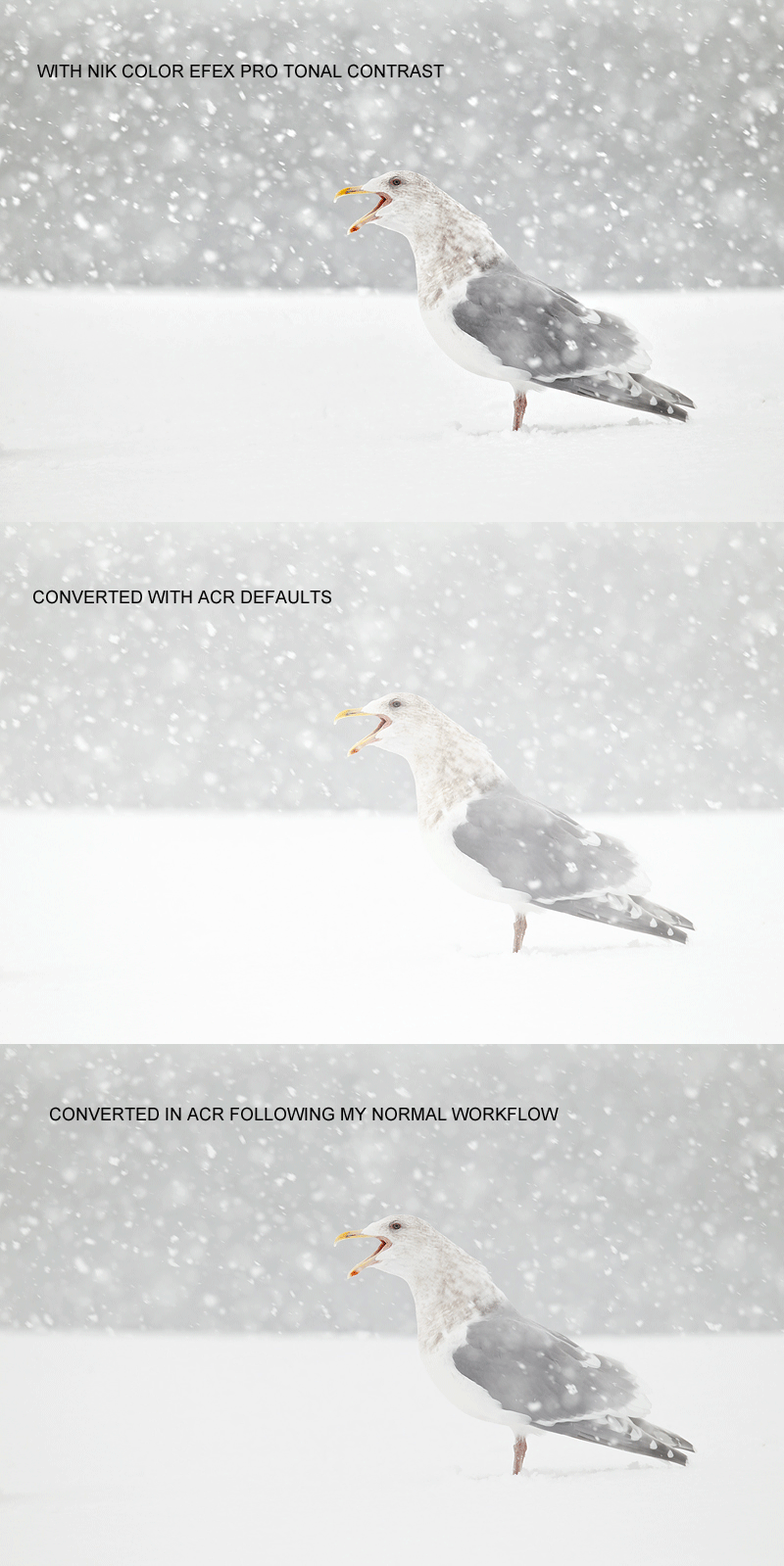
The image above represents my optimized master file. Note that it has been cropped just a bit from the original (see below). The image was sharpened after only being sized for web presentation. Note that you should not be sharpening your optimized master files; no image should be sharpened until it is sized for final use. Take a minute to study the animated GIF below. One frame, the one labeled CONVERTED WITH ACR DEFAULTS, shows exactly what the RAW file looked like. Note that the exposure was correctly pushed all the way to the right, so much so that the image looked washed out on both the back of the camera and on my laptop computer. (Many folks cannot deal with exposing to the right but doing so ensures the very best files.) The next frame is labeled CONVERTED IN ACR FOLLOWING MY NORMAL WORKFLOW. This represents the RAW file after I have adjusted the Exposure, Recovery, Black, and Brightness sliders. The final frame in the animated GIF shows the image after applying Tonal Contrast in NIK’s Color Efex Pro 4. See more on that below.

|
Denise Ippolito had been telling me for two years that Nik’s Tonal Contrast (in Color Efex Pro 4) was fantastic. I finally got around to trying it in Homer and was astounded. With the converted image open in Photoshop, open the plug-in, select Tonal Contrast, and hit OK. A Color Efex 4 layer will appear on your layers palette. Once the Color Efex layer opened I added a regular Layer Mask, hit BDX, and painted away the effect on the top of the bird’s head and the chin (to keep the RGB values in those areas no greater than 230). Next I reduced the Opacity to about 80%. (You may wish to tweak the sliders in Color Efex before hitting OK.) While I could have done pretty gotten the same look in Photoshop it would have required a good bit of time and effort; here a single filter replaced work that would have required making Selective Color, Curves, and Hue Saturation adjustments.
You can save 15% on all NIK products by clicking here and entering BAA in the Promo Code box at check-out. Then hit Apply to see your savings. If you doubt me (could that be possible :)?), you can download a trial copy that will work for 30 days and allow you to create full sized images. Bet you can’t eat just one!
If you are confused by Regular and Hide-all Layer Masks (as I was for about eight years), check out Layer Masking for Dummies in the latest (free) update of Digital Basics, an e-mailable PDF that includes my complete Digital Workflow and dozens of great Photoshop tips, all written in my clear, easy to read, easy to follow style.
|
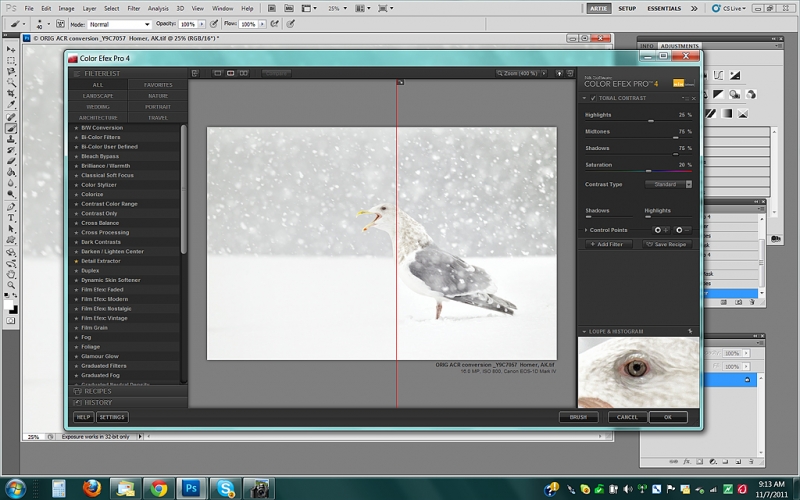
This is a screen capture of the NIK Color Efex window. The split screen slider allows you to see the effect before and after. If you have any questions on the controls or sliders or anything else, please leave them in a comment. Note that there are lots of other filter presets aside from Tonal Contrast. I have been experimenting with others and will let you know what I find. |
I will be sharing lots more examples of what Color Efex can do here over the next few months at least.
Support both the Bulletins and the Blog by making all your B & H purchases here.
B&H On-Line ordering is available six days a week (Sunday through late Friday afternoons) as usual. More and more folks are earning multiple contest entries with their B & H purchases. See here for details on that. Eleven great categories, 34 winning and honored images, and prize pools valued in excess of $20,000. Click here to visit the competition home page.
Shopper’s Guide
Below is a list of the gear used to create the image in today’s blog post. Thanks a stack to all who have used the Shopper’s Guide links to purchase their gear as a thank you for all the free information that we bring you on the Blog and in the Bulletins. Before you purchase anything be sure to check out the advice in our Shopper’s Guide.
Canon 800mm f/5.L IS lens. Right now this is my all time favorite super-telephoto lens.
Canon EOS-1D Mark IV professional digital camera body. My two Mark IVs are my workhorse digital camera bodies.
And from the BAA On-line Store:
LensCoats. I have a LensCoat on each of my big lenses to protect them from nicks and thus increase their re-sales value. All my big lens LensCoat stuff is in Hardwood Snow pattern.
LegCoat Tripod Leg Covers. I have four tripods active and each has a Hardwood Snow LegCoat on it to help prevent further damage to my tender shoulders 🙂
Gitzo GT3530LS Tripod. This one will last you a lifetime.
Mongoose M3.6 Tripod Head. Right now this is the best tripod head around for use with lenses that weigh less than 9 pounds. For heavier lenses, check out the Wimberley V2 head.
CR-80 Replacement Foot for Canon 800. When using the 800 on a Mongoose as I do, replacing the lens foot with this accessory lets the lens sit like a dog whether pointed up or down and prevents wind-blown spinning of your lens on breezy days by centering the lens directly over the tripod.
Double Bubble Level. You will find one in my camera’s hot shoe whenever I am not using flash.


Keith,
What’s the equivalent of Tonal Contrast in Topaz Adjust? I looked but couldn’t find anything obvious.
One problem with all these products is that they compete on the sheer number of adjustments they offer, most of which have little to no value to anyone, thus hiding the 10% that are genuinely useful.
I have never used Topaz Adjust. I am, however, finding more and more great filters in Color Efex Pro 4 every time that I use it. artie
CE 4.1 ? I may be wrong but there´s 4.0 only out there.
You are correct. That was a brain typo on my part. Will correct. artie
I recently acquired Color Efex Pro 4 and only wish I had bought this years ago! Simply amazing and so much easier than using layers in Photoshop. I love the U-Point technology, but also the ability to brush in the effects as needed.
Wink!
Many of the Nik filters use algorithms that are very difficult to emulate in CS, Tonal Contrast is one of them. The new version in Color Effex Pro 4, works very differently than the Color Effex Pro 3 version for extracting detail, particularly in the highlights. I prefer the older version, but there are work arounds. U-Point technology offers outstanding mask options, especially when used in conjunction with the Brush option. Warm Regards, Chas
Hey Chas, Thanks for stopping by. And for your erudite comments. I never used CE 3 but I do agree that CE 4 is amazing. artie
ps: Will you be at Bosque amigo?
For a very similar solution at a considerably more attractive price, have a look at Topaz Adjust.
Have just tried this for the first time. Absolutely brilliant, what a difference – many thanks Artie. Look forward to hearing more on ColorEfex.
Like Mark and Steve both said, there are even easier ways to do what you did using either the control points or brush feature. And, yes, you definitely should use the adjustment controls in the Nik plug-in to get the right look (especially since you can adjust per highlights, mid-tones, and shadows) so you won’t need to adjust the layer opacity in Photoshop. (You can also adjust the opacity of the effect within the Nik plug-in – this is under the control points section, so just click the arrow to expand that section and you’ll see the opacity slider.) Nik’s Web site has a lot of great recorded Webinars, as well as many live Webinars each week, so that you can learn how to use the plug-in and get tips on the different filters and combining them.
I’m not affiliated with Nik, just am a happy customer! I own the Complete Collection, including the latest Color Efex Pro 4 (which is a great upgrade from the previous version, which was already great). They are all great plug-ins!
Artie, you can also do excellent fine local adjustments of Tonal Contrast within the Nik plugin using the Positive (+) and Negative (-) control points. These create fantastic masks for you and let you adjust to opacity of each control point before you ever hit the “OK” button. Control Points are an important part of the power of all the Nik Plugins, and are really worth learning how to use them. Use them with any of the filters, or with Viveza 2, HDR Efex Pro, Silver Efex Pro 2, etc.
I love it! Must have been a challenge to focus in that heavy snow. You nailed it though. I really like the feel of this one. Great shot.
Artie – Having read your post of a few days ago, I started trying this on some of my images from Homer as well. Really works well! As a note to your workflow within ColorEfex, if you notice in the lower right hand corner of the page next to the “Cancel” and “OK” buttons is a third button labeled “Brush” By clicking this button ColorEfex not only creates the layer in PS but it puts an inverse mask on it and selects the brush tool with the correct foreground color (White). Brush in the areas you want to show, hit the “apply” button and there you have it. No more BDX.