How would I deal with the large light area directly behind the bird? Read on for the solution. |
The Image Optimization Process
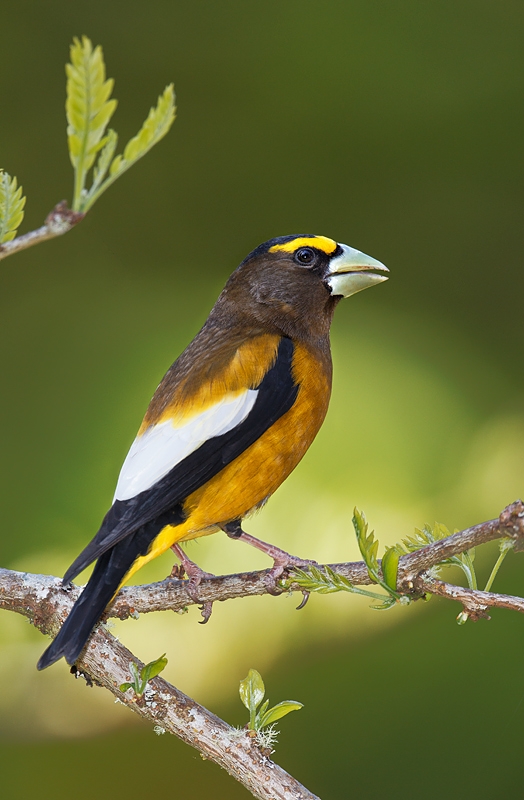
The bird in this image was sitting in the shade. We were not working at a set-up; the bird was sitting in a tree waiting to come into the feeder. We had put some perches up but the grosbeaks preferred landing in the tree. As you can see in the before image above, the light-toned leaves directly behind the bird were lit by the sun. In the past I have simply deleted similar images with large light areas behind the subject. But I had nothing on this species and wanted to do my best so I put my thinking cap on.
I used Select/Color Range to select the lightest tones and placed them on on their own layer. The I ran a Linear Burn at 50% on that layer and added a Layer Mask. I used a 30% Opacity brush to erase the darker outer edges of the selection. Then I decreased the Opacity of the Linear Burn until I was happy with the somewhat darker, less distracting light-toned area behind the bird. Additional clean up was as usual with the Patch Tool, the Clone Stamp Tool, the Spot Healing Brush, and several Quick Masks (with Layer Masks added for fine tuning). I lightened the bird’s face with a Tim Grey Dodge and Burn layer. I selected the bird only with the Quick Selection Tool and put the bird on its own layer. Then I applied a 40% Tonal Contrast filter from NIK Color Efex Pro. I followed that with a 70% Detail Extractor filter applied to the whole image. I added a Hide-All Mask and then painted away the white of the wing to restore detail and removed some BLUE from the WHITEs by hitting Control U, Hue-Saturation on a layer, selecting the BLUE channel only, and reducing the saturation by 20 points. Finally I sharpened the bird’s face only with a Contrast Mask.
Select/Color Range, Linear Burns, Layer Masks, the Patch Tool, the Clone Stamp Tool, the Spot Healing Brush, several Quick Masking, Tim Grey Dodge and Burn, Contrast Masks, and pretty much everything else mentioned above except for the NIK stuff is covered in detail in our Digital Basics File, an e-mailable PDF.
The Optimized ImageThis adult male Evening Grosbeak was photographed at a feeder in a private backyard in Sherwood, OR with the tripod-mounted Canon 800mm f/5.L IS lens and the Canon EOS-1D Mark IV. ISO 400. Evaluative metering at +1/3 stop: 1/250 sec. at f/7. in Manual mode. Fill flash at -1 stop with the Canon Speedlite 600EX-RT and a Better Beamer. Two sensors above the Central sensor AI Servo/Rear Focus AF active at the moment of exposure. Click here if you missed the Rear Focus Tutorial. Click on the image for a larger version. |
Thinking it Through…
The point here is that you need to learn to use the Photoshop skills and tools that you already have mastered to create new solutions to problems old or new. The concept of using a Linear Burn to darken the large light area and then soft erasing the edges was a new one for me. The next time that you face a difficult situation in post processing simply put your thinking cap on and consider ways to use what you already know to solve the problem.
Support both the Bulletins and the Blog by making all your B & H purchases here.
Below is a list of the gear talked about in this blog post. Thanks a stack to all who have used the Shopper’s Guide links to purchase their gear as a thank you for all the free information that we bring you on the Blog and in the Bulletins. Before you purchase anything be sure to check out the advice in our Shopper’s Guide.
Shopper’s Guide
Below is a list of the gear used to create the images in today’s post. Thanks a stack to all who have used the Shopper’s Guide links to purchase their gear as a thank you for all the free information that we bring you on the Blog and in the Bulletins. Before you purchase anything be sure to check out the advice in our Shopper’s Guide.
Canon 800mm f/5.6L IS lens. Right now this is my all time favorite super-telephoto lens.
Canon EOS-1D Mark IV professional digital camera body. The very best professional digital camera body that I have ever used.
Canon Speedlite 600EX-RT Canon’s latest/greatest most powerful-ever professional flash.
And from the BAA On-line Store:
LensCoats. I have a LensCoat on each of my big lenses to protect them from nicks and thus increase their re-sales value. All my big lens LensCoat stuff is in Hardwood Snow pattern.
LegCoat Tripod Leg Covers. I have four tripods active and each has a Hardwood Snow LegCoat on it to help prevent further damage to my tender shoulders 🙂 And you will love them in mega-cold weather….
GT3532 LS. This one replaces the GT3530LS Tripod and will last you a lifetime. I’ll be commenting on this new model soon. In short, I like it.
Mongoose M3.6 Tripod Head. Right now this is the best tripod head around for use with lenses that weigh less than 9 pounds. For heavier lenses, check out the Wimberley V2 head.
CR-80 Replacement Foot for Canon 800. When using the 800 on a Mongoose as I do, replacing the lens foot with this accessory lets the lens sit like a dog whether pointed up or down and prevents wind-blown spinning of your lens on breezy days by centering the lens directly over the tripod.
Double Bubble Level. You will find one in my camera’s hot shoe whenever I am not using flash.
The Lens Align Mark II. I use the Lens Align Mark II pretty much religiously to micro-adjust all of my gear an average of once a month and always before a major trip. Enjoy our free comprehensive tutorial here.
BreezeBrowser. I do not see how any digital photographer can exist without this program.


Lessons given as freely as yours.
Jim, Sudhir, and Thomas, Thanks for your kind comments. artie
You could have put a control point in NIK Vivesa and brought the brightness down more easily without all that Photoshop work. I know you use ColorEffex Pro but if you don’t have Vivesa you should really consider it, it’s all about light and color and is invaluable.
BTW, I’ll be using my “real” rear focus for a wedding this weekend, many thanks again for the help.
Thanks for the suggestion. I have Viveza but I made need a lesson from you. Have fun at the wedding.
Masterful Photoshop work. Perhaps your best yet.
Very informative and easy to follow tutorial. Thanks
A wonderful transformation! Thank you so much for the amazing lesson.