Home Safely
After a pretty good night’s sleep on the Auto Train we pulled into Sanford, FL this morning an hour early. I was way-lucky when my SUV was one of the first off the train. After stops at Publix and Junior’s Fish Market in Lake Wales I arrived at my home in Indian Lake Estates, FL at about noon, just in time for a nap. I am still feeling a bit under the weather but nothing too serious.
|
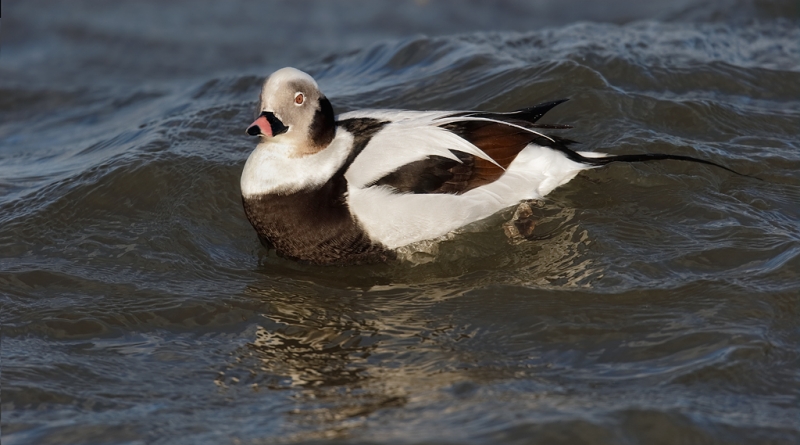
This is the optimized image. This drake Long-tailed Duck image was created on the recently concluded Barnegat Jetty IPT with the tripod-mounted Canon EF 800mm f/5.6L IS USM Autofocus lens, the Canon 1.4x EF Extender III (teleconverter), and the Canon EOS-1D X digital SLR . ISO 800. Evaluative metering +1/3 stop: 1/1000 sec. at f/9 in Manual mode. Central sensor (by necessity)/AI Servo Expand/Rear Focus AF active at the moment of exposure. The AF sensor was on the water below the side of the bird’s breast where the black meets the white; don’t ask me why the eye is sharp…. Click here if you missed the Rear Focus Tutorial. Click on the image to see a larger version. This is the optimized image. |
How Did I Get From A to B?
Dealing with choppy water and fierce winds with gusts up to 50mph made it difficult to avoid getting knocked on your butt on the jetty. Trying to get the AF sensor squarely on the bird with the bird anywhere in the frame was a great challenge. Photographing swimming sea ducks is often difficult on windless days…..
I was happy with the pose and the sharpness of the original image (see below) but the bird was way too high in the frame. In addition, I screwed up the exposure a bit when the sun broke through the gloom just as I pressed the shutter button. I saved the WHITEs in Canon Digital Photo Professional as described in detail in the DPP Conversion Guide that I wrote with Arash Hazeghi. I had to move the Highlights Slider all the way to the left and in addition, I had to lower the exposure. As a result, the white feathers on the wings came out grey rather than white. Lots to do. We will talk more about the image optimization and clean-up process in the follow-up post. On to the question of the day.
|
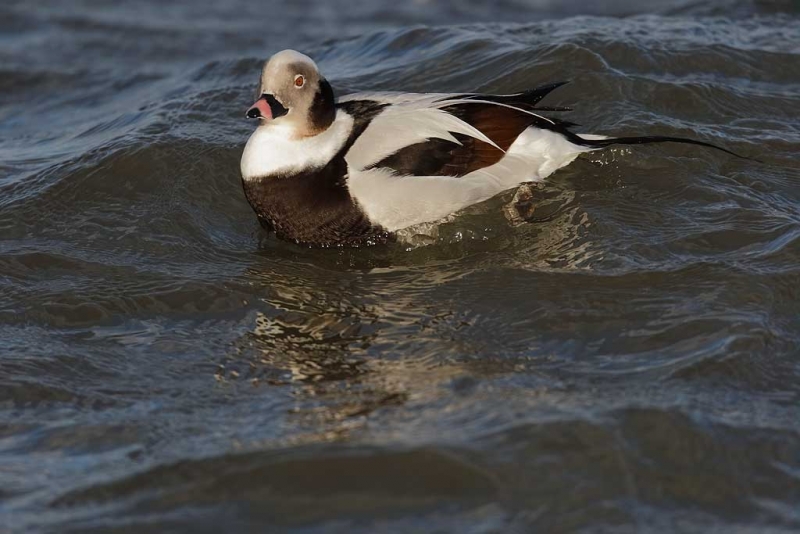
This is Image A, the original image. |
It is easy to see in the original image immediately above, Image A, that the duck is way too high in the frame. I needed to add a bit of canvas and water above and subtract a bit of canvas below the bird while keeping the whole reflection…..
What to do?
|
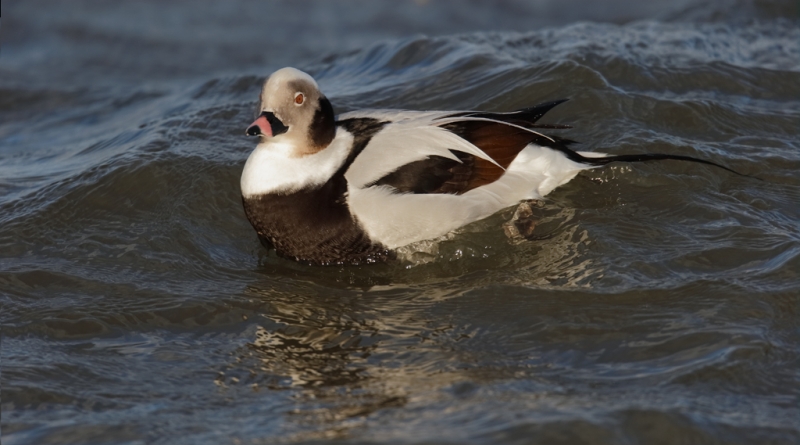
This is Image B, the image after I improved the composition but before I completed the image optimization process. I will share an animated GIF showing all the differences when I reveal the technique that I used. |
In the image immediately above, Image B, it is obvious that I added a bit of canvas and water above the bird and subtracted some canvas below the bird while avoiding cropping the reflection.
How did I get from A to B? I used a technique that I have mentioned briefly either here or on BPN in recent months. Take a moment to put your thinking cap on, try to figure out how I improved the composition, and leave a comment below. I will withhold my comments until the technique that I used is revealed, probably on Monday or Tuesday. Have fun and good luck. Clue: I did not use Content Aware Fill.
Arctic Pro Muck Boots
On my first trip to the Southern Oceans in 2007, I ordered a pair of Arctic Pro Muck Boots on the advice of many. I returned them and went with too-large and too-heavy neoprene waders. For my two 2012 trips I ordered a pair of Arctic Pro Muck Boots. I got them large enough to wear with one pair of heavy socks and one pair of regular socks. Wow! My feet were always dry and always warm. They were tall enough for all the wet landings, even those in heavy surf. This year I wore them at Bosque. My always cold feet were never cold. Last week I wore them on the Barnegat Jetty. Never cold at all. They enabled me to stand in the saltwater pools next to the jetty on the crazy wind-driven high tides that we encountered. And on the jetty, they provided firm footing at all times. (Warning: unless you have ice creepers, never walk on black, dark green, slimy jetty rocks….)
Weekend Creative Nature Photography Seminar, Tampa, FL: February 23 & 24, 2013: $149 Limit: 50/Openings: 21
Join Denise Ippolito and me on the weekend of February 23-24 on the outskirts of Tampa, FL for a great weekend of fun and learning. Learn to improve your photography skills, your skill at designing images in the field, your creative vision, and your image optimization skills. Sunday critiquing session. Click here for additional details and the complete schedule.
Best to register soon as the seminar is filling up nicely.
Support the BAA Blog. Support the BAA Bulletins
We want and need to keep providing you with the latest free information, photography and Photoshop lessons, and all manner of related information. Show your appreciation by making your purchases immediately after clicking on any of our B&H (or Amazon.com) Affiliate links in this blog post. Remember, B&H ain’t just photography!


Shop Amazon
You can find other types of Muck Boots by simply typing “muck boots” in the little white box below and hitting Go. Thanks!


I will be traveling south this weekend and plan to go to Barnegat Jetty Sunday morning. I have NEOS overshoes with the little spikes and boots similar to Arctic Pro Muck ones. Which would you recommend? I know the Arctic ones would be better if I want to go into shallow water but would the NEOS give me better traction on the wet rocks?
Maybe I will bump into you there.
I had no problem with traction with the Muck Boots. The NEOS are of course clunkier so you need to be even more careful not to trip. And you must never walk on wet black or dark green algae/seaweed covered rocks….
We should be hard to miss….
Hopefully the weather is good. I will bring the Mucks.
Hi Artie I will have a crack at this.
In order to add a bit of canvas and water above I think you would have done the following:
Increased the canvas size at the top of the image by going to Image – Canvas size, then clicking the Anchor box in the bottom middle square so the arrows are pointing upwards, then increase the value in the Height measurement box, it doesn’t matter if this value is more than required as you can always crop later, then click OK.
Select the top of the photo from the top edge of the image (NOT the top edge of the new canvas) down to just above the duck’s head and across the full width of the photo using the
Rectangular Marquee Tool. Go to Edit – Transform – Scale then grab the top edge of the marching ants on the selected area and pull the top edge up which will stretch the selected area in to the blank canvas area, if there is still some blank canvas left when is has been stretched to the desired amount the image can be cropped.
I hope this all makes sense.
Thanks
Nick
Hi Nick, You get A+ for as far as you went but your final grade is I for incomplete as you did not address the too-large reflection. The solution there is simple–just do the opposite of what you did above.
In any case, yours was the best answer by far. Please see Monday’s free video tutorial.
Thanks Artie, to be honest I hadn’t realised you had compressed the reflection at the bottom of the photo, I thought you had only cropped at the bottom. I’m not sure where to access Monday’s free video tutorial. Happy New Year and I look forward to more of your lessons in 2013.
Just spotted your new post with the video tutorial 🙂
Artie your lessons are great and the animated GIFs make them so easy to understand.
I remember back in 2010 when you were asking how to make an animated GIF on the BPN forum and Lance Peters provided you a tutorial, which you seem to have mastered!
What about including an animated GIF tutorial in your next Digital Basics update please, especially for us dummies who don’t get the traditional how-to instructions?
Yes, Lance was a great help. I have actually refined his technique a bit. I plan on doing some sort of animated GIF tutorial at some point.
I am looking forward to the explanation of your procedure. I would guess that you created a larger canvas and moved the original photo to it. Then selected the top of the photo and stretched it with edit/transform.
Dale, You are on the right track but your technique is weak and your solution does not address the reflection…. Please see Monday’s free video tutorial.
Hi, Artie, and welcome back. I don’t know what you did and look forward to learning what it was. The wind was fierce but it made for some great sights and some interesting bird behavior. So one lesson I learned on the IPT is to take what the conditions give you, and there’s usually something good.
Thanks for your kind words and do see Monday’s free video tutorial.
Hi Artie,
Thanks for the tip on the Muck boots. Been trying to decide on a brand. Mine should arrive on Monday. Weather in the mid-west delayed them today.
Doug, In the future, please, please, pretty please remember to use our affiliate links. We do not make much on each sale but over time it adds up.
Make a new layer (ctrl J), select all (Ctrl A) select the move tool then move the duck down with the down arrow key or the move tool.
Hi Paul, That will not work at all with this image for a variety of reasons:
1-the patterns of the wave at the top will be repeated.
2-the image will still be bottom-heavy as you would not have dealt with the too large reflection below the bird.
Please see Monday’s free video tutorial.
Welcome back to Florida. Glad the Auto Train was an hour early rather than the hour late that frequently happens.
Now to study today’s lesson and try to figure out what you did.
Thanks for the assignment. Got to keep learning.
Thanks Jim, and you are most welcome.