Galt Winter Bird Festival Keynote Presentation, near Sacramento, CA: Friday, January 25, 2013
I will be presenting, “Choosing and Using Lenses for Bird and Nature Photography” at the Galt Winter Bird Festival at 6pm this coming Friday evening, Friday, January 25, 2013. The keynote event, sponsored by Canon USA/Explorers of Light, is free and open to the public. The program will take place at the Cosumnes River College a bit south of Sacramento, CA. Click here for additional details.
Those who will be in attendance are invited to contact me via e-mail to explore the possibility of photographing together on Saturday the 26th.
Weekend Creative Nature Photography Seminar, Tampa, FL: February 23 & 24, 2013: $149 Limit: 50/Openings: 4
Join Denise Ippolito and me on the weekend of February 23-24 on the outskirts of Tampa, FL for a great weekend of fun and learning. Learn to improve your photography skills, your skill at designing images in the field, your creative vision, and your image optimization skills. Sunday critiquing session. Click here for additional details and the complete schedule. Best to register soon as the seminar is filling up nicely.
Incredible Door Prizes!
Once again our sponsors have come through in a huge way. Join us in Tampa for a chance to win the following:
Think Tank: Airport Airstream Rolling Bag ( $324.75)
Lens Coat: Gift Certificate ($69)
B&H: Gift Certificates (two @ $50 each)
Wimberley: P-20 Plate ($52) and P-5 Camera Body Plate ($52).
The Vested Interest: a Still Model Xtrahand Vest ($169.95) that can be credited towards the purchase of a larger Magnum or a Khumbu vest. Click here for info on the custom-designed Magnum Vest that I use. John Storrie knows it as the BIRDS AS ART Big Lens Vest. If you opt to purchase one, call John at 1 800 928 0157 to size and customize your vest. I simply could not live without mine.
NIK Software: NIK Color Efex Pro 4 Complete Edition($199.95). This is the great Photoshop plug-in that Denise and I use to improve the look of many of our images. If you purchase any NIK product, be sure to enter “BAA” in the Promo Code box at check-out and then hit Apply to see your savings. You can download a trial copy of NIK Color Efex Pro 4 that will work for 15 days and allow you to create full sized images.
Delkin Devices: two Delkin 32GB 700X CompactFlash Pro UDMA enabled cards ($114.99 each).
Manfrotto: two items ($ TBD)
|
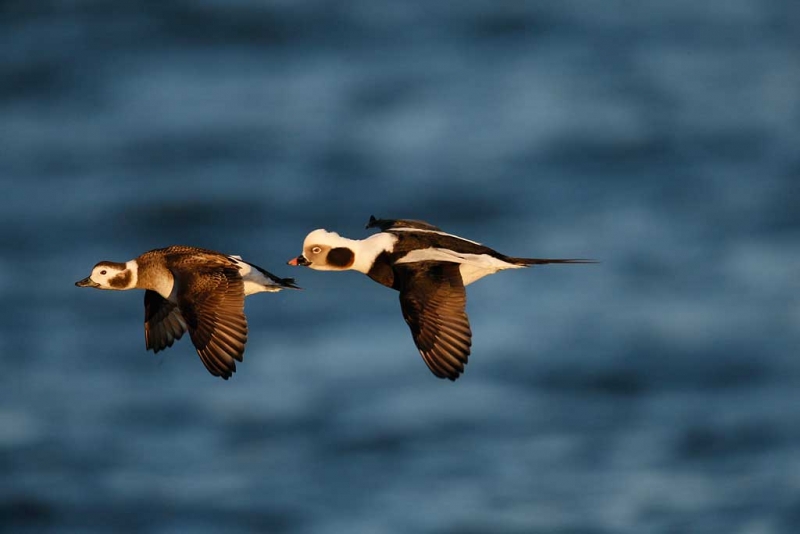
Long-tailed Duck pair in flight. On the January Barnegat Jetty IPT with the tripod-mounted Canon EF 800mm f/5.6L IS USM Autofocus lens, the Canon 1.4x EF Extender III (teleconverter), and the Canon EOS-1D X digital SLR . ISO 800. Evaluative metering -2 stops: 1/1600 sec. at f/9 in Manual mode. |
Original Image Capture
The image above is the original medium JPEG capture. If you missed that tale, click here. I failed to follow my own universal flight photography advice, “pan faster.” As a result, this pair of speeding ducks was way too far forward in the frame.
|
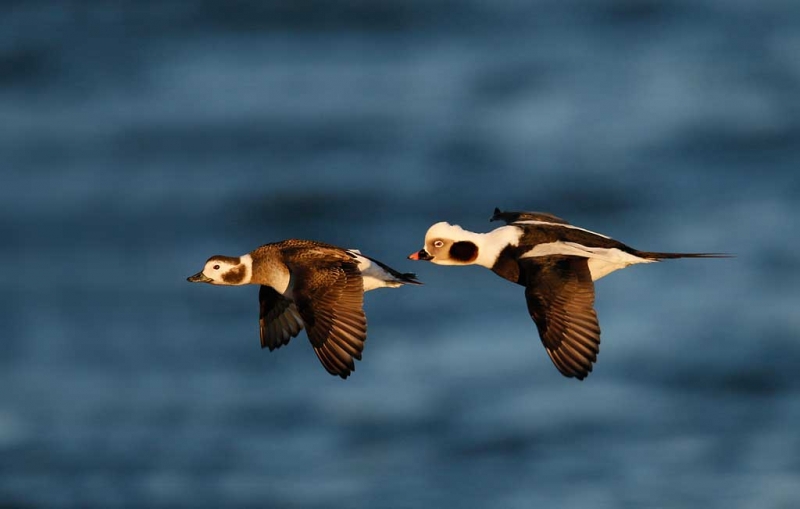
Long-tailed Duck pair in flight. This was my first attempt at processing the image. |
Repeating Patterns…
I moved the ducks back in the frame using APTATS II techniques but at first glance Denise Ippolito pointed out the many telltale groups of repeated patterns in the lower left…. I sharpened the face of the drake via a Quick Mask by applying a strong Contrast Mask, 20/80/0. Both as described in detail in Digital Basics, the best $25 you’ll ever spend on improving your Photoshop skills. The PDF, which is sent via e-mail, includes my complete digital workflow, dozens of great Photoshop tips, and all of my time-saving keyboard shortcuts. Recently added sections include “Layer Masking for Dummies,” “JPEG Sharpening,” “NIK Color Efex Pro Tips,” and “Protect and Defend Cloning with Layers.”
| [Not a valid template] |
NIK 15% Discount
As regular readers know, Color Efex Pro has drastically changed my digital workflow and little by little I have begun using Viveza to solve sticky image optimization problems and Silver Efex Pro fo fast, dramatic B&W conversions. You can save 15% on all NIK products (including Color Efex Pro, Silver Efex Pro, and Viveza) by clicking here and entering BAA in the Promo Code box at check-out. Then hit Apply to see your savings. You can download a trial copy that will work for 15 days and allow you to create full sized images.
|
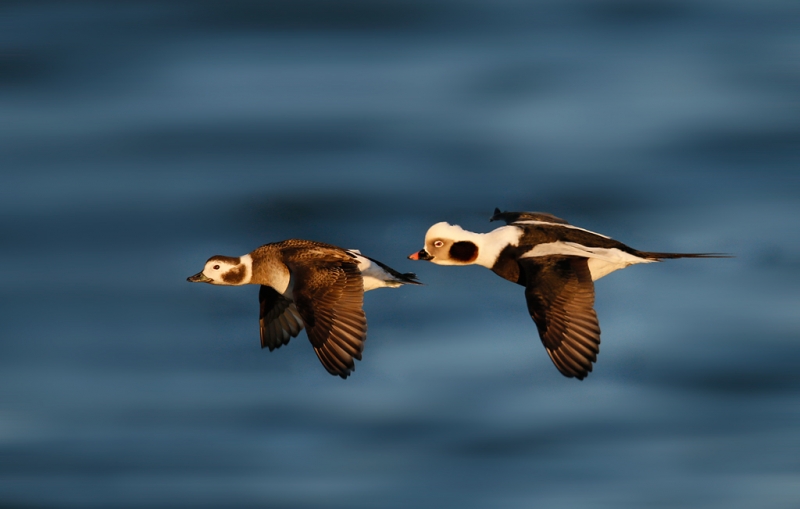
Long-tailed Duck pair in flight. The final optimized image. |
Final Version of the Optimized Image
Denise suggested that I use her new Motion Blur technique where you apply Motion Blur to the whole image and then erase the subjects using a Regular Layer Mask. We both loved the resulting image but felt that it was surely a bit overdone, more of a digital illustration or digital art than a photograph. What do you think?
Denise skillfully co-led the hugely successful Barnegat Jetty II IPT with me this past weekend. Be sure to check out her “Everywhere a Quack Quack” blog post here. I managed to miss both quacking duck images!
|
This is the original image. |
Original Image Capture
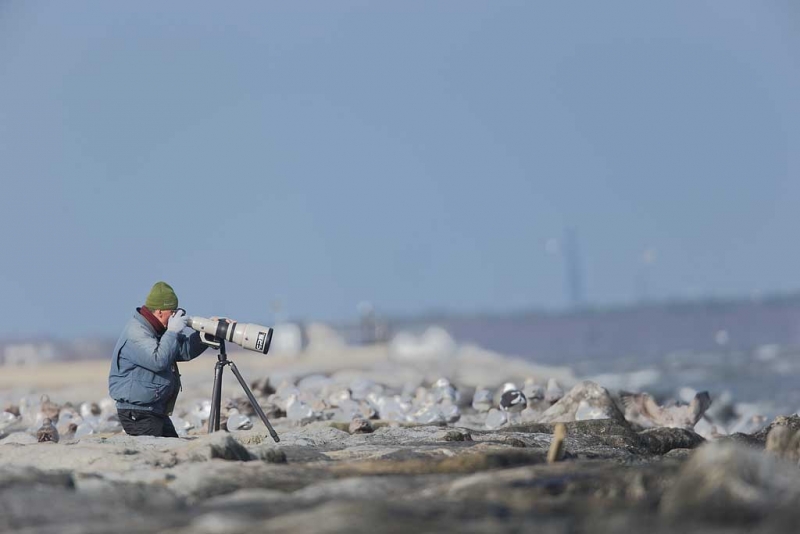
In the original image above, there are many problems that could not have been avoided in the field. Those included the jetty walkway in the background with lots of specular highlights, especially the two large ones by the front of the 800 lens, the two large poles on the right sticking up out of the bay, the piece of wood stuck in the jetty rocks, and the unfortunately placed and facing Great Black-backed Gull. The crooked horizon was on me.
|
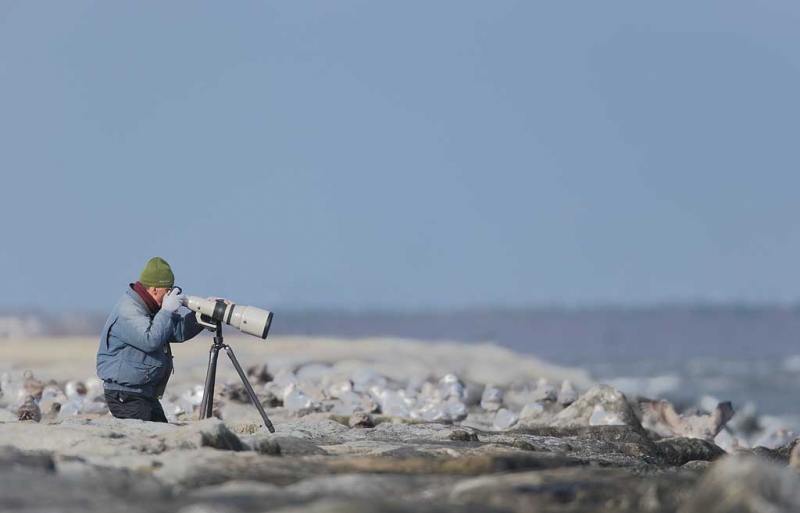
Rookie bird photographer Bill Wingfield at work on the Barnegat Jetty. Image created on the December Barnegat Jetty IPT with the tripod-mounted Canon EF 800mm f/5.6L IS USM Autofocus lens, the Canon 1.4x EF Extender III (teleconverter), and the Canon EOS-1D X digital SLR . ISO 400. Evaluative metering +1/3 stop: 1/500 sec. at f/9 in Manual mode. Central sensor (by necessity)/AI Servo Expand/Rear Focus AF and recompose. Click here if you missed the Rear Focus Tutorial. Click on the image to see a larger version. |
Cleaning Up Billy Boy
The optimized image above appeared in the January 17, 2013 blog post, “The Rookie.” After cropping and leveling the horizon, I used either Content Aware Fill or one of several Quick Masks to eliminate or cover the offending elements mentioned above. Most of the Quick Masks were refined by adding a Regular Layer Mask. The specular highlights in the inlet were eliminated with the Patch Tool, the Spot Healing Brush, or with Content Aware Fill. Here is a time saving tip: when working with the Patch Tool you can select a problematic area and then hit Shift/f5 to apply Content Aware Fill. There is not need to switch to the Lasso Tool to make your Content Aware Fill selection.
All of the Photoshop techniques used to clean up Billy Boy are described in detail in Digital Basics, the best $25 you’ll ever spend on improving your Photoshop skills. The PDF, which is sent via e-mail, includes my complete digital workflow, dozens of great Photoshop tips, and all of my time-saving keyboard shortcuts. Recently added sections include “Layer Masking for Dummies,” “JPEG Sharpening,” “NIK Color Efex Pro Tips,” and “Protect and Defend Cloning with Layers.”
MP4 Photoshop Video Tutorials
Many of the techniques used to optimize the images above are detailed in our MP4 Photoshop Video Tutorials, especially in the King Penguin Image Clean-up Video. Click here for more info or here to see the entire series. In each of the videos you will see me working in Photoshop while you hear my voice guiding you along the way step by step.
Typos
On all blog posts, feel free to e-mail or leave a comment regarding any typos, wrong words, misspellings, omissions, or grammatical errors. Just be right. 🙂
Support the BAA Blog. Support the BAA Bulletins
We want and need to keep providing you with the latest free information, photography and Photoshop lessons, and all manner of related information. Show your appreciation by making your purchases immediately after clicking on any of our B&H or Amazon Affiliate links in this blog post. Remember, B&H ain’t just photography!


Shop Amazon
And from the BAA On-line Store:
LensCoats. I have a LensCoat on each of my big lenses to protect them from nicks and thus increase their re-sales value. All my big lens LensCoat stuff is in Hardwood Snow pattern.
LegCoat Tripod Leg Covers. I have four tripods active and each has a Hardwood Snow LegCoat on it to help prevent further damage to my tender shoulders 🙂 And you will love them in mega-cold weather….
Gizo GT3532 LS CF Tripod. This one replaces the GT3530LS Tripod and will last you a lifetime. Learn more about this great tripod here.
Mongoose M3.6 Tripod Head. Right now this is the best tripod head around for use with lenses that weigh less than 9 pounds. For heavier lenses, check out the Wimberley V2 head.
Double Bubble Level. You will find one in my camera’s hot shoe whenever I am not using flash.
The Lens Align Mark II. I use the Lens Align Mark II pretty much religiously to micro-adjust all of my gear an average of once a month and always before a major trip. Enjoy our free comprehensive tutorial here.
BreezeBrowser. I do not see how any digital photographer can exist without this program.
Delkin Flash Cards. I use and depend on Delkin compact Flash Cards and card readers most every day. Learn more about their great 700X and 1000X cards here or about my favorite Delkin card here.




I love the background for the ducks, new tool? motion blur to the extreme?, thanks MJ
Photography is an art. Final optimized image looks perfect. It just looks like a pan blur, with the subjects razor sharp.
In other news, last night I dreamt that I formatted all my cards and lost all my images from the IPT. hah.
Thanks Faraaz. I trust that that was only a dream…. Thanks for making the trip from Trinidad to join us in the cold. artie
I don’t care for the amount of blur to the background. It’s almost fake looking. The ducks look like the were placed on to the background from another photo. JMO
What do I think? I think the final optimized version is beautiful!! I loved that the male and female are both in the image. Neat. I also love the beautiful colours of the subjects.
Is it “more of a digital illustration or digital art than a photograph”? I don’t like those distinctions. Suppose the background was blurred by panning with a slow shutter speed? I don’t call that more pure or more of a photograph. Both methods use something artificial to manipulate reality, or how are eyes and brain perceive reality, for the sake of a more interesting image. I think debating whether an image is an illustration or a photograph is putting effort into something not worthwhile (the debate, not the image). Make great images, disclose how if you wish, never lie about how.
Hi Artie,
I believe there is a small spelling error under the sub title, “Final Version of the Optimized Image”, for the Long Tailed duck pair. It should read “Motion Blur” instead of “Motion Blue”. Looking forward to seeing you in Tampa next month.
Cheers,
Mark
Good catch and ditto! artie
Hi, Artie. I like your optimized image a lot. As for whether it’s “digital art,” I remember your response to a comment on your bear image a few weeks ago: you said “it IS digital art.” I think that for any digital photo, once you’re willing to crop, sharpen, tweak color, clean up bills and backgrounds, and so on, then you’re making digital art. I agree with Steve Valentine about the result. As for the image of Billy Boy, well, you might have to retitle your web site to “Billy As Art.” You’d get to keep the BAA acronym, though. 🙂
Artie,
Re: the final optimised image of the LT Ducks – it works for me! I see what you mean about the background looking a little overdone, but it really makes the birds stand out and brings your focus straight to them.
Steve