|
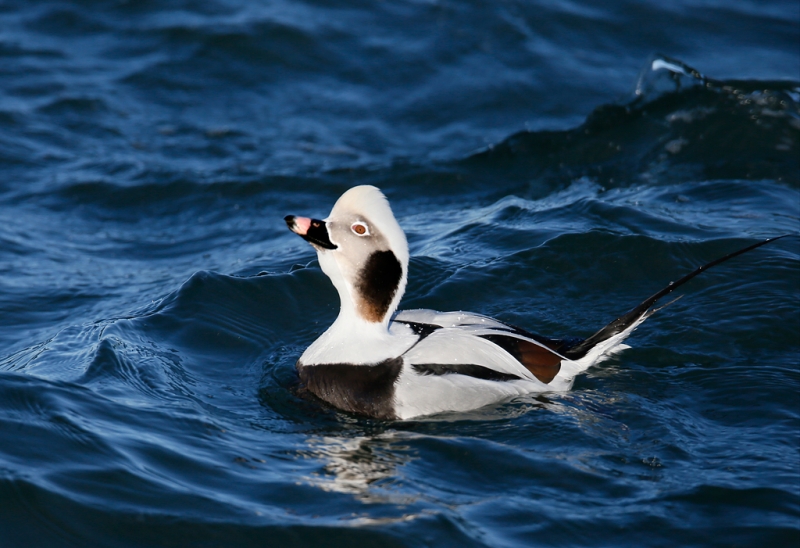
Long-tailed Duck drake flapping. I created this image created on the January Barnegat Jetty IPT with the tripod-mounted Canon EF 800mm f/5.6L IS USM Autofocus lens, the Canon 1.4x EF Extender III (teleconverter), and the Canon EOS-1D X digital SLR . ISO 800. Evaluative metering -2 stops: 1/1250 sec. at f/10 in Manual mode. Central sensor (by necessity)/Expand/AI Servo Rear Focus AF active at the moment of exposure. Click here if you missed the Rear Focus Tutorial. Click on the image for a larger version. Careful readers know that I am usually adding anywhere from 1/3 to 2 1/3 or more stops of light to my exposures. Why-2 full stops for this image? |
Canon EOS-1D X Firmware Update 1.2.1: No More Tears, No More JPEGs
In “Shooting Blanks: Do As I Say, Not As I Do,” I shared eight images that were inadvertently captured as JPEGs. In “EOS-1D X News: It Was All My Fault,” the JPEG mystery was unraveled.
The displaying Long-Tailed Duck drake image above is yet another fine image that was made during the accidental JPEG episode. Actually, as a lover of what is, (see The Work of Byron Katie), there were no tears on my part. Just another lesson learned that led to lots of sharing, teaching, and learning. As Byron Katie would say, “It was the best thing that could have happened and I can prove it.” How can I prove that? It happened.
Downloading 1D X Firmware 1.2.1
You can download the new firmware by clicking here, clicking on Drivers and Software, selecting your Operating System and Operating System Version from the dropdown menus, clicking on Firmware, clicking on the File Description, and finally by clicking on I Agree-Begin Download.
Once the file (1DX00121.FIR) is saved to your computer–I put it on my desktop–copy it to a compact flash card, put the card in your 1D X, go to the 4th Yellow (Wrench symbol) menu, click on Firmware Ver. at the bottom of the menu, and follow the prompts.
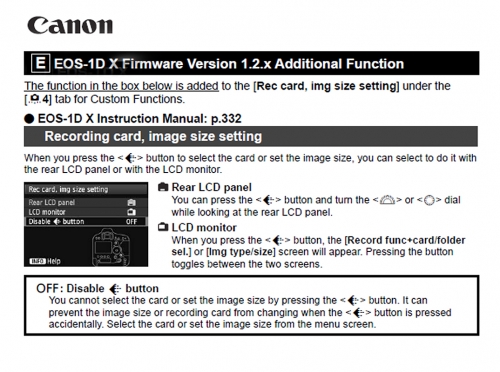
Custom Function 4-4 Instructions
The info above is from the PDF that comes with the downloaded firmware. Here are your choices for C.Fn. 4-4, Rec card, img size setting:
With C.Fn4, if you set “Rear LCD panel” and then press the Card/ImageSize Selection Button, the small rear LCD panel on the back of the camera becomes active and you can change settings by turning the thumb wheel. This is where folks ran into trouble by doing so inadvertently.
If C.Fn4 is set to “LCD monitor” and you press the Card/ImageSize Selection Button, a large bright screen lights up on the rear LCD. Again, you change your settings by turning the thumb wheel. Had folks been aware of this option–I was not as I never did a complete 1D X User’s Guide–it would have eliminated the accidental change problems. Why? As above, if you hit the Card/ImageSize Selection Button inadvertently it was easy to miss the info in the small rear LCD panel and accidentally turn the thumb wheel. But with LCD monitor set, it would be hard to miss that the entire rear LCD monitor lights up. This would be true whether you were working in daylight or in the dark (the latter as I was when bitten by the M2 JPEG bug!).
For C.Fn4, however, I choose the last option, Disable Card/ImageSize Selection Button: OFF. This last option was the one that was added with the new firmware update. Then when and if you press the Card/ImageSize Selection Button, nothing at all happens. That one works best for me as I never want to shoot anything but RAW. Folks who set this one who need to change the image size or add a JPEG to their captures need to do so by accessing “Image type/size” on the second RED menu.
Canon EOS-1D X
Everybody’s switching. Everyone is loving their 1D X. Who? Arash Harzeghi. Doug Brown. Grace Scalzo. And Peter Kes sold all of his Nikon gear and purchased a 1D X and a Canon EF 600mm f/4L IS II USM lens! Have I influenced these and many other folks to purchase the greatest digital camera body ever? Very certainly. If you are convinced, please, please, pretty please use the BAA B&H affiliate link directly above.
B&H Canon Lens and Speedlight Specials Expire February 2, 2013/Act Now
As low as the prices might seem when you click on one of the items below, which, by the way, include many of my favorite intermediate telephoto lenses, be sure to place the item in your shopping cart to learn the actual price. In many instances you save another $100 to $400 or more off the price that appears when you click. The prices are just so low that B&H is not permitted by the manufacturer to publish them on the website. But they will pop up in your shopping cart!
…..
B&H Canon Specials
Fort DeSoto Morning In-the-Field Workshop
Fort DeSoto In-the-field Workshop: FEB 25. Pre-dawn -10:30am. Limit 16/openings: 4. Includes a great working lunch: $275.
On Monday morning, February 25, Denise Ippolito and I will be co-leading a morning In-the-field Workshop at Fort DeSoto, south of St. Petersburg, FL. We should get to photograph a variety of very tame herons, egrets, gulls, terns, and shorebirds. Spoonbills possible. There will be lots of individual and small group instruction. We will cover exposure and histograms, seeing the situation, creating sharp images, and lots more. Each registrant will have a personalized gear and set-up check. The more questions you ask, the more you will learn.
A great working lunch at the Sea Porch Café on St. Petersburg Beach is included. All are invited to bring a laptop along for image sharing at lunch. After the workshop, all are invited to send us three 1024 wide or 800 tall JPEGs for critiquing. Call 1-863-692-0906 to register or send us a Paypal. Either way, be sure to note that the payment is for the Fort DeSoto In-the-Field Workshop.
Weekend Creative Nature Photography Seminar, Tampa, FL: February 23 & 24, 2013: $149 Limit: 50/Openings: 1
Best to register soon as there are just 4 seats left. The In-the-field Workshop above follows the Weekend Creative Nature Photography Seminar. You are invited to join Denise Ippolito and me on the weekend of February 23-24 on the outskirts of Tampa, FL for a great weekend of fun and learning. Learn to improve your photography skills, your skill at designing images in the field, your creative vision, and your image optimization skills. Sunday critiquing session. Click here for additional details and the complete schedule.
Typos
On all blog posts, feel free to e-mail or leave a comment regarding any typos, wrong words, misspellings, omissions, or grammatical errors. Just be right. 🙂
Support the BAA Blog. Support the BAA Bulletins: Shop B&H here!
We want and need to keep providing you with the latest free information, photography and Photoshop lessons, and all manner of related information. Show your appreciation by making your purchases immediately after clicking on any of our B&H or Amazon Affiliate links in this blog post. Remember, B&H ain’t just photography!
Support the BAA Blog. Support the BAA Bulletins: Shop Amazon here!
And from the BAA On-line Store:
LensCoats. I have a LensCoat on each of my big lenses to protect them from nicks and thus increase their re-sales value. All my big lens LensCoat stuff is in Hardwood Snow pattern.
LegCoat Tripod Leg Covers. I have four tripods active and each has a Hardwood Snow LegCoat on it to help prevent further damage to my tender shoulders 🙂 And you will love them in mega-cold weather....
Gizo GT3532 LS CF Tripod. This one replaces the GT3530LS Tripod and will last you a lifetime. Learn more about this great tripod here.
Mongoose M3.6 Tripod Head. Right now this is the best tripod head around for use with lenses that weigh less than 9 pounds. For heavier lenses, check out the Wimberley V2 head.
Double Bubble Level. You will find one in my camera's hot shoe whenever I am not using flash.
The Lens Align Mark II. I use the Lens Align Mark II pretty much religiously to micro-adjust all of my gear an average of once a month and always before a major trip. Enjoy our free comprehensive tutorial here.
BreezeBrowser. I do not see how any digital photographer can exist without this program.
Delkin Flash Cards. I use and depend on Delkin compact Flash Cards and card readers most every day. Learn more about their great 700X and 1000X cards here or about my favorite Delkin card here.


Andy Rouse is now using the 1DX!!
Smart man.
Another option would be to spot meter the white of the bird and then add exposure to compensate for the meter systems rendering the white as a gray midtone. This might be difficult on a moving subject like a bird, but metering any thing (sand, sky, water, etc) and compensating for a midtone rendering should work. I’m glad I came into this post Artie because it has helped me to remember the Zone System. I just hope I use it in the field as it is so much easier to shoot ETTR using the histogram alone.
In ABP I explain why spot metering is not good for birds. In this case how are you gonna spot meter the tiny white head of a distant duck bobbing on the waves??? I do not know about or understand the Zone System. I only know that if I get data in the rightmost box of the histogram that my images will be fine. As I keep saying, it’s not rocket science.
Why complicate things by spot metering????
The reason for the -2 exposure compensation is the way the light meter within a camera determines exposure. The meter’s job is to give an exposure value that will render the metered scene a neutral, 18% gray tone, at which the meter is very good. The water around the duck is darker than an 18% gray tone and thus the meter will increse the exposure time necessary to render the overall scene as an 18%, middle gray tone. The problem with the metered exposure is that it will blow out the whites in the duck by overexposing to neutralize the tone of the water. The exposure compensation of -2 stops counteracts this overexposure tendancy of the light meter of an overall dark scene, and brings the whites of the duck back into the exposure range of the digital sensor (or film if used).
Correct. A bit wordy but very correct.
I get it. We are not talking about the reason the exposure was reduced (e.g. blinkies), but the principle behind the adjustment. So, the bird is much lighter than a midtone (as metered), but how do you know it is 2 stops lighter? And what about the fact that the bird is on a reflective property (water)? And how the size of the bird in the frame effects the meter. Is this also part of the 2 stop adjustment?
Sorry; you do not get it. I did not say that the bird was two stops lighter than anything…. The -2EC was needed to keep the WHITE tones from being clipped, i.e., over-exposed. The size of the subject in the frame does affect the metering…. As your thinking is all over the place I would again (I think) suggest getting a copy of ABP II and studying the Exposure Simplified section.
The evaluative meter would be influenced by all the darks and about -1 is needed to keep them dark. Another -1 is needed to keep the whites from blowing out.
That is not how I would think it through but it gets you to the right place. I think that I started out at -1 and kept going until there were no more blinkies on the bird’s head.
Assuming you metered off the water (you didn’t say), which is kinda dark, the camera wanted to open up causing overexposure in the whites; -2 required to bring whites back into the 5th histogram segment.
Metered as framed but you are right on target.
Since I’m trying to learn this Manual way…is it simply the opposite of why you add when metering off the sky… metering a dark tone with the subject being predominantly lighter (vs the sky which was lighter and the subject darker)? Doug
Nope. Here is a very simple question for you: if you were shooting the image above in Av mode how would you compensate?
I know this is gonna kill ya, but here’s what I do (Av). I’d come up on the
scene and take a quick test shot of the water. No exposure compensation. I
want to see where my histogram is at.
This way whatever comes into my viewfinder I’ll know which way to go on the
compensation (if any) before I take the next shot.
Doug
Artie — You can be a big help because I know Barnegat jetty well (in other words, I can put to use what you teach). My comment about white clipping was not about the above image but about the image as metered (without -2 stops). For long-tails and harlequins in direct sun, I generally take a chimp shot, review the histogram and adjust exposure to slight blinkies. This has produced the best results with high contrasting birds. BUT, this style of (digital) shooting does not help me to learn about exposure. And I do want to learn…
It sounds as if we are doing pretty much the same thing….
Yes, I am one of those that is why I visit your site often (to learn). You were not getting blinkies as metered with direct and reflected sunlight on the bird and did not adjust your exposure accordingly?
Hi Rob,
🙂 Great!
You are confused. The WHITEs in the image above are fine. RGB values no higher than the low 230s. And if you click on the image to see the larger version you can see detail in the WHITEs (though less detail I believe than if this had been a RAW capture).
The question is, why did I need to use -2 stops EC (exposure compensation)? And yes, though it was late on a winter day, the sun was out on a clear afternoon.
Sunshine + white feathers = clipping.
That is true only for photographers who do not understand how to get the right exposure.