|
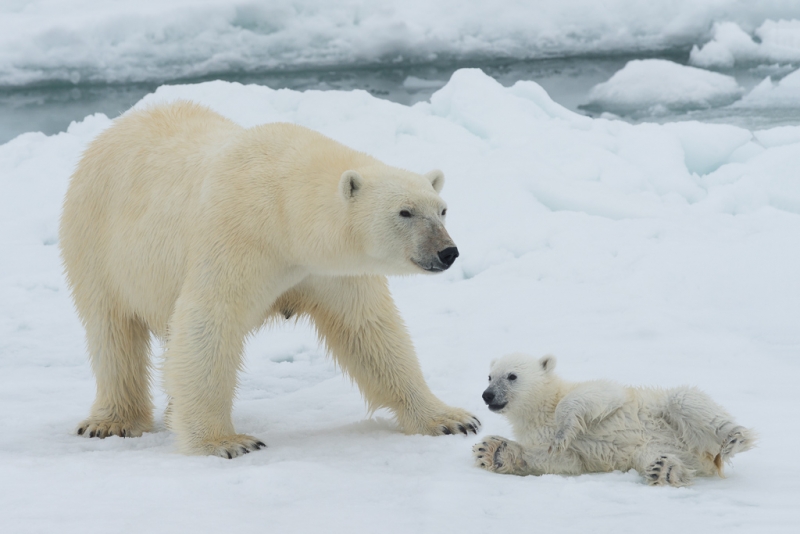
Polar Bear mom with cub, Spitsbergen, Norway. With the tripod-mounted Nikon AF-S NIKKOR 500mm f/4G ED VR II AF lns (Black), the Nikon TC-14E II 1.4x Teleconverter for D-AF-S & AF-I lenses ONLY, and the Nikon D4 digital SLR body. ISO 800: 1/1250 @ f/11. Thick overcast light. Mom and the cub were walking around, so the easy thing to meter was the white background. I metered a bright area and–working in Manual mode–placed that tone at + 1.7 stops. Since the light was not changing, all that I had to do then was wait for a good pose. Image courtesy of and copyright 2012: John Shaw. |
John Shaw
John Shaw was one of several who inspired me three decades ago. His gorgeous flower images that featured pristine blossoms–I remember lots of purple and pink ones–set against out-of-focus green backgrounds stuck in my mind and served as the springboard for what would become the BIRDS AS ART style. Thanks John.
Early on, John’s The Nature Photographer’s Complete Guide to Professional Field Techniques, published by Amphoto Books in June 1984 was my bible and fueled my dream to do a bird photography book for the same publisher. That dream led to the publication of “The Art of Bird Photography; The Complete Guide to Professional Field Techniques” in June, 1998. In the 1990s John Shaw’s Business of Nature Photography
guided me through the difficult early years of my career; bible #2. Thanks John.
Over the year’s John has become a friend, joining me as a guest co-leader on both a San Diego and a Fort DeSoto IPT. Thanks John.
After posting “Learning to Think Like a Pro In the Field,” a reader of both of our blogs e-mailed John letting him know that he was mentioned in my blog post. As a result, I received the e-mail below from John.
|
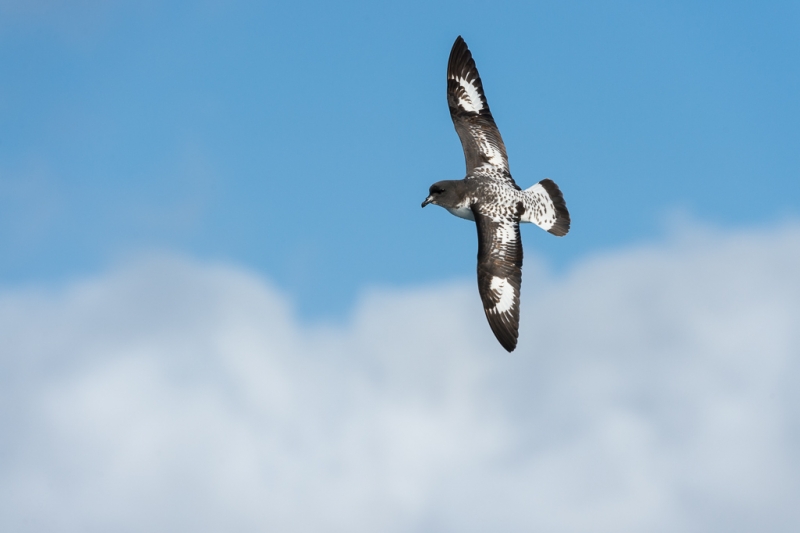
Pintado (Cape) Petrel, in the Drake Passage en route to South Georgia Island. With the handheld Nikon AF-S NIKKOR 200-400mm f/4G ED VR II Lens at 400mm and the Nikon D4 digital SLR body. ISO 800: 1/2500 at f/8. The high shutter speed was needed due to the fact that the ship was really rocking and rolling. The petrel was flying around the ship, and the background would change from white clouds to blue sky and back again. I metered the sky, and, while working in manual mode, placed it as a middle tone. The biggest problem was not the photography, but trying to keep from either falling on my butt or going overboard. Image courtesy of and copyright 2012: John Shaw. |
John Shaw on Exposure/A Guest Blog Post
Since my name was brought up in this discussion – and since I got an email asking about my thoughts on metering the gull photo – I’ll toss in my 2 cents worth.
In manual mode, the meter simply takes a reading of whatever you point it at. Adjust the settings for one tonality (the sky, and only the sky, in this case), then aim the meter at another tonality (the gull, which is a different tonality), and the meter will give a different answer. This has always been true. The meter would only give the same answer if the two different areas you metered happened to be the exact same tonality. If the entire scene is in the same consistent light, as it is in the gull photo, you could meter anything, place it as whatever tone you wanted it recorded as, and everything else would fall along the tonal scale. Why not pick the easiest area to meter?
As to my long-ago comment that “white is white,” I’ll stand by that statement. After all, a white shirt is a white shirt, even at night in your closet. It doesn’t change. It may have less light on it, but it’s still white. What does change is how you meter that “white” and where you place “white” on the tonal scale.
Some points that are adding to the confusion here are related to the fact that we no longer shoot film. Back in those days, the Fuji Provia in my camera had the same tonal response and dynamic range as the Fuji Provia in Artie’s camera. We cannot assume this with current digital cameras. Different sensors, even in the same camera brand, have different tonal responses, and vastly different dynamic ranges. And, just to confuse the issue even more, most of us shoot RAW and ETTR. But how does the histogram on the LCD (which is a histogram of a thumbnail jpeg created on the fly) relate to the histogram of the actual RAW file when it is opened in Photoshop? You might want to take a look at my recent blog post, ETTR to the Far Right. Sometimes I think we’re lucky to get an image at all.
One big point: notice that Artie is using “evaluative” metering. Nikon calls this “matrix” metering. In both cases, the camera actually runs a software program that evaluates the tonal range of what it is metering. But the two companies use very different “evaluation” programs. Meter the same area with a Nikon and with a Canon, both in “evaluative,” and the answer will probably not be the same. You need to learn what your camera does. To make a very minor point, Artie should have said “this is what I did, based upon my Canon’s evaluative metering.” If I had shot my Nikon D4 with his suggested 2 1/3 stops open off the sky, I would have definitely burned out the sky.
So, how would I have metered the grey sky/gull situation with my Nikon? OK, I’ll use matrix metering in manual exposure mode. By using matrix, which reads the entire frame, I need to aim the camera at a large area of consistent tonality. The light gray sky is the obvious easy answer. With my D4 I would open up about one and one-third stops. But I’ll bet that if we compared actual shooting exposure, both Artie and I would be close to the same. We just have gotten there different ways.
Thanks John. John is of course correct. When I photograph with Nikon-user James Shadle at Alafia Banks on his custom pontoon boat, the Hooptie Deux, we have a good laugh when it turns out that we are both working at the same exposure values (always within a third stop of each other at worse) despite the fact that we use different methods and obviously different in-camera meters. And do note as I have mentioned here and elsewhere that while Nikon folks do not need to add as much light in low light/light toned situations they need to subtract more light when working in bright light/dark toned with brilliant white situations as in the image featured here. Nikon folks would have been very close to -3 stops to come up with a good exposure on the displaying Long-tailed Duck image featured there.
In a follow-up e-mail John wrote referring to the Pintado Petrel image:
If I had used an autoexposure mode, the meter would have read the sky when that was behind the bird, then read the lighter toned clouds when those were behind the bird, and consequently given two different exposures. But so long as all were in the same light, there should be only one exposure.
John and I had a nice pre-SuperBowl chat this morning by phone. We both agreed that digital capture offers far more exposure latitude than film ever did, and we chuckled at the online experts who claim otherwise. We agreed that too many folks with expensive gear do not take the time to study their craft, and in the same vein, that many folks simply do not take the time to study and learn the intricacies of their in-camera meters.
I can’t tell you how much fun it is to chat with a friend who was and remains an idol of mine.
Learn more about John at his website here. Those who are interested in learning even more about exposure will find John’s recent blog post, “ETTR to the Far Right”, of great interest. His most recent blog post, “Eleven False Statements,”is both a hoot and filled with important truths for digital nature photographers.
Here’s #6: You can evaluate exposure by looking at the image on the camera’s LCD. You can adjust the LCD’s brightness on almost all DSLRs, so exactly which level of brightness would be “correct?” Sorry, not true at all. For that matter, the camera LCD most certainly is not a color corrected and calibrated monitor. You can evaluate composition; you cannot evaluate color or exposure. You definitely should use the histograms for exposure information.
I hope that that sounds familiar to all who have been on a BAA IPT.
Questions for John
I am pretty sure that John would be glad to answer any questions left in the Comments section when he has a bit of time.
SW FLA IPT
Speaking of IPTs, we are, due to two recent cancellations, able to offer a huge late registration discount to the first two lucky photographers to respond. Call me today at 863-692-0906 or call Jim or Jen at the same number asap during the week.
SW FLA IPT. FEB 16-21, 2013. Introductory slide program: 7pm on 2/15. 6-FULL DAYS: $2999. Co-leaders: Denise Ippolito and Robert Amoruso. Limit: 10/Openings 2.
Payment in full is due now
This is my bread and butter IPT; learn the basics and the advanced fine points from the best; escape winter’s icy grip and enjoy tons of tame birds! Subjects will include nesting Great Blue Heron and Great Egret, Mottled Duck, Brown and White Pelican at point-blank range, Snowy & Reddish Egret, Tricolored Heron, Yellow-crowned Night Heron, Osprey, wintering shorebirds and plovers, gulls and terns, & Burrowing Owl. All ridiculously tame. Roseate Spoonbill, Black-bellied Whistling Duck, American Oystercatcher, and who knows what are possible.
Click here to learn more about this IPT.
Pines West Camera Club EOL Program
I will be presenting “A Bird Photographer’s Story” for the Pines West Camera Club in Pembroke Pines, FL at 7pm on February 12, 2013. The program, sponsored by Canon Explorers of Light, is free and open to the public. Click here for additional details and scroll down for directions.
Fort DeSoto Morning In-the-Field Workshop/One Slot Left!
Fort DeSoto In-the-field Workshop: FEB 25. Pre-dawn -10:30am. Strict Limit 16/Sold Out:wait list only. Includes a great working lunch: $275.
On Monday morning, February 25, Denise Ippolito and I will be co-leading a morning In-the-field Workshop at Fort DeSoto, south of St. Petersburg, FL. We should get to photograph a variety of very tame herons, egrets, gulls, terns, and shorebirds. Spoonbills possible. There will be lots of individual and small group instruction. We will cover exposure and histograms, seeing the situation, creating sharp images, and lots more. Each registrant will have a personalized gear and set-up check. The more questions you ask, the more you will learn.
A great working lunch at the Sea Porch Café on St. Petersburg Beach is included. All are invited to bring a laptop along for image sharing at lunch. After the workshop, all are invited to send us three 1024 wide or 800 tall JPEGs for critiquing. Call 1-863-692-0906 to register or send us a Paypal. Either way, be sure to note that the payment is for the Fort DeSoto In-the-Field Workshop.
Weekend Creative Nature Photography Seminar, Tampa, FL: February 23 & 24, 2013: $149 Limit: 50/Openings: 2
Best to register soon as there are just 4 seats left. The In-the-field Workshop above follows the Weekend Creative Nature Photography Seminar. You are invited to join Denise Ippolito and me on the weekend of February 23-24 on the outskirts of Tampa, FL for a great weekend of fun and learning. Learn to improve your photography skills, your skill at designing images in the field, your creative vision, and your image optimization skills. Sunday critiquing session. Click here for additional details and the complete schedule.
Typos
On all blog posts, feel free to e-mail or leave a comment regarding any typos, wrong words, misspellings, omissions, or grammatical errors. Just be right. 🙂
Support the BAA Blog. Support the BAA Bulletins: Shop B&H here!
We want and need to keep providing you with the latest free information, photography and Photoshop lessons, and all manner of related information. Show your appreciation by making your purchases immediately after clicking on any of our B&H or Amazon Affiliate links in this blog post. Remember, B&H ain’t just photography!
Support the BAA Blog. Support the BAA Bulletins: Shop Amazon here!
And from the BAA On-line Store:
LensCoats. I have a LensCoat on each of my big lenses to protect them from nicks and thus increase their re-sales value. All my big lens LensCoat stuff is in Hardwood Snow pattern.
LegCoat Tripod Leg Covers. I have four tripods active and each has a Hardwood Snow LegCoat on it to help prevent further damage to my tender shoulders :) And you will love them in mega-cold weather....
Gizo GT3532 LS CF Tripod. This one replaces the GT3530LS Tripod and will last you a lifetime. Learn more about this great tripod here.
Mongoose M3.6 Tripod Head. Right now this is the best tripod head around for use with lenses that weigh less than 9 pounds. For heavier lenses, check out the Wimberley V2 head.
Double Bubble Level. You will find one in my camera's hot shoe whenever I am not using flash.
The Lens Align Mark II. I use the Lens Align Mark II pretty much religiously to micro-adjust all of my gear an average of once a month and always before a major trip. Enjoy our free comprehensive tutorial here.
BreezeBrowser. I do not see how any digital photographer can exist without this program.
Delkin Flash Cards. I use and depend on Delkin compact Flash Cards and card readers most every day. Learn more about their great 700X and 1000X cards here or about my favorite Delkin card here.


I have studied under many of today’s and yesterday’s masters and am much better for it. Ansel being my first inspiration followed later by John Sexton. I would strongly suggest any photographer, young, seasoned or veteran, join and/or read Art Morris and John Shaw often. The more we know the more we need to learn. Thanks for the fine site Art, and, enjoyed your 2 hr. presentation 2 weeks ago in Sac., CA. It was well worth the drive up. Be well. SM
Hey Skip, Thanks for dropping by and for your kind words. Aside from John Shaw my early inspirations were Rod Planck and Tim Fitzharris among others.
John was (and still is) a great inspiration to me as a photographer. I learned most of what I know about exposure from John Shaw’s Nature Photography Field Guide. I just picked up another copy to give to a friend as a gift.
When I first bought that book I was still shooting film – if you do not remember having to write down the settings used for each frame in the roll and then wait for the film to come back from the lab, I think you are lucky. What a joy it is to work with digital now and see the exposure right away.
Thanks to both John and Artie for everything I’ve learned from them over the years!
I started going to courses with John in the 80’s plus reading his books and was my first eyeopening experience to exposure . Boy did I have a time appreciating middle tone when he used it on a red shirt or on blue jeans and they were the same ? I was a slow learner but one day the electric light bulb went off and I understood ! I am sure many others about my age have been deeply influenced by John.
I attended one of John Shaw’s seminars outside of Philly about two years ago. What I remember most has nothing to do with technique. It has to do with a sense that John had given a piece of himself to everyone in the audience. I know that must sound strange, but that is what I remember. These post about exposure have really helped me. Over the past several years I (like many others, I think) have gotten away from the principles of exposure and have used mainly Sunny 16, the histogram and trial and error to capture images of birds. As an example, at Barnegat Jetty on a clear winter day, I would start out with ISO 400, 1/1600 @ F/5.6 (I am shooting Nikon). For close-ups of harlequins I know that my best results were obtained with ISO 400, 1/2000 @ f/8, but I really did not know (or had forgotten) the reasons why these settings worked. When I got home and viewed the images I was happy, of course. But I felt happy more because of luck than anything else. I was lucky because I took enough shots or because I tried various settings, or because I stayed on the jetty longer than anyone else did. Buy when you meter your shots and get good results, while you still might feel lucky, you also feel something else — you feel like a photographer; because you made the shot a good one! And this has to be at least one of the reasons why we are out there freezing our hands and face off waiting for hours to see what comes around the point. Thank you John/Artie for helping me remember this!
Wonderful guest blog post and wonderful of you two gentlemen (Art Morris and John Shaw) to be so generous with your expertise. Thank you.
I just tested one of my 1D4s for whether a blinkie really meant a blown out white. In short, no, as Mr Shaw said regarding his Nikon. In my 1D4, a blinkie was actually about 247 in luminosity value. I did only have to add 1 f-stop in compensation to get a truly blown out white though which was much less than for the Nikon. Good info to know.
i like my RAW files to come into DPP with the WHITEs having RGB values no greater than 235 or so so that it is not a battle to have lots of highlight detail.
I aim for about 235 too but what I now know is that my 1D4 meter reads about 2 full f-stops below optimum. I had been compensating all along to expose to the right side of the histogram but had not done the testing before. I find this techie stuff very interesting. I just bought and am reading Shaw’s ebook on Photoshop. Great writer. Just finished reading Loving What Is too. ;-0
I hate to question my tutor Artie but wouldn’t you be better to aim for the whites to be closer to 255 then pull them back to 235 in DPP with the exposure slider? Isn’t that what John Shaw is suggesting in his ‘ETTR to the far right’ post and by doing this wouldn’t it help reduce the noise in the image?
Theoretically yes. And as far as I understand things, that is what John is suggesting. But practically, no. I like my WHITEs coming into DPP at no more than 235-240 so that I do not have to struggle to bring out the detail during the image optimization process. Try it both ways and decide what is best for you.
And heck, I am here sticking my neck out so no problema.
Thanks for the prompt reply Artie, whatever you are doing certainly seems to be working for you 🙂
YAW and I agree. I often say, “It’s not like my images suck :)”
Great post! I purchased a number of John’s books back in the late 80s that contributed to my initial love of nature photography. After a long time away from the camera Artie, and others, reignited the flame a few years back. It’s good to see everything come full circle. 🙂
Great to hear John Shaw add to a discussion about exposure. His Nature Photography’s Guide to Professional Field Techniques has long been my bible. When I have taught photography or instructed a group of new photographers in the field, I have often wished they all had read John’s book, or attended one of his seminars as I did long ago. It is astounding how many of today’s photographers don’t understand depth of field, or basic exposure. The physics of light and exposure have not changed even though we no longer shoot film.
During our phone conversation we both agreed and marveled over the fact that digital has far more latitude than film, despite those who claim the opposite. Digital is able to maintain detail in the highlights while revealing detail in the dark tones,
Arthur this is a great guest blog! I often find my self thumbing through John’s books. there is tons of great advice in each and every one of them.
John, love your blog and your sense of humor too!
Great guest blog. “white is white”— best exposure tip I have ever heard! I also read Mr. Shaw’s advice re checking how far off the blinkies warning light is from reality and cannot wait to do that experiment on my 1D4. The list of misstatements raised one question for me. I know setting my camera to Adobe RGB does not effect my RAW images per se but doesn’t the setting to Adobe RGB rather than sRGB effect the histogram which is reading the jpg and not my RAW file? Which setting gives the most accurate portrayal of what the histogram of the RAW file would look like if there was one?
On second thought, the expansion/contraction of the color space probably does not effect the luminosity range and therefore does not effect the histogram?????
I just tested one of my 1D4s for whether a blinkie really meant a blown out white. In short, no, as Mr Shaw said regarding his Nikon. In my 1D4, a blinkie was actually about 147 in luminosity value. I did only have to add 1 f-stop in compensation to get a truly blown out white though which was much less than for the Nikon. Good info to know.
This is really coincidental. I picked from my bookshelf today one of John’s books from back in the film days and was reading various chapters including the one on exposure. This got me to thinking what John is up to. So I went to his website and blog and found his article “ETTR to the Far Right”. A great read to be sure as is the 11 false statements post. I was dispelling at least five of those at my Festival workshops last weekend.
“For that matter, the camera LCD most certainly is not a color corrected and calibrated monitor. You can evaluate composition; you cannot evaluate color or exposure. You definitely should use the histograms for exposure information.”
Yep, and usually it’s very very far from a decent calibration. Not counting that, unless you’re in a hide, it’s even hard to see something useful when looking at it in the bright sun.
“Nikon folks would have been very close to -3 stops to come up with a good exposure on the displaying Long-tailed Duck image featured there.”
Substantially correct in my experience (with prosumer cameras). Very good in dim light, often -2, is required in full sun. Curiously, it seems that things have changed in years. With D100, D70, D200 I can hardly recall corrections of more than -1.5 stops, and corrections were mostly related to the small-white-birds-in-blue-waters scenario. With the D7000 I require deeper corrections. I suppose that this is the reason for which when the D7000 came out, many people complained about alleged problems with the light meter.