|
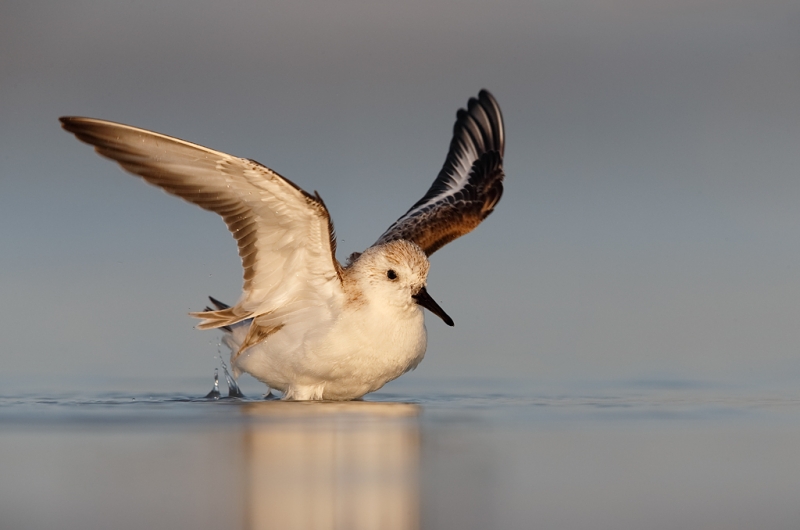
Sanderling flapping after bath. Created on Sanibel with the Canon EF 600mm f/4L IS II USM lens, the Canon 2x EF Extender III (Teleconverter), and the Canon EOS-1D X Digital SLR camera. ISO 800. Evaluative metering -1/3 stop: 1/1250 sec. at f/10 in Manual Mode. Lens foot buried in the sand. Central sensor (by necessity) Expand/AI Servo/Rear Focus AF active at the moment of exposure. Click here if you missed the Rear Focus Tutorial. Click on the image to see a larger version. |
Is It Real, or … ?
Here is the question of the day. Make sure that you click on the image to view the larger size before answering. Can you tell what work was done in Photoshop? If yes, what evidence do you have? Or do you think that this image is pretty much right out of camera?
EOS-1D X AF Guide
You can learn exactly how I set up and use this camera’s great new AF system in our EOS-1D X AF Guide. And you can learn about our camera User’s Guides here.
Southwest Florida Site Guide
Several folks have written recently asking why this great guide has not been updated since 2007. The answer is that I have not discovered any new hotspots and that the good places remain good and the great places remain great. We found the Snowy Plovers on Wednesday in the exact spot described in the Southwest Florida Site Guide. Go figure.
Africa Photo Safari: August 2013
Serengeti Summer Migration Safari: 12 full and two half-days of photography: $12,999/person double occupancy. Limit: 12/Openings: 9.
Leaders: Todd Gustafson, Denise Ippolito, and Arthur Morris. Tanzania Summer Migration Safari. Leave the US on August 3. Day 1 of the safari is August 5. We will visit Tarangire for great dry season photography, Seronera Lodge–aka Leopard City!–twice, Central Serengeti for big cats, Northern Serengeti and our mobile tented camp to search for river crossings, and the spectacular wildlife spectacle that is Ngorongoro Crater. Our last morning of photography is August 18. Fly home from Arusha, Tanzania on the evening of August 18.
A deposit of $4,000 is due now. This trip is a go. Happy Campers only please. Guaranteed maximum no more than 12 photographers plus the three great leaders. 3 persons/van. You get a row of seats for yourself and your gear. In addition to rotating in-the-field instruction with each of the co-leaders, artie, Todd, and denise will be available for image sharing and review and informal Photoshop instruction during breaks and after meals. And–with apologies to Miss Manners–even during meals!
Once we cash your check you will be strongly advised to purchase travel insurance. You may wish to consider using Travel Insurance Services. Do understand that most policies must be purchased within two weeks of our cashing your deposit check. The 2nd payment of $4000 is due MAR 30, 2013. The final payment/balance is due MAY 30, 2013. Sign up with a friend or a spouse and apply a $300 per person discount.
The lodging is all first class. Please e-mail to request a PDF with additional details, the complete itinerary, and a description of the unparalleled photographic opportunities that we will enjoy. Please e-mail or call me on my cell at 1-863-221-2372 with any questions. I hope that you can join us.
You can see a collection of my images from previous safaris here.
Weekend Creative Nature Photography Seminar, Tampa, FL: February 23 & 24, 2013: $149
You are invited to join Denise Ippolito and me on the weekend of February 23-24 on the outskirts of Tampa, FL for a great weekend of fun and learning. Learn to improve your photography skills, your skill at designing images in the field, your creative vision, and your image optimization skills. Sunday critiquing session. Click here for additional details and the complete schedule.
Fort DeSoto Morning In-the-Field Workshop/Two Slots Left!
Fort DeSoto In-the-field Workshop: FEB 25. Pre-dawn -10:30am. Strict Limit 16/2 Openings. Includes a great working lunch: $275.
On Monday morning, February 25, Denise Ippolito and I will be co-leading a morning In-the-field Workshop at Fort DeSoto, south of St. Petersburg, FL. We should get to photograph a variety of very tame herons, egrets, gulls, terns, and shorebirds. Spoonbills possible. There will be lots of individual and small group instruction. We will cover exposure and histograms, seeing the situation, creating sharp images, and lots more. Each registrant will have a personalized gear and set-up check. The more questions you ask, the more you will learn.
A great working lunch at the Sea Porch Café on St. Petersburg Beach is included. All are invited to bring a laptop along for image sharing at lunch. After the workshop, all are invited to send us three 1024 wide or 800 tall JPEGs for critiquing. Call 1-863-692-0906 to register or send us a Paypal. Either way, be sure to note that the payment is for the Fort DeSoto In-the-Field Workshop.
Typos
On all blog posts, feel free to e-mail or leave a comment regarding any typos, wrong words, misspellings, omissions, or grammatical errors. Just be right. 🙂
Support the BAA Blog. Support the BAA Bulletins: Shop B&H here!
We want and need to keep providing you with the latest free information, photography and Photoshop lessons, and all manner of related information. Show your appreciation by making your purchases immediately after clicking on any of our B&H or Amazon Affiliate links in this blog post. Remember, B&H ain’t just photography!
Support the BAA Blog. Support the BAA Bulletins: Shop Amazon here!
And from the BAA On-line Store:
LensCoats. I have a LensCoat on each of my big lenses to protect them from nicks and thus increase their re-sales value. All my big lens LensCoat stuff is in Hardwood Snow pattern.
LegCoat Tripod Leg Covers. I have four tripods active and each has a Hardwood Snow LegCoat on it to help prevent further damage to my tender shoulders 🙂 And you will love them in mega-cold weather....
Gizo GT3532 LS CF Tripod. This one replaces the GT3530LS Tripod and will last you a lifetime. Learn more about this great tripod here.
Mongoose M3.6 Tripod Head. Right now this is the best tripod head around for use with lenses that weigh less than 9 pounds. For heavier lenses, check out the Wimberley V2 head.
Double Bubble Level. You will find one in my camera's hot shoe whenever I am not using flash.
The Lens Align Mark II. I use the Lens Align Mark II pretty much religiously to micro-adjust all of my gear an average of once a month and always before a major trip. Enjoy our free comprehensive tutorial here.
BreezeBrowser. I do not see how any digital photographer can exist without this program.
Delkin Flash Cards. I use and depend on Delkin compact Flash Cards and card readers most every day. Learn more about their great 700X and 1000X cards here or about my favorite Delkin card here.


Maybe it’s real? Or, maybe it’s maybelline? 🙂 Actually, I couldn’t see any photoshop, which means you did photoshop right! I would assume PS was used to some degree, simply based on regular methods described here. But, and this perhaps is the point you are making (and please tell me if I am wrong!) what difference does it make? It is a tremendously beautiful image which calms me to view. If cloning had to happen, then so be it. If some levels, and some cropping, or maybe the canvas shifted and such, why would it matter? No one disparages a painter for his inclusions and exclusions; tis merely painting with binary, tickled by light and mouse! As far as Maybelline, what difference does it make for a model, whether her lashes are hers, or maybelline? The point with the model is for her to look her most attractive. The point in art creation is to make the most attractive image, according unto the end of the artist, and thereby fulfill his vision. Simplyfying and perfecting by exclusion of distracting elements and perfecting of present elements is what art is all about.
Maybe this is a bit of a rant, and if I am off, forgive me! 🙂
Hey Chris, Not a rant at all. Thanks for your thoughtful comments. Just for the record books, no canvas was added, and the only thing done below the bird was a crop. Answer soon.
It looks like the reflection was extended/stretched down since it does not curve with the bird. Probably some beach crud cleanup too. Nice shot though.
It took some studying but I will say that the image is as taken right out of the camera.
The image was resized by adding canvas at the bottom and stretching below the bird, at least.
Sorry to you and the rest: Not. artie ps: funny how those bandwagons work….
It appears to me that the canvas was stretched to the right, as evidenced by the strerched dark ripples which seem to be straight and not curved. Nature being what it is, it also could be right off the card.
Hi Artie,
I find myself in the camp of canvas being added, at a minimum to the reflection but perhaps in other directions to reposition the sanderling in the frame since you were shooting at f/10 and catching the height of action. Since the bird was bathing and is facing toward the sun I would expect highlights on the beak which is now rendered more of a flat black. Did you decide to work with the Skimmer II this time to spare yourself the painstaking gear clean up? 🙂 Regardless of your technique a beautiful image!
Water droplets removed? Where are bird’s feet? Reflection manipulated? When will we know? (Did we ever learn “the rest of the story” on SURREALITY?)
Art,
I think that the bottom shadow does not match with the bird,so it’s been fixed.
JEFF
What the others said; glorious image and the reflection seems stretched out, but I probably wouldn’t have noticed (or imagined) anything absent your question and the other comments.
The Sanderling is real (and beautiful). Canvas added at the bottom… evidence: reflection shape doesn’t match.
What a fantastic photograph!! I looked at that picture for some time before reading your information and nothing crossed my mind about what could have been done to it. It is a geat picture. Even after looking at it thinking about what could have been done to it to improve it I couldn’t think of anything.
Congratulations and thanks for sharing.
There are probably more things but what I noticed is the reflection looks stretched.out making me think you added canvas at the bottom
I could guess just based on what you’ve done in the past, but
that’s all it would be, a lucky guess.
My feelings are, if you did do something to the image, heck if
I can tell. It looks great.
If you didn’t do anything to the image, heck if I can tell. It
looks great.
Doug