Stuff
Honest. I would have gotten up early and went out photographing on Tuesday but for the crappy weather forecast (that for a change happened to be quite accurate).
Tuesday morning involved more relaxing while creating this blog post and watching Golden State win a tough game against the New Orleans Pelicans. Then my core exercises.
This blog post, the 104th in a row, took about 2 1/2 hours to prepare. It was published at about 3:40am on Wednesday. I got up at oh-dark-hundred to make my 6:40am flight from ISP to MCO. If everything goes as expected Jim will be picking me up at about 9:45am on Wednesday morning.
St. Augustine IPT Late Registration Discount Info
Please see below and/or call the office at 863-692-0906 for St. Augustine IPT Late Registration Discount info.


Canon’s Huge Megapixel Bodies
Canon’s two new huge megapixel bodies are available for pre-order. If you want to get your hands on one, please pre-order by clicking on the logo-link above. They will surely be difficult to get; shoot me your B&H receipt via e-mail and I will be glad to do my best to expedite your order. Learn more about the two new bodies here.
Please Remember to use our Affiliate Links 🙂
To show your appreciation for my continuing efforts here, we ask, as always, that you use our the B&H and Amazon affiliate links on the right side of the blog for all of your purchases. B&H is recommended for you major photography gear purchases, Amazon for your household, entertainment, and general purpose stuff. Please check the availability of all photographic accessories in the BIRDS AS ART Online Store, especially the Mongoose M3.6 tripod heads, Gitzo tripods, Wimberley heads and plates, LensCoats and accessories, and the like. We sell only what I have used, have tested, and can depend on. We will not sell you junk. We know what you need to make creating great images easy and fun. And we are always glad to answer your gear questions via e-mail. I just learned that my account was suspended during my absence; it should be up and running by Monday at the latest.
I would of course appreciate your using our B&H affiliate links for all of your major gear, video, and electronic purchases. For the photographic stuff mentioned in the paragraph above we, meaning BAA, would of course greatly appreciate your business. Here is a huge thank you to the many who have been using our links on a regular basis and visiting the BAA Online store as well.
|
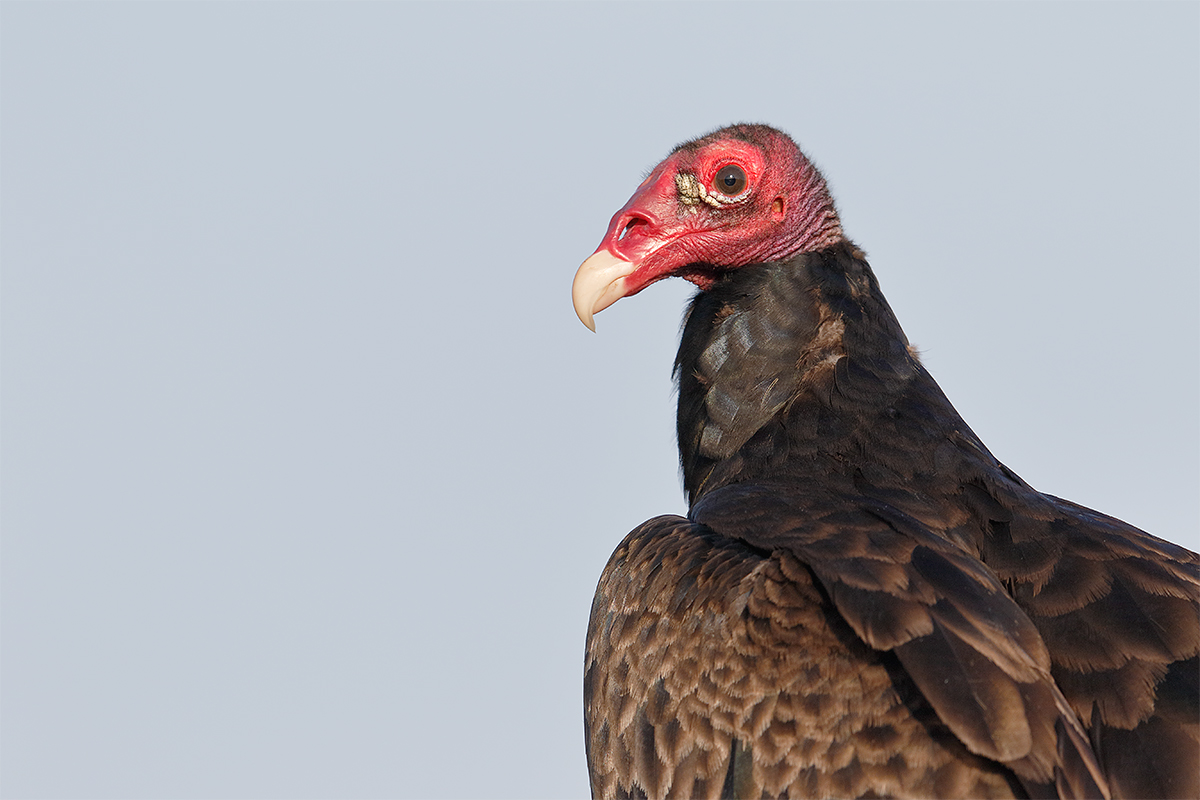
This image was created down by the lake at ILE on the morning of April 16, 2015 from my SUV with the BLUBB-supported Canon EF 600mm f/4L IS II USM lens, the Canon Extender EF 1.4X III, and the Canon EOS 7D Mark II. ISO 400. Evaluative metering +1/3 stop as framed: 1/1250 sec. at f/6.3 in Manual mode. AWB. At +2/3 in early morning light I was getting a few blinkies on the bill tip so I went 1/3 stop darker. One AF point above and one to the right of the center AF point/AI Servo Expand/Rear Focus AF as framed was active at the moment of exposure (as is always best if possible when working off the BLUBB). The active AF point was on the bird’s neck just below and forward of the bird’s eye. This put the active AF point right on the same plane as the bird’s eye. Click here to see the latest version of the Rear Focus Tutorial. Click on the image to see a larger version. |
Down By the Lake
When I was home, I was getting down to the lake pretty regularly each morning. I fly home on Wednesday morning and will get to sleep in my own bed for just one night as I head over to St. Pete on Thursday for the long sold out Fort DeSoto IPT. I hope to get down to the lake again on Thursday morning as last Thursday is was pretty good. And, I found a new, very pretty crane nest that I want to check out. I am hoping that it is a viable nest.
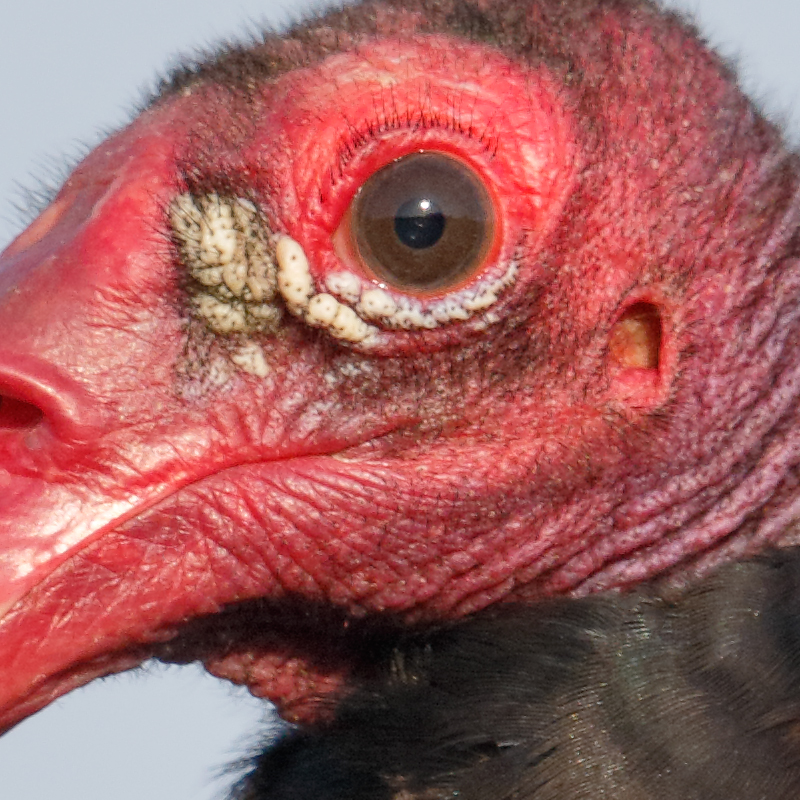
One to One (1:1) 100% Crop Tutorial by Michael Tapes with Arthur Morris
Michael Tapes of LensAlign has visited twice recently helping me out with micro-adjusting some of my gear. With his help I will be creating a written tutorial that will detail the use of LensAlign and a new version of FocusTune to be released early this summer. This tutorial will be for serious photographers who want to get the most out of their gear in terms of sharpness. I must admit to having been intrigued by FocusTune early on as it can really open your eyes about all things AF. And most importantly, It will enable you to set up all of your camera lens combinations so that you will on average be creating the absolute sharpest images possible
I have assembled nearly all the gear that I need to do the micro-adjusting to perfection; right now I am only lacking a cable release.
In any case, on his last visit I mentioned my confusion with creating 1:1 or 100% crops when I needed to show folks how sharp or how unsharp a given image is. He opened my eyes to the fact that I had been doing most everything wrong. Most notably, he explained that the percentage view had nothing at all to do with creating a 1:1 crop, a fact that I had been happily oblivious to before his last visit. In other words, if you view an image a 200% and then simply use the Crop Tool the resulting JPEG will be comprised of re-sampled (read “mangled”) pixels.
Here is how Michael taught me to do it.
1: Bring either your converted TIFF or your optimized image file into Photoshop. Using a previously un-cropped image will give you the truest representation of the sharpness of the file.
2-Activate the Rectangular Marquee Tool.
3-In the Style box select Fixed Size from the drop-down menu.
4-Type in the size in pixels that you want your JPEG to be. For today’s image I went with Width: 800 px and Height: 800 px. Note that if you use larger values (like 1200 X 1200) you will have a wider view. With smaller values (like 400 X 400) you will have a much tighter view. But no matter, you will be looking at a 1:1 representation.
5-Now click anywhere on the image and your 1:1 crop symbol will appear. Grab the crop symbol with the cursor and position it as desired.
6-To execute the crop go Image > Crop. (I use my personal keyboard shortcut, Command C.)
7-Optional: hit Command D to lose the marching ants.
8-Then go File > Save for Web (or hit Shift + Alternate + Command + S). It is mandatory that you save the JPEG at Quality 100%.
9-Hit OK and you are done.
For most accurate viewing it is best to display the final image at its pixel dimensions. In this case that would be 800 X 800 px.
Many thanks to Michael Tapes for his help with these concepts that were previously confusing to me. More on LensAlign, the new ruler, and the next version of FocusTune some time in June.
|
The Image Optimization
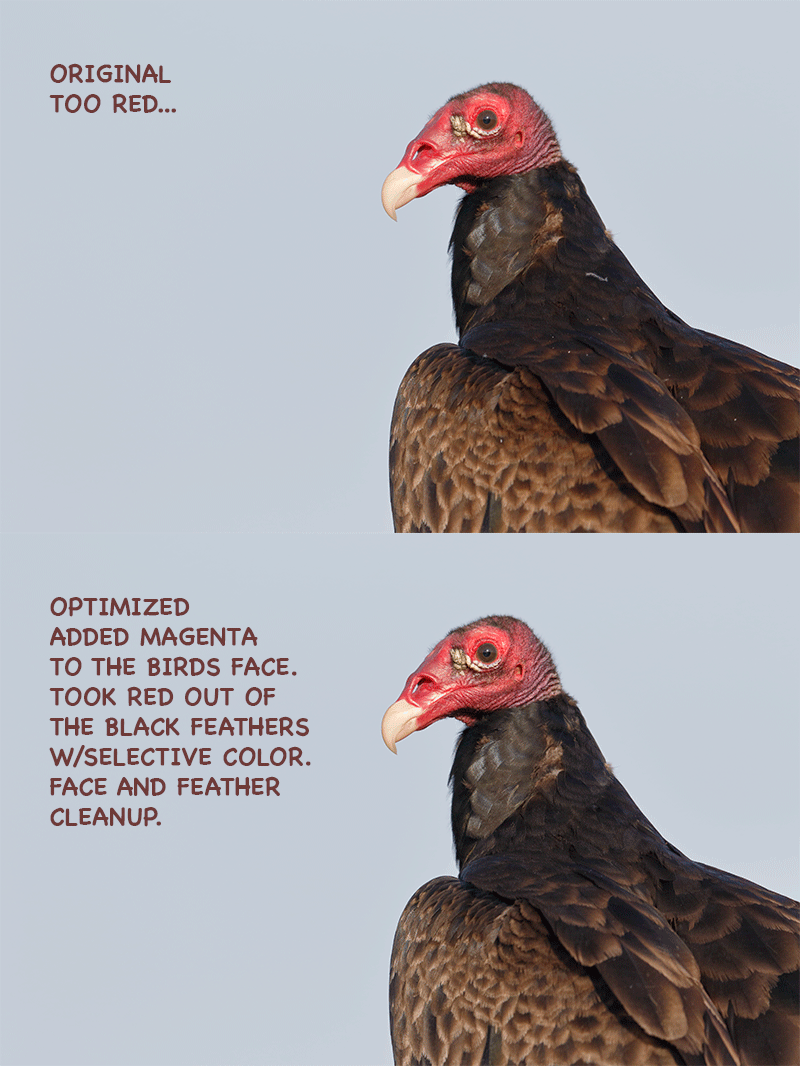
The primary challenge in optimizing this image involved deal with the RED color cast that was due to the quality of the early morning light. To restore detail to the Turkey Vulture’s red head I selected it with the Quick Selection Tool and then added 35 points of CYAN to the REDs in Selective Color. Next I selected all the BLACK feathers, again with the Quick Selection Tool and then went to Hue-Saturation, chose the RED channel, and reduced the RED saturation about 30 points. As a result of these two steps, the light still looked sweet but the color looked far more natural.
Next was clean-up of the face and the feathers with my favorite cast of friends, the Spot Healing Brush (J), the Clone Stamp Tool (S), a small Quick Mask or two, and the Patch Tool (my personalized keyboard shortcut P). I applied a 50% layer of my NIK 50-50 pre-set and refined that with a Regular Layer Mask. I varied the opacity of the brush to leave the full effect on the face and bill tip but reduced it substantially on the black feathers.
Digital Basics
Everything that I did to optimize today’s image is covered in detail in our Digital Basics File–written in my easy-to-follow, easy-to-understand style. Are you tired of making your images look worse in Photoshop? Digital Basics File is an instructional PDF that is sent via e-mail. It includes my complete digital workflow, dozens of great Photoshop tips, details on using all of my image clean-up tools, the use of Contrast Masks, several different ways of expanding and filling in canvas, all of my time-saving Keyboard Shortcuts, Quick Masking, Layer Masking, and NIK Color Efex Pro basics, Contrast Masks, Digital Eye Doctor techniques, using Gaussian Blurs, Tim Grey Dodge and Burn, a variety of ways to make selections, how to create time-saving actions, the Surface Blur (background noise reduction) settings, and tons more.
APTATS I & II
Learn the details of advanced Quick Masking techniques in APTATS I. Learn Advanced Layer Masking Techniques in APTATS II. Mention this blog post and apply a $5 discount to either with phone orders only. Buy both APTATS I and APTATS II and we will be glad to apply at $15 discount either with phone orders or here in the BAA Online Store. For phone orders, call Jim or Jennifer at 863-692-0906 weekdays.
|
You can order your copy of “The Photographers’ Guide to Canon Digital Photo Professional 4.0” (aka the DPP 4 Raw Conversion eGuide) by Arash Hazeghi and Arthur Morris by clicking here. |
The DPP 4 eGuide (PDF)
The Ideal Companion to the 7D Mark II User’s Guide
Learn how and why I and many other discerning photographers choose and use only DPP 4 to convert their Canon RAW files in the DPP 4 RAW Conversion Guide by Arash Hazeghi and yours truly. The latest version supports all of the newer Canon camera bodies and several older models including the EOS-7D and the EOS-1D Mark IV. A free update that will cover most of the newly added cameras will be sent as soon as I get it from Arash.
|
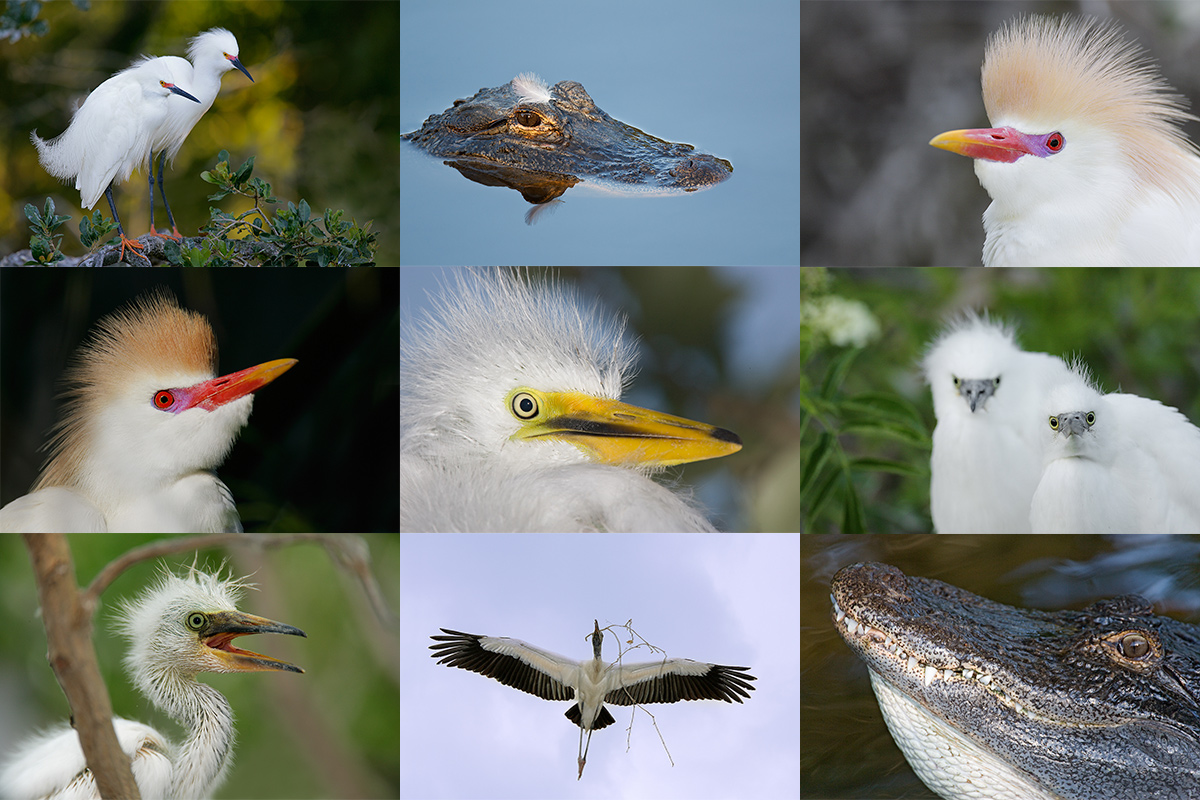
Clockwise from upper left to center: Snowy Egrets/breeding plumage pair, American Alligator with egret feather on head, Cattle Egret in breeding plumage (with fill flash), large Snowy Egret chicks, displaying gator, Wood Stork in flight carrying nesting material (fill flash), begging Snowy Egret chick, another Cattle Egret in breeding plumage (with fill flash), and Great Egret chick. |
St. Augustine Alligator Farm Short-Notice Spoonbill and Wading Bird Chicks IPT: May 4-6, 2015. TWO FULL and TWO 1/2 DAYS: $1099. Limit 8/Openings 5.
Call on Monday to learn of the Late Registration Discount: 863-692-0906
St. Augustine in early May is a bird photographer’s paradise. With any luck we should have chicks of all sizes in the nests ranging from newly hatched Snowy Egrets and Tricolored Herons to nearly fledged Great Egrets. More than a few pairs of Roseate Spoonbills have nested at the Alligator Farm for the past several years. Photographing the spoonbill chicks in the nest is a huge challenge…. With any luck we will encounter a few Snowy and Cattle Egrets in stunning breeding plumage. We should have lots of flight photography ops especially late in the day. We will enjoy extra early entry on our three mornings. Folks who will need a photographer’s pass need to get us $89.95. This fee includes full season early entry and late stay and submission fees for up to 5 photos in their annual contest. This works out to cheaper than four separate entry tickets. We pick up the passes on our first afternoon.
|
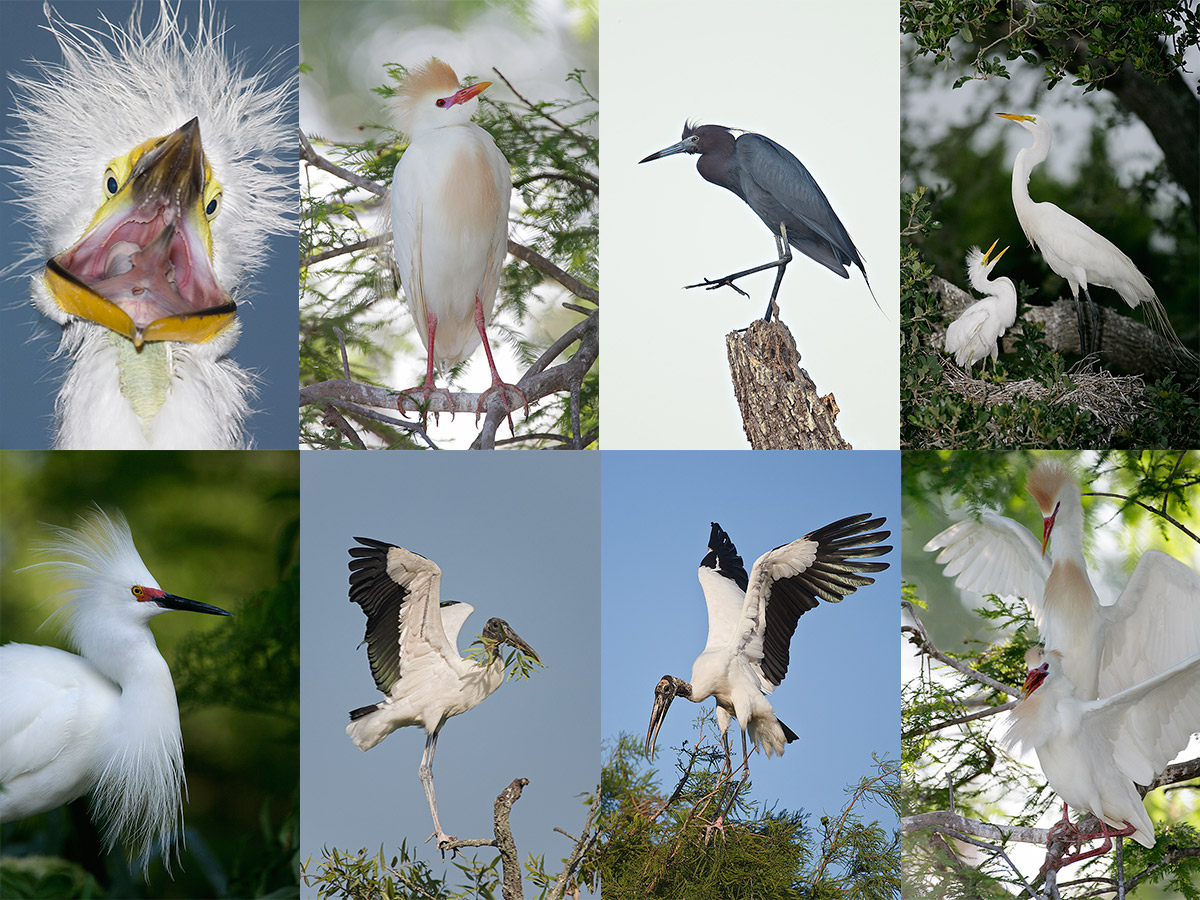
Clockwise from upper left: flash-as-main light Great Egret chick begging, breeding plumage Cattle Egret w/fill flash, Little Blue Heron, Great Egret chick in nest begging, Cattle Egrets copulating, Wood Stork with nesting material, another Wood Stork with nesting material, and breeding plumage Snowy Egret displaying. |
What You Will Learn
On this IPT you will the learn the basics and fine points of digital exposure and how to get the right exposure every time after making a single test exposure. You will learn to understand and predict bird behavior and to see and understand the light. You will learn to design pleasing images by mastering your camera’s AF system and how and why to work in Manual mode (even if you’re scared of it). Most importantly, you will learn to spot the good situations, to choose the best perspective. Rookeries are crowded, cluttered, white-washed places. Most folks who visit have no clue as to the difference of an image with tons of distractions and one with a clean line of sight and the best possible distant background. Join me and I will teach you to see like a pro.
I will be bringing my flash to the Alligator Farm (gasp!) I have not used flash for at least a year. I will be teaching you how to use flash as fill and how to use flash as main light. In addition, I will be reviewing the flash flight techniques that I developed at St. Augustine more than a few years ago.
|
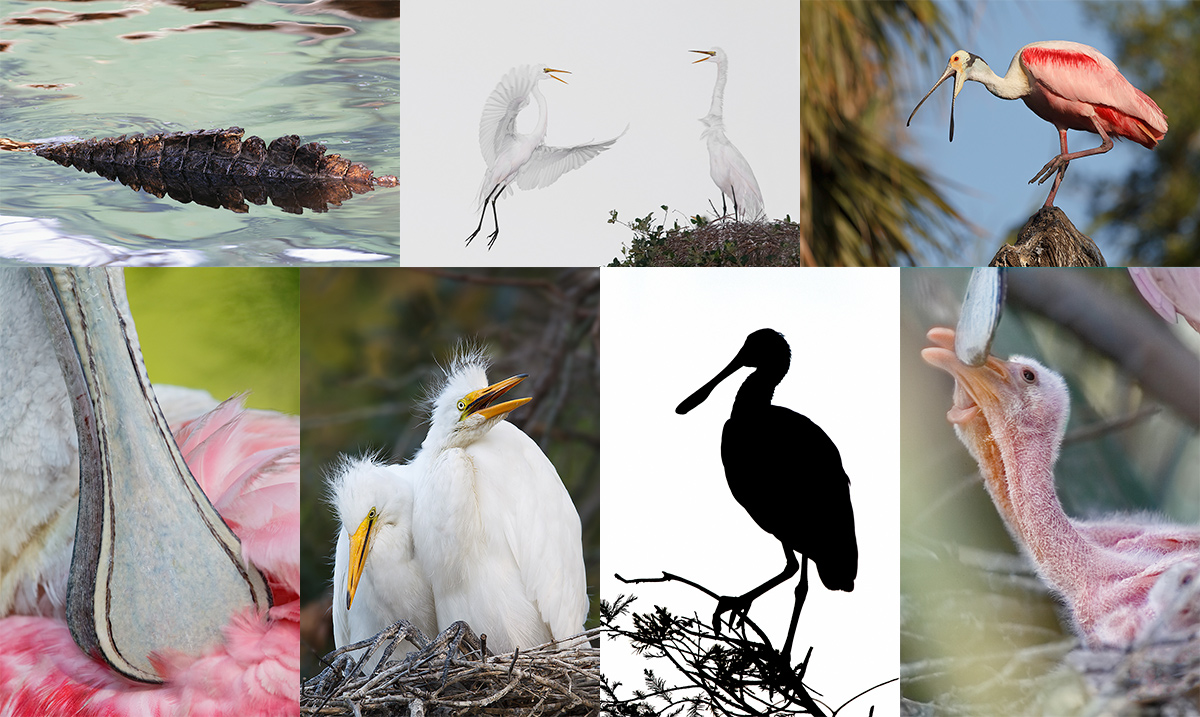
Clockwise from upper left: gator back, Great Egret returning to mate (with fill flash), Roseate Spoonbill with bill open, Roseate Spoonbill chick begging, Roseate Spoonbill 11am silhouette, large Great Egret chicks in nest, and bill of Roseate Spoonbill. |
Whats the Rest of the Deal?
Afternoon session on Monday, May 4. Then two full days with a morning and afternoon session each day, May 5 & 6. Then our last morning on May 7. At lunch on Tuesday and Wednesday (included) we will review my images; folks learn a ton watching me edit–why keep this one and delete that one? If you opt to bring your laptop, we can take a look at five of your best images from the morning or another session. We will process a few of my images in Photoshop after converting them in DPP. That followed by Instructor Nap Time.
A $499 non-refundable deposit is required to hold your spot. Your balance–$600, payable only by check, is due immediately. Please include a separate check for $89.95 so that we can purchase your pass in advance. Please click here to read our cancellation policy before committing. Then please print, read, and sign the necessary paperwork linked to here and get it to us. You can register by calling Jim or Jen at the office at 863-692-0906 and arranging for your deposit of $499. Balances are payable only by check. I hope to see you there.
From Pat and Stokes Fishburne
The Alligator Farm is quite good right now. Good spoonbill nests and lots of spoonbills. Also, Snowy Egrets, Tricolored Herons, and a few Cattle Egrets along with more than a few Great Egret nests with chicks.
Be sure to like and follow BAA on Facebook by clicking on the logo link upper right. Tanks a stack!
Support the BAA Blog. Support the BAA Bulletins: Shop B&H here!
We want and need to keep providing you with the latest free information, photography and Photoshop lessons, and all manner of related information. Show your appreciation by making your purchases immediately after clicking on any of our B&H or Amazon Affiliate links in this blog post. Remember, B&H ain’t just photography!
Amazon.com
Those who prefer to support BAA by shopping with Amazon may use this link:
Amazon Canada
Many kind folks from north of the border, eh, have e-mailed stating that they would love to help us out by using one of our affiliate links but that living in Canada and doing so presents numerous problems. Now, they can help us out by using our Amazon Canada affiliate link by starting their searches by clicking here. Many thanks to those who have written.
Typos
In all blog posts and Bulletins, feel free to e-mail or to leave a comment regarding any typos or errors. Just be right :).



Thanks for the further info, Artie. So, basically 1:1 equals a square crop and is showing no interpolated pixels, right?
I did a little experimenting on my 17inch laptop and came up with 730×730 also equaling 100% view filling the window in PS CS5 when I ctrl-alt-0. I will try this same crop size on my 24inch desktop to see if it also will equal 100% view. If it does, you could use that crop size and have 1:1 and 100%!! Your cake and eat it too! ;-).
Good info above Artie. However, I am a little confused. I understand the 1:1 thing but not the 100% part. What do you mean by “100%”? I think of “100%” view as that view or amount of “magnification” that I see when I click on the “100%”view option in PS or any other editing or browsing software that I am currently using. I tried your 800×800 dimensions and this indeed produced a mag of approximately the same size and selecting the “100%” view option (PS shortcut ctrl-alt-0). But, when I tried 1200×1200, the view was wider and not “100%” mag.
HI Dan,
Thanks. It is a very confusing subject 🙂 By a 100% view I mean a crop of the image viewed at actual pixels. Again, it has nothing to do with the View percentage in the lower left corner of the Photoshop screen.
If you follow the directions carefully and use the Marquee Tool as detailed and do one at 600 square and one at 1200 square the results will be different. Both will offer true 1:1 views but the 1200 SQ will show four times as much as the 600 square….
artie
Great tutorial. Thanks to both you and Michael.
Hi Artie,
Thanks for the info on 1:1 cropping. I had it wrong too.
It does seem to me though, that no amount of optimisation can make a turkey vulture look more appealing.
I am astonished at the detail you are getting at around 1300 focal length ( equiv).
That’s amazing
Travel safe tomorrow
Regards
David
YAW. Tomorrow’s blog post will be two Piping Plovers at 600 X 1.6 X 2X = 1920 equivalent or 38.4X magnification. I should get to your e-mails this morning. a
Thank you . Just finished reading them. Reply pending.
D
Not that if you use larger values Not you meant Note
So noted 🙂 And corrected. Many thanks.
a
Thanks very much for another detailed and helpful post.
Best wishes.
ThankStu! a