What’s Up?
On Thursday, I continued working on blog posts to be published during my more than nine-week trip to South America. That plus the usual.
Gear Questions and Advice
Too many folks attending IPTs and dozens of the folks whom I see in the field, and on BPN, are–out of ignorance–using the wrong gear, especially when it comes to tripods and more especially, tripod heads… Please know that I am always glad to answer your gear questions via e-mail.
The Streak
Today’s blog post marks a totally insane, irrational, illogical, preposterous, absurd, completely ridiculous, unfathomable, silly, incomprehensible, what’s wrong with this guy?, makes-no-sense, 295 days in a row with a new educational blog post. There should be no end in sight until my big South America trip next fall. Or not… As always-–and folks have been doing a really great job recently–-please remember to use our B&H links for your major gear purchases. For best results use one of our many product-specific links; after clicking on one of those you can continue shopping with all subsequent purchases invisibly tracked to BAA. Your doing so is always greatly appreciated. Please remember: web orders only. And please remember also that if you are shopping for items that we carry in the new BAA Online Store (as noted in red at the close of this post below) we would appreciate your business.
Almost, but clipped a single primary feather |
Bummer
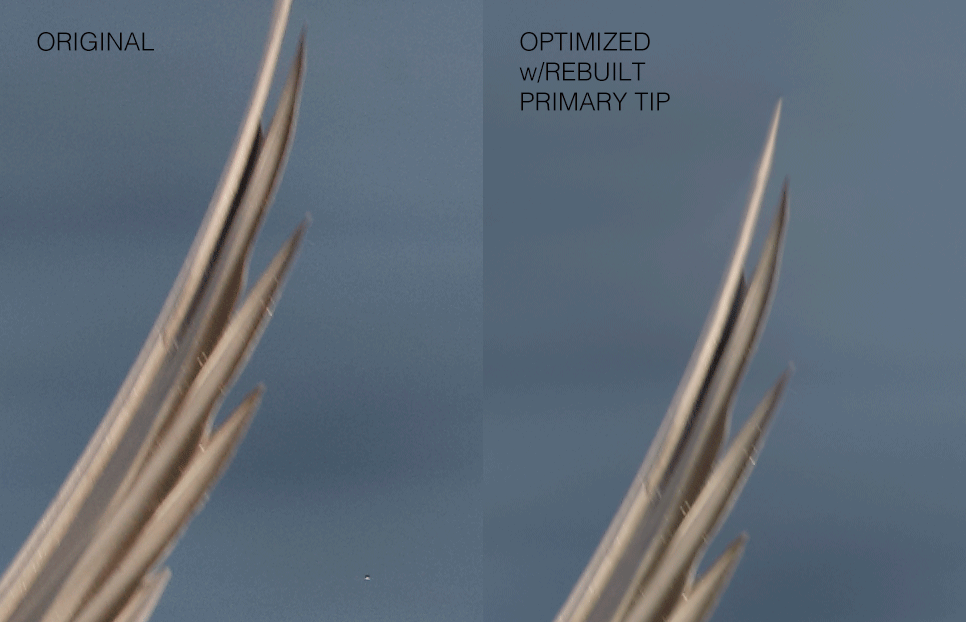
You do just about everything perfectly, but you clip a single primary tip. If you have mastered the techniques detailed in APTATS I and II you can simply add canvas to the top and re-build the wing tip. If, and only if, you use your imagination… More on using your imagination below.
Learn advanced Quick Masking and advanced Layer Masking techniques in APTATS I & II. You can save $15 by purchasing the pair.
Learning From the DPP 4 Screen Capture
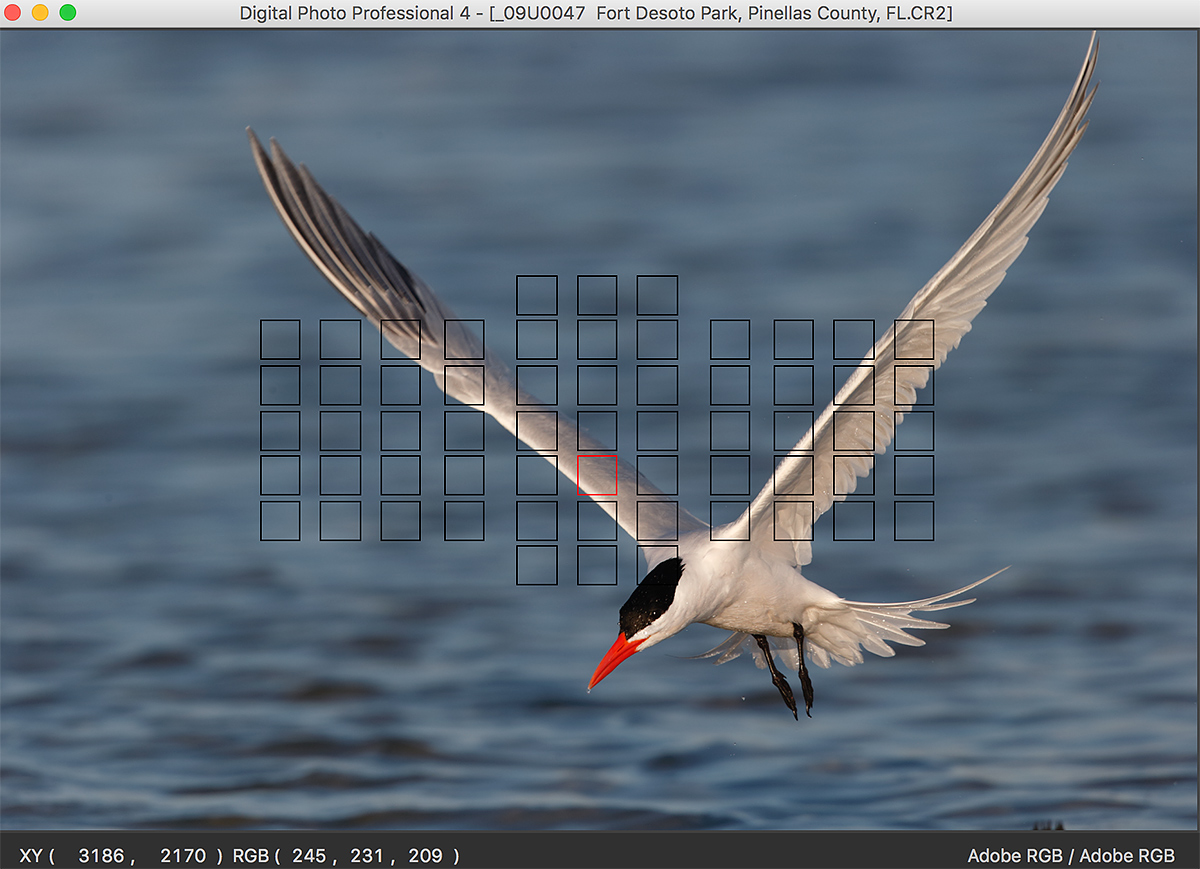
Noe the RGB values for the brightest whites: R=245, G= 231, B=209. Why not the pure whites you are used to seeing, say 235, 235, 235? Because images made in rich, warm, early morning or late afternoon light will always show RGB numbers on the warm side. You could of course optimize the image to look as if it were taken at 9:30am but why lose the sweet light?
AF Payback…
Do you remember the A Primer on the Many Causes of Unsharp Images… blog post here? There were many images where the AF point was correctly right on the bird’s face, head, or upper breast but the images were totally out of focus.
Well, turnabout is fair play. Note that the square illuminated in red shows that the active AF point was on the far wing, about 3 inches past the plane of the bird’s eye. Yet the eye is very sharp. Even though I was using Surround, none of the assist point caught even the bird’s black cap. How was this possible?
It is likely that I had the Af point on the bird’s face or cap with AF tracking perfectly but as the bird flew closer and lower, I let the selected AF point slip up a bit so that I would have a chance to get the whole bird in the frame hoping that Af would continue to track accurately for a second to two more. Prayer answered.
|
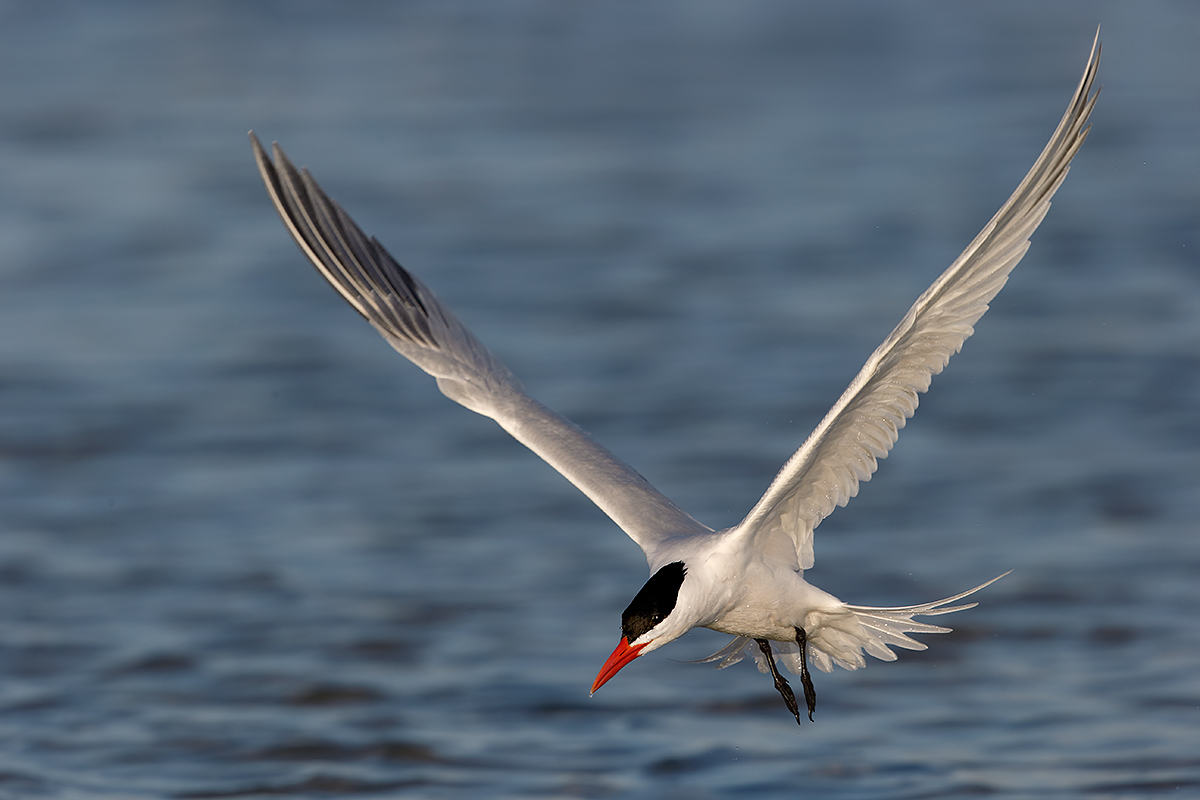
This image was created at Fort DeSoto in spring with the Induro/GIT 304L/Mongoose M3.6-mounted Canon EF 500mm f/4L IS II USM lens, the Canon Extender EF 1.4X III, and the 1D X (now replaced by the rugged, blazingly fast Canon EOS-1D X Mark II DSLR). ISO 400. Evaluative metering -1/3 stop: 1/2000 sec. at f/7.1. AWB. Center AF point/AI Servo Surround/Rear Button Focus AF as originally framed was active at the moment of exposure. The selected AF point was on the far wing, about 3 inches past the plane of the bird’s eye. Yet the eye is sharp. Keep reading for the explanation. Click here to see the latest version of the Rear Focus Tutorial. Click on the image to see a larger version. Royal Tern in flight |
Nice Job!
All in all I was very happy with the optimized image, especially considering that I rescued it from the office Drobo. I ran a layer of Gaussian Blur on the upper one-fifth of the image to smooth out the added canvas. I did that on a layer of course and then painted out the now perfect primaries with a very small brush. I cleaned up the black cap and sharpened it with a Contrast Mask. All of course as detailed in my Digital Basics File.
Digital Basics is an instructional PDF that is sent via e-mail. It includes my complete digital workflow, dozens of great Photoshop tips, details on using all of my image clean-up tools, the use of Contrast Masks, several different ways of expanding and filling in canvas, all of my time-saving Keyboard Shortcuts, the basics of Quick Masking, Layer Masking, and NIK Color Efex Pro, Digital Eye Doctor techniques, using Gaussian Blurs, Dodge and Burn, a variety of ways to make selections, how to create time-saving actions, the Surface Blur settings that I use to smooth background noise, and tons more.
That Red Bill
Compare the red of the bill in the screen capture with the red of the bill in the optimized image. In the warm light of early morning, the bill in the original frame glowed bright enamel red. Most folks will tell you to simply desaturate the REDs. Wrong answer. As detailed here often and in Digital Basics, simply go to Selective Color and add 60-90 points of CYAN to the REDs. It’s magic. It tones down the REDs without losing the natural tones as happens when you go the de-sat route.
|
Rebuilding the Missing Primary Tip
When you have no source feather to work with, as here, rebuilding one or more feather tips from scratch can be quite tricky even if you have mastered all of the principles and tutorials in APTATS I & II. Why no source feather? Note in the animated GIF that the underside of the second primary is gray, but the underside of the missing first primary is mostly white. What did I do?
Those who are comfortable working with Quick Masks and Layer Masks should be able to follow this free tutorial.
1: After expanding canvas and cleaning up the smudged area above the missing primary tip, I made a Quick Mask of the last half inch of the white primary and put it on its own layer being sure to include a bit of blue sky on each side. I added a Regular Layer Mask so that I could clean up the blue edges.
2: Then I merged that layer. That gave me a feather with a square end. Not good.
3: I created a smaller Quick Mask of just the right half of the added end of the primary and included some blue along the right side.
4: After putting that on its own layer I warped the selection to bring it to a point and again refined it after adding a Regular Layer Mask.
5: Then I did the exact same thing to the left half of the added feather. Note that the extra blue included with each Quick Mask covered the unneeded squared off end of the added primary tip.
If you are confused, you will need to sign up for the DeSoto IPT so that you can sit next close when we are doing a Photoshop session.
Noise Reduction
Note the great job of noise reduction via Neat Image as detailed in the Post Processing Guide here.
|
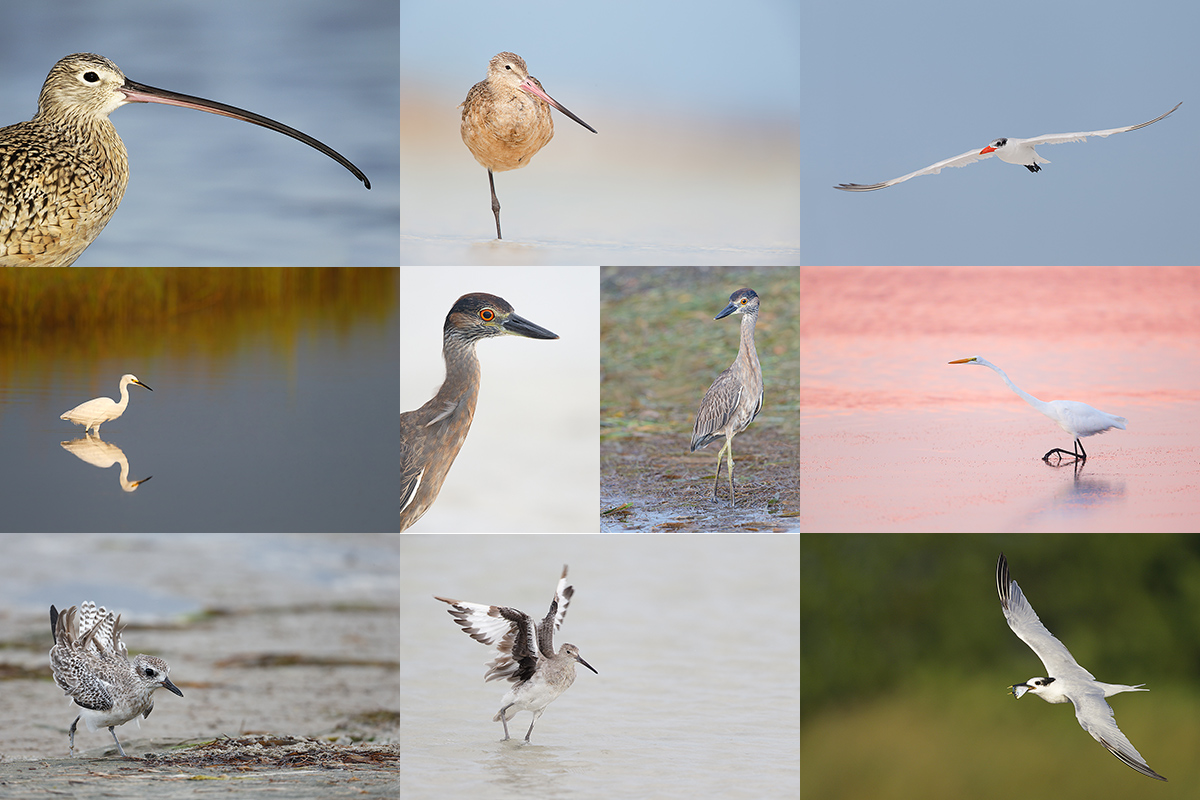
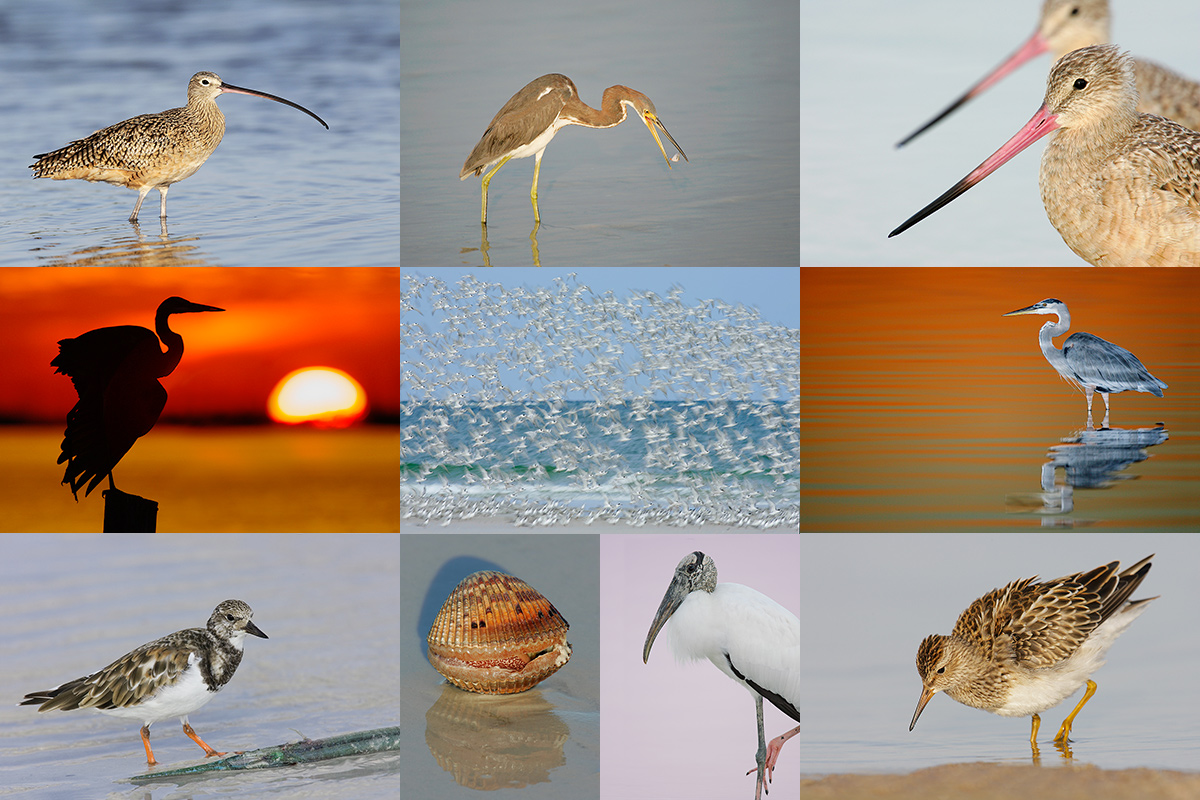
Fort DeSoto in fall is rife with tame birds. All of the images in this card were created at Fort DeSoto in either late September or early October. I hope that you can join me there this fall one way or another. Click on the composite to enjoy a larger version. |
BIRDS AS ART Fort DeSoto In-the-Field Meet-up Workshop (ITFW): $99
Join me on the morning of October 2, 2016 for 3-hours of photographic instruction at Fort DeSoto Park. Beginners are welcome. Lenses of 300mm or longer are recommended but even those with 70-200s should get to make some nice images. Teleconverters are always a plus.
You will learn the basics of digital exposure and image design, autofocus basics, and how to get close to free and wild birds. We should get to photograph a variety of wading birds, shorebirds, terns, and gulls. This inexpensive morning workshop is designed to give folks a taste of the level and the quality of instruction that is provided on BIRDS AS ART Instructional Photo-tours. I hope to meet you there.
To register please call Jim or Jennifer during weekday business hours with a credit card in hand to pay the nominal registration fee. Your registration fee is non-refundable. You will receive a short e-mail with instructions, gear advice, and meeting place one week before the event.
|
Folks attending the IPT will be in the field early and stay out late to take advantage of sunrise and sunset colors. The good news is that the days are relatively short in early fall. Click on the composite to enjoy a larger version. |
Fort DeSoto Short Notice Fall IPT/September 28 (meet & greet at 2pm followed by our afternoon session) through the full day on October 1, 2016. 3 1/2 DAYs: $1549. Limit 10/Openings: 6. Sunday morning ITFW free to IPT registrants.
Fort DeSoto, located just south of St. Petersburg, FL, is a mecca for migrant shorebirds in fall. There they join dozens of egrets, herons, night-herons, gulls, and terns who winter on the T-shaped peninsula that serves as their wintering grounds. With any luck, we should get to photograph two of Florida’s most desirable shorebird species: Marbled Godwit and the spectacular Long-billed Curlew. Black-bellied Plover and Willet are easy, American Oystercatcher likely. Great Egret, Snowy Egret, Great Blue Heron, and Tricolored Heron are easy as well and we will almost surely come up with a tame Yellow-crowned Night-Heron or two. We should get to do some Brown Pelican flight photography. And Royal, Sandwich, Forster’s, and Caspian Terns will likely provide us with some good flight opportunities as well. Though not guaranteed, Roseate Spoonbill and Wood Stork would not be unexpected.
Folks who sign up for the IPT are welcome to join me as my guest on the ITFW on the Sunday morning following the workshop. See above for details on that.
On this and all other IPTs you will learn basics and fine points of digital exposure and to get the right exposure every time after making a single test exposure, how to approach free and wild birds without disturbing them, to understand and predict bird behavior, to identify and age many species of shorebirds, to spot the good situations, to choose the best perspective, to see and understand the light, to, and to design pleasing images by mastering your camera’s AF system. And you will learn learn how and why to work in Manual mode (even if you’re scared of it).
At brunch (included) we will review my images–folks learn a ton watching me edit–why keep this one and delete that one? If you opt to bring your laptop, we can take a look at a few of your images from the morning session. We will process a few of my images in Photoshop after converting them in DPP. That followed by Instructor Nap Time.
As I already have one signed up for this workshop, it is a go. Hotel info will be e-mailed when you register. The best airport is Tampa (TPA). It is always best if IPT folks stay in the same hotel so if you are interested it would be a good idea to register now and make your hotel reservations as soon as you hear from us. We can, however, coordinate with local folks who opt to stay at home.
Because of the relatively late date, payment is full is due upon registration either by check or credit card. If the former, please e-mail us immediately so that we can save you a spot. If the latter, please call Jim or Jennifer during weekday business hours at 863-692-0906 with a credit card in hand to register. Your registration fee is non-refundable unless the IPT sells out with eight so please check your plans carefully before committing. You will receive a confirmation e-mail with detailed instructions and gear & clothing advice a fairly soon.
Please Remember to use my Affiliate Links and to Visit the New BAA Online Store 🙂
To show your appreciation for my continuing efforts here, we ask, as always, that you get in the habit of using my B&H affiliate links on the right side of the blog for all of your photo and electronics purchases. Please check the availability of all photographic accessories in the New BIRDS AS ART Online Store, especially the Mongoose M3.6 tripod head, Wimberley lens plates, Delkin flash cards and accessories, and LensCoat stuff.
As always, we sell only what I have used, have tested, and can depend on. We will not sell you junk. We know what you need to make creating great images easy and fun. And we are always glad to answer your gear questions via e-mail.
I would of course appreciate your using our B&H affiliate links for all of your major gear, video, and electronic purchases. For the photographic stuff mentioned in the paragraph above we, and for everything else in the new store, we, meaning BAA, would of course greatly appreciate your business. Here is a huge thank you to the many who have been using our links on a regular basis and those who will be visiting the New BIRDS AS ART Online Store as well.
Be sure to like and follow BAA on Facebook by clicking on the logo link upper right. Tanks a stack!
Typos
In all blog posts and Bulletins, feel free to e-mail or to leave a comment regarding any typos or errors. Just be right 🙂



Great tutorial! Thanks for all your efforts
Many thanks sir. How have you been doing?
later and love, artie