Stuff
Late on Monday I micro-adjusted my 600 II naked indoor with the lights: +2.
On Tuesday I micro-adjusted the 600 II with my 1.4X III i TC in the morning: -1, outdoors with the lights (as the distance is too great for indoors even with my bowling alley hallway). Then it got too sunny. In the afternoon it clouded up again so I did the 600 II with my 2X III i TC. That turned out to be a hoot First I screwed up the distance. Then I was getting weird results with the graphs. I finally thought that I had everything perfect but Jen opened the door of the house as she was leaving for home. Her big dog Olivia spotted an Anole and charged after it dislodging the tripod with the LensAligh unit on it; I had to start over from scratch. It turned out to be the best thing that could have happened as I realized that when I was lining up the target in Live View that I was not using the dead centered Flexi-zone single box! Once I fixed that I was done in ten minutes: -10.
I am still looking for a few more folks for San Diego #2. If you are considering this trip and might be interested in adding on a free morning of instruction before the IPT begins please shoot me an e-mail.
Please see yesterday’s blog post if you are interested in joining us at DeSoto this weekend for some cheap instruction.
The Streak
Today makes ninety days in a row with a new educational blog post! This blog post took more than two hours to prepare. With all of my upcoming free time (or not …), the plan right now is to break the current record streak of 480 … Good health and good internet connections willing.
|
|
2017 in San Diego was a very good year …. |
2018 San Diego 3 1/2-DAY BIRDS AS ART IPT #2: Sunday, JAN 28 thru and including a morning session on Wednesday, JAN 31, 2018: 3 1/2 days: $1699. Limit: 8: Openings: 6
Meet and Greet at 6:30pm on the evening before the IPT begins; Saturday, Jan 27, 2018.
I am offering a free morning session on SAT 27 JAN for all who register.
Click here for details.
Booking.Com
Booking.Com came through for me twice again recently with both the DeSoto Fall IPT and next July’s UK Puffins, Gannets, and Bempton Pre-trip room reservations. And all the rates were great. If you’d like to give Booking.Com a shot, click here and you will earn a $25 reward. Thanks to the many who have already tried and used this great service.


Gear Questions and Advice
Too many folks attending BAA IPTs and dozens of folks whom I see in the field, and on BPN, are–out of ignorance–using the wrong gear especially when it comes to tripods and more especially, tripod heads… Please know that I am always glad to answer your gear questions via e-mail.
|
|
|
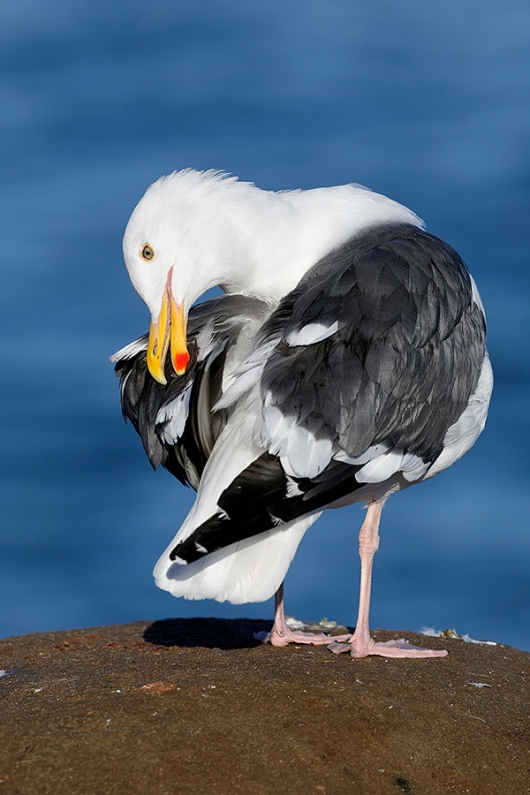
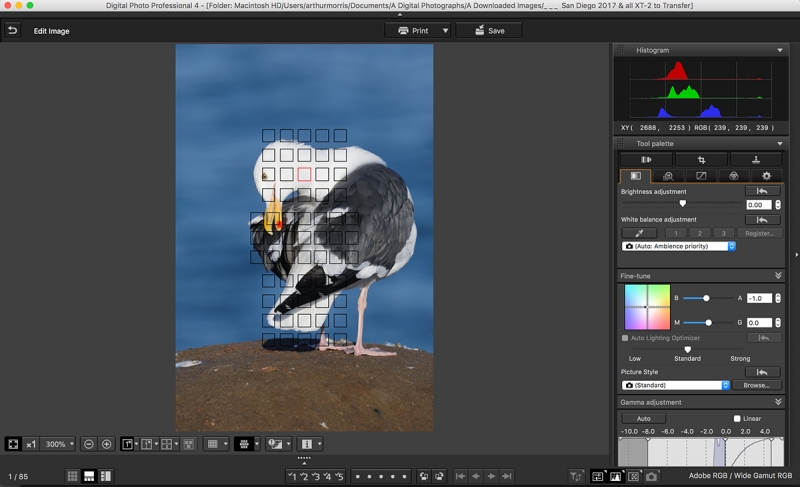
This image was created at 8:25am on the 2017 San Diego IPT with the hand held Canon EF 100-400mm f/4.5-5.6L IS II USM lens (at 360mm) and my favorite bird photography camera, the Canon EOS 5D Mark IV. ISO 400. Evaluative metering probably at zero as famed: 1/2000 sec. at f/6.3 in Manual mode. AWB. One AF point that was two and one-half rows up from and three columns to the right of the center AF point/AI Servo/Manual selection/Shutter Button AF as framed was active at the moment of exposure. See the DPP 4 screen capture below to see the exact placement of the single (selected) AF point. FocusTune/LensAlign Micro Adjustment: 0. Image #1: Western Gull, adult breeding plumage preening |
Understanding the Color of Light/Part II
In the Understanding the Color of Light/Part I blog post here, I posted an image of this same bird (see that image just below) that was created about one hour earlier in richer light. Scroll down to understand why the light in the two images looks so different.
Helpful Bird Photography Principles Re-visited and Adapted for Today’s Image…
- 1- When photographing a preening bird strive to press the shutter button when the bird’s head is square or close to square to the imaging sensor, aka, the back of the camera.
- 2- When photographing a bird from behind be sure to focus on or very near the head.
- 3- When working in vertical format with the subject large in the frame it is fine to center the bird both from side to side and from top to bottom.
- 4- Learn to work competently in Manual mode so that the amount of black or white in the frame at a given moment will not affect the exposure. That involves making an exposure check image, checking or blinkies, and evaluating the histogram to make sure that you have exposed well to the right (with at least some data halfway into the rightmost histogram box).
- 5- When photographing a bird from behind there is no need to use additional depth of field as long as the distance to the subject provides you will enough depth of field to cover the subject (as with today’s featured image).
- 6- Working with backgrounds that are separated from the subject and relatively distant while using wide apertures will yield pleasingly out of focus canvases for your avian images.
From Chapter Seven, Designing the Image (page 108), of the original The Art of Bird Photography (Amphoto, NY: 1998)
If the subject is positioned against an uncluttered background or if there is a cluttered background well behind the subject, telephoto lenses 00 with their narrow angles of view — and the shallow depth of field that comes with the use of wide apertures, will produce lovely soft, out-of-focus backgrounds. I’ll take still blue water or well lit green foliage every time.
Shooting wide open (at your lens’ widest aperture heightens this effect; with subject size constant, it is the aperture rather than the length of the lens that determines the depth of field. Large apertures such as f/2.8, f/4, and f/5.6, minimize depth of field and reduce background detail. Conversely, small apertures, such as f/22 and f/11, and even f/11 maximize depth of field and increase background detail.
|
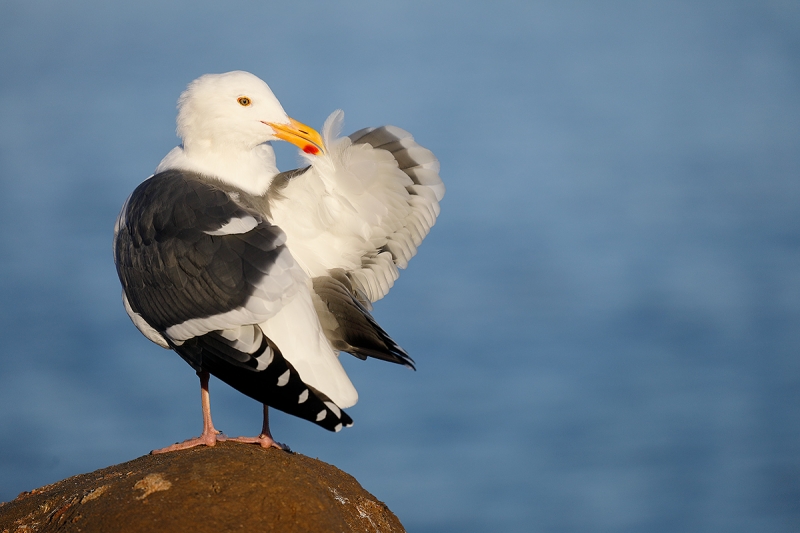
This is the same bird photographed at 7:39am on the same day in early morning light that is richer in the warm tones than it is in images made later on a clear day (as seen in the image that opens this blog post). Image #2: Western Gull, adult breeding plumage preening |
Which Light Do You Prefer?
Do you prefer the perfectly neutral light (see below) in Image #1, or the warmer, richer light in Image #2? Either way, take a crack at why you prefer one over the other.
Which is the Stronger Image?
Which image do you think is the better photograph? Why?
The DPP 4 Screen Capture for today’s featured image |
Understanding the Color of Light/Part II
Note the RGB values for the brightest WHITEs in Image #1, the image made later on in the morning: R=239, G=239, B=239. These values indicate perfectly neutral WHITEs. Compare them to the BGR values for the brightest WHITEs in Image #2: R=240, G = 233, B = 216. Note the high value for RED and the low value for B. Note also that that image was created 45 minutes earlier at 7:39am. On clear mornings not long after sunrise the light is rich in REDs and YELLOWs; much of the BLUE is filtered out as the light travels obliquely a long way through the earth’s atmosphere. The result is what we call “early” or “sweet” light (as opposed to the colder light later on in the day when the sun is much more directly overhead as in Image #1.).
When working with richer (and therefore softer) light, I am more inclined to work a bit off of sun angle if need be. In colder (bluer), stronger light, I will do my very best to stay right on sun angle with the light coming right over the top of my head and my shadow pointed right at the subject.
If In Doubt …
If in doubt about using the BAA B&H affiliate link correctly, you can always start your search by clicking here. Please note that the tracking is invisible. Web orders only. Please, however, remember to shoot me your receipt via e-mail.


Please Remember to use my Affiliate Links and to Visit the New BAA Online Store 🙂
To show your appreciation for my continuing efforts here, we ask, as always, that you get in the habit of using my B&H affiliate links on the right side of the blog for all of your photo and electronics purchases. Please check the availability of all photographic accessories in the New BIRDS AS ART Online Store, especially the Mongoose M3.6 tripod head, Wimberley lens plates, Delkin flash cards and accessories, and LensCoat stuff.
As always, we sell only what I have used, have tested, and can depend on. We will not sell you junk. We know what you need to make creating great images easy and fun. And please remember that I am always glad to answer your gear questions via e-mail.
I would of course appreciate your using our B&H affiliate links for all of your major gear, video, and electronic purchases. For the photographic stuff mentioned in the paragraph above, and for everything else in the new store, we, meaning BAA, would of course greatly appreciate your business. Here is a huge thank you to the many who have been using our links on a regular basis and those who will be visiting the New BIRDS AS ART Online Store as well.
Amazon.com
Those who prefer to support BAA by shopping with Amazon may use the logo link above.
Amazon Canada
Many kind folks from north of the border, eh, have e-mailed stating that they would love to help us out by using one of our affiliate links but that living in Canada and doing so presents numerous problems. Now, they can help us out by using our Amazon Canada affiliate link by starting their searches by clicking here.
Be sure to like and follow BAA on Facebook by clicking on the logo link upper right. Tanks a stack.
Typos
In all blog posts and Bulletins, feel free to e-mail or to leave a comment regarding any typos or errors. Just be right :).


Too tight all around was actually what I was thinking rather than “too tight to the right” but it was the right that stood out. I guess that aspect is just a personal preference relating to how much a person wants to maximize the detail of the subject. I started out a few years ago with tighter cropping and now have relaxed that.
Jack
Though both are fine images where I come from, I’m with David Policansky and John Mack in preferring image #2. For the image design, the quality of the light, the raised wing pose, the exposed tail, and the feather in the bill.
I do not feel that Image #1 is cropped too tightly from the right; the bird is effectively facing to our left. The distance from the left frame-edge to the bird is about three times greater than the distance from the right frame-edge to the bird. I don’t think that centering the bird would have improved things a whole lot. That said, it would not have been a big deal to add canvas on three sides, left, right and above. More room all around would not have hurt.
Thanks to all who commented.
with love, artie
Artie: I prefer the second of these two fine images. I like the partially open wing, the single feather visible near the bird’s bill, the less-cluttered composition*, the lovely, clear white patches in the bird’s left wing, and the extra space you’ve given the bird, the result of using landscape orientation. I prefer the light in image # 2 as well, but that’s less important to me than the other factors.
*I guess it’s not so much the composition that’s cluttered as the bird itself in image #1, and “cluttered” likely isn’t right, either. It’s just easier for me to see what’s going on in image #2.
I also would like to know why the first bird has been cropped tight on the right. I’m consistently a red/yellow guy while my wife likes those horrid white led lights in the house, so image 2 is more pleasing.
Jack
I prefer the first image. I feel that portrait orientation does for this image what landscape orientation fails to do for the other. I also like the detail of the legs in the first image–those legs really capture Larus occidentalis for me.
Hey Arthur, Image number two is my favorite. Love the preening pose the warmer light and the rule of thirds position.
I’ll have to go along with Joel about the PJ’s. Just begs the question….
Re the two birds, as far as the view, I like the first: tighter, fully exposed bill and better look at the feet. But I feel the bird needs to be a little more left in the frame. But, I like light in the earlier shot.
Oh well, guess you can’t have it all, all the time.
Thank you for more information on color balance.
Sounds like fun but I usually wear at least some PJ’s 🙂