Stuff
A Bronx Tale was great. Amazing music and a terrific cast, especially the young “C.” As expected, I cried almost from the opening number through the standing ovation. I had seen the movie for the first time a few months back.
Anita North and I met my B&H friends Izzy Flamm, Yosef Brown, and Nat Greenfield, we headed uptown a bit to Le Marais — “a rare( kosher) steakhouse, well done” — for two hours of fine food and wonderful conversation.
Do consider joining me on the Early Winter DeSoto IPT. Details below.
The Streak
Today makes one hundred twelve days in a row with a new educational blog post! This one took about an hour to prepare. With all of my upcoming free time (or not …), the plan right now is to break the current record streak of 480 … Good health and good internet connections willing.
Everybody’s Doing It…
Everybody’s buying and selling used gear on the BAA Used Gear Page. Sales of lenses especially have been picking up recently. There are lots of great deals on a variety of camera bodies right now, all with low prices. Selling your used (or like-new) photo gear through the BAA Blog or via a BAA Online Bulletin is a great idea. We charge only a 5% commission. One of the more popular used gear for sale sites charged a minimum of 20%. Plus assorted fees! Yikes. They recently folded. And eBay fees are now in the 13% range. The minimum item price here is $500 (or less for a $25 fee). If you are interested please e-mail with the words Items for Sale Info Request cut and pasted into the Subject line :). Stuff that is priced fairly–I offer free pricing advice, usually sells in no time flat. In the past few months, we have sold just about everything in sight. Do know that prices on some items like the EOS-1D Mark IV, the old Canon 500mm, the EOS-7D, and the original 400mm IS DO lens have been dropping steadily. Even the prices on the new 600 II and the 200-400 with Internal Extender have been plummeting. You can see all current listings by clicking here or by clicking on the Used Photo Gear tab on the yellow-orange menu bar at the top of each blog post.
Booking.Com
Booking.Com came through for me twice again recently with both the DeSoto Fall IPT and next July’s UK Puffins, Gannets, and Bempton Pre-trip room reservations. And all the rates were great. If you’d like to give Booking.Com a shot, click here and you will earn a $25 reward. Thanks to the many who have already tried and used this great service.


Gear Questions and Advice
Too many folks attending BAA IPTs and dozens of folks whom I see in the field, and on BPN, are–out of ignorance–using the wrong gear especially when it comes to tripods and more especially, tripod heads… Please know that I am always glad to answer your gear questions via e-mail.
|
|
|
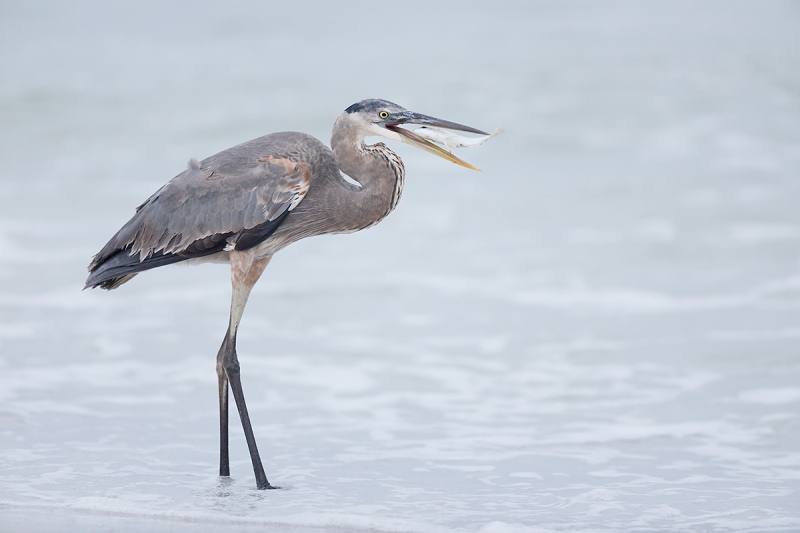
This image was created at Fort DeSoto very early (7:06am) on the very cloudy morning of November 12, 2017 with the Induro GIT304L Grand Series 3 Stealth Carbon Fiber Tripod/Mongoose M3.6-mounted Canon EF 600mm f/4L IS II USM lens and my favorite GBH photography camera body, the Canon EOS 5D Mark IV. ISO 3200. Evaluative metering +2 1/3 stops off the grey sky: 1/500 sec. at f/4.0 in Manual mode. AWB in cloudy dark, completely overcast conditions. LensAlign/FocusTune micro-adjustment: -2. Center Large Zone/AI Servo/Shutter Button AF was active at the moment of exposure. The system selected two AF points, one directly above the other, that fell on the bird’s upper and lower neck, right on the same plane as the bird’s eye. Great Blue Heron with greenback (thread herring)Be sure to enjoy an enlarged version by clicking on the image. |
On Being Ready
It pays to check your camera body and lens (or camera bodies and lenses) as you head out for a photo session. You should be 100% sure of the following:
- Camera on with fresh battery and clean card.
- RAW capture
- AF switch set to AF (not M!)
- AI Servo AF
- AF Area Selection mode: AF expand (with the center AF point) for horizontals, Upper Large Zone AF for both vertical orientations
- Shutter button or rear button AF
- Shooting mode (almost always Manual or Av)
- Full or not full focusing range (the former for close subjects, the latter for flight and distant subjects)
- ISO (this is totally dependent on the weather and sky conditions)
- Chosen aperture and exposure compensation (or shutter speed and exposure compensation if in Tv mode)
- 2-second timer off
- High speed frame rate
- IS set to Mode 2
If I left anything out, please leave a comment.
My Thinking …
As there was a big feeding spree going on, it looked as if Noel and I would be concentrating at first on Sandwich Terns in flight. As it was so dark, I set the ISO to 3200 so that at +2 2/3 stops I could get to 1/500 second (at f/4). As we approached the beach I noticed a GBH with a live fish off to our left and called it out. As we approached, I switched from center AF Expand to center large zone, confident that 1/500 sec. at f/4 would be perfect; even though the heron was darker overall than the terns, the silvery fish was very bright. The bird was standing by an ugly pile of grass so I made three images, checked the exposure — well to the right with no blinkies — and approached the bird slowly. That had the desired effect; the bird walked slowly away from me and then turned back into the wind so that it was perfectly square to the back of the camera, just as I had planned 🙂
I acquired focus and fired off three quick frames. Then the bird swallowed the fish and resumed hunting. I got really, really lucky with the third frame as the bird had its bill open with the fish in am almost perfect position. (Completely in midair would have been absolutely perfect.)
Notice …
Notice that by being well prepared, knowing the settings on my camera, being sure of the correct exposure in advance, and by correctly analyzing the bird’s behavior, I was able to get the shot. Had I done a single thing wrong or if I needed to fiddle with this or that, I would have been up the proverbial creek without a good image.

|
The Before and After NeatImage Noise Reduction
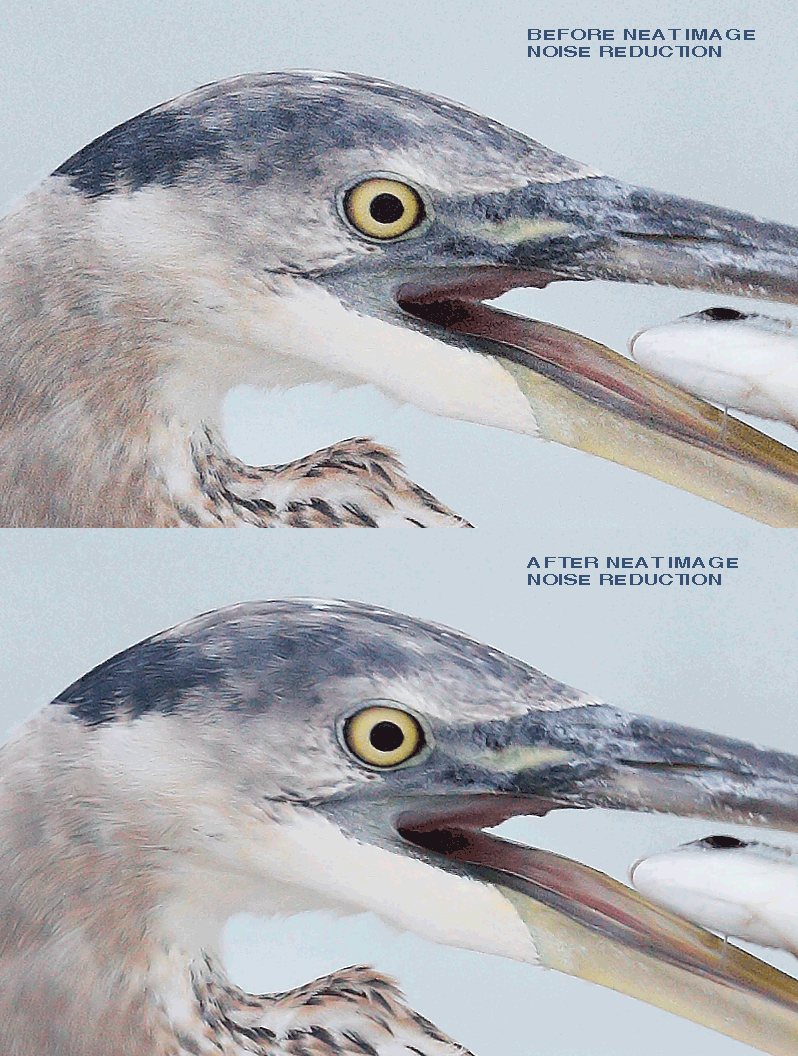
The noise on the correctly exposed RAW (CR.2) file was not bad at all for ISO 3200. The noise reduction settings in my 5D Mark IV ISO 3200 recipe took care of the color noise and some of the luminance noise. As expected and as you can see above, NeatImage noise reduction dealt with the remaining luminance noise beautifully without messing with the detail. Do understand that our eyes often perceive noise as detail. With the light-toned noise free background I did not need to select the bird and was able to do a fast and dirty NeatImage noise reduction (that as detailed in here, by sending a Paypal for $40 DB II.
|
|
|
The BIRDS AS ART Current Workflow e-Guide (Digital Basics II) will teach you an efficient Mac or PC/Photo Mechanic/Photoshop workflow that will make it easy for you to make your images better in Photoshop (rather than worse). That true whether you convert your images in DPP 4 or ACR. See the blog post here to learn lots more and to read a free excerpt. You can order your copy from the BAA Online Store here, by sending a Paypal for $40 here, or by calling Jim or Jennifer weekdays at 863-692-0906 with your credit card in hand. |
The BIRDS AS ART Current Workflow e-Guide (Digital Basics II)
The few things mentioned above (and tons more) are covered in detail in the BIRDS AS ART Current Workflow e-Guide (Digital Basics II), an instructional PDF that is sent via e-mail. Learn more and check out the free excerpt in the blog post here. The new e-Guide reflects my Macbook Pro/Photo Mechanic/DPP 4/Photoshop workflow. Do note that you will find the RGB Curves Adjustment Color Balancing tutorial only in the new e-guide. Note: folks working on a PC and/or those who do not want to miss anything Photoshop may wish to purchase the original Digital Basics along with DB II while saving $15 by clicking here to buy the DB Bundle.
The two most recent and many of the older MP4 Photoshop Tutorial videos releases go hand and hand with the information in DB II):
Folks who learn well by following along rather than by reading can check out the complete collection of MP 4 Photoshop Tutorial Videos by clicking here.
You can learn how and why I and other discerning Canon shooters convert nearly all of their Canon digital RAW files in DPP 4 using Canon Digital Photo Professional in the DPP 4 RAW conversion Guide here. And you can learn advanced Quick Masking and advanced Layer Masking techniques in APTATS I & II. You can save $15 by purchasing the pair. Folks can learn sophisticated sharpening and (NeatImage) Noise Reduction techniques in the The Professional Post Processing Guide by Arash Hazeghi and yours truly.
|
|
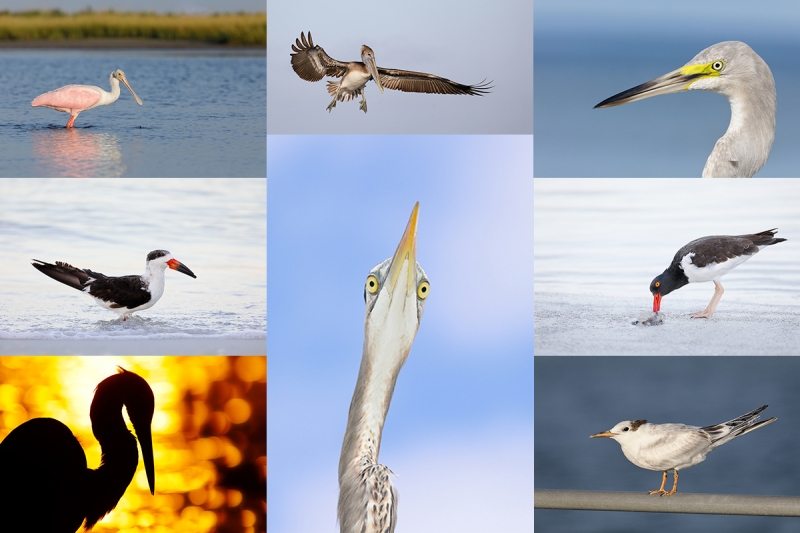
Recent Fort DeSoto ImagesFrom bottom left clockwise back to center: Great Egret, blasting sunrise highlights; Black Skimmer, winter plumage in pre-dawn light; Roseate Spoonbill foraging; Brown Pelican, juvenile landing; hybrid heron X egret???; American Oystercatcher feeding; Royal Tern, worn juvenile; Great Blue Heron from below. You can see a composite of more recent images in the DeSoto Sucked This Past Weekend blog post here. |
Fort DeSoto Early Winter IPT. 3 1/2 days: $1599
Saturday DEC 2 (afternoon session) through the full day on Tuesday DEC 5, 2017. Meet and Greet Introduction on SAT DEC 2, 2017
With no water in Estero Lagoon, Corkscrew Swamp and Anhinga Trail total busts for many years, and Ding Darling NWR managed into oblivion, Fort DeSoto has emerged as the premier bird photography location in the state. Join me in early winter to escape the cold weather and photograph lots of tame terns, gulls, herons, egrets (including Reddish Egret), shorebirds (including and especially Marbled Godwit), Osprey, and Brown Pelican. Long-billed Curlew, Wood Stork, and Roseate Spoonbill all range somewhere between likely and possible.
Learn to get the right exposure every time, to approach free and wild (and often tame!) birds, and to design a pleasing image. And learn the location of my new Fort DeSoto hotspot along with my favorite sunset location (sky conditions permitting). To register call Jim or Jen at the office at 863-692-0906 or shoot me an e-mail.
DeSoto IPT Details
This IPT will include four 3 hour afternoon sessions, three 3 1/2 hour morning sessions, three lunches, and after-lunch image review and Photoshop sessions. To ensure early starts, breakfasts will be your responsibility. Dinners are on your own so that we can get some sleep.
Because of the narrow time frame, your $499 non-refundable deposit can be paid not by credit card. Call Jim or Jennifer at the office with a credit card at 863-692-0906 to register. Your balance must be paid by check once you sign up. The balance check (made out to “BIRDS AS ART) should me mailed to us at BIRDS AS ART, PO Box 7245, Indian Lake Estates, FL, 33855. Please print, complete, and sign the form that is linked to here and shoot it to us along with your balance check. If you have any questions, please feel free to contact me via e-mail.
Canon lens rentals are available on a limited basis: 600 II, 500 II, 400 DO II, and 200-400 f/4 with Internal TC.
If In Doubt …
If in doubt about using the BAA B&H affiliate link correctly, you can always start your search by clicking here. Please note that the tracking is invisible. Web orders only. Please, however, remember to shoot me your receipt via e-mail.


Please Remember to use my Affiliate Links and to Visit the New BAA Online Store 🙂
To show your appreciation for my continuing efforts here, we ask, as always, that you get in the habit of using my B&H affiliate links on the right side of the blog for all of your photo and electronics purchases. Please check the availability of all photographic accessories in the New BIRDS AS ART Online Store, especially the Mongoose M3.6 tripod head, Wimberley lens plates, Delkin flash cards and accessories, and LensCoat stuff.
As always, we sell only what I have used, have tested, and can depend on. We will not sell you junk. We know what you need to make creating great images easy and fun. And please remember that I am always glad to answer your gear questions via e-mail.
I would of course appreciate your using our B&H affiliate links for all of your major gear, video, and electronic purchases. For the photographic stuff mentioned in the paragraph above, and for everything else in the new store, we, meaning BAA, would of course greatly appreciate your business. Here is a huge thank you to the many who have been using our links on a regular basis and those who will be visiting the New BIRDS AS ART Online Store as well.
Amazon.com
Those who prefer to support BAA by shopping with Amazon may use the logo link above.
Amazon Canada
Many kind folks from north of the border, eh, have e-mailed stating that they would love to help us out by using one of our affiliate links but that living in Canada and doing so presents numerous problems. Now, they can help us out by using our Amazon Canada affiliate link by starting their searches by clicking here.
Be sure to like and follow BAA on Facebook by clicking on the logo link upper right. Tanks a stack.
Typos
In all blog posts and Bulletins, feel free to e-mail or to leave a comment regarding any typos or errors. Just be right :).


Why mode 2 for IS?
Mode 1 is for static subjects but Mode 2 just just as well for 99.9% of those. Modes 2 and 3 are for tracking moving birds but with IS mode 3 the IS does not kick in until the shutter is fully depressed. With IS Mode 2 I love the the image in the viewfinder is stabilized when you are panning with a moving subject. So I simply set IS Mode 2 and forget it 🙂
with love, artie
Artie, re “I set the ISO to 3200” … is there any reason not to use Auto ISO?
Hi CJ,
I never have to set Auto ISO because — as recommended in all of our camera user’s guides, I use ISO Safety Shift. That has the advantage of your not having to set Auto ISO as it is alway in place.
While each session is different I could have gone to Tv mode and set 1/500 sec. and +2 1/3 stops EC. The advantage of being in Manual mode rather than Tv mode is that you do not have to worry about the size of a dark subject like a young Brown Pelican in the frame influencing the meter. As the morning got brighter and we went to lower ISOs I would go 2 clicks (2/3 stop) lighter for the pelicans than for the Sandwich Terns.
Thanks for the good question and lmk if it all makes sense 🙂
with love, artie
P.S. When we take people on safari, I beg them to 1) learn your camera, 2) be ready!
Hi Artie,
When I walk, or drive, I use all those settings, except, rather than AV, I use Auto ISO, F8, 1/400, and Exposure Comp +2/3. Those are my C1 custom settings so I can revert back to them easily. Then I’m always ready for just about anything that happens. Unfortunately, many cameras don’t allow EC with Auto ISO. Thanks for all you do.
Mike in CT
Are you in Manual mode “rather than Av”? That seems to be implied but not clearly stated.
with love, artie
Yes, manual, but I call it Auto ISO mode, the 4th mode
On Being Ready
Check to ensure filter is clean – especially if you were working in wet or windy conditions the previous day.
Check your lens hood for dirt and debris – the inside felt of the 100-400 is a magnet for debris. I also find a surprising number of spider webs accumulate across the opening of my lens hood when I walk trails in the morning.
I try to remember to check the drop-in filter every few days.
Many thanks, a