Stuff
I spent most of Monday dealing with low back/hip pain issues. 🙂 And I cut down one more skinny dead tree as a potential perch. And I swam my 3/4 mile and exercised.
If you need a hotel reservation be sure to give Booking.com a try; at worst, you will save $25 off your first reservation. See below for details.
Everyone did a good job of leaving comments on yesterday’s Can a 1 1/2 degree head angle difference be a big deal? blog post here.
I was glad to learn that Mansoor Assadi sold both his 1DX Mark II and his 1D Mark IV after the recent price drops.
The Streak
Today makes one hundred twenty-three days in a row with a new educational blog post! This one took almost two hours to prepare. With all of my upcoming free time (or not …), the plan right now is to break the current record streak of 480 … Good health and good internet connections willing.
Booking.Com
Booking.Com came through for me twice again recently with both the DeSoto Fall IPT and next July’s UK Puffins, Gannets, and Bempton Pre-trip room reservations. And all the rates were great. If you’d like to give Booking.Com a shot, click here and you will earn a $25 reward. Thanks to the many who have already tried and used this great service.


Gear Questions and Advice
Too many folks attending BAA IPTs and dozens of folks whom I see in the field, and on BPN, are–out of ignorance–using the wrong gear especially when it comes to tripods and more especially, tripod heads… Please know that I am always glad to answer your gear questions via e-mail. Those might include system, camera body, accessory, and lens choices and decisions.
|
|
|
These image was created on the morning of Sunday, November 27, 2017 from my Toyota Sequoia (engine turned off) with the BLUBB-supported Canon EF 600mm f/4L IS II USM lens, the Canon Extender EF 1.4X III, and my favorite tern photography camera body, the Canon EOS 5D Mark IV. ISO 400. Evaluative metering minus about 1/3 stop (should have been +2/3 stop): 1/640 sec. at f/5.6 in Manual mode. AWB in early morning light. LensAlign/FocusTune micro-adjustment: -1. One AF point up from the center AF point/AI Servo/Expand/Shutter Button AF was active at the moment of exposure. As originally framed, the selected AF point was on the bird’s cheek directly below the bird’s eye. Mottled Duck |
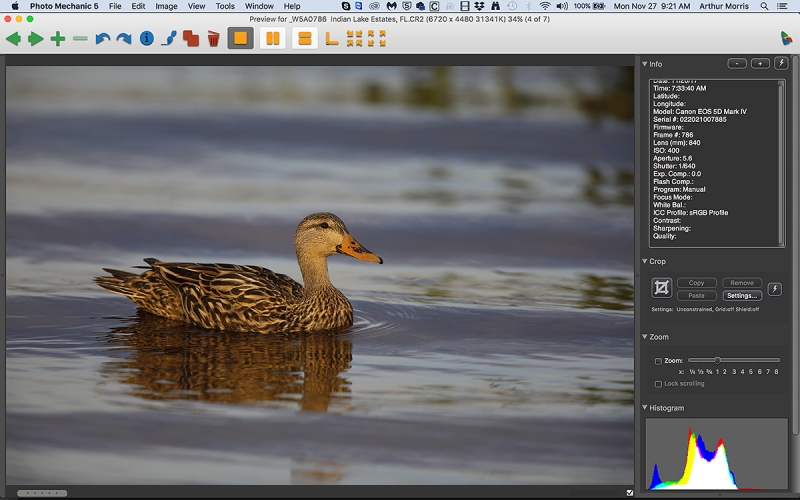
The Under-exposed RAW File as Viewed in Photo Mechanic
Above you see what I see when I am editing my images (so swiftly) in Photo Mechanic. You do not need to look at the histogram to tell that this image was a gross underexposure. Notice though that the histogram is pretty much centered with little or no data on the right side of the histogram. Note the tiny check-mark in the small white box bottom left of the histogram. I hit “t” (for tagged) on the keyboard to denote my keepers. The rejects are left blank.
So how did I wind up one full stop under? I was photographing a Boat-tailed Grackle when three Mottled Ducks flew in and landed quite close by just to the left of sun angle. These ducks are usually quite skittish. I thought that the ducks would need less exposure than the grackle so I spun the shutter speed dial two clicks to get from 1/400 to 1/640 sec. In addition, with the ducks somewhat left of sun angle you lose about 1/2 stop of light. As the grackle turned out to be underexposed I wound up much too dark for the duck. If I had been in Av mode at +2/3 stop I would have been a lot closer to the correct exposure for the duck. That said, I continue to use Manual mode for about 90% of my photography. And I recommend that you learn to do the same. 🙂 Note also that the red channel is the farthest to the right …
|
|
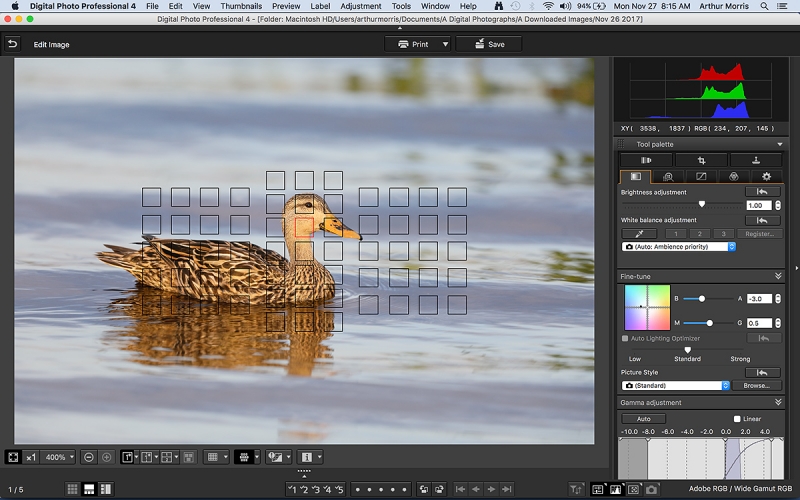
This is the DPP 4 Screen Capture after I had made adjustments to the RAW file |
The DPP 4 Screen Capture After I Had Made Adjustments to the RAW File
First note the placement of the active AF point, the illuminated red square. You are much better off going for the cheek than for the eye as it provides a broader, more stable target. Note also that I needed to move the Brightness slider one full stop to the right to +1.00. That represents a rare mistake for me. You cannot see that with the one stop under-exposure I opted to use my 5DIV ISO 800 recipe rather than my 5D IV ISO 400 recipe; it is always a good plan to go to the recipe for the next higher ISO when you have a gross underexposure error. Notice that the RGB values for the brightest area of the duck’s cheek show RED predominating even though I moved the Color fine-tune dot toward BLUE and away from RED.
You can use this same strategy if you are converting in ACR: increase the exposure and use your RAW noise reduction noise settings for the next higher ISO.
|
|
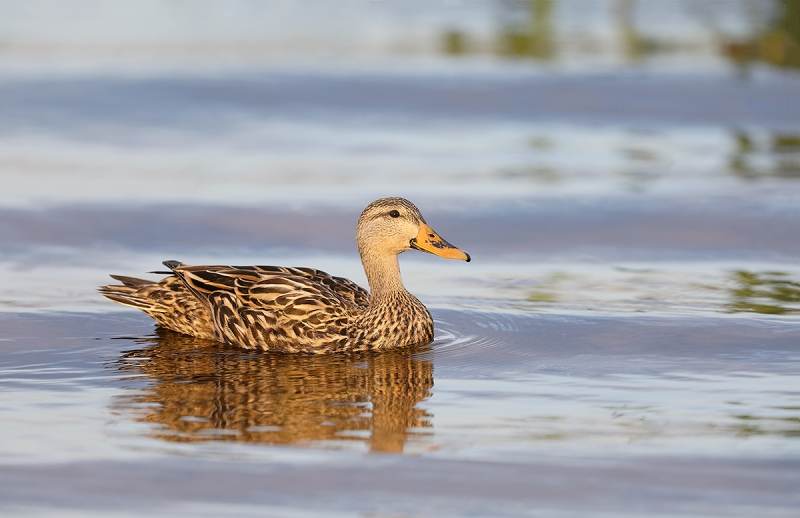
This is the optimized version of today’s featured imageBe sure to click on the image to view the larger size and see the superb image quality and the lack of noise. |
The Image Optimization
First off notice that despite the gross underexposure I was able to create a virtually noise-free, high quality TIF file without much effort. After converting the RAW in DPP 4, the first thing that I did once the image was brought into Photoshop was to level it. I used the Ruler Tool (my keyboard shortcut R) by drawing a line along the bottom of the aquatic plants in the upper right part of the frame. The I hit Command + / ((my keyboard shortcut for Image > Rotate > Arbitrary). Then I hit C for the Crop Tool and then Clear. I cropped from all sides but the bottom. That left me to fill in the three skinny triangles with John Heado Content Aware Fill. When you do that be sure to enlarge the edges to check for any problems. With this image, the water was perfect but the spots with the vegetation were not. When I tried to use the Spot Healing Brush (my keyboard shortcut J) to smooth things out, I made more of a mess so I simply redid the obvious creases with the Patch Tool (my Keyboard shortcut P).
Then it was just a matter of naming and saving my master file and creating and sharpening the 1200 pixel wide JPEG that you see immediately above.
Image Design Question
Do you like the inclusion of the aquatic vegetation in the upper right or would you have preferred an all-water background? Either way, let us know why?
|
|
|
The BIRDS AS ART Current Workflow e-Guide (Digital Basics II) will teach you an efficient Mac or PC/Photo Mechanic/Photoshop workflow that will make it easy for you to make your images better in Photoshop (rather than worse). That true whether you convert your images in DPP 4 or ACR. See the blog post here to learn lots more and to read a free excerpt. You can order your copy from the BAA Online Store here, by sending a Paypal for $40 here, or by calling Jim or Jennifer weekdays at 863-692-0906 with your credit card in hand. |
The BIRDS AS ART Current Workflow e-Guide (Digital Basics II)
The few things mentioned above (and tons more) are covered in detail in the BIRDS AS ART Current Workflow e-Guide (Digital Basics II), an instructional PDF that is sent via e-mail. Learn more and check out the free excerpt in the blog post here. The new e-Guide reflects my Macbook Pro/Photo Mechanic/DPP 4/Photoshop workflow. Do note that you will find the RGB Curves Adjustment Color Balancing tutorial only in the new e-guide. Note: folks working on a PC and/or those who do not want to miss anything Photoshop may wish to purchase the original Digital Basics along with DB II while saving $15 by clicking here to buy the DB Bundle.
The two most recent and many of the older MP4 Photoshop Tutorial videos releases go hand and hand with the information in DB II):
Folks who learn well by following along rather than by reading can check out the complete collection of MP 4 Photoshop Tutorial Videos by clicking here.
You can learn how and why I and other discerning Canon shooters convert nearly all of their Canon digital RAW files in DPP 4 using Canon Digital Photo Professional in the DPP 4 RAW conversion Guide here. And you can learn advanced Quick Masking and advanced Layer Masking techniques in APTATS I & II. You can save $15 by purchasing the pair. Folks can learn sophisticated sharpening and (NeatImage) Noise Reduction techniques in the The Professional Post Processing Guide by Arash Hazeghi and yours truly.
If In Doubt …
If in doubt about using the BAA B&H affiliate link correctly, you can always start your search by clicking here. Please note that the tracking is invisible. Web orders only. Please, however, remember to shoot me your receipt via e-mail.


Please Remember to use my Affiliate Links and to Visit the New BAA Online Store 🙂
To show your appreciation for my continuing efforts here, we ask, as always, that you get in the habit of using my B&H affiliate links on the right side of the blog for all of your photo and electronics purchases. Please check the availability of all photographic accessories in the New BIRDS AS ART Online Store, especially the Mongoose M3.6 tripod head, Wimberley lens plates, Delkin flash cards and accessories, and LensCoat stuff.
As always, we sell only what I have used, have tested, and can depend on. We will not sell you junk. We know what you need to make creating great images easy and fun. And please remember that I am always glad to answer your gear questions via e-mail.
I would of course appreciate your using our B&H affiliate links for all of your major gear, video, and electronic purchases. For the photographic stuff mentioned in the paragraph above, and for everything else in the new store, we, meaning BAA, would of course greatly appreciate your business. Here is a huge thank you to the many who have been using our links on a regular basis and those who will be visiting the New BIRDS AS ART Online Store as well.
Be sure to like and follow BAA on Facebook by clicking on the logo link upper right. Tanks a stack.
Typos
In all blog posts and Bulletins, feel free to e-mail or to leave a comment regarding any typos or errors. Just be right :).


Hi Artie,
I agree and I like the new crop!
One question I have from this image concerns shutter speed. I find my subjects are almost always moving in some way. When shooting Mallards recently, 1/640 of a second was not enough to freeze their motion, yet the subject in your image is sharp.
From a technique perspective, what should I be doing to get my subjects sharper at that shutter speed?
Thanks and best wishes,
Don
Hi, Artie. I didn’t even notice the (very OOF) vegetation in the background until I read your image design question. I guess I prefer it now because it is the source of the nice repeated reflections of it in the water, but it’s not a big deal for me either way. It doesn’t (wouldn’t) make or break this very nice image.
Thanks David. I had one nice frame without the veggies and the reflections but there was a floating lead or two so I went with this one and liked it.
with love, artie
Artie – Why & when did you switch from BreezeBrowser to Photo Mechanic? (I’m still in BAA blog catch up mode)
CJ,
I switched to MAC in May 2014. 🙂 And yes, you have lots of catching up to do. Glad to have you back.
with love, artie
On my computer I find I like the lighter duck, but the background is a tad bright.
I just re-calibrated my laptop today with the X-Rite ColorMunki/Display — the water should look a bit darker now 🙂
Good timing.
with love, artie
Hi Artie that turned out really well for being under exposed. Was there an update for 5DIV recipes? I’ve currently been using the 1DX II recipes for my 5DIV images with good results. Thanks
Thanks Joe. Long ago. Please e-mail Jim at staffbaa@att.net to request the latest version.
with love, artie
Thanks!
Hi Artie,
I think like vegetation complements the colors in the duck’s feathers, but to me, more importantly illustrates the camouflaging properties of those feathers.
Mike
Confused as the duck is not at all camouflaged …
with love, artie
Yes, You’re right. But we all see different things in an image. Some see waves, some see reflections. I see why this species survived, in part, because its coloration is similar to the surrounding vegetation. Thanks.
I find the repeating wave pattern interesting and my cropping would emphasize this pattern.
I would use the dark bands of the top and bottom waves to frame the image, so I would crop out the vegetation. I would keep the reflections that remain after cropping because they are subtle. They create balance and make the image more interesting.
If you crop from the top you would need to take quite a bit off the bottom for balance; that would result in a really skinny pano …
with love, artie