Stuff
Saturday started out looking like another gray day but before I knew it the sun was out. I headed to the lake at 8:30am. About a dozen times I had a vulture doing a perfect full double wing stretch taking in the morning sun. And a dozen times I screwed up by taking too long. I came away with nothing. There’s always next time. In the evening the sunset was very clear so I came up with a new strategy: I quit trying to get the Anhinga against the ball of the sun and photographed it against the bright sky. Why? When it does its elaborate stretching it does not completely fit inside the disc of the sun. I missed the dependable head-down stretch while moving the tripod but got a few good ones of the takeoff. There’s always next time.
I was having a problem autofocusing with the 600 II and the 2X III TC last night — AF simply did not work. I will try to figure things out this morning; is the problem is with the lens, the camera, or the TC. Depending on what I learn, I might be doing lots of micro-adjusting today …
Again I spent much of the day doing second and third edits on various folders to make more room on my laptop. The pool temps continue to drop so I tried out my new snorkeling vest and kept myself fairly warm for another mile. It was the first time that I had done a mile three days in a row. Soon I will be one month without swimming.
How I Got Lucky
While multiple IPT veteran Jake Levin of Montreal, Canada, left a near-perfect answer to the “In what ways did I get lucky with the Black Vulture flight image in yesterday’s blog post here, not a single person attempted to answer the quality of light question. Revisits are welcome. Well done Jake. I will see Jake again on the San Diego #1 IPT; there are still 3 spots open on San Diego #2.
Jake Levin
December 30, 2017 at 1:03 pm · Reply · Edit
How I think you got lucky:
1) The bird started flying away, but looked back towards you, creating a good head angle.
2) The selected focus point caught a piece of the wing on the same plane as the bird’s head and eye.
3) The vulture was captured entirely within the blue area created by the background water, meaning you didn’t get any lines cutting through it.
4) The wing position at the time of exposure didn’t create any shadows on the body.
To that I would add that had the wings been down I would not have even seen the bird’s face …
Click on the logo-link above for great holiday savings!
$300 off on the Canon 100-400 II!
$300 off on the Canon 100-400 II!
The Streak
Today makes one hundred fifty-four days in a row with a new educational blog post! This blog post took about an hour to prepare including the time spent optimizing the image. With all of my upcoming free time (or not …), the plan right now is to break the current record streak of 480 … Good health and good internet connections and my continuing insanity willing.
New Listing
Canon EOS 5D Mark III digital camera body
Canon EOS 5D Mark III digital camera body
Gerald Barrack is offering a Canon EOS 5D Mark III digital camera body (with extras) in excellent to near-mint condition for $1,349.00. The sale includes the front cap, the Canon camera strap, one Canon battery, the battery charger, the Really Right Stuff camera body plate (B 5D3 A, a $55.00 value), a Delkin 700X- 64GB compact flash card, and insured ground shipping via major courier to US address only. Your item will not ship until your check clears unless other arrangements are made.
Interested folks can contact Gerald via e-mail or try him on his cell at 201 638 3510 (Eastern time).
I owned and used this superb, full frame, 22mp digital body for several years. It was always my first choice for scenic, Urbex (urban exploration), and flower photography until I fell in love for a while with the 5DS R (for a lot more money!). Then I switched to the 5D IV body. In addition, I loved my 5D III body for birds with my big lenses and both TCs. I used mine to create many dozens of high quality images. artie
Click here for Amazing 5D Mark IV Bundles and Deals
Booking.Com
Booking.Com came through for me twice again recently with both the DeSoto Fall IPT and next July’s UK Puffins, Gannets, and Bempton Pre-trip room reservations. And all the rates were great. If you’d like to give Booking.Com a shot, click here and you will earn a $25 reward. Thanks to the many who have already tried and used this great service.
Gear Questions and Advice
Too many folks attending BAA IPTs and dozens of folks whom I see in the field, and on BPN, are–out of ignorance–using the wrong gear especially when it comes to tripods and more especially, tripod heads… Please know that I am always glad to answer your gear questions via e-mail. Those questions might deal with systems, camera bodies, accessories, and/or lens choices and decisions.
|
|
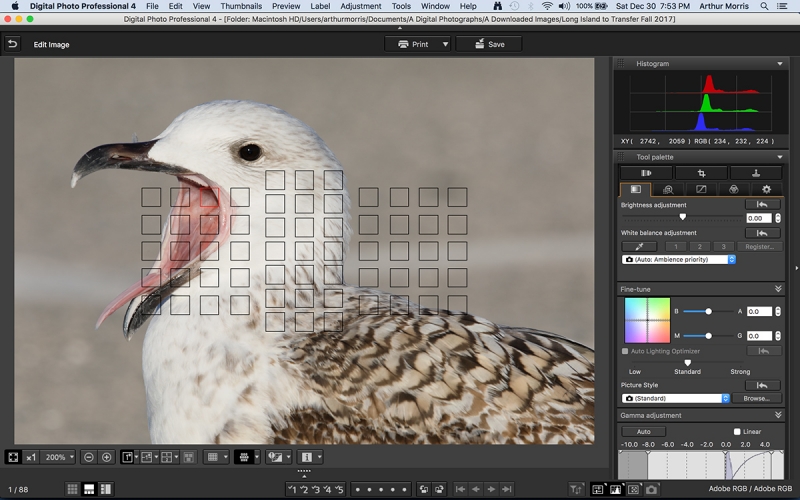
The DPP 4 Screen CaptureClick on the image to see a larger version if you’d like to read the fine print. |
The DPP 4 Screen Capture
First, note the location of the selected AF point. Next, note the white parking lot line cutting through the bird along with the rest of the mess in the background. Working at f/14 rather than f/5.6 or f/6.3 surely brought up the unwanted background detail. (See how I cleaned up the background in the optimized image below.)
Aperture/Depth of Field Question
What was I trying to do by choosing a very small aperture? Doing so sure created lots of extra work in post processing …
Image Design Question
Answer this question correctly first might actually help you to get the right answer for the aperture/depth of field question above: why did I select an AF point that placed the bird so far forward in the frame?
Learn everything that there is to know about the great AF system of the 5D Mark IV in the new 5D Mark IV User’s Guide.
|
|
|
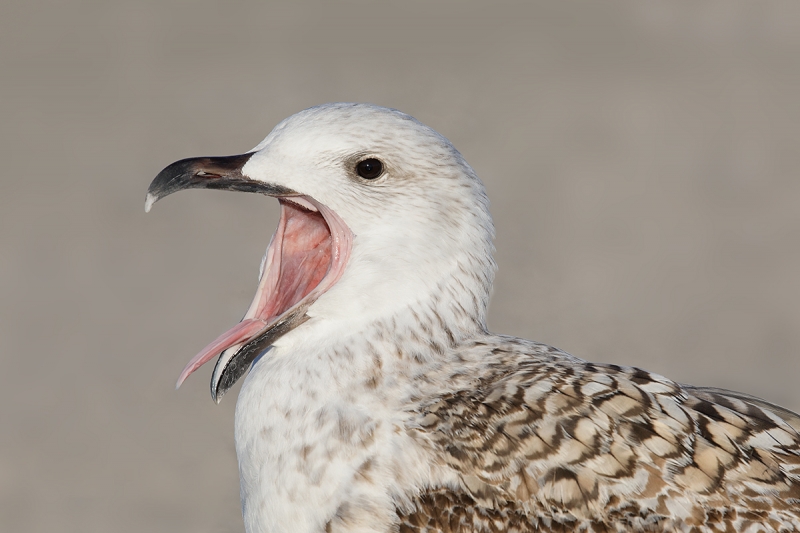
This image was created on the morning of November 24 at Robert Moses State Park, Long Island, NY with the BLUBB-supported Canon EF 600mm f/4L IS II USM lens, the Canon Extender EF 1.4X III, and my favorite gull photography camera body, the Canon EOS 5D Mark IV. ISO 400. Evaluative metering + 2/3 stop as framed: 1/500 sec. at f/14 in Manual mode. At 8:08am in partly sunny conditions. LensAlign/FocusTune micro-adjustment: -2. Two rows up and three AF points to the left of the center AF point/AI Servo/Expand/Shutter Button AF was active at the moment of exposure. The selected AF point was on the rear upper gape of the bill just in front of and below (and on the same plane as) the eye (as seen in the DPP 4 screen capture below). Great Black-backed Gull, first winter yawningBe sure to click on the image to enjoy the larger version. |
The Optimized Image
I knew when I pressed the shutter button with the aperture set to f/14 that I would have lots of extra work to do in post cleaning up the mess in the background. First I selected the background, feathered the selection .7 pixels, and put it on its own layer. By working on the new layer the bird was protected. I used my normal cadre of clean-up tools: the Patch Tool, Content Aware Fill, the Spot Healing Brush, the Clone Stamp Tool, and a series of small Quick Masks that were refined with the addition of Regular Layer Masks. Finally I smoothed out the background with the addition of a 60-pixel Gaussian Blur. I was quite happy with the result, the result that I had envisioned when I pressed the shutter button at f/14.
To see a really nice example of skillful work on a background check out all the learning going on at Joe Przybyla’s fine Florida Burrowing Owl image in the Avian forum of BirdPhotographers.net – It Ain’t Just Birds by clicking here.
|
|
|
The BIRDS AS ART Current Workflow e-Guide (Digital Basics II) will teach you an efficient Mac or PC/Photo Mechanic/Photoshop workflow that will make it easy for you to make your images better in Photoshop (rather than worse). That true whether you convert your images in DPP 4 or ACR. See the blog post here to learn lots more and to read a free excerpt. You can order your copy from the BAA Online Store here, by sending a Paypal for $40 here, or by calling Jim or Jennifer weekdays at 863-692-0906 with your credit card in hand. |
The BIRDS AS ART Current Workflow e-Guide (Digital Basics II)
Your guessed it, everything mentioned above (and tons more) is covered in detail in the BIRDS AS ART Current Workflow e-Guide (Digital Basics II), an instructional PDF that is sent via e-mail. Learn more and check out the free excerpt in the blog post here. While the new e-Guide reflects my Macbook Pro/Photo Mechanic/DPP 4/Photoshop workflow, folks using a PC and/or BreezeBrowser will also benefit greatly by studying the material on DB II. Do note that you will find the RGB Curves Adjustment Color Balancing tutorial only in the new e-guide. Note: folks working on a PC and/or those who do not want to miss anything Photoshop may wish to purchase the original Digital Basics along with DB II while saving $15 by clicking here to buy the DB Bundle.
The two most recent and many of the older MP4 Photoshop Tutorial videos releases go hand and hand with the information in DB II):
Folks who learn well by following along rather than by reading can check out the complete collection of MP 4 Photoshop Tutorial Videos by clicking here.
You can learn how and why I and other discerning Canon shooters convert nearly all of their Canon digital RAW files in DPP 4 using Canon Digital Photo Professional in the DPP 4 RAW conversion Guide here. And you can learn advanced Quick Masking and advanced Layer Masking techniques in APTATS I & II. You can save $15 by purchasing the pair. Folks can learn sophisticated sharpening and (NeatImage) Noise Reduction techniques in the The Professional Post Processing Guide by Arash Hazeghi and yours truly.
Support the Blog
Please help support my (stupendous) efforts here on the blog by remembering to click on the logo link above each time that you shop Amazon. That would be greatly appreciated. with love, artie
If In Doubt …
If in doubt about using the BAA B&H affiliate link correctly, you can always start your search by clicking here. Please note that the tracking is invisible. Web orders only. Please, however, remember to shoot me your receipt via e-mail.


Please Remember to use my Affiliate Links and to Visit the New BAA Online Store 🙂
To show your appreciation for my continuing efforts here, we ask, as always, that you get in the habit of using my B&H affiliate links on the right side of the blog for all of your photo and electronics purchases. Please check the availability of all photographic accessories in the New BIRDS AS ART Online Store, especially the Mongoose M3.6 tripod head, Wimberley lens plates, Delkin flash cards and accessories, and LensCoat stuff.
As always, we sell only what I have used, have tested, and can depend on. We will not sell you junk. We know what you need to make creating great images easy and fun. And please remember that I am always glad to answer your gear questions via e-mail.
I would of course appreciate your using our B&H affiliate links for all of your major gear, video, and electronic purchases. For the photographic stuff mentioned in the paragraph above, and for everything else in the new store, we, meaning BAA, would of course greatly appreciate your business. Here is a huge thank you to the many who have been using our links on a regular basis and those who will be visiting the New BIRDS AS ART Online Store as well.
Be sure to like and follow BAA on Facebook by clicking on the logo link upper right. Tanks a stack.
Typos
In all blog posts and Bulletins, feel free to e-mail or to leave a comment regarding any typos or errors. Just be right :).


Hi, Artie. I agree with Warren H. For what it’s worth, right or not, I came to that conclusion independently.
Hi Artie!
I have a desktop 5k iMac and previously many of your images loaded very quickly. This one took a lot longer to load and the detail looked to be much better than normal. Because it looked so good and took longer to load I thought it may be a bigger file. Perhaps just my internet. However the detail of this image on my iMac was certainly an eye popper.
Regards!
Neil
Agree with Warren and Elinor. Also this image is of much higher quality than normal. A new year bonus? Happy New Year everyone from Oz – we see the new year in first down under. Sydney fireworks scored a billion viewers worldwide.
Hi Neil,
I am quite confused by this, “Also this image is of much higher quality than normal.”
I’d love to know why you think that.
with love, artie
You used the aperture already set in the camera so you would not miss the photo op. You may have missed the shot while resetting the camera.
Hi James, Nope. I would rarely have a reason to be at f/14. In this case, I got there on purpose … with love, artie
I agree with Elinor, that your depth of field was very shallow. I think your main reason for a high aperture (f/14) was to get all the feather detail on the back of the bird. That would take several inches of depth of field for a Great Black-backed Gull, therefore high f stop. That would also explain your composition/ placement of the bird in the frame.
DOF is small with 600 1.4 being somewhat close to the bird. You wanted both sides of the mouth in sharp focus. And those back feathers all in focus. Therefore small aperture. The focus point was far forward to get those beautiful back feathers into the composition. Would a crop from the right still showing some back feathers make a good composition as well? It would make the bill not seem so far forward.
vulture and light……..It was early morning so sun was low, looks like about on the same plane as the vulture, and directly behind your back. So the bird was evenly lit, including under the wings. The RGB values show early light with red dominating as it does early and late.
Excellent on the RGB vulture stuff.
with love, artie