Stuff
We had a very successful morning on Cayman Brac climbing right to the edge of the jagged limestone cliffs for flight photography. The why of that is explained below. We were ready for another fabulous afternoon but the booby with the big chick sat in a bush for two hours and only the male of the pair that had been courting peacefully right nearby the day before was around. He would fly in and land and then take off again in search of his missing mate. Late in the day we got some nice stuff of the big chick and mom as they left the bush and enjoyed the shade that had enveloped their little piece of paradise.
It’s not too late to join us for one of the spoonbill IPTs; there are two spots left on each. Please e-mail if you would like to learn about the late registration discount.
Today makes one hundred ninety-four days in a row with a new educational blog post! This one took less than an hour to prepare. With all of my upcoming free time (or not …), the plan right now is to break the current record streak of 480 … Good health and good internet connections and my continuing insanity willing. I was glad to learn that Gary Meyer sold his Canon EF 500mm f/4L IS USM lens in near-mint condition along with a pair of like-new Series III TCs for the (unbelievable) record low BAA price of $3458.00.


Booking.Com
Several folks on the Spoonbill IPTs used the Booking.Com link below and got great rates and saved a handsome $25.00 in the process. If you too would like to give Booking.Com a shot, click here and to earn a $25 reward on your first booking. Thanks to the many who have already tried and used this great service.
Gear Questions and Advice
Too many folks attending BAA IPTs and dozens of folks whom I see in the field, and on BPN, are–out of ignorance–using the wrong gear especially when it comes to tripods and more especially, tripod heads… Please know that I am always glad to answer your gear questions via e-mail. Those questions might deal with systems, camera bodies, accessories, and/or lens choices and decisions.
|
|
|
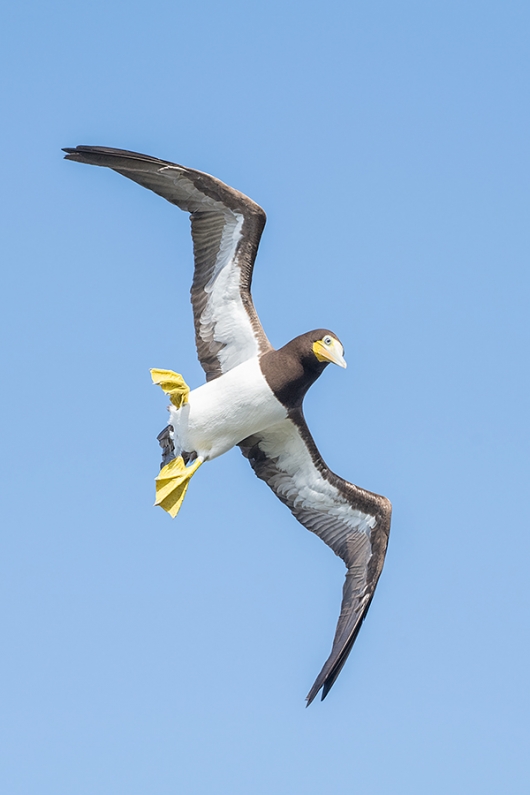
This image was created on my first morning on Cayman Brac with the hand held Nikon AF-S NIKKOR 200-500mm f/5.6E ED VR lens (at 500mm) with the mega mega-pixel Nikon D850. ISO 1000. Matrix metering at about 2 stops as framed: 1/2000 sec. at f/6.3 was a big over-exposure; I should have known better based on the ISO and the lighting conditions. But as was explained yesterday, I was overly reliant on the blinkies (that had somehow been turned off … Center Group (grp) shutter button AF was active at the moment of exposure. AF micro-adjustment: -1. Brown Booby braking in flight, cropped from a horizontal original. |
Evaluating the Situation
The wind on Cayman Brac is non-stop from the east and almost always strong. In the mornings, we are facing north while looking out over the Caribbean Sea; the sun comes up 90 degree to our right so that that light is paralleling the cliff. Then the sun moves ever-so-slowly behind us to the south. With the birds flying into the wind, I knew immediately that the very best place to be for flight photography was as close to the edge of the cliff as possible. Thus our adventures over the jagged limestone and through the thorn bushes right up to the edge of the Caribbean 150 feet below.
|
|
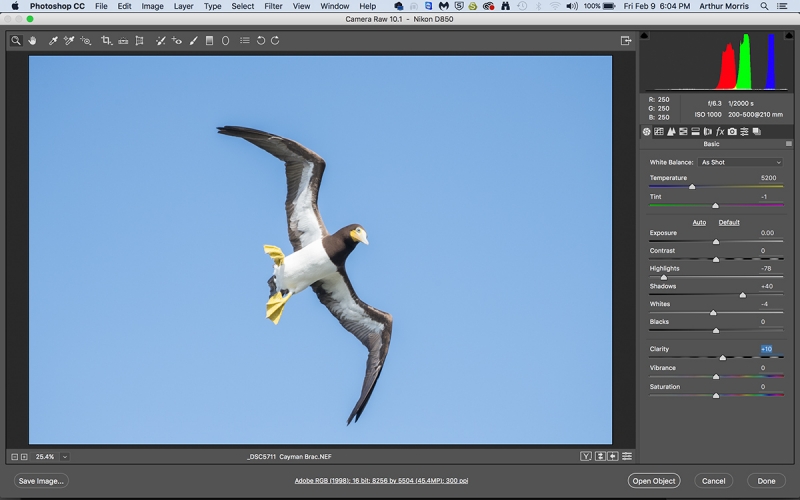
This is the ACR screen capture for today’s featured image. |
The RAW Conversion
Th RAW file for today’s featured image was so over-exposed (as detailed in yesterday’s Screwing Up (and then learning a ton) in a Very Challenging Situation on Cayman Brac blog post here) that when I moved the Exposure slider all the way to the left to -5 stops, there were still WHITEs with RGB values of R=255, G=255, B=255. Now that’s overexposed! I have always taught folks that when dealing with hot WHITEs is is always best to start with the Exposure slider. But this image taught me that there is another very effective option: I started with the Highlight slider and went from there. Be sure to click on the screen capture above in order to read the fine print. Do understand that the screen capture is the “after” version, i/e., after moving the sliders.
The Image Optimization
First I cropped to a 3X2 vertical. Then I expanded the canvas and filled it in using John Haedo Content Aware Fill. Then I selected the bird with the Quick Selection Tool, saved the selection, and put it on its own layer. Next I applied my 40/40 Color Efex Pro Detail Extractor/Tonal Contrast recipe to that layer. That worked like a charm by toning down the WHITEs, bringing up the dark tones, and revealing the detail in both. Next I ran NeatImage noise reduction with y = 75 on the bird, and y = 100 on the background (with the bird protected). All of that as detailed in the The Professional Post Processing Guide by Arash Hazeghi and yours truly. That eliminated what I call the small pixel noise from the D-850 (especially from the background).
|
|
|
The BIRDS AS ART Current Workflow e-Guide (Digital Basics II) will teach you an efficient Mac or PC/Photo Mechanic/Photoshop workflow that will make it easy for you to make your images better in Photoshop (rather than worse). That true whether you convert your images in DPP 4 or ACR. See the blog post here to learn lots more and to read a free excerpt. You can order your copy from the BAA Online Store here, by sending a Paypal for $40 here, or by calling Jim or Jennifer weekdays at 863-692-0906 with your credit card in hand. |
The BIRDS AS ART Current Workflow e-Guide (Digital Basics II)
Your guessed it, everything mentioned above (except for new Highlight slider first strategy) and tons more is covered in detail in the BIRDS AS ART Current Workflow e-Guide (Digital Basics II), an instructional PDF that is sent via e-mail. Learn more and check out the free excerpt in the blog post here. While the new e-Guide reflects my Macbook Pro/Photo Mechanic/DPP 4/Photoshop workflow, folks using a PC and/or BreezeBrowser will also benefit greatly by studying the material on DB II. Do note that you will find the RGB Curves Adjustment Color Balancing tutorial only in the new e-guide. Note: folks working on a PC and/or those who do not want to miss anything Photoshop may wish to purchase the original Digital Basics along with DB II while saving $15 by clicking here to buy the DB Bundle.
The two most recent and many of the older MP4 Photoshop Tutorial videos releases go hand and hand with the information in DB II):
Folks who learn well by following along rather than by reading can check out the complete collection of MP 4 Photoshop Tutorial Videos by clicking here.
You can learn how and why I and other discerning Canon shooters convert nearly all of their Canon digital RAW files in DPP 4 using Canon Digital Photo Professional in the DPP 4 RAW conversion Guide here. Yes, I still have many Canon images to work on. 🙂 And you can learn advanced Quick Masking and advanced Layer Masking techniques in APTATS I & II. You can save $15 by purchasing the pair. Folks can learn sophisticated sharpening and (NeatImage) Noise Reduction techniques in the The Professional Post Processing Guide by Arash Hazeghi and yours truly.
Help Support the Blog
Please help support my (stupendous) efforts here on the blog by remembering to click on the logo link above each time that you shop Amazon. That would be greatly appreciated. There is no problem using your Prime account; just click on the link and log into your Prime account. With love, artie
If In Doubt …
If in doubt about using the BAA B&H affiliate link correctly, you can always start your search by clicking here. Please note that the tracking is invisible. Web orders only. Please, however, remember to shoot me your receipt via e-mail.


Please Remember to use my Affiliate Links and to Visit the New BAA Online Store 🙂
To show your appreciation for my continuing efforts here, we ask, as always, that you get in the habit of using my B&H affiliate links on the right side of the blog for all of your photo and electronics purchases. Please check the availability of all photographic accessories in the New BIRDS AS ART Online Store, especially the Mongoose M3.6 tripod head, Wimberley lens plates, Delkin flash cards and accessories, and LensCoat stuff.
As always, we sell only what I have used, have tested, and can depend on. We will not sell you junk. We know what you need to make creating great images easy and fun. And please remember that I am always glad to answer your gear questions via e-mail.
I would of course appreciate your using our B&H affiliate links for all of your major gear, video, and electronic purchases. For the photographic stuff mentioned in the paragraph above, and for everything else in the new store, we, meaning BAA, would of course greatly appreciate your business. Here is a huge thank you to the many who have been using our links on a regular basis and those who will be visiting the New BIRDS AS ART Online Store as well.
Be sure to like and follow BAA on Facebook by clicking on the logo link upper right. Tanks a stack.
Typos
In all blog posts and Bulletins, feel free to e-mail or to leave a comment regarding any typos or errors. Just be right :).


Artie, I see these great videos on YouTube with the 5DM4, but mine are really bad. I’m trying to figure it out because I’m a stills guy. I’ll get there. Your blog is great…watching the progression of your photography with your new gear. Fantastic stuff. Great learning. Thank you very much!
Great post work Artie!
Hi Arthur,
really like the subtle underwing shadow detail you’ve achieved. Black/white birds are such a challenge. Makes us old wedding photographers, (she in white, he in black) smile.
Just wondering in what Picture Control setting you’re using for the “Blinkies”, depending on it being set for contrasty, such as Vivid or low contrast in Flat does make a stop or so difference in the Blinkies being shown on screen.
I guess I’m never really sure how that PC translates into what I see finally in ACR.
I use RAW-DIGGER as a way of analyzing the data in a file, but still have to ACR however it does give pointers on what needs attention.
Am following your new direction with interest.
I heard about RAW digger regarding getting optimal exposure in RAW files, but I could not understand it well. Do you use it often, if yes how do you use it ?
Hi, KPK,
I don’t use it often, and it can be a complex and time consuming effort. But very enlightening and helpful in optimising exposure. Iliah has quite a number of blog posts and a few videos on basic use and more importantly on how to use the data to make decisions on future exposure settings and what settings to use in the raw conversion. Took me awhile to figure out that ACR has its own ‘baked in’ settings
RawDigger is not an raw converter, but rather shows useful data that needs to be considered when dealing with the blown out highlights or blocked shadows, such as we get in shots like Arthur’s inflight Booby.
Is RawDigger a solution, no not really. Does it help to understand the problems, yes, I think it does. For a few bucks, a couple of hours, and a bit of testing, it can only help nail the right exposure, and post process settings.
Hope that helps. Keep takin’ photos. We do.
Hi Artie
For a while now I’ve been taking the highlights all the way left, shadows all the way right, then the whites right until a few small areas blow (red, I use Lightroom) (or until the histogram moves far enough right), then pull the blacks left until slightly more areas go under (blue). I then add some contrast, some dehaze, and then pull the highlights and shadows back to the middle until I like it and the histogram looks good. All without ever touching the exposure.
I’ve got so used to this it only takes seconds, and the results seem consistently quite pleasing. It has also seemed to me to be quite different to what you usually do, until this last post!(Though not the whites and blacks). Is there a chance that you could share the raw files for the images use in your featured examples in ARC? That way we could recreate exactly what you’re doing and really learn.
Best wishes
Neil
Hi Neil,
What you are doing sounds nuts but I will give it a try. And yes, very different from what I do. If you would like this particular RAW file with not adjustments send us a Paypal for $10 to birdsasart@att.net and include the words “over-exposed brown booby RAW file” in the e-mail and I will get it to you.
with love, artie
Artie: Another fine image of a gorgeous bird. I always find it very challenging to get the exposure right for a white and black (or dark brown) bird, and in this case, to my eye, the white parts look just a bit overdone, although the dark parts look terrific. In yesterday’s image everything seemed right.
Thanks David, This one was a big mess to start with. I meant to add that I was able to make something halfway decent …
with love, artie