What’s Up?
Monday morning was another calm morning that featured a white disk in a hazy grey sky until about 9:00am. With perfect conditions for flower photography, I drove the side-streets for an hour without getting me gear out once as it was a bit breezy. I headed down to the lake and decided to try to shoot some fleabane blossoms. Just as I was about to set up, my friend Ron came by on his golf cart. He described a brown and grey bird with a yellow breast that was catching dragonflies to feed its chicks in the nest in his backyard right near the pool. It sounded perfect for Great-crested Flycatcher. I followed him to his home and found two Great-crested Flycatchers feeding young every few minutes.
The big problem for photography is that the nest was built deep in the end of a pile of 25-foot long lengths of aluminum siding atop a trailer. I found two perches that Ron kindly duct-taped in place in the spots where the birds landed consistently. But the birds ignored the perches all day long choosing to land on the siding right next to the perch …
At 9:00am I drove back down to the lake and spent 30 minutes with the fleabane flowers. With the sun then brighter, I shaded the flowers with my body and created a few nice images.
The forecast for today — Tuesday 30 JUNE 2020 — is for another hazy, hot, and humid day. I will be heading down to the lake before seven am.
BIRDS AS ART
BIRDS AS ART is registered in the U.S. Patent and Trademark Office.
Via e-Mail from Phillip Bird
As a new user of the Sony A7RIII I ordered your Sony e-Guide as soon as I unpacked the camera. Buying the guide is one of the best camera-related investments I have ever made. I am learning so much and I’m sure that the guide is saving me a great deal of time and frustration in dealing with all of the options available on this amazing camera. Thanks to you and Patrick for putting this guide together. Phill
SONY e-Guide Discount Program
Purchase a (new) qualifying SONY camera body (a7r iii, a7r iv, a9, a9 ii) from Bedfords or using a BIRDS AS ART B&H affiliate link, and you will receive a $40 discount on the SONY e-guide. Purchase a (new) SONY 200-600mm G lens from Bedfords or using a BIRDS AS ART B&H affiliate link, and you will receive a $25 discount on the SONY e-guide. Purchase a (new) SONY 600mm f/4 GM lens from Bedfords or using a BIRDS AS ART B&H affiliate link, and you will receive a free SONY e-guide with one or two videos.
Please send your Bedford’s or B&H receipts to me via e-mail to receive your discount and your ordering instructions. Folks purchasing from Bedfords and using the BIRDSASART code will save $50. Folks sending their B&H receipts may need to wait a few days to have their purchases confirmed. Folks using Bedfords will have their purchases confirmed immediately.
|
|
|
99 sold to rave reviews. The SONY e-Guide by Patrick Sparkman and Arthur Morris |
The Sony Camera User’s e-Guide (and Videos)
Click here to purchase the guide with one Camera Set-up Video. Be sure to e-mail us by clicking here to specify your camera body so that we can send you a link for the correct video.
Click here to purchase the guide with two Camera Set-up Videos. Be sure to e-mail us by clicking here to specify your two camera bodies so that we can send you links for the correct videos.
Click here to learn more about the SONY e-Guide.
Money Saving Reminder
If you need a hot photo item that is out of stock at B&H, would enjoy free overnight shipping, and would like a $50 discount on your first purchase over $1000.00, click here to order and enter the coupon code BIRDSASART at checkout. If you are looking to strike a deal on Canon or Nikon gear (including the big telephotos) or on a multiple item order, contact Steve Elkins via e-mail or on his cell at (479) 381-2592 (Eastern time) and be sure to mention your BIRDSASART coupon code and use it for your online order. Steve has been great at getting folks the hot items that are out of stock at B&H. Those include the SONY a7r IV, the SONY 200-600, the SONY 600mm f/4 GM, and the Nikon 500mm PF. Steve is eager to please.


Gear Questions and Advice
Too many folks attending BAA IPTs and dozens of photographers whom I see in the field and on BPN, are–out of ignorance–using the wrong gear especially when it comes to tripods and more especially, tripod heads… Please know that I am always glad to answer your gear questions via e-mail. Those questions might deal with systems, camera bodies, accessories, and/or lens choices and decisions.
|
|
|
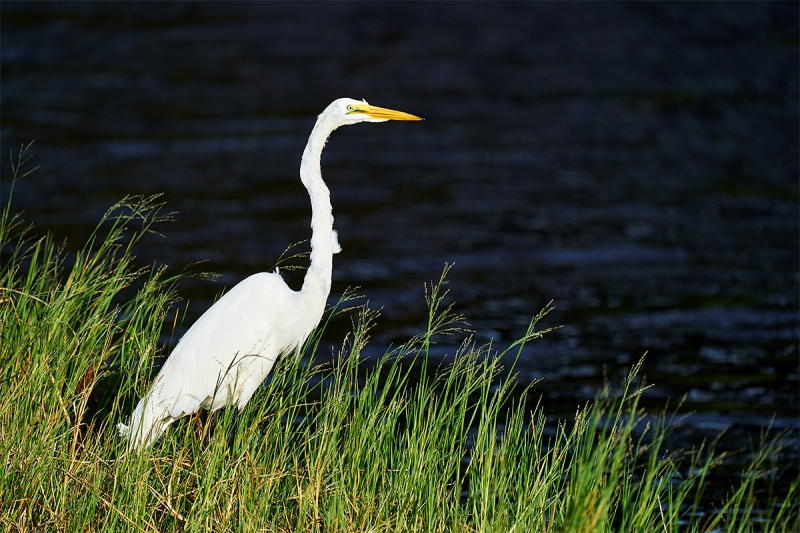
This image was created on 14 MAY 2020 at Indian Lake Estates, FL. Working from my vehicle, I used the handheld Sony FE 200-600mm f/5.6-6.3 G OSS lens (at 600mm) and the blazingly fast AF King, the Sony Alpha a9 II Mirrorless Digital camera body. ISO 320. Exposure determined by Zebras with ISO on the rear wheel: 1/1600 sec. at f/6.3 in Manual mode. AWB at 6:48pm on a sunny afternoon. Wide AF-C was active at the moment of exposure; the system caught a spot on the about 2/3 of the way down on the front edge of the lower neck, right on the same plane as the eye. Click on the image for a larger version. Image #1: Great Egret hunting |
Afternoons at ILE
On clear afternoons, bird photography at ILE can be challenging. If you are working on sun angle, there will often be homes in the background. I found the Great Egret in today’s featured image (two versions) looking for prey in the canal that runs east/west at the south end of the South Peninsula. As this species is quite shy at ILE, I needed to approach slowly while moving my vehicle into position. I was able to get almost but not quite on sun angle with a lovely dark-water background. With the wind from the south I needed to wait until the bird looked to its right so that my image would feature a decent head angle. It did and I pushed the shutter button.
|
|
|
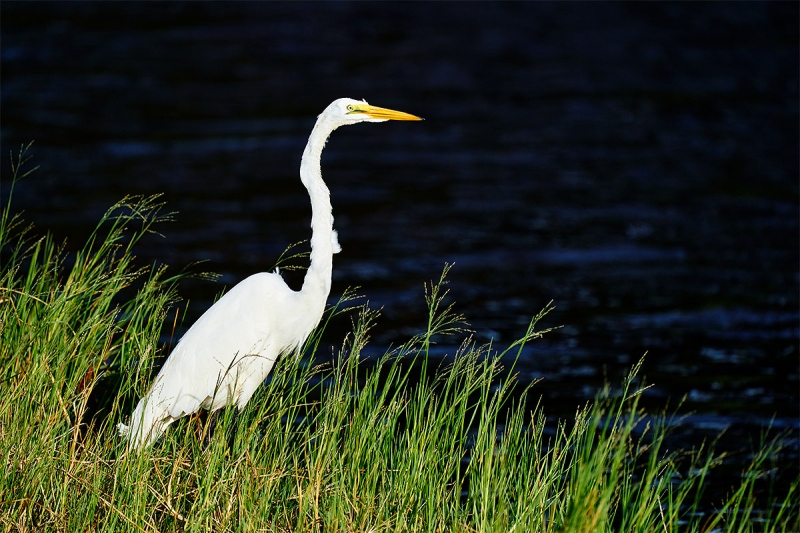
This image was created on 14 MAY 2020 at Indian Lake Estates, FL. Working from my vehicle, I used the handheld Sony FE 200-600mm f/5.6-6.3 G OSS lens (at 600mm) and the blazingly fast AF King, the Sony Alpha a9 II Mirrorless Digital camera body. ISO 320. Exposure determined by Zebras with ISO on the rear wheel: 1/1600 sec. at f/6.3 in Manual mode. AWB at 6:48pm on a sunny afternoon. Wide AF-C was active at the moment of exposure; the system caught a spot on the about 2/3 of the way down on the front edge of the lower neck, right on the same plane as the eye. Click on the image for a larger version. Image #2: Great Egret hunting — DARKER background version |
Intensifying Blackgrounds
When you have images where you wish to intensify a black background (I call them “backgrounds”), making a Curves Adjustment is often the way to go. See the tutorial below to learn how to do that.
Your Call?
Which version do you prefer, Image #1 or Image #2? Please let us know why you made your choice.
|
|
|
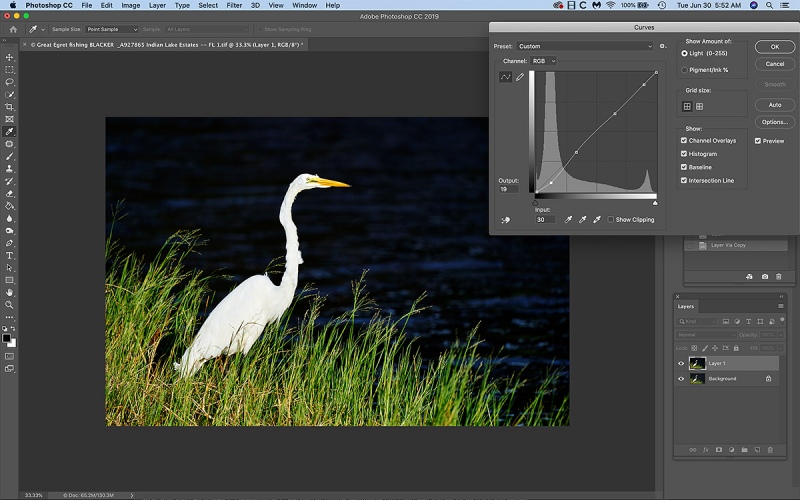
Click on the image for a larger version. Image #3: Pinning the Curve to darken the background |
Making Curves Adjustments
Below is a free excerpt adapted from The BIRDS AS ART Current Workflow e-Guide (Digital Basics II). Two decades ago when I was learning Photoshop, I struggled greatly learning to use Regular Layer Masks and making Curves adjustments. Long-time friend and then oft-co-leader Ellen Anon came to the rescue …
When you have an image that is flat, i.e., lacking contrast, you can try this. Create a new layer (Command J) and go Image > Auto Contrast. In most cases you will want to reduce the opacity to from 10% to 50% but at times 100% might look good.
When I need to lighten or darken an image, try this simple technique: hit Command J to put the image on a new layer and then go Image > Adjustments > Curves (or hit Command M.) Then pull the curve up from the center to lighten the image or pull the curve down from the center to darken it. To change the contrast in an image, first click dead center to place a point on the diagonal line. Then place a second point on the diagonal line three-quarters of the way up. Pull that point down to reduce the contrast (make the highlights darker and the dark tones lighter) or pull that point down to increase contrast (make the highlights brighter and the dark tones darker). For finer control, you can use the up arrow key to reduce the contrast or the down arrow key to increase it.
Curves adjustments are typically used to adjust a specific tonality in an image while leaving the others unchanged. Let’s say that you are happy with the light tones and the middle tones in an image but want to darken only the dark tones (as in today’s featured image). First you need to place three or four locking points exactly on the straight line where you want to leave the tonalities unchanged; this is called pinning the Curve. Tip: you can tell that the locking points are exactly on the straight line by checking the values in the Output and Input boxes on near the lower left corner of the dialogues box. If the point is on the line these values will be the same. If you are off by a bit, you can get them to match simply by hitting the up or down arrow keys.
Tonality Tip: Here is a tip that can help you understand exactly what you are doing by showing you where the various tonalities in an image are located. Note that when you open a Curves dialogue box that the Eyedropper Tool will be active. Click anywhere on the image to learn its tonality. As long as you hold the cursor down, a dot will appear on the diagonal line. The dark tones will show on the lower left part of the diagonal line, the light tones on the upper right. The middle tones will of course be somewhere near the middle.
You can set one or more locking points on the diagonal lines at a specific tonality by Command-clicking on that tonality. This can be a big help when you need to work precisely.
In the diagram above, understand that when you work on the dark tones that the three locking points will lock the light and middle tones down; when you pull the curve down to darken the dark tones, the rest of the line will not move and the tonalities there will not change. Again, this is called pinning the curve.
|
|
The BIRDS AS ART Current Workflow e-Guide (Digital Basics II).You can order your copy from the BAA Online Store here, by sending a PayPal for $40 here, or by calling Jim or Jennifer weekdays at 863-692-0906 with your credit card in hand. Be sure to specify Digital Basics II. |
The BIRDS AS ART Current Workflow e-Guide (Digital Basics II)
The techniques mentioned above and tons more (with the exception of Capture One RAW Conversions) — along with all of my personalized Keyboard Shortcuts — are covered in detail in the BIRDS AS ART Current Workflow e-Guide (Digital Basics II), an instructional PDF that is sent via e-mail. Learn more and check out the free excerpt in the blog post here. While the new e-Guide reflects my MacBook Pro/Photo Mechanic/DPP 4/Photoshop workflow, folks using a PC and/or BreezeBrowser will also benefit greatly by studying the material on DB II. Note: folks working on a PC and/or those who do not want to miss anything Photoshop may wish to purchase the original Digital Basics along with DB II while saving $15 by clicking here to buy the DB Bundle.
Folks who learn well by following along rather than by reading can check out the complete collection of MP 4 Photoshop Tutorial Videos by clicking here. Note: all of the videos are now priced at an amazingly low $5.00 each.
You can learn how and why I converted all of my Canon digital RAW files in DPP 4 in the DPP 4 RAW Conversion Guide here. More recently, I became proficient at converting my Nikon RAW (NEF) files in Adobe Camera Raw. About two years ago I began converting my Nikon and Sony RAW files in Capture One Pro 12 and continue to do so today.
To purchase Capture One, please use this link. Then you can learn more about Capture One in the Capture One Pro 12 Simplified MP4 Video here. The next step would be to get a copy of Arash Hazeghi’s “The Nikon Photographers’ Guide to Phase One Capture One Pro e-Guide” in the blog post here.
You can learn advanced Quick Masking and advanced Layer Masking techniques in APTATS I & II. You can save $15 by purchasing the pair. Folks can learn sophisticated sharpening and (NeatImage) Noise Reduction techniques in The Professional Post Processing Guide by Arash Hazeghi and edited by yours truly. Please use this link to purchase NeatImage.
To introduce folks to our MP.4 videos and the basics involved in applying more NeatImage noise reduction to the background and less on the subject, I’d be glad to send you a free copy of the Free Noise Reduction Basics MP.4 Video. Simply click to shoot me an e-mail to get your free copy.
If In Doubt …
If you are in doubt about using the BAA B&H affiliate link correctly, you can always start your search by clicking here. Please note that the tracking is invisible. Web orders only. Please, however, remember to shoot me your receipt via e-mail.


Please Remember to use my Affiliate Links and to Visit the BAA Online Store 🙂
To show your appreciation for my continuing efforts here, we ask, as always, that you get in the habit of using my B&H affiliate links on the right side of the blog or Bedfords, for all of your photo and electronics purchases. Please check the availability of all photographic accessories in the New BIRDS AS ART Online Store, especially the Mongoose M3.6 tripod head, Wimberley lens plates, Delkin flash cards and accessories, and LensCoat stuff.
As always, we sell only what I have used, have tested, and can depend on. We will not sell you junk. We know what you need to make creating great images easy and fun. And please remember that I am always glad to answer your gear questions via e-mail.
I would, of course, appreciate your using our B&H affiliate links or Bedfords for all of your major gear, video, and electronic purchases. For the photographic stuff mentioned in the paragraph above, and for everything else in the new store, we, meaning BAA, would of course greatly appreciate your business. Here is a huge thank you to the many who have been using our links on a regular basis and those who regularly visit the New BIRDS AS ART Online Store as well.
Be sure to like and follow BAA on Facebook by clicking on the logo link upper right.
Typos
In all blog posts and Bulletins, feel free to e-mail or to leave a comment regarding any typos or errors. Just be right :).




Artie. On my monitor the Egret in both images looks totally blown out…totally white with no detail. Not sure why.
Hi Paul,
The WHITEs on the top of the head are in teh mid-240ss 🙂
with love, a
Dear Artie
I love the color of the Egret on the Green and the Water! I prefer image #1 a little bit lighter water as it shows the waves a tad better, however Image #2 gives it a dusk feeling and is really nice as it pops but my vote and personal preference is Image #1 Thank you, Wisconsin love your way!