What’s Up?
It is just before 1pm on Thursday 22 October. After leaving ILE at 4am, we just entered Alabama. We have just 90 miles to go to get to Gulfport, MS, but will be doing some shopping, sight-seeing, and scouting along the way.
Huge thanks to Dave Miner of New Orleans who e-mailed with some solid info about bird photography locations near Gulfport. We followed that up with a nice chat. And to Donna Dewhurst as well.
Canon EOS R5 Bodies Available from Bedfords!
Steve Elkins called to LMK that Bedfords will be getting several Canon R5 in a day or two. Scroll down to contact Steve and to save a handsome 3% on your order.
Please Remember
With income from IPTs approaching zero, please, if you enjoy and learn from the blog, remember to use one of my two affiliate programs when purchasing new gear. Doing so just might make it possible for me to avoid having to try to get a job as a Walmart greeter and will not cost you a single penny more. And if you use Bedfords and remember to enter the BIRDSASART code at checkout, you will save 3% on every order and enjoy free second-day air shipping. In these crazy times — I am out at least forty to sixty thousand dollars so far due to COVID 19 (with lots more to come) — remembering to use my B&H link or to shop at Bedfords will help me out a ton and be greatly appreciated. Overseas folks who cannot order from the US because of import fees, duties, and taxes can always help out by clicking here if they see fit.
The BAA Used Gear Page
The Used Gear page continues to be red hot! It is BAA Used Gear Page is the place to sell your used photographic equipment. We will help you to get your gear sold quickly for 20 to 60% or more than what the big guys are offering … Doubt me? Check out the Recent Sales list for the past ten months at the bottom of the page.
BIRDS AS ART is registered in the U.S. Patent and Trademark Office
Great Topaz News!
Folks who use the BAA Topaz link to purchase Sharpen AI, DeNoise AI, or the Utility Bundle (or any other Topaz plugins) will receive a 15% discount by entering the ARTHUR15 code at checkout. To get the discount you must use my link and you must enter the discount code. Be sure to start with this link.
Topaz Stuff
As I said just a while back and have said often many times before, I should have listened sooner. If you, like me, are new to the Topaz party, please use this link to purchase. Right now I can wholeheartedly recommend both Topaz Sharpen AI and Topaz DeNoise AI. Though I have not yet worked with JPEGtoRAW AI or Gigapixel AI, I have installed both of these plug-ins and look forward to trying them on some I-Phone 11 images fairly soon. If you are thinking like me, consider the Utility Bundle that includes all four plug-ins mentioned above at a money-saving price.
Again, those who purchase Sharpen AI or DeNoise AI using my link, can e-mail to request a short Getting Started with Topaz e-Guide. I had a bit of trouble getting the two plug-ins installed and having them appear in the Photoshop Filter Menu. In addition, I will explain how to best learn about the two plug-ins by applying them on a Layer (in Photoshop). I amazed myself yesterday by completing this guide in the car on the way to and from Sebastian. Huge thanks to Anita for doing the driving. Please include a copy of your Topaz order when requesting the guide.
New and Better Bedfords Discount Policy!
You can now save 3% on all of your Bedfords photo gear purchases by entering the BIRDSASART coupon code at checkout. Your discount will be applied to your pre-tax total. In addition, by using the code you will get 2nd day air shipping via Fed Ex.
Grab a Nikon AF-S Teleconverter TC-14E III and save $14.99. Purchase a Canon EOS R5 and your discount will be $116.97. Purchase a Sony FE 600mm f/4 GM OSS lens and save a remarkable $389.94! Your Bedford’s purchase no longer needs to be greater than $1,000.00 for you to receive a discount. The more you spend, the more you save.
|
|
|
116 sold to rave reviews. The SONY e-Guide by Patrick Sparkman and Arthur Morris |
The Sony Camera User’s e-Guide (and Videos)
Click here to purchase the guide with one Camera Set-up Video. Be sure to e-mail us by clicking here to specify your camera body so that we can send you a link for the correct video.
Click here to purchase the guide with two Camera Set-up Videos. Be sure to e-mail us by clicking here to specify your two camera bodies so that we can send you links for the correct videos.
Click here to learn more about the SONY e-Guide.
Money Saving Reminder
Many have learned that if you need a hot photo item that is out of stock at B&H and would enjoy free overnight shipping, your best bet is to click here, place an order with Bedfords, and enter the coupon code BIRDSASART at checkout. If an item is out of stock, contact Steve Elkins via e-mail or on his cell phone at (479) 381-2592 (Eastern time). Be sure to mention the BIRDSASART coupon code and use it for your online order. Steve has been great at getting folks the hot items that are out of stock at B&H and everywhere else. The wait lists at the big stores can be a year or longer for the hard to get items. Steve will surely get you your gear long before that. For the past year, he has been helping BAA Blog folks get their hands on items like the SONY a9 ii, the SONY 200-600 G OSS lens, the Canon EOS R5, the Canon RF 100-500mm lens, and the Nikon 500mm PF. Steve is personable, helpful, and eager to please.


Gear Questions and Advice
Too many folks attending BAA IPTs and dozens of photographers whom I see in the field and on BPN, are–out of ignorance–using the wrong gear especially when it comes to tripods and more especially, tripod heads… Please know that I am always glad to answer your gear questions via e-mail. Those questions might deal with systems, camera bodies, accessories, and/or lens choices and decisions.
|
|
|
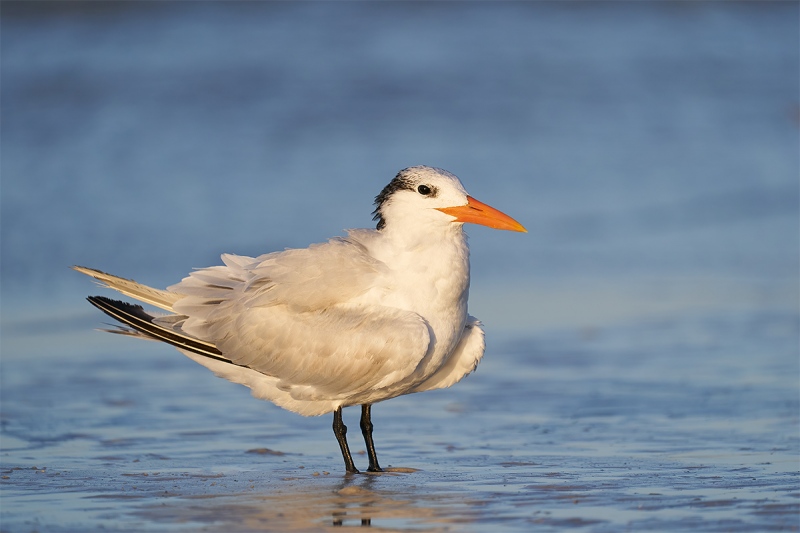
This image was created at Fort DeSoto Park in Pinellas County, FL on the morning of 19 OCT 2020. I used the handheld Sony FE 200-600mm f/5.6-6.3 G OSS lens (at 594mm) and the blazingly fast AF King, the Sony Alpha a9 II Mirrorless Digital camera body. Exposure was determined via Zebra evaluation with ISO on the rear dial as detailed in The Sony Camera User’s e-Guide and One Camera Set-up Video. ISO 1000: 1/2000 sec. at f/6.3 in Manual mode. The raw file brightness was confirmed as dead-solid perfect by RawDigger. ABW at 7:53 am on a clear morning with just a hint of moisture in the air. Center Zone AF-C was active at the moment of exposure and worked well. Click on the image to see a larger version. Image #1: Royal Tern in butter light |
Knee-Pod While Seated Perspective
To create Image #1, I was seated on the wet sand with my left knee bent. My left hand was on the zoom ring well out on the lens barrel and facing the sky. My left forearm was resting firmly on my left knee. That is the knee pod-technique that I use quite often. The lens was about 18 inches above the bird shooting down at it just a bit from a distance of twenty feet or so. I would guess that the angle of declination was less than five degrees.
The bird in Image #1 was just about to ruffle its feathers. In retrospect, I wish that I had placed the bird just a bit higher in the frame to give it a bit more space from the feet to the bottom frame-edge. When using Center Zone for images like this, make sure that the AF points are dancing on the bird’s face as you fire the shutter.
|
|
|
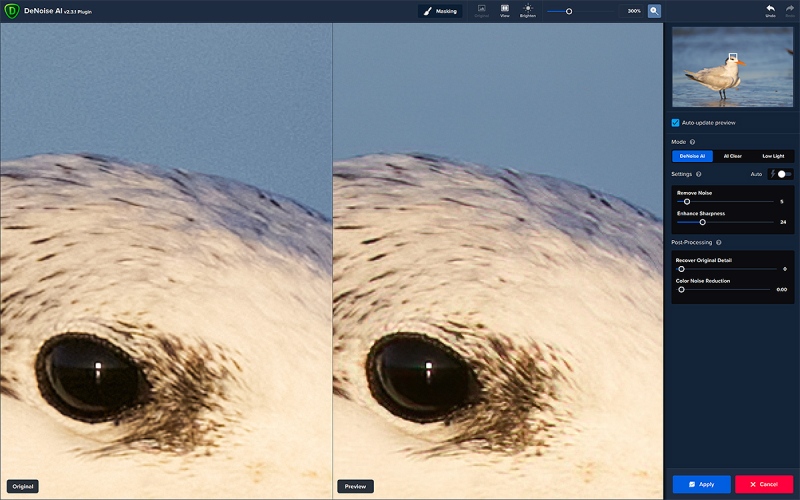
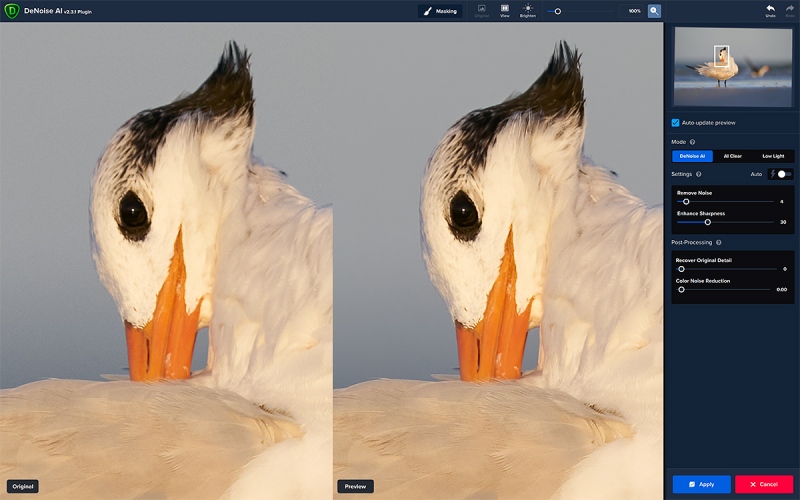
Click on the screen capture to view a larger version. Image #1A: Topaz DeNoise AI screen capture for Royal Tern in butter light at 300% |
Topaz DeNoise AI Auto Tip
First off, view the image in DeNoise AI at 300 or 400% to see the incredible job that the plug-in does with the noise reduction on the background. At these high magnifications, you may see a bit of edge pixilation as a result of a bit too much sharpening. To eliminate that problem, try reducing the Enhance Sharpening setting by about 1/3 or 1/4. For this image, the Auto setting had Enhance Sharpening at 36; I reduced it to 24. Do note that in addition to the noise reduction DeNoise has sharpened the eye nicely and cleaned up the WHITEs as well.
|
|
|
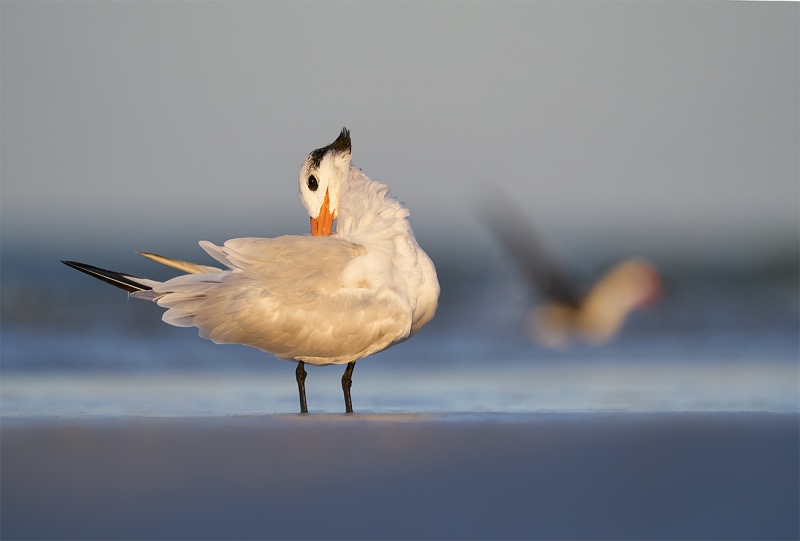
This image was also created at Fort DeSoto Park in Pinellas County, FL on the morning of 19 OCT 2020. Again, I used the handheld Sony FE 200-600mm f/5.6-6.3 G OSS lens (this one at 600mm) and the blazingly fast AF King, the Sony Alpha a9 II Mirrorless Digital camera body. Exposure was determined via Zebra evaluation with ISO on the rear dial as detailed in The Sony Camera User’s e-Guide and One Camera Set-up Video. ISO 1600: 1/2000 sec. at f/6.3 in Manual mode. The raw file brightness was confirmed as dead-solid perfect by RawDigger. ABW at 7:49 am on a clear morning with just a hint of moisture in the air. Center Zone Continuous AF was active at the moment of exposure and worked well. Click on the image to see a larger version. Image #2: Royal Tern preening in butter light with bathing Black Skimmer in background |
Lens Hood on the Beach!
Though I began doing it at Jamaica Bay Wildlife Refuge in Queens, NY about thirty years ago, lying flat down on wet sand, mud, or muck is never a whole lot of fun. Unless you get great images. And those super-low perspectives are very special. At DeSoto last week, I practiced using the articulating rear Monitor to get super-low perspective images on the beach. Here is what I did:
- 1- With the camera to my eye, determined the correct exposure through the viewfinder as I normally would with SONY by getting a fair amount of Zebras on the tern’s neck.
- 2- Enabled the level on the rear Monitor and set Center Zone AF-C.
- 3- Pulled the articulating rear monitor screen out and up to about 75 degrees.
- 4- Placed the front of the 200-600 lens hood on the beach.
- 5- Held the bottom left side of the camera body about an inch above the sand.
- 6- Gripped the camera normally with my right hand with my index finger on the shutter button. I do not use a vertical grip with my SONY bodies. I noticed just the other day that when holding the cameras that I bend the pinky finger of my right hand and place it under the lower right corner of the camera body. This gives me a bit of extra support and came in especially handy when shooting with the lens hood on the beach as detailed above; it made it easier to level the camera and hold it steady.
- 7- Found the subject, framed and leveled the image, and acquired focus. With a bit of practice, this became easier than I thought it would.
- 8- Pushed the shutter button to make some images.
Note that it may be difficult for some folks with less than perfect near vision (like me) to see the head angle and to level the image perfectly using the level in the Monitor. To help with these concerns try the following:
- 1- Zoom out to frame the image a bit looser than you usually would. This gives you some extra canvas in case you need to level the image a few degrees.
- 2- Fire the shutter button more liberally than you usually would. When you cannot see exactly what is going on, it is better to make more images so that you do not miss anything really good …
Image #2
When I saw the skimmer land and begin to bathe, I immediately zoomed out and realized that the juxtaposition was pretty much perfect. I fired off about a dozen frames before the skimmer jumped up and flapped. In all of the frames but this one, the terns bill was buried in the feathers or its back. To come up with both the perfect preening head angle and a raised crest was quite lucky, especially when you consider that I was not even looking through the viewfinder!
When working low on the beach, you’d best have a paint brush on your person so that you can clean the sand off your gear as needed.
Note: it is much, much easier to frame the image, note the head angle, and follow that action when you are flat on your belly looking through the viewfinder. But it is a lot messier …
High Level Shutter Speed Question
Why did I opt to go with a shutter speed of 1/2000 second (along with a relatively high ISO) for each of today’s featured images when I could easily have dropped down to at least 1/1000 second (and cut the ISO by half or more)? The clue is in Image #2.
|
|
|
Click on the screen capture to view a larger version. Image #2A: Topaz DeNoise AI screen capture for Royal Tern preening in butter light with bathing Black Skimmer in background at 100%. |
Topaz DeNoise AI Auto Tip
Even with the view at “only” 100%, it is easy to see the incredible job that the plug-in does with the noise reduction on the background. When I zoomed in to 400% here, I noted some edge artifacting as a result of a bit too much sharpening. After starting with Auto, I reduced the Enhance Sharpening setting from 40 to 30. Again, note that in addition to the noise reduction DeNoise has sharpened the eye nicely and cleaned up the WHITEs as well.
Which Perspective?
Which perspective do you prefer, seated or lens hood on the beach?
Typos
In all blog posts and Bulletins, feel free to e-mail or to leave a comment regarding any typos or errors. Just be right :).




My flip screen technique that I’ve been using with my Sony A9 since 2018 is to rest the camera on the toe of my shoe. But this works a lot better with the battery grip vs no grip. Then nothing touches the ground and lens hood sits less than an inch off ground. When I do this with my 600GM my left hand actually holds the top edge of the lens hood (but I use a 3D printed very short hood on my 600 so I don’t have to reach out as far as the stock hood). With the 200-600 I sometimes flip the foot upwards and hold that or just hold the barrel as you would handholding normally.
One of the main reason I switched to all MILCs is for the flip screen ground level shooting. After doing this for the past 2 years I can’t even take a photo at the level of a gimbal ground pod…even that looks too high and messy to me. Sure there are some situations where water patterns make a ground pod or knee pod shot interesting but flip screen on the ground images are what I do 90% of the time these days. I used to lie down or use a right angle finder but now I can go out in public after shooting not covered in sand/mud 😉
I currently shoot with A9II, A7RIV and R5. The R5’s Bird Eye AF is absolutely amazing…it can follow the eye of a foraging shorebird like a yellowlegs right to water level, as the eye goes beneath the water it grabs the remaining head and instantly as even half the eye comes back out of the water it is back to a small box on the eye. Game changing. Sure I can get all the shots I want on my Sony’s usually using Zone for that type of thing but the R5 just makes it silly easy and accurate. Sony A9II still is better AF for fast, erratic BIF but the R5 is better for everything else. IMHO, YMMV. Cheers 🙂
Hi Geoff, If that works for you, great. It seems like too much of a balancing act for me … And yes, the flip screens are great — I just wish that the SONY bodies went both ways.
Good luck shooting two systems 🙂
with love, a
Hi Artie, I hope you are doing well. I just wanted to let readers know that Topaz AI is running additional discount on bundle for 15 days and currently it is priced at $195 and after your code it comes down to $166. I used your link just now.
Huge thanks and much love, artie
I like the second image (because of the bathing), but miss the feet. And moving up would have moved the second bird up and given you less sky (if I have my perspective change correct), which may have been more pleasing. To me at least.
Nice to hear from you.
with love, a
Now imagine how easily you could do the camera on the ground shots if your Somy had bird eye AF! It’s truly remarkable on the R5, particularly in these instances.
I much preferred the tilt screen on the A9 I had before I sold it after obtaining an R5. Much easier for this type of work.
Hi Ryan,
Does the R5 have a tilt screen? In this situation, Center Zone performed perfectly so no need for me to imagine anything :). And since you cannot see the AF point or the head veery well, me-thinks that the AF point just might lose the eye … At least that is the word on the street.
with love, a
It has the flip out and tilt screen like the recent XXD series camera have.
In this particular instance, it should have kept focus on the head if the eye is not visible. If the bird starts moving in the screen out of your center AF point, it will continue to track the eye or head if visible.
Thanks, Ryan. Is the screen two-way, horizontal and vertical? Bummer that the SONY bodies are only horizontal …
with love, artie
180 degrees horizontal and 270 degrees vertical, if I am not mistaken. In other words it can flip out as far as flat from the body and around nearly in a circle around the vertical axis.
Thanks, Adam. Advantage Canon on that feature. Maybe the a9 x will have something similar.
with love, artie
What Adam said…
I actually prefer the Sony version since I never need to flip it around to look from the front (as a vlogger might).. I shoot from a fishing kayak a lot and the screen on the R5 increases the footprint pretty significantly. It may not seem like a lot, but it often is somewhat difficult to maneuver as it hits my foot.
I usually have one of my R5s on the 600iii in the kayak, and one on the 100-500. With the 600iii, when I went to get the camera as low as possible, I set the camera/lens over the left side of the kayak. Sometimes I let it rest on the lensfoot, sometimes on the barrel. The camera is now just a few inches above water level. I flip out the screen, point it at the bird, then engage animal eye detection, and it tracks like a champ. This is a big advantage over the 1DXii/iii where I could do this in live view, but I had to contort myself to try and see the LCD and I had to try and keep a focus point on the head. Now I can just look down at the screen and push my AF button and snap away.
I’m sure SONY will have effective bird eye AF soon.
Amazing times we’re living in!
Agree with Ryan on this. The R5 was designed as a compromise for the videographer and photographer and the articulating screen is in keeping with this philosophy. Though the screen quality and full touch capabilities are much better than Sony’s, I find the flip out cumbersome and less than reassuring with respect to durability. Yes it can be rotated either opened or closed against the body which is a nice feature for protection purposes, yet it can’t be tilted when in these positions. Trade offs…
Hi Artie and Anita hope your trip is going well thus far.
Artie i like both images #1 i can see a little bit more of the Tern to my eye & the background is clean. #2 the OOF bird to the right seems to draw my attention but i do like the level water and background being low you get more of the distant background and color change.
Stay safe in your travels.
Wisconsin love your way.
Bob
Thanks, Bob. Different strokes. For me the bathing skimmer is a huge plus 🙂
with love, artie