What’s Up?
I stayed in and worked on the RawDigger e-Guide on Tuesday morning. At 10am, Jim and I drove down to the lake to get wet and muddy. With a roll of stiff wire and a pair of pliers, we repaired The Perch that I had erected with Anita North about two years ago. I thought that it has simply fallen down, but closer inspection revealed that it actually broke in half. We were able to wire the upper part of the perch to the lower part. The best news is that the horizontal part of the perch at the top was shortened perfectly when it fell. After that was done, we erected a second tall perch that I had found last week on a day of perch hunting. Thanks, Jim!
Now I will see how long it takes for the birds to get used to them 🙂
Today is Wednesday 16 December 2020. The forecast is partly cloudy with gentle south/southeast winds so I will be headed down to the lake at about 7:30am. Have a great day, and consider joining me at DeSoto at the end of this week.
I peeked out the back door at 7:13am and saw that it is totally foggy so my trip to the lake will be delayed just a bit.
Fort DeSoto In-the-Field Instructional Sessions
As the weather is looking excellent again for this coming Friday and Saturday, I will almost surely be headed over to Fort DeSoto to photograph early on Friday and Saturday mornings. If you would like to join me for one or two morning sessions (and possibly for a Friday afternoon session as well), please contact me via e-mail to learn the low rates.Limit two.
The BAA Used Gear Page
The Used Gear page continues to be red hot! It is BAA Used Gear Page is the place to sell your used photographic equipment. We will help you to get your gear sold quickly for 20 to 60% or more than what the big guys are offering … Doubt me? Check out the Recent Sales list for the past ten months at the bottom of the page.
Brand New Listings
SONY a7r iii Mirrorless Digital Camera Body(with SONY battery grip!)
Mansoor Assadi is offering a SONY a7r iii Mirrorless digital camera body in excellent condition for a very low $1198.00. The sale includes a Sony VG-C3EM Vertical Grip (a $348.00 value), only the original battery, the original box, the front body cap, the strap, and insured ground shipping via major courier. Your item will not ship until your check clears unless other arrangements are made.
Please contact Mansoor via e-mail or by phone at 415-559-8027 (Pacific time).
The 7r iii performed superbly as my workhorse camera body on the 2019 Galapagos Photo-Cruise of a Lifetime. The image files are superb and it was not bad at all for flight photography. As this body with the SONY grip sells new for $2,346.00, you can save a handsome $1,148.00 by grabbing Mansoor’s a7r iii (with the SONY grip!) right now. artie
SONY a9 Mirrorless Digital Camera Body
Mansoor Assadi is offering a SONY a9 Mirrorless digital camera body in like-new condition for a BAA record-low $2,297.00. The sale includes an off-brand (Green Extreme) battery grip, only the original battery, the original box, the front body cap, the strap, and insured ground shipping via major courier. Your item will not ship until your check clears unless other arrangements are made.
Please contact Mansoor via e-mail or by phone at 415-559-8027 (Pacific time).
I was sold on SONY five minutes after trying my SONY a9 on the Brandt’s Cormorants at La Jolla, CA. The AF system is identical to the AF system on the more expensive a9 ii which costs $4,498.00. The a9 ii body is about 1/8 inch thicker than the a9 ii. If you do not have large hands, or if you like the feel of a smaller body, you will love the a9. And if you like the feel of $1,101.00 in your pocket — the a9 sells for $3,398.00 — get in touch with Mansoor ASAP. artie
Canon R5/R6 AF e-Guide Info
So far, thirty-six folks have sent PayPals for their copy of the Canon R5/R6 AF e-Guide. And twenty who used my affiliate links to purchase their R5 e-mailed for their free copy of the guide. If you e-mailed or sent a PayPal and did not receive your guide, please LMK immediately via e-mail.
Feedback has been overwhelmingly positive so far. Three folks wrote stating that they had a better way of setting up AF on their R5s. When I wrote back explaining why they were in error, two of them back-tracked. One stubborn guy is still doing it his way, less efficiently. Be sure to scroll down to read about my plans for a Canon R5/R6 User’s e-Guide. Understand that the info in the BAA Canon R5/R6 Autofocus e-Guide is so important that I opted to publish the AF guide immediately as the R5/R6 User’s Guide will take at least a month to finish.
BAA Canon R5/R6 Autofocus e-Guide
Twenty-one pages. 3,452 words. 28-DPP4 screen captures showing the R5’s vaunted AF system in action. Note: the AF system of the R5 is identical to the AF system of the R6.
You will learn:
1- The two most useful AF Methods for general bird photography and for birds in flight.
2- How to set up your R5/R6 AF Menus.
3- What boxes to check (and un-check) under Limit AF Methods.
4- How to change the AF Method quickly, easily, and efficiently. Note: the default way of doing this is clunky, cumbersome, and inefficient at best. One person replied that this tip alone was worth the price of admission.
5- The only setting that should be used for Initial Servo AF pt for Face Detection + Tracking.
I you are currently using multiple back buttons either for general bird photography or for birds in flight, what you learn in this guide will change your life. For the better.
Here are the first three paragraphs of this e-Guide:
From the moment I learned about the new Canon mirrorless bodies, I read about using two or three back-buttons to focus using different AF methods. The word on the street said that the way to go for birds in flight was to use one button to acquire focus with Zone AF or with Large Zone: Horizontal AF and then switch to another button to activate Face Detection + Tracking AF and then use the shutter button to make an image. My immediate thought was, “This is insanity! There has got to be a better way.” In short, there is a far superior way to set up AF on your R5 or R6.
Remember that I got away from any form of back-button or rear focusing many years ago after finally realizing that it is always easier to do one thing (press the shutter button), than it is to do two things (press a back button and then press the shutter button).
The default method of switching AF Methods with the R5/R6 bodies is cumbersome at best. It involves first pressing the grid button (my name) on the upper right back of the camera and then pressing the hard-to-access M-Fn button to toggle through the AF Methods. This method is so bad that it will not be mentioned again in this guide.
The guide is free to all who have ordered an R5 or an R6 using my B&H affiliate link or from Steve Elkins/Bedfords using the BIRDSASART coupon code at checkout. Please send your receipt to me via e-mail. It will take me a few days to a week to verify the B&H purchases. Bedfords folks should expect their free e-Guides fairly quickly.
To purchase your copy of the e-Guide, please send a PayPal for $25.00 to birdsasart@verizon.net and be sure to include the words R5/R6 AF Guide in your PayPal e-mail.
Everyone who gets the guide will receive a free update no later than the first week in January.
Canon R5/R6 User’s e-Guide
I am planning on doing a complete Canon R5/R6 User’s e-Guide. This will require a lot of research, a lot of time, and a lot of effort. I am hoping to have it complete by mid- to late January. As always, folks who use the BAA affiliate links to purchase their Canon gear will receive a substantial discount.
Understand that the info in the BAA Canon R5/R6 Autofocus e-Guide is so important that I opted to publish the AF guide ASAP.
Please Remember
With income from IPTs approaching zero, please, if you enjoy and learn from the blog, remember to use one of my two affiliate programs when purchasing new gear. Doing so just might make it possible for me to avoid having to try to get a job as a Walmart greeter and will not cost you a single penny more. And if you use Bedfords and remember to enter the BIRDSASART code at checkout, you will save 3% on every order and enjoy free second-day air shipping. In these crazy times — I am out at least forty to sixty thousand dollars so far due to COVID 19 (with lots more to come) — remembering to use my B&H link or to shop at Bedfords will help me out a ton and be greatly appreciated. Overseas folks who cannot order from the US because of import fees, duties, and taxes can always help out by clicking here if they see fit.
Great Topaz News!
Folks who use the BAA Topaz link to purchase Sharpen AI, DeNoise AI, or the Utility Bundle (or any other Topaz plugins) will receive a 15% discount by entering the ARTHUR15 code at checkout. To get the discount you must use my link and you must enter the discount code. Be sure to start with this link.
Topaz Stuff
As I said just a while back and have said often many times before, I should have listened sooner. If you, like me, are new to the Topaz party, please use this link to purchase. Right now I can wholeheartedly recommend both Topaz Sharpen AI and Topaz DeNoise AI. Though I have not yet worked with JPEGtoRAW AI or Gigapixel AI, I have installed both of these plug-ins and look forward to trying them on some I-Phone 11 images fairly soon. If you are thinking like me, consider the Utility Bundle that includes all four plug-ins mentioned above at a money-saving price.
Again, those who purchase Sharpen AI or DeNoise AI using my link, can e-mail to request a short Getting Started with Topaz e-Guide. I had a bit of trouble getting the two plug-ins installed and having them appear in the Photoshop Filter Menu. In addition, I will explain how to best learn about the two plug-ins by applying them on a Layer (in Photoshop).
|
|
|
126 sold to rave reviews. The SONY e-Guide by Patrick Sparkman and Arthur Morris |
The Sony Camera User’s e-Guide (and Videos)
Click here to purchase the guide with one Camera Set-up Video. Be sure to e-mail us by clicking here to specify your camera body so that we can send you a link for the correct video.
Click here to purchase the guide with two Camera Set-up Videos. Be sure to e-mail us by clicking here to specify your two camera bodies so that we can send you links for the correct videos.
Click here to learn more about the SONY e-Guide.
New and Better Bedfords Discount Policy!
You can now save 3% on all of your Bedfords photo gear purchases by entering the BIRDSASART coupon code at checkout. Your discount will be applied to your pre-tax total. In addition, by using the code you will get 2nd day air shipping via Fed Ex.
Grab a Nikon AF-S Teleconverter TC-14E III and save $14.99. Purchase a Canon EOS R5 and your discount will be $116.97. Purchase a Sony FE 600mm f/4 GM OSS lens and save a remarkable $389.94! Your Bedford’s purchase no longer needs to be greater than $1,000.00 for you to receive a discount. The more you spend, the more you save.
Money Saving Reminder
Many have learned that if you need a hot photo item that is out of stock at B&H and would enjoy free overnight shipping, your best bet is to click here, place an order with Bedfords, and enter the coupon code BIRDSASART at checkout. If an item is out of stock, contact Steve Elkins via e-mail or on his cell phone at (479) 381-2592 (Eastern time). Be sure to mention the BIRDSASART coupon code and use it for your online order. Steve has been great at getting folks the hot items that are out of stock at B&H and everywhere else. The wait lists at the big stores can be a year or longer for the hard to get items. Steve will surely get you your gear long before that. For the past year, he has been helping BAA Blog folks get their hands on items like the SONY a9 ii, the SONY 200-600 G OSS lens, the Canon EOS R5, the Canon RF 100-500mm lens, and the Nikon 500mm PF. Steve is personable, helpful, and eager to please.


Gear Questions and Advice
Too many folks attending BAA IPTs and dozens of photographers whom I see in the field and on BPN, are–out of ignorance–using the wrong gear especially when it comes to tripods and more especially, tripod heads… Please know that I am always glad to answer your gear questions via e-mail. Those questions might deal with systems, camera bodies, accessories, and/or lens choices and decisions.
|
|
|
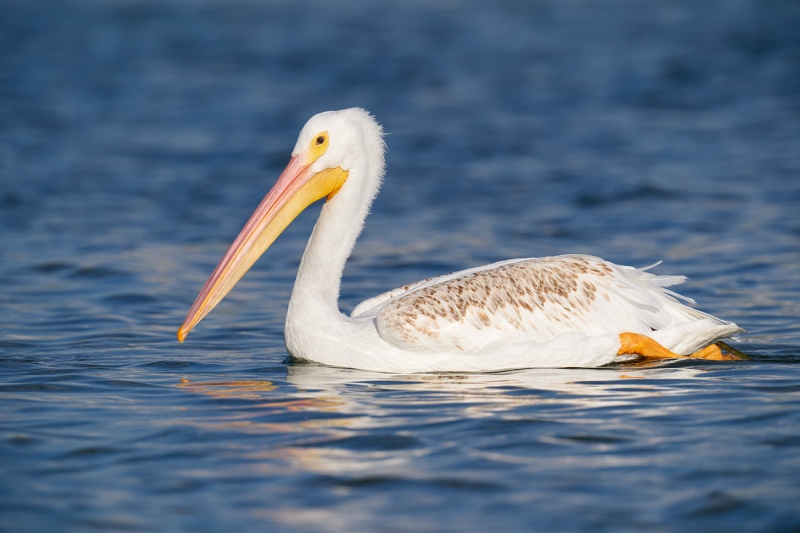
This image was created on 15 October 2020 at Fort DeSoto Park, Tierra Verde, FL. TX. I used the Induro GIT 304/Levered-clamp FlexShooter-mounted Sony FE 600mm f/4 GM OSS lens with the Sony FE 2.0x teleconverter and the blazingly fast Sony Alpha a9 II Mirrorless Digital camera body). ISO 640. Exposure determined by Zebras with ISO on the rear dial: 1/2000 sec. at f/9 in Manual mode. AWB at 4:33pm on a clear afternoon. Tracking Flexible Spot (M) AF-C was active at the moment of exposure and performed to perfection. Click the image to see a larger version. Image #1: American White Pelican in fresh juvenal plumage |
American White Pelican in Fresh Juvenal Plumage
I was thrilled to see several American White Pelican in fresh juvenal plumage in a flock of about forty early-arriving birds in mid-October of this year. Note all the brown and tan feathers on what I believe are the wing coverts. Wanting to create a field–guide-portrait of single bird in what was a brand new plumage for me, I added the 2X TC to the 600 GM and approached carefully. I got lucky as the birds swam from one group to another and was thrilled with several frames; this one was my favorite by a small margin.
|
|
|
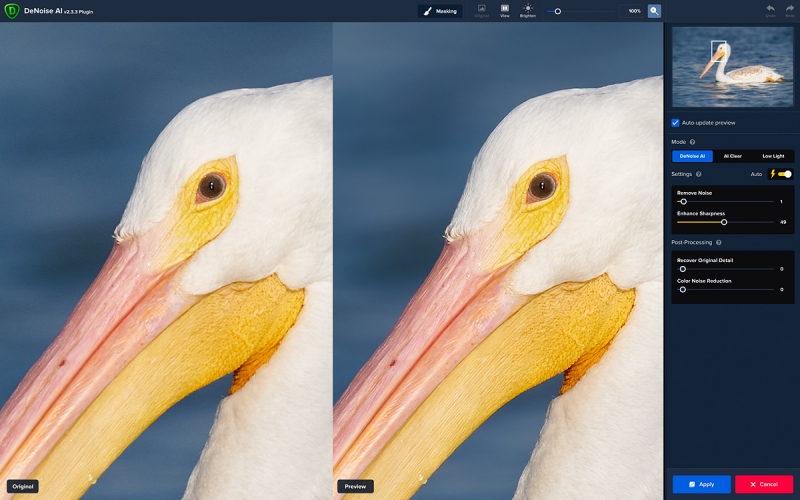
Be sure to click on the image to view it larger. Image #1A: Topaz DeNoise AI on Auto on the American White Pelican in fresh juvenal plumage image at 100% |
Topaz DeNoise AI on the American White Pelican in fresh juvenal plumage image
Be sure to click on the image and note how Topaz DeNoise AI on Auto completely eliminated the noise in the blue water background and while sharpening the bird non-destructively.
Understand that the noise in the water was partly due to the fact that water was about one stop under-exposed as we properly exposed for the WHITEs. Remember: WHITEs need one stop less light to be properly exposed than middle tones and about one and two-thirds stops less light than dark tones. Confused? See and study the section on Exposure Theory in the original The Art of Bird Photography.
|
|
|
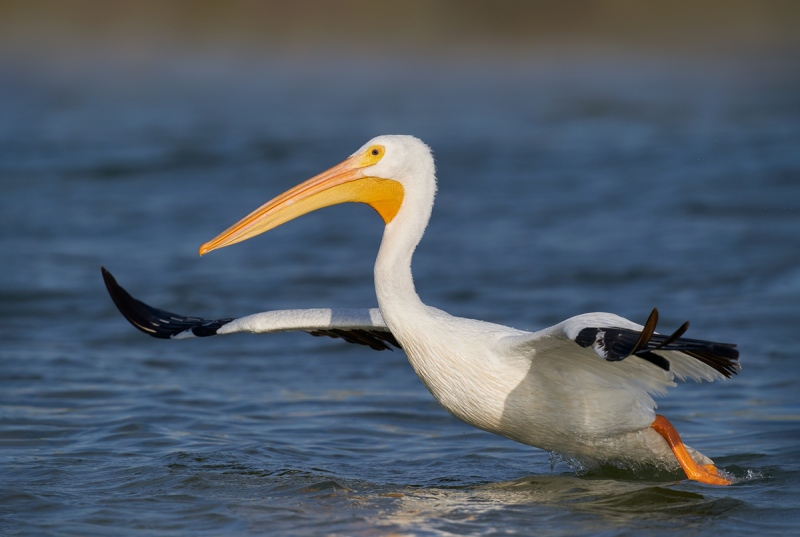
This image was created on 15 October 2020 at Fort DeSoto Park, Tierra Verde, FL. TX. I used the Induro GIT 304/Levered-clamp FlexShooter-mounted Sony FE 600mm f/4 GM OSS lens with the Sony FE 2.0x teleconverter and the blazingly fast Sony Alpha a9 II Mirrorless Digital camera body). ISO 800. Exposure determined by Zebras with ISO on the rear dial: 1/2500 sec. at f/9 in Manual mode. AWB at 4:37pm on a clear afternoon. Tracking Flexible Spot (M) AF-C was active at the moment of exposure and performed surprisingly well. Click the image to see a larger version. Image #2: American White Pelican adult taking flight |
You Know the Drill!
If I have said it here once … When unexpected action happens, push the shutter button. Do not try to make it perfect. I created about a dozen sequences of individual birds taking flight knowing that at 1200mm (much too long a focal length), my chances of not clipping wings or feet or heads were somewhere between slim and none. But push the button I did, and in just one frame, slim came home! You can see how tight the original image capture was and what I did about that in the Animated GIF just below.
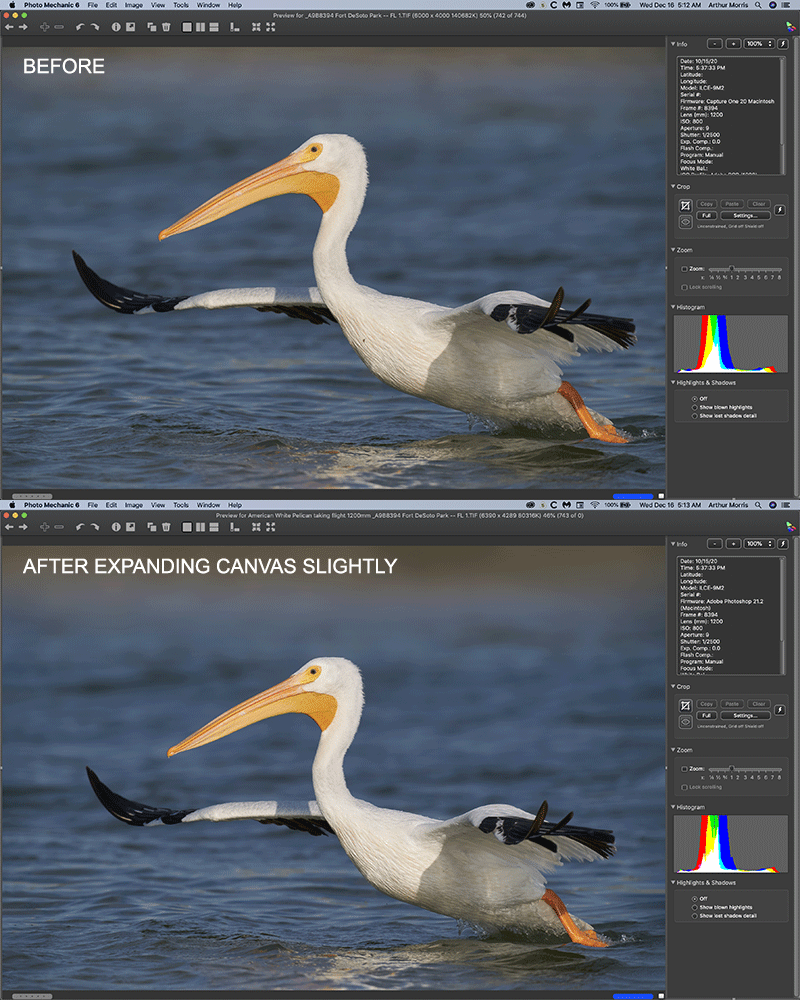
|
Adding Canvas with Choppy Water …
First I tried adding canvas using the Crop Tool/Content-Aware Fill option. That made a total mess of things. Instead, I expanded the canvas and then filled in the skinny triangle on three of the frame edges one skinny triangle at a time!. Though I am sure that the pixel-peepers could find some problematic areas, the optimized image with just a bit more room behind, above, and in front of the subject, is a lot more pleasing to my eye.
The expanding and filling in canvas techniques mentioned above and tons more great Photoshop tips and tricks are covered in detail in the BIRDS AS ART Current Workflow e-Guide (Digital Basics II), an instructional PDF that is sent via e-mail.
Exposure Fine-Point Question
Why did I use 1/3-stop less light to photograph the adult than I did to make the image of the juvenile?
Note: both exposures were confirmed as dead-solid perfect by RawDigger.
RawDigger e-Guide and Video Advance Copy Available
Save $10 Now
The RawDigger e-Guide and Video is almost finished. It will sell for $51.00. If you are anxious to get started with RawDigger, learn to mega-Expose to the Right, and wind up with the highest quality image files, you can save $10.00 and have a chance to review a pre-publication copy of the guide by sending a PayPal for $41.00 to birdsasart@verizon.net with the words RawDigger e-Guide and Video Pre-publication Copy cut and pasted into the Subject line. The recent delay is the result of my recent conversations with Iliah Borg, the brains behind RawDigger. It is likely that the Shock-your-World section will shock you.
You will of course receive a link for the completed PDF when the guide is finished.
Typos
Feel free to e-mail or to leave a comment regarding any typos or errors. Just be right :). with love, artie




On the exposure question I can think of a couple of reasons why the exposure might be different. I noticed you had increased the ISO from 640 to 800 and then the shutter speed from 1/2000 to 1/2500 and kept the aperture @ f/9.
You just pointed out that the exposure for the two images was identical: ISO 640 — 1/2000 sec. at f/9 equals ISO 800 — 1/2500 sec. at f/9. I was so busy trying to show everyone how smart I was that I screwed up 🙂
The higher shutter speed needed for flight imaging is one factor but also the Juvi has some brown “splotches” on its back whereas the adult body is all white therefore it requires less light for proper exposure.
The latter had been my intent 🙁
with love, artie
Hello Artie,
You commented that you pushed the shutter button during the action without taking extra time to get everything perfect.
That is correct.
At the exposure you used (being 1 stop under)
One stop under what? I did screw up — see my replies to Joel Eade above) but I do not think that I said “1 stop under.”
comparing with the image of the juvenile did you go to a higher shutter speed because of the flight action as opposed to the juvenile swimming?
Probably.
I do enjoy trying to nut out these exposure questions.
Do see what I wrote to Joel. It is hard to do when the guy asking the question screwed up 🙂
Best wishes for the Christmas season. Merry Christmas.
David.
Thanks and ditto, with love, artie