What’s Up?
I spent most of Saturday working on the Canon EOS R5 Camera Body User’s Guide. It is hard work that involves lots of research and — with camera and lens in hand, lots of experimenting. I am, however, making good progress as I slog through the relevant menu items.
I had fun down at the lake in the early morning photographing Cattle Egret, Boat-tailed Grackle singing on the newly erected Y-perch, and Black Vulture heads. I learned a lot while creating a series of Sandhill Crane blasting silhouette images. I will share what I learned with you here soon. With the cold mornings the pool continues to be on the chilly side, but compared to the air temps, the pool is balmy. I have been swimming my slow 1/2-mile every day since the pump was replaced. I only shiver when I get out of the pool! I may not swim today — with several cold days in a row, the water was down to 74 degrees this morning …
Today is Sunday 27 December 2020. The forecast is a carbon copy of the two previous days: clear and cold with a north wind. Not great, not terrible, especially if the north wind has a bit of east in it as it did yesterday. I will be headed down to the lake at about 7:30am.
Huge thanks to Gary Meyer and Ian Barker for their generous BAA Blog Thanks gifts.
I have made this point here often: reading the Comments on various blog posts can be tremendously rewarding and educational. The two biggest tips for the R5 AF Guide came from the Comments section. Both Geoff Newhouse and Ryan Sanderson have left incredibly helpful comments and answered additional questions via e-mail. And I have learned a ton from the insightful comments left by blog-regular Adam Rubenstein. In the Excuses for an Unsharp Flight Shot. Topaz Sharpen AI to the Rescue blog post here, he left a comment that mentioned a panel display in Sharpen AI where one can see the results of all three sharpening actions. I took that ball, ran with it, and learned a ton. That is how Topaz DeNoise and Sharpen AI Comparison Views became the main subject of today’s blog post. Reading all the comments is is like mining for gold. You sift through a lot and occasionally come up with a big, fat, valuable nugget.
This blog past makes ten days in a row with a new blog post. This one took more than three hours to prepare. Please remember …
Please Remember
With income from IPTs approaching zero, please, if you enjoy and learn from the blog, remember to use one of my two affiliate programs when purchasing new gear. Doing so just might make it possible for me to avoid having to try to get a job as a Walmart greeter and will not cost you a single penny more. And if you use Bedfords and remember to enter the BIRDSASART code at checkout, you will save 3% on every order and enjoy free second-day air shipping. In these crazy times — I am out at least forty to sixty thousand dollars so far due to COVID 19 (with lots more to come) — remembering to use my B&H link or to shop at Bedfords will help me out a ton and be greatly appreciated. Overseas folks who cannot order from the US because of import fees, duties, and taxes can always help out by clicking here if they see fit.
Wanted to Buy
I have potential buyers for a Canon EF 2X III Teleconverter and a Canon EF 600mm f/4L IS III USM lens. If you have either that you are looking to sell, please get in touch via e-mail.
The BAA Used Gear Page
The Used Gear page continues to be very active. The BAA Used Gear Page is the place to sell your used photographic equipment. We will help you to get your gear sold quickly for 20 to 60% or more than what the big guys are offering … Doubt me? Check out the Recent Sales list for the past eleven months at the bottom of the page.
Canon R5/R6 AF e-Guide Info
So far, 50 folks have sent PayPals for their copy of the Canon R5/R6 AF e-Guide. And 27 who used my affiliate links to purchase their R5 have e-mailed for and received their free copy of the guide. If you e-mailed or sent a PayPal and did not receive your guide, please LMK immediately via e-mail.
Feedback has been overwhelmingly positive so far. Three folks wrote stating that they had a better way of setting up AF on their R5s. When I wrote back explaining why they were in error, two of them back-tracked. One stubborn guy is still doing it his way — less efficiently. Be sure to scroll down to read about my plans for a Canon R5/R6 User’s e-Guide. Understand that the info in the BAA Canon R5/R6 Autofocus e-Guide is so important that I opted to publish the AF guide immediately as the R5/R6 User’s Guide will take at least a month to finish.
BAA Canon R5/R6 Autofocus e-Guide
Twenty-one pages. 3,452 words. 28-DPP4 screen captures showing the R5’s vaunted AF system in action. Note: the AF system of the R5 is identical to the AF system of the R6.
You will learn:
1- The two most useful AF Methods for general bird photography and for birds in flight.
2- How to set up your R5/R6 AF Menus.
3- What boxes to check (and un-check) under Limit AF Methods.
4- How to change the AF Method quickly, easily, and efficiently. Note: the default way of doing this is clunky, cumbersome, and inefficient at best. One person replied that this tip alone was worth the price of admission.
5- The only setting that should be used for Initial Servo AF pt for Face Detection + Tracking.
I you are currently using multiple back buttons either for general bird photography or for birds in flight, what you learn in this guide will change your life. For the better.
Here are the first three paragraphs of this e-Guide:
From the moment I learned about the new Canon mirrorless bodies, I read about using two or three back-buttons to focus using different AF methods. The word on the street said that the way to go for birds in flight was to use one button to acquire focus with Zone AF or with Large Zone: Horizontal AF and then switch to another button to activate Face Detection + Tracking AF and then use the shutter button to make an image. My immediate thought was, “This is insanity! There has got to be a better way.” In short, there is a far superior way to set up AF on your R5 or R6.
Remember that I got away from any form of back-button or rear focusing many years ago after finally realizing that it is always easier to do one thing (press the shutter button), than it is to do two things (press a back button and then press the shutter button).
The default method of switching AF Methods with the R5/R6 bodies is cumbersome at best. It involves first pressing the grid button (my name) on the upper right back of the camera and then pressing the hard-to-access M-Fn button to toggle through the AF Methods. This method is so bad that it will not be mentioned again in this guide.
The guide is free to all who have ordered an R5 or an R6 using my B&H affiliate link or from Steve Elkins/Bedfords using the BIRDSASART coupon code at checkout. Please send your receipt to me via e-mail. It will take me a few days to a week to verify the B&H purchases. Bedfords folks should expect their free e-Guides fairly quickly.
To purchase your copy of the e-Guide, please send a PayPal for $25.00 to birdsasart@verizon.net and be sure to include the words R5/R6 AF Guide in your PayPal e-mail.
Everyone who gets the guide will receive a free update no later than the first week in January.
Canon R5/R6 User’s e-Guide
I am working on a complete Canon R5/R6 User’s e-Guide. This will require a lot of research, a lot of time, and a lot of effort. I am hoping to have it complete by mid- to late January. As always, folks who use the BAA affiliate links to purchase their Canon gear will receive a substantial discount.
Understand that the info in the BAA Canon R5/R6 Autofocus e-Guide is so important that I opted to publish the AF guide right off the bat to help folks get started with their new camera bodies.
Great Topaz News!
Folks who use the BAA Topaz link to purchase Sharpen AI, DeNoise AI, or the Utility Bundle (or any other Topaz plugins) will receive a 15% discount by entering the ARTHUR15 code at checkout. To get the discount you must use my link and you must enter the discount code. Be sure to start with this link.
Topaz Stuff
As I said just a while back and have said often many times before, I should have listened sooner. If you, like me, are new to the Topaz party, please use this link to purchase. Right now I can wholeheartedly recommend both Topaz Sharpen AI and Topaz DeNoise AI. Though I have not yet worked with JPEGtoRAW AI or Gigapixel AI, I have installed both of these plug-ins and look forward to trying them on some I-Phone 11 images fairly soon. If you are thinking like me, consider the Utility Bundle that includes all four plug-ins mentioned above at a money-saving price.
Again, those who purchase Sharpen AI or DeNoise AI using my link, can e-mail to request a short Getting Started with Topaz e-Guide. I had a bit of trouble getting the two plug-ins installed and having them appear in the Photoshop Filter Menu. In addition, I will explain how to best learn about the two plug-ins by applying them on a Layer (in Photoshop).
|
|
|
127 sold to rave reviews. The SONY e-Guide by Patrick Sparkman and Arthur Morris |
The Sony Camera User’s e-Guide (and Videos)
Click here to purchase the guide with one Camera Set-up Video. Be sure to e-mail us by clicking here to specify your camera body so that we can send you a link for the correct video.
Click here to purchase the guide with two Camera Set-up Videos. Be sure to e-mail us by clicking here to specify your two camera bodies so that we can send you links for the correct videos.
Click here to learn more about the SONY e-Guide.
New and Better Bedfords Discount Policy!
You can now save 3% on all of your Bedfords photo gear purchases by entering the BIRDSASART coupon code at checkout. Your discount will be applied to your pre-tax total. In addition, by using the code you will get 2nd day air shipping via Fed Ex.
Grab a Nikon AF-S Teleconverter TC-14E III and save $14.99. Purchase a Canon EOS R5 and your discount will be $116.97. Purchase a Sony FE 600mm f/4 GM OSS lens and save a remarkable $389.94! Your Bedford’s purchase no longer needs to be greater than $1,000.00 for you to receive a discount. The more you spend, the more you save.
Money Saving Reminder
Many have learned that if you need a hot photo item that is out of stock at B&H and would enjoy free overnight shipping, your best bet is to click here, place an order with Bedfords, and enter the coupon code BIRDSASART at checkout. If an item is out of stock, contact Steve Elkins via e-mail or on his cell phone at (479) 381-2592 (Central time). Be sure to mention the BIRDSASART coupon code and use it for your online order to save 3% and enjoy free 2nd-day air shipping. Steve has been great at getting folks the hot items that are out of stock at B&H and everywhere else. The wait lists at the big stores can be a year or longer for the hard to get items. Steve will surely get you your gear long before that. For the past year, he has been helping BAA Blog folks get their hands on items like the SONY a9 ii, the SONY 200-600 G OSS lens, the Canon EOS R5, the Canon RF 100-500mm lens, and the Nikon 500mm PF. Steve is personable, helpful, and eager to please.


Gear Questions and Advice
Too many folks attending BAA IPTs and dozens of photographers whom I see in the field and on BPN, are–out of ignorance–using the wrong gear especially when it comes to tripods and more especially, tripod heads… Please know that I am always glad to answer your gear questions via e-mail. Those questions might deal with systems, camera bodies, accessories, and/or lens choices and decisions.
|
|
|
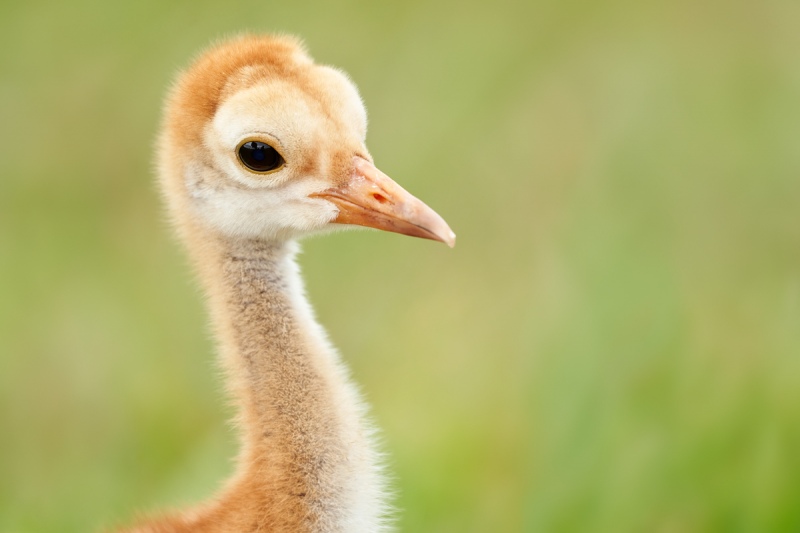
This image was created on 17 May 2020 at Indian Lake Estates, FL. While seated, I used the handheld Sony FE 100-400mm f/4.5-5.6 GM OSS lens (at at 400mm) and the 61-mega-pixel monster, the Sony Alpha a7R IV Mirrorless Digital camera body. ISO 800. Exposure determined by Zebras with ISO on the rear dial. 1/500 sec. at f/6.3 in Manual mode. AWB at 9:01am on a cloudy fairly bright morning. Tracking Flexible Spot (M)/AF-C was active at the moment of exposure. Image #1: Mother’s Day Sandhill Crane chick at 7 1/2 days old |
Mother’s Day Miracle Chicks
One Good Thing About the Pandemic
Coming upon the Mother’s Day miracle chicks on May 10 of this year was indeed a photographic blessing for me. One of the two chicks survived, and can be seen every day down by the lake with its mom and dad. Now in its seventh month, the surviving colt (seen below), is never far from its parents. The forage together, enjoy preening sessions together, and often fly off together, usually to challenge other pairs of calling cranes.
When I magnify this image, I can see myself and one of the parent cranes reflected in the eye.
I do not know if the bird in Image #1 is the chick that survived to colt-hood, or the small colt that perished. Either way, the growth and development of young Sandhill Cranes is something to behold. And I have 🙂
|
|
|
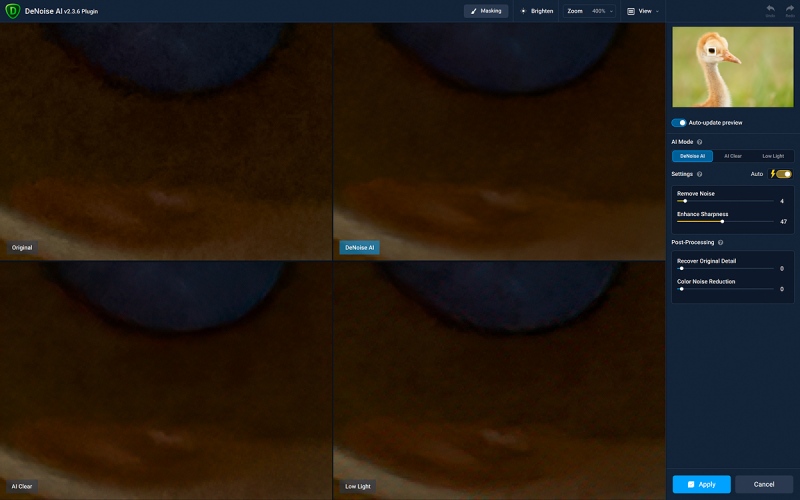
Click on the image to see a larger version. Topaz DeNoise AI Comparison View of the on the Mother’s Day Sandhill Crane chick at 7 1/2 days old image |
Topaz DeNoise AI Comparison View
Huge thanks to blog regular Adam Rubenstein for turning me on to Comparison Views with Topaz DeNoise and Sharpen AI. To activate the Comparison View go to View and check Comparison View from the dropdown menu. Be sure that Auto-update Preview is clicked On. (I think that On is the default). The upper left will show the original, the upper right depicts DeNoise AI, the lower left is AI Clear, and the lower right shows the results with Low Light. To begin, I placed the Navigator box on the darkest green background in the lower right corner of the image. All four views looked pretty good. Then I moved the Navigator box to the darkest part of the image, the bottom of the eye. At 100% and 200% all looked pretty good. But at 400%, DeNoise AI was the clear winner if only by a small margin. It did the best job of handling the color noise; see especially the lower left edge of the pupil. Once you’ve made your choice simply click on that box and hit Apply.
While preparing this blog post I noticed after the fact that when I moved the Color Noise Reduction to the right that Low Light looked a bit better than DeNoise AI (while perhaps softening some fine detail). So there are lots of options, and lots more to discover in DeNoise AI when working with the Comparison Views.
|
|
|
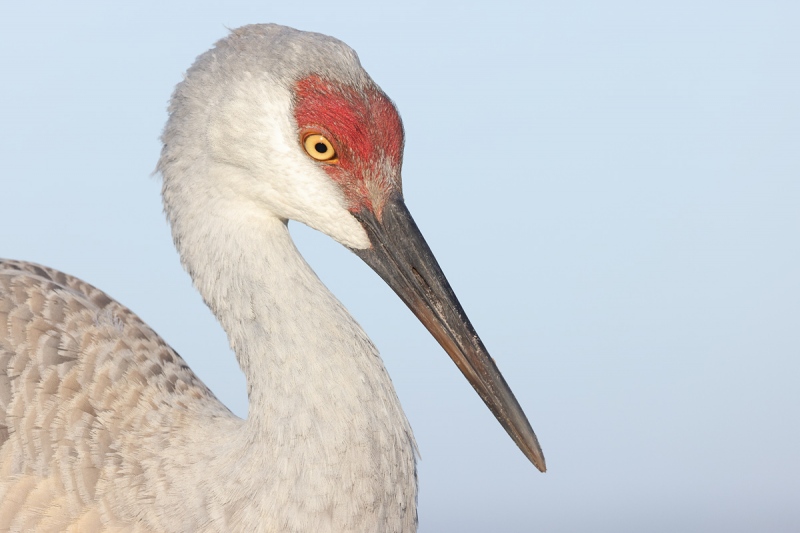
This image was created on 24 December 2020 at Indian Lake Estates, FL. I used the handheld Canon RF 100-500mm f/4.5-7.1L IS USM lens (at 500mm) and the highly touted 45MP Canon EOS R5 Mirrorless Digital camera body. ISO 800. Exposure determined using the in-camera histogram and confirmed as perfect by RawDigger: 1/1000 sec. at f/10 (stopped down 1 stop) in Manual mode. AWB at 8:19am on sunny morning. Face Detection + Tracking/AI Servo AF was active at the moment of exposure and tracked the colt’s eye. Click the image to see a larger version. Image #2: Mother’s Day Sandhill Crane colt at 7 1/2 months old |
The Miracle Continues …
I am not sure if I imprinted on the chicks, but since that first day back in May, the entire family has trusted me completely. The pink cap of the surviving colt (seen in Image #2) has been getting a deeper red with each passing day. The gray feathers just above the base of the bill still distinguish it from its parents, but I imagine that those will be fully molted to red within the next month or two. Time will tell.
|
|
|
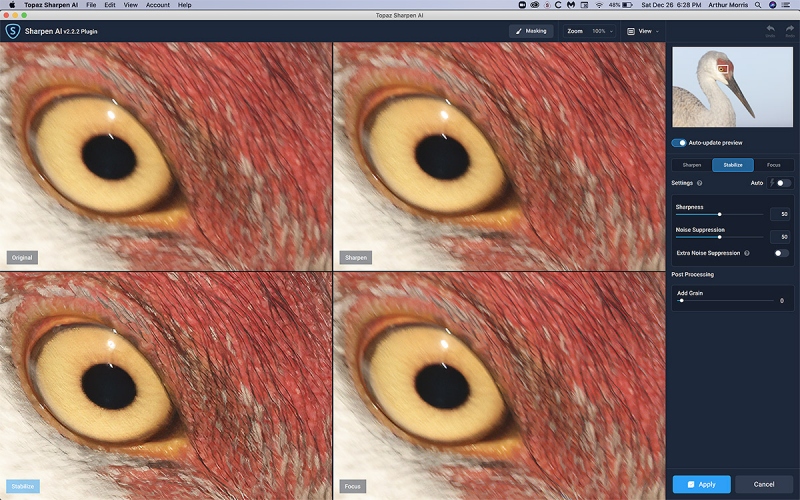
Click on the image to see a larger version. Topaz Sharpen AI Comparison View of the on the Mother’s Day Sandhill Crane chick at 7 1/2 months old image |
Topaz Sharpen AI Comparison View
Huge thanks again to blog regular Adam Rubenstein for turning me on to Comparison Views with Topaz DeNoise and Sharpen AI. To activate the Comparison View go to View and check Comparison View from the dropdown menu. Be sure that Auto-update Preview is clicked On. (I think that On is the default). In Sharpen AI, the upper left will show the original, the upper right depicts Sharpen, the lower left is Stabilize, and the lower right shows the results with Focus. Working at 100% it was clear that Stabilize was best by far. Then I clicked on the Stabilize box, reduced the Sharpness to 40, reduced the Noise Suppression to 20, and hit Apply. In most cases, you will opt to reduce the Sharpness settings suggested by Auto.
Look closely at the small, angled, straight line eye highlight on the edge of the pupil in each view. I find it fascinating that Stabilize significantly reduced the length of that highlight by re-aligning the pixels. The angle of that highlight shows the direction that the bird’s head was moving when it lowered it.
An Important Point on Image Stabilization
It is important to realize and remember that no Image Stabilization system — no matter how sophisticated — can eliminate, or even reduce motion blur. Remember also that the faster the shutter speed, the less the effects of motion blur will be.
Typos
In all blog posts and Bulletins, feel free to e-mail or to leave a comment regarding any typos or errors.




Mug Shot Test
Test failed 🙁
a
Hi Artie, thank you for the kind “shout out”. A key point to consider regarding the comparison view in is if one doesn’t have the “auto update” slider to “on”, the images in the display will not have the sharpening method applied unless one manually performs it.
Thanks, Adam. I added that to the post.
with love artie