What’s Up?
My favorite morning location in Lakeland was terrible. There were about eight American White Pelicans way too far away on large support ring around the soon-to-be-dismantled lighted, ornamental X-mas tree in the middle of the lake. Usually there are several dozen of them sitting on the bulkheads right next to the lake. There were a few ducks around including a hen Canvasback; I did not get any pictures of her. The Great Blue Heron nest failed as it had for the past few years:( Then we headed to the next-best morning Lakeland lake where there was lots of action. The Anhingas there are silly tame and dependable as were the Lesser Scaups and the White Ibises.
I learned a ton more about my R5 and still have to figure out some weird stuff with Auto ISO … Alas, there were no flight photography opportunities.
Today is Wednesday, 30 December 2020. The forecast if for partly cloudy with east and east/southeast winds. I will be headed down to the lake soon to set up the road-kill cafe for the vultures.
This blog past makes thirteen days in a row with a new blog post. This one took about 2 1/2 hours to prepare including the time spent on the image optimizations. Please remember …
Via e-Mail from Joe Usewicz
Hi Artie, I forgot to mention that Topaz products are 30% off right now and if you go thru your link and add Arthur15, you get an additional 15% off. Like I just did! Warm regards, Joe
Please Remember
With income from IPTs approaching zero, please, if you enjoy and learn from the blog, remember to use one of my two affiliate programs when purchasing new gear. Doing so just might make it possible for me to avoid having to try to get a job as a Walmart greeter and will not cost you a single penny more. And if you use Bedfords and remember to enter the BIRDSASART code at checkout, you will save 3% on every order and enjoy free second-day air shipping. In these crazy times — I am out at least forty to sixty thousand dollars so far due to COVID 19 (with lots more to come) — remembering to use my B&H link or to shop at Bedfords will help me out a ton and be greatly appreciated. Overseas folks who cannot order from the US because of import fees, duties, and taxes can always help out by clicking here if they see fit.
The BAA Used Gear Page
The Used Gear page continues to be very active. The BAA Used Gear Page is the place to sell your used photographic equipment. We will help you to get your gear sold quickly for 20 to 60% or more than what the big guys are offering … Doubt me? Check out the Recent Sales list for the past eleven months at the bottom of the page.
Canon R5/R6 AF e-Guide Info
So far, 56 folks have sent PayPals for their copy of the Canon R5/R6 AF e-Guide. And 27 who used my affiliate links to purchase their R5 have e-mailed for and received their free copy of the guide. If you e-mailed or sent a PayPal and did not receive your guide, please LMK immediately via e-mail.
Feedback has been overwhelmingly positive so far. Three folks wrote stating that they had a better way of setting up AF on their R5s. When I wrote back explaining why they were in error, two of them back-tracked. One stubborn guy is still doing it his way — less efficiently. Be sure to scroll down to read about my plans for a Canon R5/R6 User’s e-Guide. Understand that the info in the BAA Canon R5/R6 Autofocus e-Guide is so important that I opted to publish the AF guide immediately as the R5/R6 User’s Guide will take at least a month to finish.
BAA Canon R5/R6 Autofocus e-Guide
Twenty-one pages. 3,452 words. 28-DPP4 screen captures showing the R5’s vaunted AF system in action. Note: the AF system of the R5 is identical to the AF system of the R6.
You will learn:
1- The two most useful AF Methods for general bird photography and for birds in flight.
2- How to set up your R5/R6 AF Menus.
3- What boxes to check (and un-check) under Limit AF Methods.
4- How to change the AF Method quickly, easily, and efficiently. Note: the default way of doing this is clunky, cumbersome, and inefficient at best. One person replied that this tip alone was worth the price of admission.
5- The only setting that should be used for Initial Servo AF pt for Face Detection + Tracking.
I you are currently using multiple back buttons either for general bird photography or for birds in flight, what you learn in this guide will change your life. For the better.
Here are the first three paragraphs of this e-Guide:
From the moment I learned about the new Canon mirrorless bodies, I read about using two or three back-buttons to focus using different AF methods. The word on the street said that the way to go for birds in flight was to use one button to acquire focus with Zone AF or with Large Zone: Horizontal AF and then switch to another button to activate Face Detection + Tracking AF and then use the shutter button to make an image. My immediate thought was, “This is insanity! There has got to be a better way.” In short, there is a far superior way to set up AF on your R5 or R6.
Remember that I got away from any form of back-button or rear focusing many years ago after finally realizing that it is always easier to do one thing (press the shutter button), than it is to do two things (press a back button and then press the shutter button).
The default method of switching AF Methods with the R5/R6 bodies is cumbersome at best. It involves first pressing the grid button (my name) on the upper right back of the camera and then pressing the hard-to-access M-Fn button to toggle through the AF Methods. This method is so bad that it will not be mentioned again in this guide.
The guide is free to all who have ordered an R5 or an R6 using my B&H affiliate link or from Steve Elkins/Bedfords using the BIRDSASART coupon code at checkout. Please send your receipt to me via e-mail. It will take me a few days to a week to verify the B&H purchases. Bedfords folks should expect their free e-Guides fairly quickly.
To purchase your copy of the e-Guide, please send a PayPal for $25.00 to birdsasart@verizon.net and be sure to include the words R5/R6 AF Guide in your PayPal e-mail.
Everyone who gets the guide will receive a free update no later than the first week in January.
Canon R5/R6 User’s e-Guide
I am working on a complete Canon R5/R6 User’s e-Guide. This will require a lot of research, a lot of time, and a lot of effort. I am hoping to have it complete by mid- to late January. As always, folks who use the BAA affiliate links to purchase their Canon gear will receive a substantial discount.
Understand that the info in the BAA Canon R5/R6 Autofocus e-Guide is so important that I opted to publish the AF guide right off the bat to help folks get started with their new camera bodies.
Great Topaz News!
30% Off Sale Right Now!
Folks who use the BAA Topaz link to purchase Sharpen AI, DeNoise AI, or the Utility Bundle (or any other Topaz plugins) will receive an additional 15% discount by entering the ARTHUR15 code at checkout. To get the discount you must use my link and you must enter the discount code. Be sure to start with this link.
Topaz Stuff
As I said just a while back and have said often many times before, I should have listened sooner. If you, like me, are new to the Topaz party, please use this link to purchase. Right now I can wholeheartedly recommend both Topaz Sharpen AI and Topaz DeNoise AI. Though I have not yet worked with JPEGtoRAW AI or Gigapixel AI, I have installed both of these plug-ins and look forward to trying them on some I-Phone 11 images fairly soon. If you are thinking like me, consider the Utility Bundle that includes all four plug-ins mentioned above at a money-saving price.
Again, those who purchase Sharpen AI or DeNoise AI using my link, can e-mail to request a short Getting Started with Topaz e-Guide. I had a bit of trouble getting the two plug-ins installed and having them appear in the Photoshop Filter Menu. In addition, I will explain how to best learn about the two plug-ins by applying them on a Layer (in Photoshop).
|
|
|
128 sold to rave reviews. The SONY e-Guide by Patrick Sparkman and Arthur Morris |
The Sony Camera User’s e-Guide (and Videos)
Click here to purchase the guide with one Camera Set-up Video. Be sure to e-mail us by clicking here to specify your camera body so that we can send you a link for the correct video.
Click here to purchase the guide with two Camera Set-up Videos. Be sure to e-mail us by clicking here to specify your two camera bodies so that we can send you links for the correct videos.
Click here to learn more about the SONY e-Guide.
New and Better Bedfords Discount Policy!
You can now save 3% on all of your Bedfords photo gear purchases by entering the BIRDSASART coupon code at checkout. Your discount will be applied to your pre-tax total. In addition, by using the code you will get 2nd day air shipping via Fed Ex.
Grab a Nikon AF-S Teleconverter TC-14E III and save $14.99. Purchase a Canon EOS R5 and your discount will be $116.97. Purchase a Sony FE 600mm f/4 GM OSS lens and save a remarkable $389.94! Your Bedford’s purchase no longer needs to be greater than $1,000.00 for you to receive a discount. The more you spend, the more you save.
Money Saving Reminder
Many have learned that if you need a hot photo item that is out of stock at B&H and would enjoy free overnight shipping, your best bet is to click here, place an order with Bedfords, and enter the coupon code BIRDSASART at checkout. If an item is out of stock, contact Steve Elkins via e-mail or on his cell phone at (479) 381-2592 (Central time). Be sure to mention the BIRDSASART coupon code and use it for your online order to save 3% and enjoy free 2nd-day air shipping. Steve has been great at getting folks the hot items that are out of stock at B&H and everywhere else. The wait lists at the big stores can be a year or longer for the hard to get items. Steve will surely get you your gear long before that. For the past year, he has been helping BAA Blog folks get their hands on items like the SONY a9 ii, the SONY 200-600 G OSS lens, the Canon EOS R5, the Canon RF 100-500mm lens, and the Nikon 500mm PF. Steve is personable, helpful, and eager to please.


Gear Questions and Advice
Too many folks attending BAA IPTs and dozens of photographers whom I see in the field and on BPN, are–out of ignorance–using the wrong gear especially when it comes to tripods and more especially, tripod heads… Please know that I am always glad to answer your gear questions via e-mail. Those questions might deal with systems, camera bodies, accessories, and/or lens choices and decisions.
|
|
|
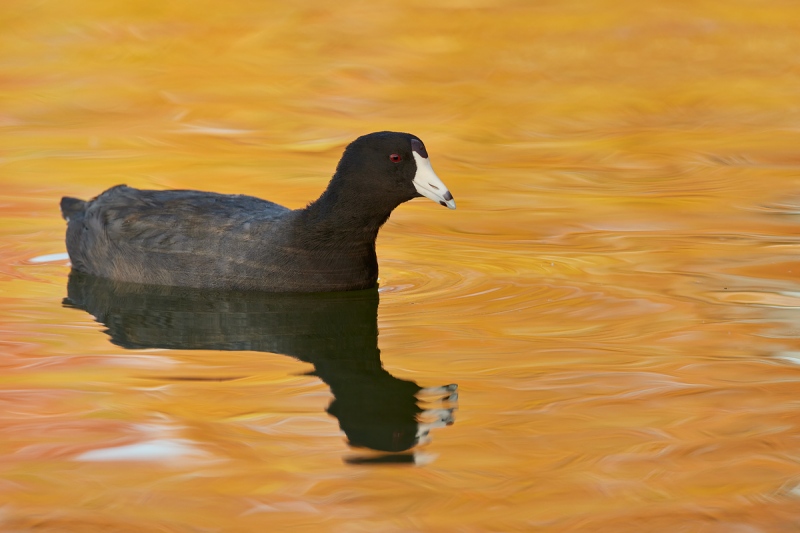
This image was created on 29 December 2020 at my favorite Lakeland location. I used the handheld Canon RF 100-500mm f/4.5-7.1L IS USM lens (at 454mm) and the highly touted 45MP Canon EOS R5 Mirrorless Digital camera body. ISO 1600. Exposure determined using the in-camera histogram followed by a histogram/blinkies evaluation and luck. The raw file brightness was confirmed as perfect by RawDigger: 1/500 sec. at f/8 in Manual mode. AWB at 8:09am in the shade on clear morning. Face detection + Tracking/AI Servo AF was active at the moment of exposure and performed quite well, tracking and catching most of the eye. Click the image to see a larger version. Image #1: American Coot in early morning reflections |
Backgrounds …
In bird photography, the backgrounds are often more important to the artistic success of an image than the bird itself. Have you heard the expression, Ugly as a coot? The swirly, soft yellow water in this image is the over-riding reason for its success.
This is a slight crop. I ran Topaz DeNoise AI on Auto and Topaz Sharpen AI on Stabilize.
|
|
|
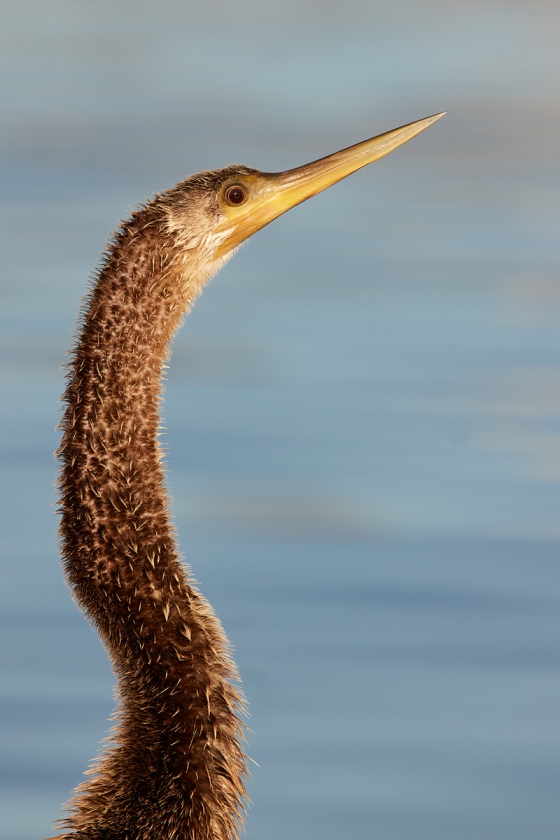
This image was created on 29 December 2020 at my Lakeland morning back-up location. I used the handheld Canon RF 100-500mm f/4.5-7.1L IS USM lens with the Canon Extender RF 1.4x (at 560mm) and the highly touted 45MP Canon EOS R5 Mirrorless Digital camera body. ISO 640. Exposure determined by experience and luck and confirmed as perfect by RawDigger: 1/640 sec. at f/13 (stopped down one stop) in Manual mode. AWB at 8:39am on sunny morning. Face detection + Tracking/AI Servo AF was active at the moment of exposure and performed to perfection nailing the bird’s eye. Click the image to see a larger version. Image #2: Immature Anhinga head and neck portrait |
The Effects of f/13 on the Background
So why was I at f/13 in the first place? Working at 700mm, I was doing tight head shots of this bird — in those situations, an additional stop of depth-of-field is a plus. When I zoomed out, I effectively increased that depth-of-field. That brought up the wide striations in the background. Usually I want the backgrounds as smooth as possible. I really like the look of this one with the more defined strips of color background.
This one is full frame. Looking at the comparison view in Topaz DeNoise AI, I went with Low Light by a small margin.
|
|
|
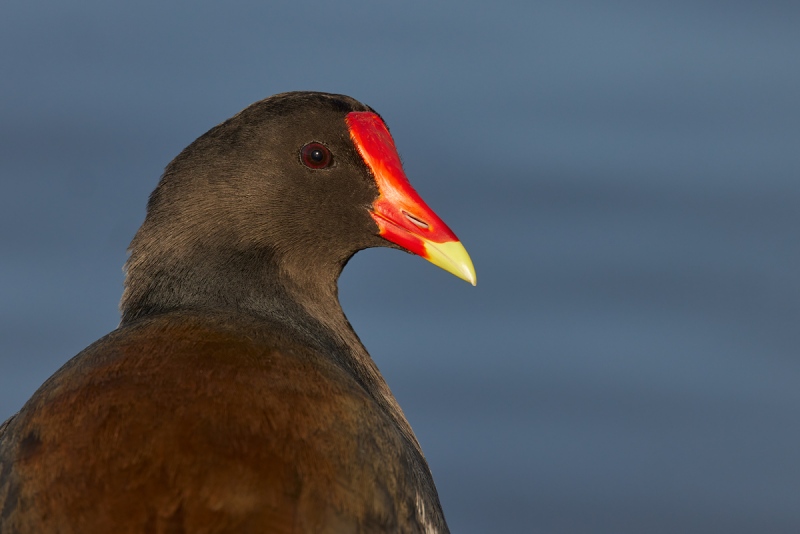
This image was created on 29 December 2020 at my Lakeland morning back-up location. I used the handheld Canon RF 100-500mm f/4.5-7.1L IS USM lens with the Canon Extender RF 1.4x (at 700mm) and the highly touted 45MP Canon EOS R5 Mirrorless Digital camera body. ISO 800. Exposure determined by experience, histogram evaluation, and luck, and confirmed as perfect by RawDigger: 1/500 sec. at f/14 (stopped down 1 1/3 stops) in Manual mode. AWB at 9:00am on sunny morning. Large Zone: Horizontal (up two clicks)/AI Servo AF was active at the moment of exposure and performed to perfection by painting the bird’s face and bill with active AF points Click the image to see a larger version. Image #3: Common Moorhen adult over the shoulder head portrait |
Head Angle
With over-the-shoulder portraits, my great preference is for the bird’s head to be perfectly parallel to the imaging sensor. This moorhen (formerly gallinule) has its head turned about two degrees toward me, just a bit too much. But I love the great detail on the face. I might have stopped down another stop to sharpen up the feathers on the back, but that would likely not have helped much as I was so close. With many of today’s featured images, the fabulous close focusing abilities of the RF 100-500 were a big plus.
Notice here that at f/14 the background is much softer and less defined than in Image #2. Why? I was much closer to the bird; depth-of-field decreases as the distance to the subject decreases.
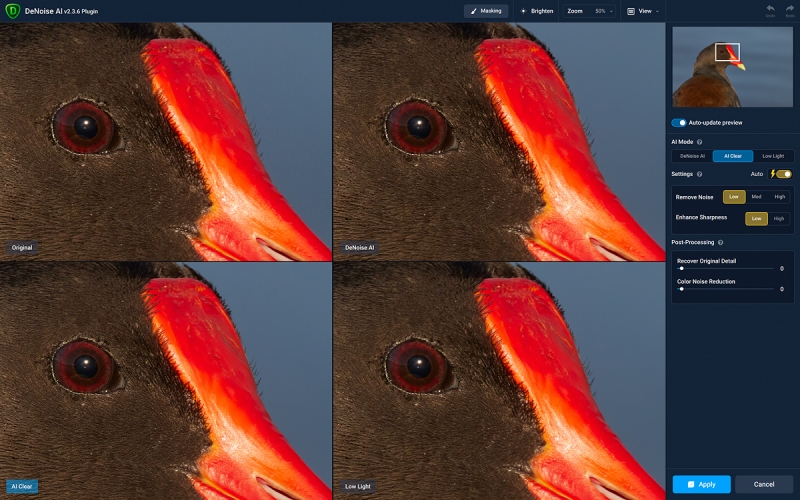
The REDs on the bill were simply too bright but rather than desaturating them, I used the Selective Color trick that is detailed in the BIRDS AS ART Current Workflow e-Guide (Digital Basics II). This tip is great for cardinals and other red birds in sweet light — it completely eliminates the enamel look of too-bright REDs.
|
|
Image #3A: Common Moorhen adult over the shoulder head portrait |
The Comparison View
This is one is slight crop. Looking at the comparison view in Topaz DeNoise AI, I went with AI Clear by a very small margin. Learn how to set up the comparison view in the blog post here.
|
|
|
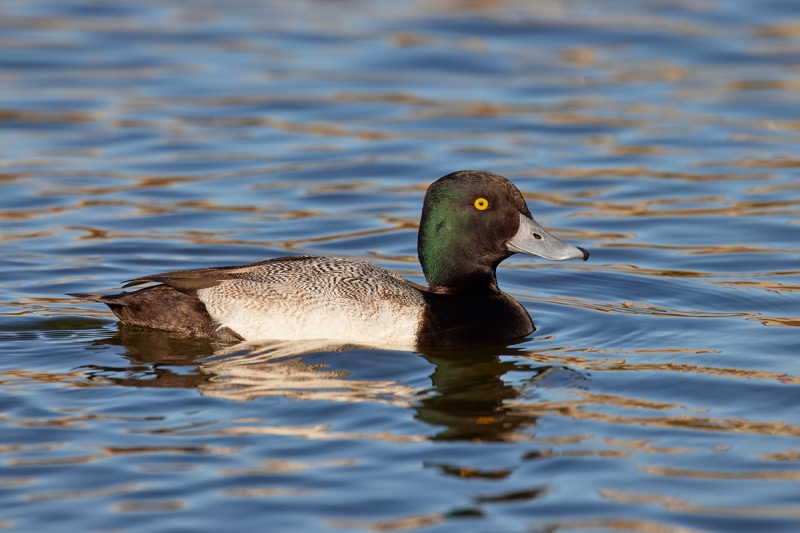
This image was also created on 29 December 2020 at my Lakeland morning back-up location. Again I used the handheld Canon RF 100-500mm f/4.5-7.1L IS USM lens with the Canon Extender RF 1.4x (this one at 661mm) and the highly touted 45MP Canon EOS R5 Mirrorless Digital camera body. ISO 800. Exposure determined by experience, histogram evaluation, and luck and confirmed as perfect by RawDigger: 1/1250 sec. at f/11 (stopped down 1/3-stop) in Manual mode. AWB at 9:10am on sunny morning. Face detection + Tracking/AI Servo AF was active at the moment of exposure and performed to perfection nailing the bird’s eye. Click the image to see a larger version. Image #4: Lesser Scaup drake swimming |
An Explanation of my R5 Exposure Problems and Concerns
If a single bird is just sitting there, I have no problem getting a perfect exposure with the R5 after making a test image or two. RawDigger has taught me that I barely want a single blinkie with the new Canon body. But in bird photography, the subjects rarely sit still. With the scaups, the drakes need 1/3-stop less light than the hens because the bright silver on the flanks of the adult males is brighter than the white ovals on either side of the bill on the hens (and on the first-year males as well). In addition, you might get to shoot a more evenly toned duck species that does not have any bright highlights. I do my best to keep up with the changing tonalities, but getting the exposure perfect often involves luck. On Tuesday morning, RawDigger showed that about 90% of my images were over-exposed with non-recoverable highlights … A very big part of the problem is that it is pretty much impossible to properly evaluate the live-in-the-viewfinder histogram with moving subjects … In addition, small bright highlights are not seen well on the histogram.
With SONY, folks using Patrick Sparkman’s Zebras strategy with their camera set up correctly with ISO on the rear wheel, getting the right exposure is much, much simpler. Simply adjust the ISO until you see some Zebras on the highlights, and you are assured of having a perfect exposure time after time. With practice, you can do this even when tracking a bird in flight. So with the ducks of varying tonalities, you simply adjust the ISO with the rear wheel till you see some blinks; shutter speed and aperture are set manually and do not change. This method is fast, simple, and accurate.
Monstrously Huge Advantage: SONY
This is one is full frame. Looking at the comparison view in Topaz DeNoise AI, I again opted for Low Light albeit by a small margin.
|
|
Image #4A: DPP4 Screen Capture for Lesser Scaup drake swimming |
DPP4 Screen Capture
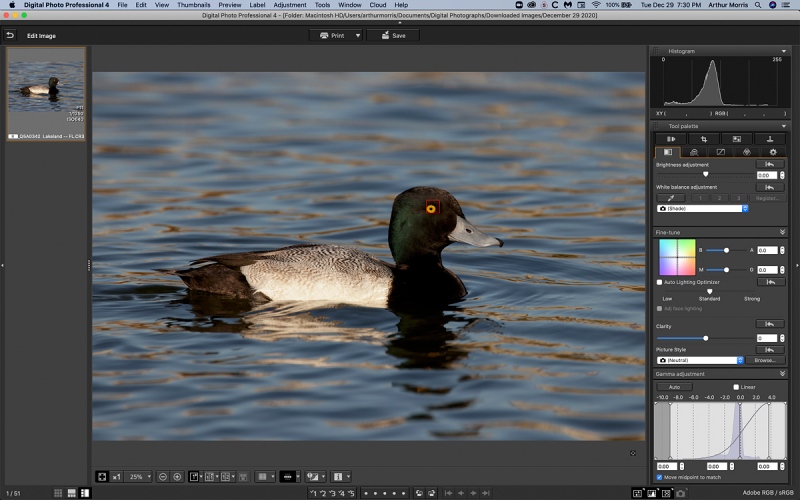
Be sure to enlarge the image to view the small red square squarely on the bird’s eye. Face Detection + Tracking/AI Servo AF with the R5 is indeed quite remarkable. In the R5/R6 AF Guide, you will learn exactly how to set up your camera properly so that you can take advantage of this amazing technology. When I first started testing the Canon gear, I made one mistake that seriously limited my success when using Face Detection + Tracking …
Even though some of the new AF technology is superb, successful image designs are attained only after lots of practice to help develop your framing skills. It is very easy to be sloppy and mis-frame an image; I will be doing a blog post soon showing lots of examples of just that, all created by yours truly.
|
|
|
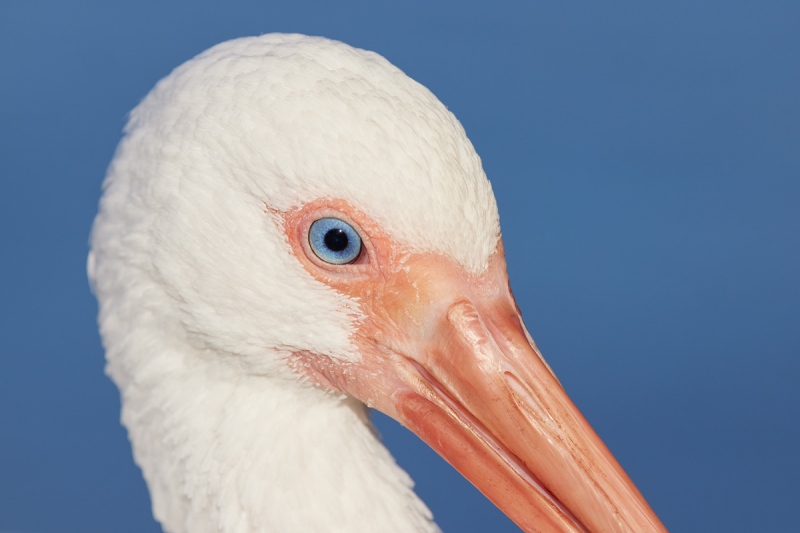
This image was also created on 29 December 2020 at my Lakeland morning back-up location. Again I used the handheld Canon RF 100-500mm f/4.5-7.1L IS USM lens with the Canon Extender RF 1.4x (this one at 700mm) and the highly touted 45MP Canon EOS R5 Mirrorless Digital camera body. ISO 640. Exposure determined by experience, histogram evaluation, and luck and confirmed as perfect by RawDigger: 1/1000 sec. at f/13 (stopped down one full stop) in Manual mode. AWB at 9:14am on sunny morning. Face detection + Tracking/AI Servo AF was active at the moment of exposure and performed to perfection nailing the bird’s eye. Click the image to see a larger version. Image #5: White Ibis winter adult face portrait |
Point-Blank Depth-of-Field
Here I am so close to this tame subject that even with the aperture stopped down one full stop the background is rendered totally smooth and detail-less. With this image I love the blue iris and the incredible feather detail.
This is one is a very small crop. Looking at the comparison view in Topaz DeNoise AI, I went with AI Clear by a hair.
|
|
The BAA Middle of Florida Photographic Site GuideYou can purchase your copy here in the BAA Online Store. |
The BAA Middle of Florida Photographic Site Guide
126 pages, 87 photographs by Joe Przybyla and Arthur Morris.
The PDF for this e-Guide is an electronic download sent via e-mail.
Purchase your copy here in the BAA Online Store.
I had thought about doing a guide to some of the great but little-known photo hotspots around central Florida for about a decade, but those plans never came to fruition. I met Joe online in the Avian Forum at BirdPhotographer’s.Net about two years ago. Joe’s photography has improved tremendously over the past few years; he credits the BAA blog, my books and PDFs, and his participation on BPN. The one thing that I learned right from the get-go about Joe is that he is a hard and tenacious worker, always striving to improve his skills and to grow his knowledge base. As he knew of more than a few good spots in central Florida, I broached the idea of us doing a photographic site guide that covered many of the little-known photographic hotspots from Brandon to Lakeland to Joe Overstreet Road to Indian Lake Estates (my Florida home for the past 20 years or so). After more than many, many dozens of hours of effort, The BIRDS AS ART Middle of Florida Photographic Site Guide is now a reality. Thanks to Joe’s wife Dottie for her review of our writing. We all learned once again that writing is a process, a back and forth process. All thanks to the white pelicans of Lakeland. Here are the locations that are detailed in this e-Guide:
- Indian Lake Estates: Sandhills Cranes with chicks and colts, lots of vultures, and Ospreys up the kazoo!
- Gatorland, Kissimmee: Learn to make great images of wading birds in a cluttered rookery.
- The Brandon Rookery: Great for nesting Wood Storks, Great Egrets, and more.
- Circle Bar B Reserve, Lakeland: Here you will find a great variety of avian subjects in a great variety of habitats.
- Lake Morton, Lakeland: There are lots of silly tame birds here including and especially American White Pelican during the colder months.
- Lake Mirror, Lakeland: Tame Anhingas, Limpkins, and a zillion White Ibises at times.
- West Lake Parker, Lakeland: Here you will have a chance for two difficult birds, Snail Kite, and Purple Gallinule.
- Joe Overstreet Road, Kenansville: Crested Caracara, meadowlarks, Loggerhead Shrike, and much more on the fenceposts and barbed wire.
Each location includes a map, a detailed description of the best spots, best season, light and time of day instructions, the expected species, and an educational and inspirational gallery that is designed to open your eyes as to the possibilities.
You can purchase a copy here in the BAA Online Store.
Typos
In all blog posts and Bulletins, feel free to e-mail or to leave a comment regarding any typos or errors.





Hi Artie
You are so lucky to have such sweet in Florida, all your Images had it and of course with it comes
problems with blown out highlights, I find Photoshop Bridge can handle them most of the time but there is always a exception to the rule.
Best and love
Ken
UK
PS no wood for us next year I hope.
Blown highlights cannot be recovered. Getting a perfect exposure with bright whites that maintain detail is the job of the photographer. I never really knew how to do that or to see if I actually did that until I started evaluating my images in RawDigger.
Sweet what in Florida?
with love, artie
“I went with AI Clear by a hair”
I’m surprised; I would have thought you’d say “by a feather”! 🙂
Anthony, I object. Blown highlights are a “you” thing.
As usual I knew “you” would disagree 🙂
Artie, I think blown highlights are currently a Canon “thing”. I would ALWAYS have problems with my 1DX II and 5DMIV. Folks thought I was crazy. I was not.
Hi Anthony,
I disagree. It is and always had been possible to produce properly exposed image files that include bright whites with detail. It is just a lot more difficult without Zebras, at least for me.
with love, artie
I knew you would disagree 😉
Sorry Anthony, I disagree too. Yes, any camera can blow out the highlights and it seems easier to do on my Canon bodies than my Sony cameras possibly due to the lack of zebras. Unless they are totally cooked, the highlights are usually recoverable. Hopefully, Canon will add them in a FW upgrade. The bigger issue I’ve found is the noise in the R5 if not properly exposed to the right.