From Bob Peltz via e-Mail
Oh my god Artie… The R5 AF Method-switching set up detailed in the R5/R6 AF e-Guide is much more user-friendly than the ridiculous back button set up! Many thanks, Bob
Your Favorite?
Which of today’s two three featured images is your favorite? Please leave a comment and let us know why you made your choice.
The Most Versatile Super-Telephoto Zoom Lens Ever?
A quick peek at today’s three featured images might lead you to believe that the Canon RF 100-500 zoom lens just is the most versatile telephoto zoom lens ever. It is stunningly sharp. It offers greater reach than any of the 100-400 lenses. Compared to the SONY 200-600, it is lighter and smaller (and thus easier to handhold) and focuses a whole lot closer. The four-foot minimum focusing distance makes it great for medium-sized flowers, butterflies, large bugs, and frogs and toads and the like. And with my newly discovered best R5 AF Method for birds in flight (and the confidence that came with that), it is a superb flight lens.
What’s Up?
On Wednesday morning, it was drizzling at 7:30am and raining hard at 8:00am. The rain persisted until noon. A bit before 1:00pm, I headed down to the lake for a walk. I walked from the pier to the south end of the South Field to check on the crane nest that neighbor-Ron showed me the other day. I found the two adults foraging in the shallows with two very small chicks! I watched them for a while, walked back to the car, and decided to drive up to the end of the North Field to check on the two chicks that I had seen the previous day. Keep reading to find out what happened.
I did get a ton of work done on the Canon EOS R5 Camera User’s e-Guide yesterday and will get even more done today. The complete guide will sell for $75.00. Folks who purchased their Canon gear using my links will receive a $65.00 discount; the guide will cost them a nominal $10.00. Folks who spent more than $7500.00 on Canon mirrorless gear using either of my affiliate links (B&H or Bedfords), will receive the User’s Guide for free. Folks who purchased the R5/R6 AF e-Guide will receive a $10.00 discount on the User’s e-Guide. The best news is that the end is in sight.
Today is Thursday 18 February 2021. The forecast for this morning is for partly cloudy with a brisk wind from the south. That is pretty good for bird photography, but I will be heading into town early this morning for an endoscopy; we are trying to figure out why I have been clearing my throat far too often for the past two years … Reflux often causes such throat-clearing, even when there is zero heartburn. As I have a history of stomach ulcer (more than four decades ago), we are looking to rule out H. Pylori.
This post took well more than three hours to prepare and makes sixty days in a row with a new one. Please remember …
Please Remember
With income from IPTs now at zero, please, if you enjoy and learn from the blog, remember to use one of my two affiliate programs when purchasing new gear. Doing so just might make it possible for me to avoid having to try to get a job as a Walmart greeter and will not cost you a single penny more. And if you use Bedfords and remember to enter the BIRDSASART code at checkout, you will save 3% on every order and enjoy free second-day air shipping. In these crazy times — I am out at least forty to sixty thousand dollars so far due to COVID 19 (with lots more to come) — remembering to use my B&H link or to shop at Bedfords will help me out a ton and be greatly appreciated. Overseas folks who cannot order from the US because of import fees, duties, and taxes, are invited to help out by clicking here to leave a blog thank you gift if they see fit.
|
|
RawDigger e-Guide with Two Videos |
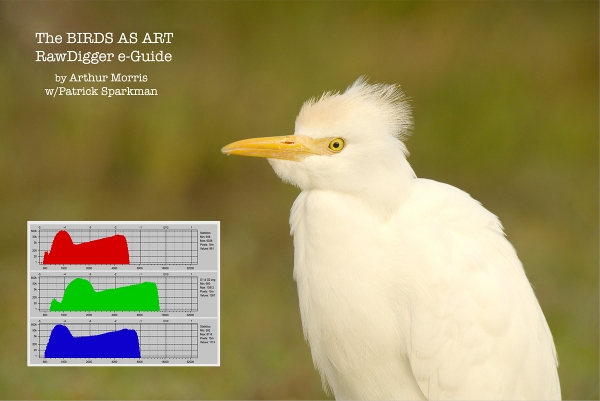
The RawDigger e-Guide with Two Videos
by Arthur Morris with Patrick Sparkman
The RawDigger e-Guide was created only for serious photographers who wish to get the absolute most out of their raw files.
Patrick and I began work on the guide in July 2020. At first we struggled. We asked questions. We learned about Max-G values. We puzzled as to why the Max G values for different cameras were different. IPT veteran Bart Deamer asked lots of questions that we could not answer. We got help from RawDigger creator Iliah Borg. We learned. In December, Patrick came up with an Adapted Histogram that allows us to evaluate the exposures and raw file brightness for all images created with all digital camera bodies from the last two decades. What we learned each time prompted three head-to-toe re-writes of the guide.
The point of the guide is to teach you to truly expose to the mega-Expose-to-the-Right so that you will minimize noise, maximize image quality, best utilize your camera’s dynamic range, and attain the highest possible level of shadow detail in your RAW files in every situation. In addition, your properly exposed RAW files will contain more tonal information and feature the smoothest possible transitions between tones. And your optimized images will feature rich, accurate color.
We teach you why the GREEN channel is almost always the first to over-expose. We save you money by advising you which version of RawDigger you need. We teach you how to interpret the Max G values for your Canon, Nikon, and SONY camera bodies. It is very likely that the Shock-your-World section will shock you. And lastly — thanks to the technical and practical brilliance of Patrick Sparkman — we teach you a simple way to quickly and easily evaluate your exposures and raw file brightness using an Adapted RawDigger histogram.
The flower video takes you through a session where artie edits a folder of images in Capture One while checking the exposures and Max-G values in RawDigger. The Adapted Histogram video examines a series of recent images with the pink histograms and covers lots of fine points including and especially how to deal with specular highlights. The directions for setting up the Adapted Histogram are in the text.
If we priced this guide based on how much effort we put into it, it would sell it for $999.00. But as this guide will be purchased only by a limited number of serious photographers, we have priced it at $51.00. You can order yours here in the BAA Online Store.
|
|
BAA Canon R5/R6 Autofocus e-Guide |
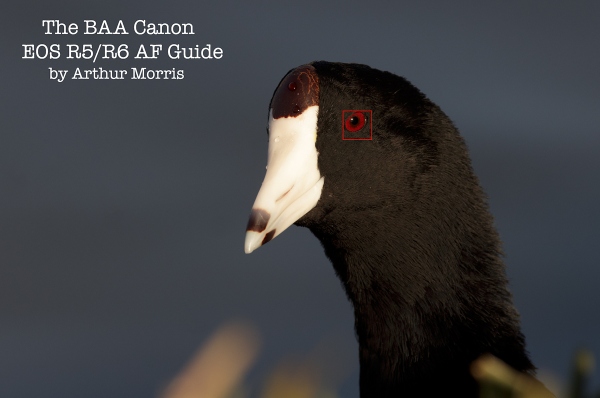
BAA Canon R5/R6 Autofocus e-Guide is Now Complete!
Forty-one pages. 6250 words. 50-DPP4 screen captures showing the R5’s vaunted AF system in action. Note: the AF system of the R5 is identical to the AF system of the R6.
You will learn:
1- The two most useful AF Methods for general bird photography and for birds in flight and the AF method that works best for me for birds in flight.
2- How to set up your R5/R6 AF Menus.
3- What boxes to check (and un-check) under Limit AF Methods.
4- How to change the AF Method quickly, easily, and efficiently. Note: the default way of doing this is clunky, cumbersome, and inefficient at best. One person replied that this tip alone was worth the price of admission.
5- The only setting that should be used for Initial Servo AF pt for Face Detection + Tracking.
I you are currently using multiple back buttons either for general bird photography or for birds in flight, what you learn in this guide will change your life. For the better.
Here are the first three paragraphs of this e-Guide:
From the moment I learned about the new Canon mirrorless bodies, I read about using two or three back-buttons to focus using different AF methods. The word on the street said that the way to go for birds in flight was to use one button to acquire focus with Zone AF or with Large Zone: Horizontal AF and then switch to another button to activate Face Detection + Tracking AF and then use the shutter button to make an image. My immediate thought was, “This is insanity! There has got to be a better way.” In short, there is a far superior way to set up AF on your R5 or R6.
Remember that I got away from any form of back-button or rear focusing many years ago after finally realizing that it is always easier to do one thing (press the shutter button), than it is to do two things (press a back button and then press the shutter button).
The default method of switching AF Methods with the R5/R6 bodies is cumbersome at best. It involves first pressing the grid button (my name) on the upper right back of the camera and then pressing the hard-to-access M-Fn button to toggle through the AF Methods. This method is so bad that it will not be mentioned again in this guide.
The guide is free to all who have ordered an R5 or an R6 using my B&H affiliate link or from Steve Elkins/Bedfords using the BIRDSASART coupon code at checkout. Please send your receipt to me via e-mail. It will take me a few days to a week to verify the B&H purchases. Bedfords folks should expect their free e-Guides fairly quickly.
To purchase your copy of the e-Guide, please click here or send a PayPal for $25.00 to birdsasart@verizon.net and be sure to include the words R5/R6 AF Guide in your PayPal e-mail.
Everyone who purchased or earned the AF guide should have already received their link.
Canon EOS R5 Camera User’s e-Guide
As most of you know, I have been working on a complete BAA Canon EOS R5 Camera User’s e-Guide. Because the camera and the Menus are so complex, this has required a lot of research, a lot of time, and a lot of effort (and will continue to do so until it is complete. It should be finished by late February. As always, folks who use the BAA affiliate links to purchase their Canon gear will receive a substantial discount. The final update of the R5/R6 AF e-guide will become part of the complete Camera User’s e-Guide but will be improved as and if warranted.
Great Topaz News!
Folks who use the BAA Topaz link to purchase Sharpen AI, DeNoise AI, or the Utility Bundle (or any other Topaz plug-ins) will receive a 15% discount by entering the ARTHUR15 code at checkout. If the stuff is on sale (as it usually is), you save 15% off of the sale price! To get the discount you must use my link and you must enter the discount code. Be sure to start with this link.
Those who purchase Sharpen AI, DeNoise AI, or any other Topaz plug-ins using my link and then entering the ARTHUR15 code at checkout can e-mail to request a short Getting Started with Topaz e-Guide. Please include a copy of your Topaz receipt that shows the discount. Aside from the basics, the guide explains how to install the plug-ins so that they appear in the Photoshop Filter Menu.
New and Better Bedfords Discount Policy!
You can now save 3% on all of your Bedfords photo gear purchases by entering the BIRDSASART coupon code at checkout. Your discount will be applied to your pre-tax total. In addition, by using the code you will get 2nd day air shipping via Fed Ex.
Grab a Nikon AF-S Teleconverter TC-14E III and save $14.99. Purchase a Canon EOS R5 and your discount will be $116.97. Purchase a Sony FE 600mm f/4 GM OSS lens and save a remarkable $389.94! Your Bedford’s purchase no longer needs to be greater than $1,000.00 for you to receive a discount. The more you spend, the more you save.
Money Saving Reminder
Many have learned that if you need a hot photo item that is out of stock at B&H and would enjoy free second-day air shipping, your best bet is to click here, place an order with Bedfords, and enter the coupon code BIRDSASART at checkout. If an item is out of stock, contact Steve Elkins via e-mail or on his cell phone at (479) 381-2592 (Central time). Be sure to mention the BIRDSASART coupon code and use it for your online order to save 3% and enjoy free 2nd-day air shipping. Steve has been great at getting folks the hot items that are out of stock at B&H and everywhere else. The wait lists at the big stores can be a year or longer for the hard to get items. Steve will surely get you your gear long before that. For the past year, he has been helping BAA Blog folks get their hands on items like the SONY a9 ii, the SONY 200-600 G OSS lens, the Canon EOS R5, the Canon RF 100-500mm lens, and the Nikon 500mm PF. Steve is personable, helpful, and eager to please.


Gear Questions and Advice
Too many folks attending BAA IPTs (remember those?) and dozens of photographers whom I see in the field and on BPN, are–out of ignorance–using the wrong gear especially when it comes to tripods and more especially, tripod heads… Please know that I am always glad to answer your gear questions via e-mail. Those questions might deal with systems, camera bodies, accessories, and/or lens choices and decisions.
|
|
|
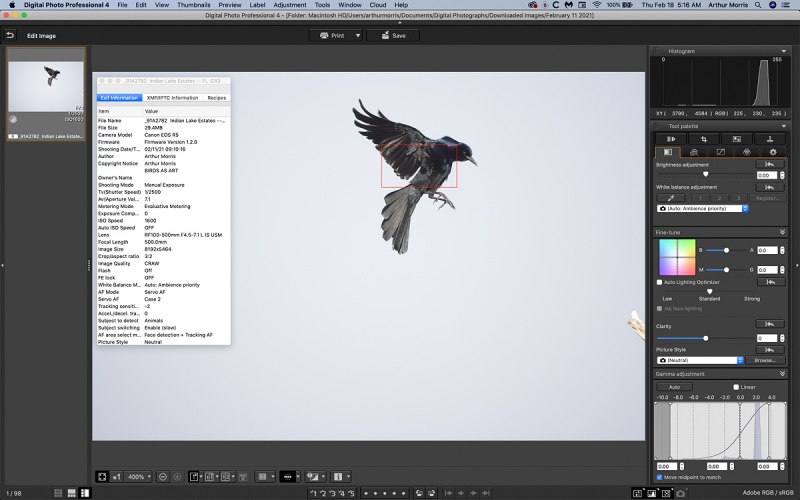
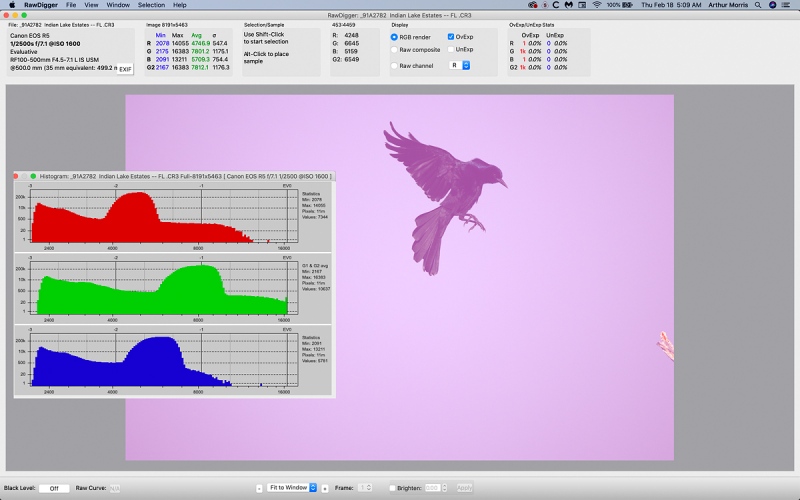
This image was created on 11 February 2021 down by the lake near my home in ILE. working from the driver’s seat of my SUV, I used the handheld Canon RF 100-500mm f/4.5-7.1L IS USM lens (at 500mm) and the highly touted 45MP Canon EOS R5 Mirrorless Digital camera body. ISO 1600. Exposure determined via quick thinking: 1/2500 sec. at f/7.1 (wide open) in Manual mode. RawDigger showed the raw file brightness here to be dead-solid-perfect. (See the RawDigger screen capture below.) AWB at 9:10am on a sunny morning. Face detection + Tracking yielded a very sharp image. (See the DPP 4 screen capture below.) Click on the image to see a rather spectacular larger version. Image #1: Boat-tailed Grackle jumping from one perch to another |
The Situation
I was in my vehicle trying to create some perch-scape images of the grackle on the new tall perch. When the bird jumped off the perch and headed for the lower Y-perch, I panned (not too well) with the bird now in flight and fired off a few frames. This was the best of the lot.
Exposure Determined Via Quick Thinking
Many photographers simply do not get the concept that dark-toned birds require more light than mid-toned birds to be properly exposed. In the same vein, many do not understand that white birds require less light than mid-toned birds to be properly exposed.
For the grackle image above, I had been set up for Osprey flight at ISO 640 1/2500 sec. at f/7.1. When I switched to grackles, I simply went four clicks up on the ISO. Making the needed changes for subjects of different tonalities is a hugely important skill that can best be learned on an IPT or during an In-the-Field Instructional session. Info on more of those soon.
Topaz Three Ways!
After converting the RAW file in Capture One I executed a very large Original Ratio crop. I checked the box for Delete Cropped Pixels reduce the file size so that the Topaz plug-ins would not have to work too hard. First was DeNoise AI on Low Light. Then I selected the head and the front half of the bird and ran Sharpen AI on Focus on that layer only. Last was Gigapixel AI at 2X.
The crop-ability of sharp R5 files is outstanding and adding Gigapixel to the mix allows folks to create large, high quality master files from relatively large crops like this one, and even from massive crops.
|
|
|
Click on the screen capture to see a larger version and better note the red AF square precisely on the bird’s eye. Image 1A: DPP 4 screen capture for the Boat-tailed Grackle jumping from one perch to another image |
Face detection + Tracking AF Improved!
With Firmware Version 1.2.0, I am positive that performance with this AF Method improved significantly. Here, the system reverted to a large rectangle and produced a very sharp image.
You can learn exactly how to set up Face detection + Tracking AF on your R5 in the BAA Canon R5/R6 Autofocus e-Guide and — in the extensive AF Gallery, see and learn how it reverts in different situations. In addition, you will learn the answers to every question you’ve ever had about R5 AF but were afraid to ask.
|
|
|
Click the image to see a larger version. Image #1B: RawDigger Adapted (pink) histogram for the Osprey and Cypress tree in fog image |
Mega-ETTR
With this image mega-Exposed to the Right (m-ETTR), the only OvExp pixels are on the tip of the Y-perch just peeking into the frame on our right; click on the screen capture to see the rosy-red OvExp warnings there. The result: little-to-no noise in the dark tones of this ISO 1600 image.
In the RawDigger e-Guide you will learn to set up the Adapted “pink” RawDigger Histogram and use it to quickly and easily evaluate the exposure or raw file brightness of images from all digital cameras currently in use. With careful study, your exposures will improve by leaps and bounds.
|
|
|
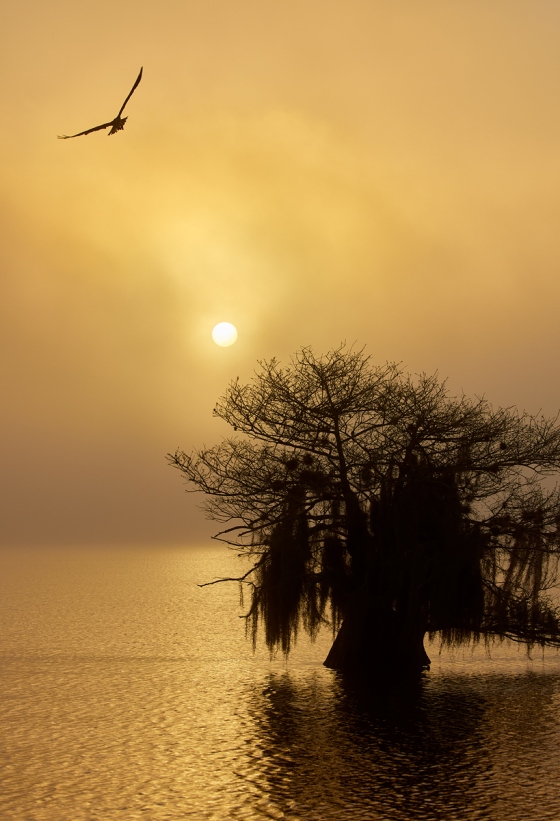
This image was created on 12 February 2021 at Lake Blue Cypress, Indian River County, FL. Working from Clemens van Der Werf’s boat, I used the handheld Canon RF 100-500mm f/4.5-7.1L IS USM lens (at 100mm) and the highly touted 45MP Canon EOS R5 Mirrorless Digital camera body. AUTO ISO set ISO 100. Exposure determined via test image/histogram evaluation. Evaluative metering +1/3 stop: 1/500 sec. at f/6.3 (stopped down 1/3-stop) in Shutter Priority (Tv) mode. As expected, RawDigger showed the sun to be toasted. AWB at 7:26am on a foggy morning. Zone/AI Servo AF performed perfectly by painting the upper left part of the tree (our left) with AF points. Image #2: Osprey and Cypress tree in fog |
At 100mm
I missed the first Osprey that flew over the foggy tree. But I did not miss the second one. When I first saw this image on my MacBook Pro, I was somewhat disappointed with the image design. I thought that I could have zoomed out and gotten the whole tree in the frame. When I saw the EXIF, I realized that I could not have zoomed wider as I was already at 100mm. So I decided to crop (rather than clip) the right side (our right) of the tree and then move the bird a bit toward the ULC of the frame for better compositional balance.
On a final note, there is a chance that if I had pointed the lens a bit to my right that I could have gotten the whole tree and the bird in the frame.
|
|
|
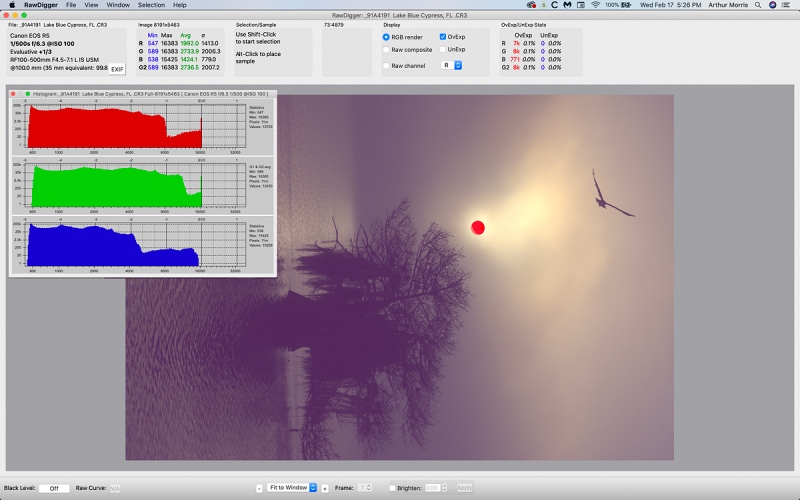
Click the image to see a larger version. Image #2A: RawDigger Adapted (pink) histogram for the Osprey and Cypress tree in fog image |
Toast the Sun!
With the sun breaking through the fog, I knew that the best exposure would leave the sun completely over-exposed (as seen by the bright- (rather than rosy-) red OvExp warnings on the sun in the screen capture above). Why? If I exposed so that I did not burn the sun, the rest of the image would have been black …
In the RawDigger e-Guide you will learn to set up the Adapted “pink” RawDigger Histogram and use it to quickly and easily evaluate the exposure or raw file brightness of images from all digital cameras currently in use.
|
|
|
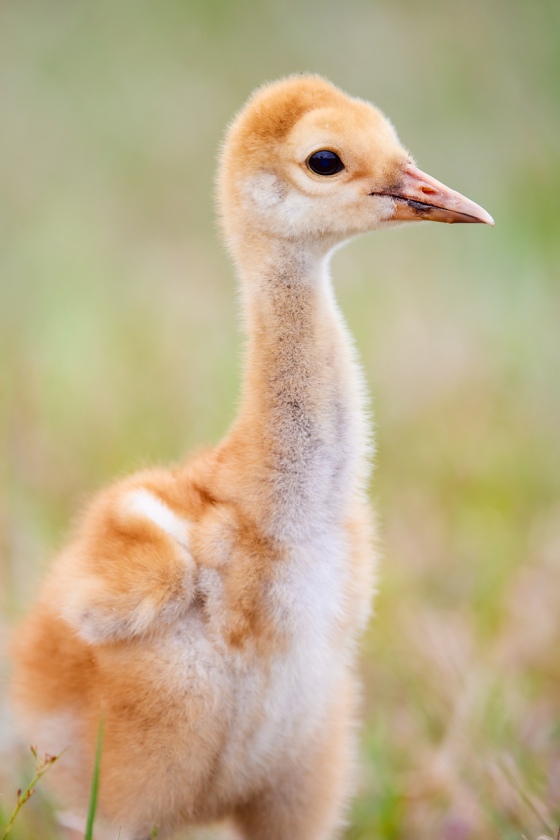
This image was created on 17 February 2021 down by the lake near my home in ILE. Sitting on the North Field, I used the handheld Canon RF 100-500mm f/4.5-7.1L IS USM lens (at 500mm) and the highly touted 45MP Canon EOS R5 Mirrorless Digital camera body. ISO 800. Exposure determined via test image/histogram evaluation: 1/640 sec. at f/7.1 (wide open) in Manual mode. RawDigger showed this one to be about 1/3 stop under-exposed. AWB at 1:25am on a very overcast day. Face detection + Tracking performed perfectly. (See the DPP 4 screen capture below.) Image #3: Sandhill Crane chick |
A Pleasant Surprise that Bodes Well for the Future
As I drove toward the north end of the North Field, I spotted two adult cranes foraging. Maybe the two chicks are with them, I thought. I was happy to learn that I was right. I got out of the car and was amazed as all four birds were completely comfortable with my presence, just as the 2020 Mother’s Day crane family had been. So I grabbed the R5/RF 100-500 rig, sat down in the grass, got my butt wet, and made a few images. As it turned out, the chicks were larger than I had thought when I saw them for the first time on Tuesday; I’d guess that they are about ten days old right now.
The Brown Gunk
Th brown gunk on the chick’s beak might be left-over earthworm.
|
|
|
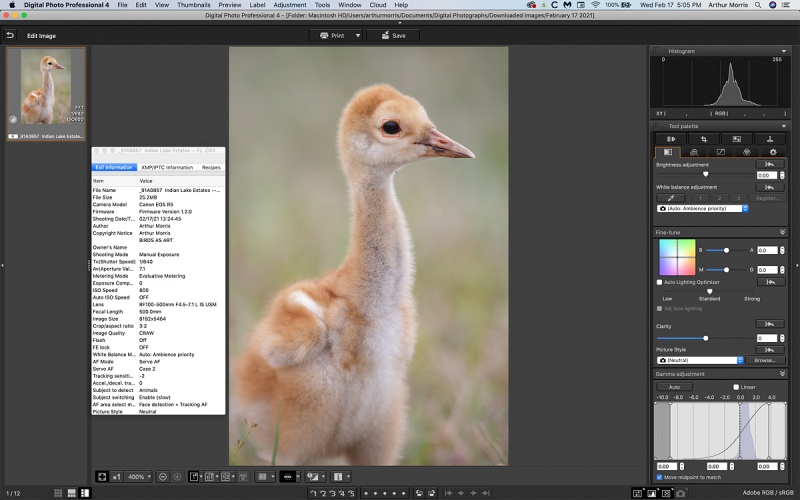
Click the image to see a larger version; note the red AF square that precisely tracked the bird’s eye. Image 2A: DPP 4 screen capture for the Sandhill Crane chick image |
Face detection + Tracking AF Improved!
With Firmware Version 1.2.0, I am positive that performance with this AF Method improved significantly. As the two crane chicks foraged in grass that was taller than they were, AF would grab the eye and never let go even when some grass stalks intervened.
You can learn exactly how to set up Face detection + Tracking AF on your R5 in the BAA Canon R5/R6 Autofocus e-Guide. Plus everything that you wanted to know about R5 AF but were afraid to ask.
Typos
In all blog posts and Bulletins, feel free to e-mail or to leave a comment regarding any typos or errors.




Hi, Artie. I agree with Ron Sprunger and Pat Fishburne in preferring image #2, for the same reasons they gave.
#1. Because I love close-in work. The closer the subject, the better for me. #2 is quite excellent too.
#2 by a mile. Absolutely wonderful capture, with great tonality, composition, and presentation.
No. 1 is my favorite because I like the position of the bird with its wings, feet and tail, colors of the grackle and the exposure. Simple and clean.
My favorite is #2. A sun, tree, water shot would have been “nice” but what really makes this one unique is the bird in the upper left corner.
Hi Artie
# 1 I thought the Crackle looked a bit awkward but technically a brilliant shot. #2 was my favourite there is something primeval about that image I love it a lot. I have another piece of Canon kit on my wish list the Canon 100mm to 500mm F4.5 IS USM it looks so dinky I want one.
Best and love
Ken
I love image #2. Beautiful color and it really draws me in, I want to be there…
I also like the chick image. It reminds me of one of my favorite images you took of the Mother’s day chick last year walking upright, directly toward the lens. Its hard to look at any sandhill chick image without thinking about that great image….
>> I used the handheld Canon RF 100-500mm f/4.5-7.1L IS USM lens (at 100mm) and the highly touted 45MP Canon EOS R5 Mirrorless Digital camera body. AUTO ISO set ISO 100. Exposure determined via test image/histogram evaluation. Evaluative metering +1/3 stop: 1/500 sec. at f/6.3 (wide open) in Shutter Priority (Tv) mode. <<
Isn't the 100-500mm lens f/4.5 when it's wide open at 100mm?
Thanks, Steve. Good catch. Thanks for keeping me on my toes 🙂
with love, a
We all profit so much, from all of your hard work! Love the R5 AF guide. It greatly improved my captures. Looking forward to the complete R5/R6 guide. Thank You, Layton, and hugs.