What’s Up?
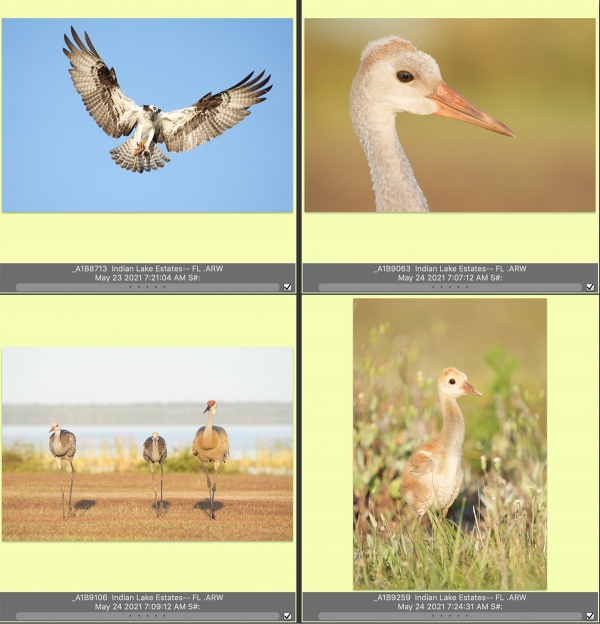
I had a very good session on Sunday morning. I photographed the crane colts and the crane chicks. The latter are getting large enough to be visible above the grass. Recognizing the wind and light conditions, my best images were of an Osprey landing with some chunks of reddish bark for its nest. Last were some good ground level images of a pair of Black-necked Stilts. I’ve started going down at sunset to check out The Perch II. So far, nothing but Boat-tailed Grackles …
Today is Monday 24 May 2021. I will be heading down to the lake soon no matter the weather. Today, I will be consolidating all of my April photo sessions into a single folder and then doing a second edit. Wherever you are, and whatever you are doing, I hope that you have a great day.
This blog post took about two hours to prepare, and makes 150 consecutive days with a new one. Please remember that if an item — a Delkin flash card, or a tripod head — for example, that is available from B&H and/or Bedfords and is also available in the BAA Online Store, it would be great if you opt to purchase from us. We will match any price. Please remember also to use my B&H affiliate links or to save 3% at Bedfords by using the BIRDSASART discount code at checkout. Doing either often earns you free guides and/or discounts. And doing so always earns my great appreciation.
|
|
ImaGE #0: From the last two mornings at ILE |
What You’ve Been Missing
All of the images in the screen capture above were created on either May 23rd or 24th with the hand held SONY 200-600 and the a1. The pickings are easy.
ILE In-the-Field Sessions
Sandhill Crane colts and small chicks guaranteed!
Tuesday May 25, Wednesday May 26, or Sunday May 30, 2021.
2-hour session: $300.00/each
The crane colts family and the crane chicks family have been utterly dependable for the past few days. Join me for a morning at Indian Lake Estates with a money-back guarantee: if we do not get to photograph either the colts and/or the chicks at close range, you will get every penny back. Also possible: Ospreys in flight and Black-necked Stilts.
Lodging and Photoshop lessons available. If you are seriously interested in joining me for one or more sessions, get in touch via e-mail or call or text me on my cell at 863-221-2372.
Please Remember
With income from IPTs now at zero, please, if you enjoy and learn from the blog, remember to use one of my two affiliate programs when purchasing new gear. Doing so just might make it possible for me to avoid having to try to get a job as a Walmart greeter and will not cost you a single penny more. And if you use Bedfords and remember to enter the BIRDSASART code at checkout, you will save 3% on every order and enjoy free second-day air shipping. In these crazy times — I am out at least forty to sixty thousand dollars so far due to COVID 19 (with lots more to come) — remembering to use my B&H link or to shop at Bedfords will help me out a ton and be greatly appreciated. Overseas folks who cannot order from the US because of import fees, duties, and taxes, are invited to help out by clicking here to leave a blog thank you gift if they see fit.
New and Better Bedfords Discount Policy!
You can now save 3% on all of your Bedfords photo gear purchases by entering the BIRDSASART coupon code at checkout. Your discount will be applied to your pre-tax total. In addition, by using the code you will get 2nd day air shipping via Fed Ex.
Grab a Nikon AF-S Teleconverter TC-14E III and save $14.99. Purchase a Canon EOS R5 and your discount will be $116.97. Purchase a Sony FE 600mm f/4 GM OSS lens and save a remarkable $389.94! Your Bedford’s purchase no longer needs to be greater than $1,000.00 for you to receive a discount. The more you spend, the more you save.
Money Saving Reminder
Many have learned that if you need a hot photo item that is out of stock at B&H and would enjoy free second-day air shipping, your best bet is to click here, place an order with Bedfords, and enter the coupon code BIRDSASART at checkout. If an item is out of stock, contact Steve Elkins via e-mail or on his cell phone at (479) 381-2592 (Central time). Be sure to mention the BIRDSASART coupon code and use it for your online order to save 3% and enjoy free 2nd-day air shipping. Steve has been great at getting folks the hot items that are out of stock at B&H and everywhere else. The wait lists at the big stores can be a year or longer for the hard to get items. Steve will surely get you your gear long before that. For the past year, he has been helping BAA Blog folks get their hands on items like the SONY a9 ii, the SONY 200-600 G OSS lens, the Canon EOS R5, the Canon RF 100-500mm lens, and the Nikon 500mm PF. Steve is personable, helpful, and eager to please.


Gear Questions and Advice
Too many folks attending BAA IPTs (remember those?) and dozens of photographers whom I see in the field and on BPN, are–out of ignorance–using the wrong gear especially when it comes to tripods and more especially, tripod heads… Please know that I am always glad to answer your gear questions via e-mail.
|
|
|
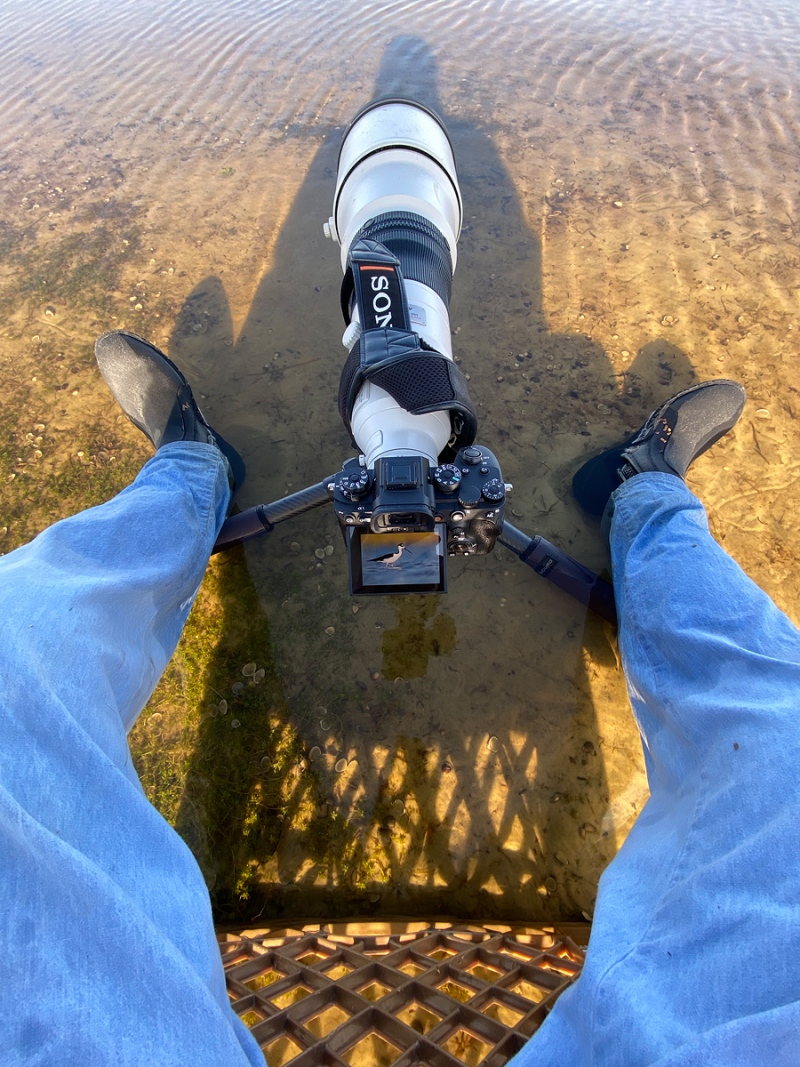
I-Phone image at 1/2 magnification (wide-angle). Click on the image to see a version that fits in your browser window. Note: most of this frame is shallow water. Image #1: the view from the milk crate |
Near-ground Level Shooting on the Tripod in the Water
I leave the bottom tripod leg sections extended about one inch. All the other leg sections are not extended at all. That allows me to have the tripod as low as possible. Before splaying the legs completely, I will usually loop the lens strap a few times around the near-end of the lens to keep it dry. Having my reading glasses with me for these endeavors is important. Once I set the tripod down firmly, I level the Induro GIT 304L topped by a Levered-Clamp FlexShooter Pro so that I can pan left and right while remaining perfectly level. I activate the Level to make sure that I am perfect. Then I toggle the Level off. Next, of course, is to flip up the rear screen to about 45 degrees.
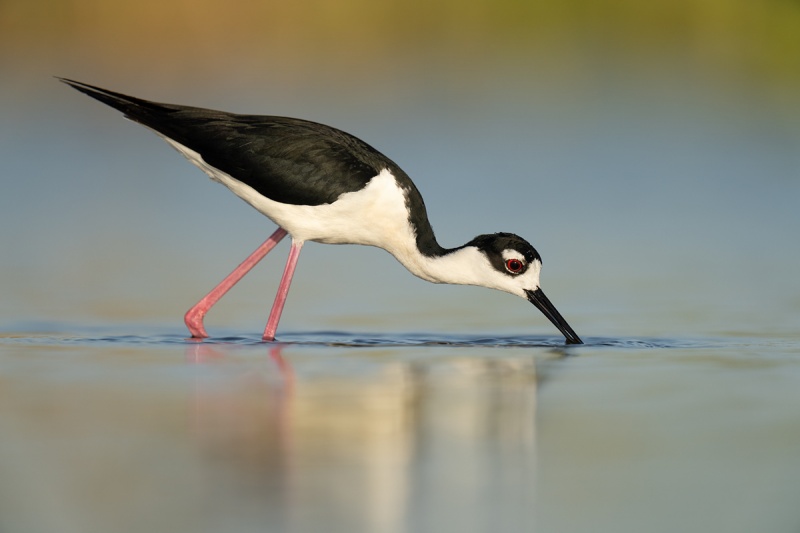
It takes some practice to find the bird in the lens so that you can see it on the rear screen. Once you’ve done that, double-check your exposure by whatever method you use. It is of course, easiest for those using SONY Zebra technology (assuming of course that the camera is set up correctly). With small in the frame subjects the trick is to acquire focus with the subject in the center of the frame, and then pan to move the subject back in the frame. At times, even the AF system of the a1 is blind. With the 600 GM, it is a simple matter of focusing manually until the bird becomes fairly sharp and is thus visible to the AF system. With large in the frame subject’s such as the Black-necked Stilt in Image #2, you simply have to trust the Face/Eye/Subject tracking AF. Learn more in the AF point screen capture below.
I wear a long-sleeved outdoors shirt with two large pockets on the upper chest (like a dress shirt would have). I keep the TC caps in the left pocket, and my cell phone in the right. If I need to remove the TC, I can simply drop it in the left hand pocket and be good to go. I’ll pop my glasses into the right hand pocket for flight photography. The pockets have flaps with Velcro closures. I make sure to shut the pockets carefully ;if I get up to do something and happen to bend over, I do not want anything to fall into the lake.
The huge advantage of sitting on the milk crate (or when sitting on a beach or a mudflat using a Panning Ground Pod) is that you stay relatively dry and relatively clean. All that without having to strain your lower back and neck … Do understand that in general you have more control when lying down flat, but understand that there are large prices to pay (as noted in the two previous sentences). Shooting off the rear screen while seated is child’s play as compared to truly getting down and dirty.
One thing that I have failed to mention is that if you are working super-low off the rear screen and spot a bird in the distance flying toward you, it is possible — even easy with a slow-flying bird, to flip the rear screen down, unclamp the lever, grab the rig, and hand hold it for flight.
|
|
The iPhone Photography e-Guide
|
Hard to Believe
Yes, Cliff has a great eye and wonderfully creative vision. Yet it is still hard for me to believe that he can make so many great images with “just“ an i-phone. Almost more amazingly Cliff captures with his iPhone and does all of his post-processing on the phone! In this great new e-Guide written for BIRDS AS ART you will learn to use set up you iPhone quickly and efficiently and how to use it. In addition, there are dozens and dozens of tips on Cliff’s favorite apps and his favorite gear. Scroll down to the bottom to see the Table of Contents.
The iPhone Photography e-Guide: $20.00.
To order your copy of the iPhone Photography e-Guide please click here.
Dr. Cliff Oliver
Dr. Cliff Oliver is an award-winning photographer, former photography instructor for the San Diego Natural History Museum, cutting-edge integrative health care professional, and international workshop leader. He created and taught the first 5-day immersion iPhone photography workshop at Hollyhock, Canada’s premier Leadership Learning Center. He teaches quarterly iPhone photography classes at the Athenaeum Music & Arts Library School of the Arts (these include Art on the iPhone, iPhoneography, Portraits and Selfies, and Practicing in the Field). His images have been on the cover of WildBird magazine, on display at Scripps Oceanography Institute, and been honored with multiple first-place finishes in the International Exhibition of Photography Del Mar. The San Diego Natural History Museum’s, “Birds of the World” centennial exhibit featured several of his images. One of his iPhone images received an honorable mention in the Athenaeum 23rd annual juried exhibition. He has displayed images at Art Speaks: Expressions of Hope and Healing and has produced a series of books, called Zen I, II, III, IV, V, VI and VII that feature original images that promote inner peace. The last 4 books feature only images taken on the iPhone. He teaches individuals and groups the skills of capturing iPhone/mobile photographs and then how to create personalized works of art.
To see some of Cliff’s iPhone images, click here. Learn more about Cliff and what he does on his Center for Balance website here. And don’t forget, if I had never met Cliff I would be pushing up daisies somewhere. To request my Health Basics File that contains the whole story, please shoot me an e-mail by clicking here..
|
|
|
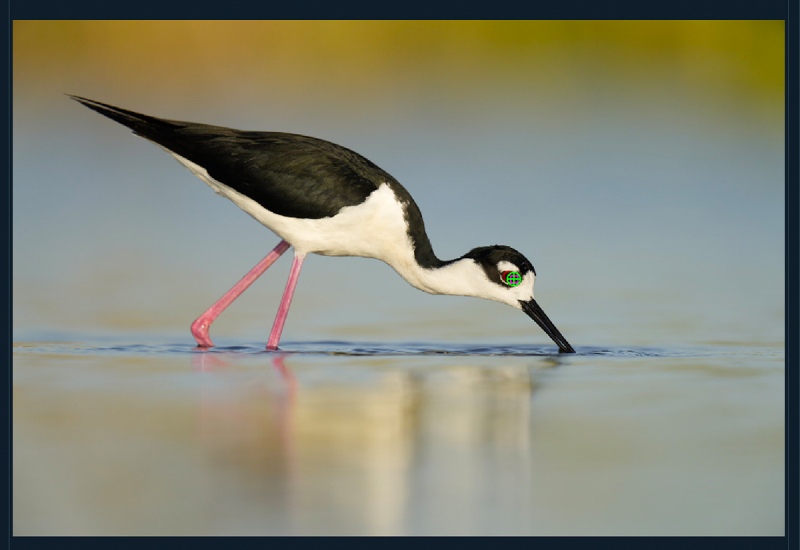
This image was created down by the lake at ILE on 21 May 2021. While sitting on a milk crate along behind my flattened Wide/AF-C was active at the moment of exposure and performed beyond flawlessly — see the second screen capture below. Click on the image to see a larger version. Image #2: Black-necked Stilt male feeding |
Success!
When you do everything just right, the results can be spectacular. Today’s featured image is full frame. The raw file was converted in Adobe Camera Raw and aside from a layer of Topaz DeNoise, is pretty much right out of camera. As regular readers know, I have recently become obsessed with ground level shooting. It’s official: I am now addicted.
The males of this species are totally black above, while the females have a brownish saddle of feathers on their backs.
|
|
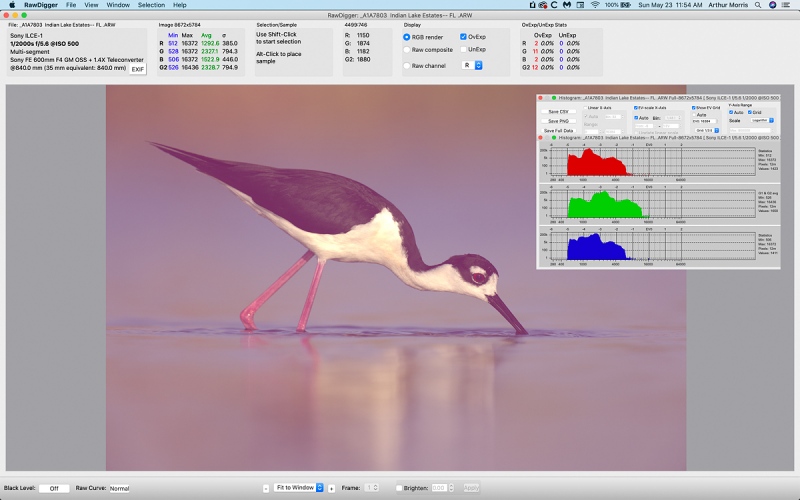
Image #2A: The RawDigger Adapted (Pink) histogram for the Black-necked Stilt male feeding image |
Dead Solid Perfect Exposures …
This one, with the G channel just a shade inside the 16000 line, is better than most as far as exposures go. Learn how to fine tune your exposures in the RawDigger e-Guide.
|
|
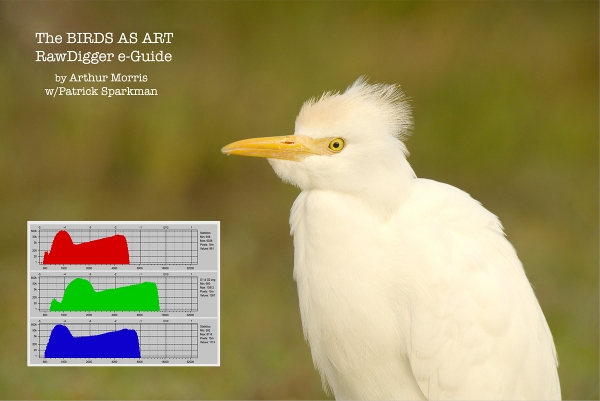
RawDigger e-Guide with Two Videos |
The RawDigger e-Guide with Two Videos
by Arthur Morris with Patrick Sparkman
The RawDigger e-Guide was created only for serious photographers who wish to get the absolute most out of their raw files.
Patrick and I began work on the guide in July 2020. At first we struggled. We asked questions. We learned about Max-G values. We puzzled as to why the Max G values for different cameras were different. IPT veteran Bart Deamer asked lots of questions that we could not answer. We got help from RawDigger creator Iliah Borg. We learned. In December, Patrick came up with an Adapted Histogram that allows us to evaluate the exposures and raw file brightness for all images created with all digital camera bodies from the last two decades. What we learned each time prompted three complete beginning to end re-writes.
The point of the guide is to teach you to truly expose to the mega-Expose-to-the-Right so that you will minimize noise, maximize image quality, best utilize your camera’s dynamic range, and attain the highest possible level of shadow detail in your RAW files in every situation. In addition, your properly exposed RAW files will contain more tonal information and feature the smoothest possible transitions between tones. And your optimized images will feature rich, accurate color.
We teach you why the GREEN channel is almost always the first to over-expose. We save you money by advising you which version of RawDigger you need. We teach you how to interpret the Max G values for your Canon, Nikon, and SONY camera bodies. It is very likely that the Shock-your-World section will shock you. And lastly — thanks to the technical and practical brilliance of Patrick Sparkman — we teach you a simple way to quickly and easily evaluate your exposures and raw file brightness using an Adapted RawDigger histogram.
The flower video takes you through a session where artie edits a folder of images in Capture One while checking the exposures and Max-G values in RawDigger. The Adapted Histogram video examines a series of recent images with the pink histograms and covers lots of fine points including and especially how to deal with specular highlights. The directions for setting up the Adapted Histogram are in the text.
If we priced this guide based on how much effort we put into it, it would sell it for $999.00. But as this guide will be purchased only by a limited number of serious photographers, we have priced it at $51.00. You can order yours here in the BAA Online Store.
|
|
Image #2B: The AF point for the Black-necked Stilt male feeding image |
More-Than-You-Could-Ever-Hope-For Autofocus …
With large-in-the-frame birds, most AF systems will simply grab the side of the bird leaving the head and eye quite soft, well beyond point of focus. Even with my reading glasses on I cannot see the tiny green box that tracks the bird’s eye with the a1. And though I am forced to trust the AF system, I never dreamed that it would have performed so superbly in this situation. But it did, not only for this image but for all those in the series!
Sony Alpha a1 AF
Barring operator error, the performance of the Sony Alpha a1 AF system at any focal length — including 1200mm as seen in recent blog posts — is, when the a1 is set up properly as detailed in the in e-mails to the Sony Alpha a1 Info & Updates group, more than remarkable. Early on, there was lots of discussion within the group with many preferring multiple back button approaches. For me a simple shutter button approach with the right AF settings that yield 99% sharp-on-the-eye images is best. By far. It is super-simple and mega-effective. In the next SONY Alpha a1 Set-up and Info Group e-mail, I will be sharing what I have learned as to when and it what situations it is best to abandon Wide. And with what. The group has already learned to limit the AF Area choices and to switch AF Areas quickly and conveniently. The default method of switching AF points with the C2 button is both slow and cumbersome.
SONY Alpha a1 Set-up and Info Group
The SONY Alpha a1 Set-up and Info Group is going great guns as folks chime in with thoughtful questions and experience-based advice. We are now up to an astounding 46 lucky folks. Early on, we discussed the myriad AF options. I gave my opinion as to the best one for flight and general bird photography. More recently, we have been in contact with folks at SONY sharing our thoughts, experiences, and frustrations with the EVF blackout problem.
All who purchased their Alpha a1 bodies via a BAA affiliate link will receive a free subscription to the Sony Alpha a1 Set-Up and Info Updates after shooting me their receipts via e-mail. (Note: it may take me several days to confirm B&H orders.) This same service may be purchased by anyone with an a1 body via a $150.00 PayPal sent to birdsasart@verizon.net indicating payment for Alpha a1 Info Updates. Alternatively, folks can call Jim weekdays at 1-863-692-0906 to pay via credit card. New members will receive composite e-mails that summarize all previous discussions.
Typos
With all blog posts, feel free to e-mail or to leave a comment regarding any typos or errors.




Art, beautiful stilt image, and thanks too for the technique photo and description. Perfect sun angle even on the equipment image!
Thanks, Cliff. Actually I was about 1/2 degree to the left off sun angle … This technique is a life-changer for me.
with love, artie
35. I’ve started using a Kirk strap that attaches to the Arca-Swiss replacement foot I’ve added. I rarely use a tripod any more and carry either my 600/4 or 400/2.8 with that strap. If I do use a tripod, it’s when I’m staying stationary. I’m now using version iii of both Canon lenses and find them hand holdable. When I had the 600 IS version I, I did use it mostly on a tripod and my shoulder did take the brunt of the pains!
I’ll shoot some R5 images to you later this week.
Ryan
35 ain’t 75 🙂
It’s a rare bird that owns a 600 f/4 and a 400 2.8! Both version IIIs no less. Mazel tov!
I look forward to seeing some images.
with love, a
Why do you leave the strap attached to your lens when on a tripod? I stopped leaving a strap attached when using a tripod several years ago as it NEVER offered any benefit when using a tripod, and only served to get in the way.
Hi Ryan,
How old are you?
After 25 or 30 years of carrying a big lens in the field on the tripod with the whole thing on my right shoulder, I learned that doing that will — over time — seriously damage your shoulder. I came up with a safer but still somewhat harmful way to carry the lens on a tripod (as seen in the tripod video that I did somewhere …)
Then I realized that carrying the lens either by the lens foot or via the lens strap over either shoulder is much better shoulder-health wise. So I keep the strap on to keep my shoulders healthier.
So when I am getting into position, the lens is always either on my shoulder with the lens via the lens strap or in one hand with the tripod in the other hand.
So for me the benefits are huge. They might be for you if you keep on resting your long lens on a tripod on one or both shoulders for another decade or two.
with love, artie
ps: if you have any great R5 images you are invited to shoot me a few JPEGs 1200 pixels on the long side.