What’s Up?
It was indeed cloudy on Monday morning. I checked on and saw all three crane families but did not stop for any photography. I got out late as I was trying to solve a manual focus/magnification riddle with the SONY a1 body. Once I did that, I was hot to find a good macro subject. I went to my favorite Baton Rouge (pink lichen) oak tree but did not find anything interesting so I never got the camera out of the car. Nearby, I found a nice Sabatia blossom. I picked one flower and set it up in the lee of my SUV with two Plamps to keep it still in the breeze. No worries, the ILE Highway Department is constantly mowing and dredging all of the canals with and without flowers.
In any case, my solution worked perfectly. I will be sharing it (and lots more) with the SONY a1 Info and Updates group via e-mail today.
Speaking of which, today is Tuesday 8 June 2021. The forecast for ILE this morning is for clear skies with an east breeze. I will head down to the lake to see what I shall see. Wherever you are, and whatever you are doing, I hope that you have a great day.
This blog post took more than two hours to prepare, and makes 164 consecutive days with a new one. Please remember that if an item — a Delkin flash card, or a tripod head — for example, that is available from B&H and/or Bedfords and is also available in the BAA Online Store, it would be great if you opt to purchase from us. We will match any price. Please remember also to use my B&H affiliate links or to save 3% at Bedfords by using the BIRDSASART discount code at checkout. Doing either often earns you free guides and/or discounts. And doing so always earns my great appreciation.
Please Remember
With income from IPTs now close to zero, please, if you enjoy and learn from the blog, remember to use one of my two affiliate programs when purchasing new gear. Doing so just might make it possible for me to avoid having to try to get a job as a Walmart greeter and will not cost you a single penny more. And if you use Bedfords and remember to enter the BIRDSASART code at checkout, you will save 3% on every order and enjoy free second-day air shipping. In these crazy times — I am out at least forty to sixty thousand dollars so far due to COVID 19 (with lots more to come) — remembering to use my B&H link or to shop at Bedfords will help me out a ton and be greatly appreciated. Overseas folks who cannot order from the US because of import fees, duties, and taxes, are invited to help out by clicking here to leave a blog thank you gift if they see fit.
New and Better Bedfords Discount Policy!
You can now save 3% on all of your Bedfords photo gear purchases by entering the BIRDSASART coupon code at checkout. Your discount will be applied to your pre-tax total. In addition, by using the code you will get 2nd day air shipping via Fed Ex.
Grab a Nikon AF-S Teleconverter TC-14E III and save $14.99. Purchase a Canon EOS R5 and your discount will be $116.97. Purchase a Sony FE 600mm f/4 GM OSS lens and save a remarkable $389.94! Your Bedford’s purchase no longer needs to be greater than $1,000.00 for you to receive a discount. The more you spend, the more you save.
Money Saving Reminder
Many have learned that if you need a hot photo item that is out of stock at B&H and would enjoy free second-day air shipping, your best bet is to click here, place an order with Bedfords, and enter the coupon code BIRDSASART at checkout. If an item is out of stock, contact Steve Elkins via e-mail or on his cell phone at (479) 381-2592 (Central time). Be sure to mention the BIRDSASART coupon code and use it for your online order to save 3% and enjoy free 2nd-day air shipping. Steve has been great at getting folks the hot items that are out of stock at B&H and everywhere else. The wait lists at the big stores can be a year or longer for the hard to get items. Steve will surely get you your gear long before that. For the past year, he has been helping BAA Blog folks get their hands on items like the SONY a9 ii, the SONY 200-600 G OSS lens, the Canon EOS R5, the Canon RF 100-500mm lens, and the Nikon 500mm PF. Steve is personable, helpful, and eager to please.


Gear Questions and Advice
Too many folks attending BAA IPTs (remember those?) and dozens of photographers whom I see in the field and on BPN, are–out of ignorance–using the wrong gear especially when it comes to tripods and more especially, tripod heads… Please know that I am always glad to answer your gear questions via e-mail.
|
|
|
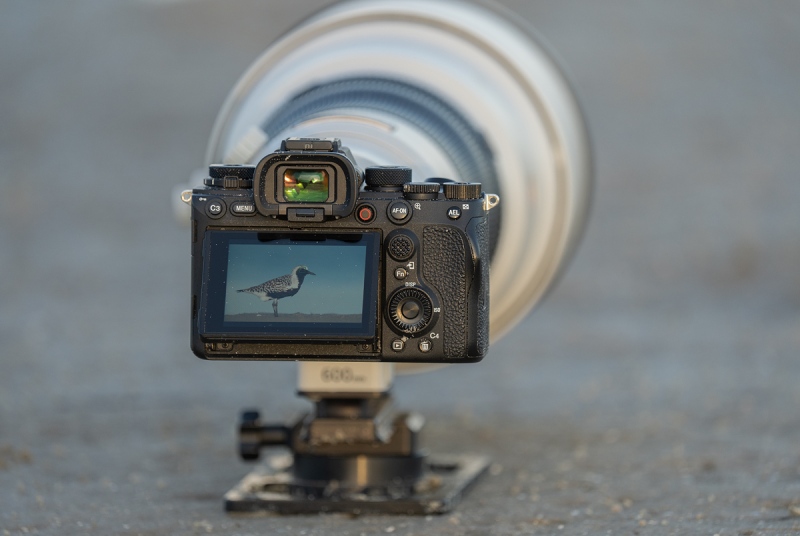
This image was created while seated at my favorite afternoon spot at Fort DeSoto. I used the versatile, hand held 200-600 (at 535mm) and the a1. Image #1: 600 GM & 2X TC with the SONY a1 on the Panning Ground-Pod |
Getting Sand and Mud on Your Expensive Camera Body
Yes, when working at ground level I routinely get sand and mud on my camera bodies, expensive and otherwise. When I am at the beach, I always have a soft paint brush in my fanny pack for quick but effective clean-ups. Getting your camera dirty is included in the price of admission for those wishing to create intimate, ultra-low perspective images of birds on the ground. You can always keep your gear clean by standing up and shooting down at your subjects …
How Low Can You Go?
On a flat beach, nothing beats the Panning Ground-Pod for getting low. The ground pod is not more than 1 1/2 inches tall and as its name implies, you can pan (smoothly and easily) with a moving subject.
Now you have two options:
- 1: Lying flat on the ground or the mud or the sand, allows you the greatest control as you have your eye to the viewfinder. For some — like me, it may involve back and neck strain. And you will get dirty for sure.
- 2- Sitting, and working on the tilted rear screen does not involve much strain or pain and the only thing getting dirty will be your butt unless you are sitting on some sort of pad. If you are sitting on a pad it will be much more difficult to change your position either to follow the birds or to get on sun angle. I do not recommend sitting on a milk crate when using the Panning Ground-Pod (as opposed to working off a fully-splayed, flattened tripod. Why? It will be a long way down to the camera body and it will be difficult to see the rear screen.
Sitting and working off the tilted rear screen has opened up whole new worlds for me. Wearing my reading glasses makes it a lot easier to see the rear monitor well. That said, you need to be able to trust your AF system. Panning with a moving subject and properly framing the image takes practice. Lots of practice. But the rewards are well worth it.
Note: as detailed in our SONY e-Guide and in the a1 Info and Updates e-mails, the high-end SONY body’s allow you to toggle the electronic level off and on. I do that quite often when working super-low to try and ensure that my images are square-to-the-world.
|
|
|
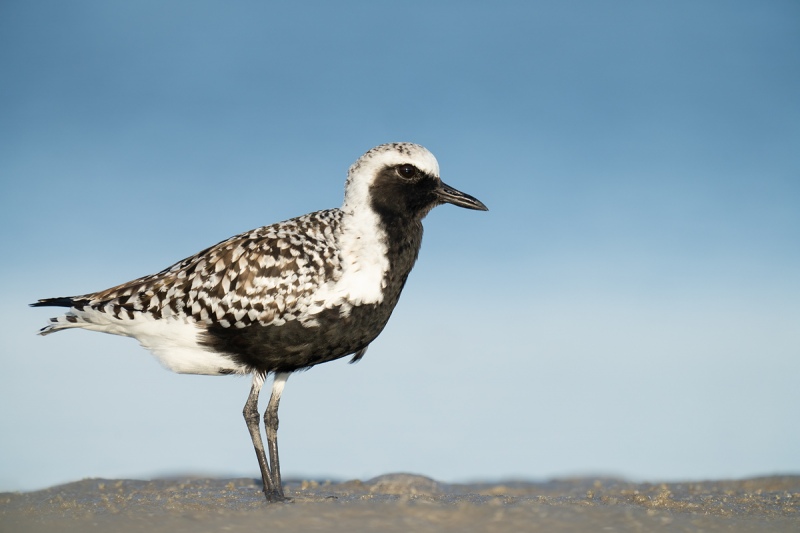
This image was created on 10 May 2021 at the my favorite afternoon spot at Fort DeSoto. While seated, I used the Panning Ground-Pod mounted-Sony FE 600mm f/4 GM OSS lens, the Sony FE 2.0x Teleconverter, and The One, the Sony Alpha 1 Mirrorless Digital Camera (Body Only). ISO 800. The exposure was determined by Zebras with ISO on the rear wheel: 1/800 sec. at f/8 (wide open) in Manual mode. AWB at 7:17pm on a sunny afternoon. Wide/AF-C was active at the moment of exposure and performed perfectly. Click on the image to enjoy a larger version. Image #1A: Black-bellied Plover — male in full breeding plumage |
Picking a Subject
There were several Black-bellied Plovers on the beach. Some were in basic (winter) plumage, some were molting into breeding plumage, and one was in full breeding plumage with a complete jet-black belly. The black bellies of the females are splotchy. There is no way to know whether or not this individual bird made it up to the sub-Arctic to breed this season, but given the date — 10 May, it had plenty of time. Shorebirds can fly many thousands of miles in just several days.
In any case, this is the bird I chose to go after. First, I watched the bird from a distance and noted the pattern of his movements. Working at 1200mm (today’s featured image is un-cropped), I picked a spot with a nice stretch of relatively clean mud, got right on sun angle, sat well back, and waited for the subject to come to me. It did. And I had lots of great chances. After the second edit, this was the best of four similar keepers.
If you are going to do some work when going after a quality image, it only makes sense to go after the best-looking bird.
The Fort DeSoto Site Guide
Though a bit long in the tooth (like me), the Fort DeSoto Site Guide will get you to my two favorite morning spots and to my favorite afternoon spots as well. DeSoto is the rare location that has the potential> to offer great photography any day of the year.
|
|
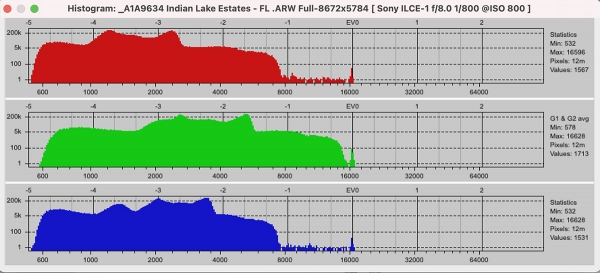
Image #1B: The RawDigger adapted histogram for the Black-bellied Plover — male in full breeding plumage image |
Dead-Solid-Perfect Always Works Well
Recently, we have been discussing the difference between perfect exposures, with the G channel ending at the line 2/3rds of the way from the 8000-line to the 16000-line, and dead-solid-perfect exposures where the G channel makes it all the way to the 16000 line. Dead solid perfect is always to be preferred with subjects with large dark or black areas to maximize the detail in the dark tones.
The tiny spikes in each channel represent exactly 406 OvExp pixels (out of 51,000,000), all those from the specular highlights on the bird’s bill and legs, and in the eye highlight. In addition, there is a very faint smattering of OvExp pixels on the brightest WHITEs of the bird’s breast. In the RawDigger e-Guide, we teach you why you want to ignore the over-exposed pixels in the specular highlights.
Via e-Mail from Geri George
Hi Artie, Thanks for the RawDigger e-Guide. With many of my flower images, DPP 4 shows lots of over-exposure on the petals, but RawDigger shows only a smattering (less than a hundred). They all converted perfectly in DPP 4 simply by pulling down the Highlight slider a bit. RawDigger has some really cool stuff!
Thanks and best, Geri
|
|
RawDigger e-Guide with Two Videos |
The RawDigger e-Guide with Two Videos
by Arthur Morris with Patrick Sparkman
The RawDigger e-Guide was created only for serious photographers who wish to get the absolute most out of their raw files. It is not for the faint-of-heart who are happy to go through life under-exposing every raw file they create.
Patrick and I began work on the guide in July 2020. At first we struggled. We asked questions. We learned about Max-G values. We puzzled as to why the Max G values for different cameras were different. IPT veteran Bart Deamer asked lots of questions that we could not answer. We got help from RawDigger creator Iliah Borg. We learned. In December, Patrick came up with an Adapted Histogram that allows us to evaluate the exposures and raw file brightness for all images created with all digital camera bodies from the last two decades. What we learned each time prompted three complete beginning to end re-writes.
The point of the guide is to teach you to truly mega-Expose-to-the-Right so that you will minimize noise, maximize image quality, best utilize your camera’s dynamic range, and attain the highest possible level of shadow detail in your RAW files in every situation. In addition, your properly exposed RAW files will contain more tonal information and feature the smoothest possible transitions between tones. And your optimized images will feature rich, accurate color.
We teach you why the GREEN channel is almost always the first to over-expose. We save you money by advising you which version of RawDigger you need. We teach you how to interpret the Max G values for your Canon, Nikon, and SONY camera bodies. It is very likely that the Shock-your-World section will shock you. And lastly — thanks to the technical and practical brilliance of Patrick Sparkman — we teach you a simple way to quickly and easily evaluate your exposures and raw file brightness using an Adapted RawDigger histogram.
The flower video takes you through a session where artie edits a folder of images in Capture One while checking the exposures and Max-G values in RawDigger. The Adapted Histogram video examines a series of recent images with the pink histograms and covers lots of fine points including and especially how to deal with specular highlights. The directions for setting up the Adapted Histogram are in the text.
If we priced this guide based on how much effort we put into it, it would sell it for $999.00. But as this guide will be purchased only by a limited number of serious photographers, we have priced it at $51.00. You can order yours here in the BAA Online Store.
Typos
With all blog posts, feel free to e-mail or to leave a comment regarding any typos or errors.


Beautiful specimen, beautiful image.
Gotta love ground-level shooting – beautiful shot!
Thanks, David. You know how hard it is to find clean shoreline at that spot. This was just by the little outflow creek, the spot where I once got my Sequoia stuck in the mud!
with love, artie
Indeed. I’ll share with you a godwit I shot yesterday. I’m pleased.