Telling the Story
Which of today’s three featured images best tells the story on its own? Please leave a comment and let us know why you made your choice.
What’s Up?
On Saturday 31 July (can you believe it?), younger daughter Alissa, her husband, Ajiniyaz, and I drove up to the Anderson Center for Autism in Hyde Park, NY, to visit my 15-year old grandson, Ilyas. It had been a long time, so it was good to see him. We had lunch together and took a nice walk in the woods. We spent more than six hours in the car, but traffic on the way home was not as bad as had been expected. Ilyas’ brother Idris, is away at camp, and will be home mid-month.
Today is Sunday 1 August 2021. I have not headed out to photograph on Long Island yet and it is supposed to rain this afternoon. I will get out soon, I hope. Wherever you are, and whatever you are doing, I hope that you too have a great day.
Remember that you can find some great photo accessories (and necessities!) on Amazon by clicking on the Stuff tab on the orange/yellow menu bar above. On a related note, it would be extremely helpful if blog-folks like me, who spend too much money on Amazon, would get in the habit of clicking on the Amazon logo link on the right side of each blog post. As you might expect, doing so will not cost you a single penny, but would be appreciated tremendously by yours truly. And it works seamlessly with your Amazon Prime account.
This blog post took more than two hours to prepare and makes 216 consecutive days with a new one. Please remember that if an item — a Delkin flash card, or a tripod head — for example, that is available from B&H and/or Bedfords, and is also available in the BAA Online Store, it would be great, and greatly appreciated if you would opt to purchase from us. We will match any price. Please remember also to use my B&H affiliate links or to save 3% at Bedfords by using the BIRDSASART discount code at checkout. Doing either often earns you free guides and/or discounts. And doing so always earns my great appreciation.
Homer Bald Eagles Winter 2022
The photography on this trip of a lifetime is beyond amazing. You can do the whole trip with either the Canon 100-500 or the SONY 200-600 along with any 70-200mm lens. Flight photography until you cannot raise your arms, creative set-ups, lots of snow we hope (earlier in the season is best for that), and lots of opportunities for point-blank head portraits and talon shots. All in a variety of spectacular settings. This is an expensive (but competitively priced) trip. If you are seriously interested in joining me for the world’s best Homer/Kachemak Bay Bald Eagle trip(s) — mid-FEB thru early MARCH 2022, please contact me immediately via e-mail for dates and details. I am looking for a roommate who will be doing all eleven days.
The East Pond
The East Pond at Jamaica Bay Wildlife Refuge, Queens, NY was the place to observe and photograph North America’s southbound migrant shorebirds. It shined from 1975 through about 2010. Then, for reasons noted in the blog post here, the place pretty much went down the tubes due to high water levels. At present, it seems that the folks at Gateway have gotten their act together; conditions at the pond are reported to be excellent this season. I have a strong connection to the East Pond. I photographed my first shorebird — a Semipalmated Sandpiper, there in August of 1983. I’ve been visiting for 45 years and have spent thousands of hours on the pond.
If you would like to learn to identify more than a dozen species of shorebirds and photograph some of them on an In-the-Field Workshop in August, please shoot me an e-mail to learn the dates and details. The East Pond is best for photography for just three specific days in a calendar year … I will be there then. Here’s hoping that the East Pond will return to its former crown-jewel glory.
|
|
|
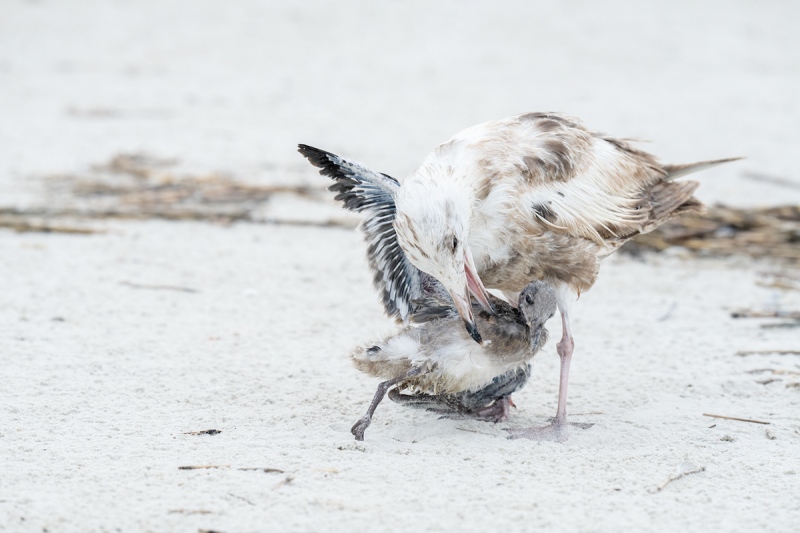
This image was created on 30 June on the JAX IPT. I used the hand held Sony FE 200-600mm f/5.6-6.3 G OSS lens (at 600mm) and The One, the Sony Alpha 1 Mirrorless digital camera. ISO 1600. Exposure determined via Zebras with ISO on the rear dial: 1/1000 sec. at f/7.1 (stopped down 1/3-stop) in Manual mode. RawDigger showed that the raw file brightness to be dead-solid perfect. AWB at 5:54pm on a cloudy afternoon. Unable to detect the Herring Gull’s eye, Wide/AF-C reverted to a zone-like AF and painted the large gull’s face and upper breast with dancing aF points. The raw file was sharp where it needed to be sharp. Image #1: Herring Gull attacking large Laughing Gull chick |
Never Settle …
The entire group was on the beach in front of the tall dunes and behind the colony ropes when we spotted a very worn, first-summer Herring Gull attacking a large but unfledged Laughing Gull chick to our left. Relying on instinct, I knew that we needed to get the east wind behind us, so I called to the group to move well to our left. Knowing that such attacks usually last only a few seconds, everyone stayed put and would up with butt shots only and not a single useable image …
My philosophy is to always go for the best image, even at the risk of completely missing out on the action. In this situation, I was able to create only three frames of the attack and wound up with today’s featured Image #1.
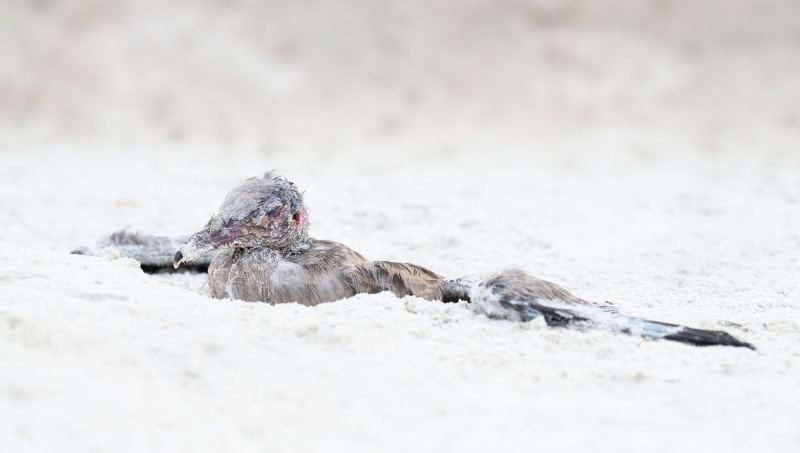
Right after I created my very short burst, the large gull dropped its prey. The chick lay motionless in a small depression in the sand. Everyone, including me, assumed that the young Laughing Gull was dead. I was puzzled as to why the gull did not at least attempt to swallow its victim whole.
On Getting Lower …
Had I been been sitting on the ground rather than standing, how would Image #1 have been improved?
|
|
|
This image was also created on 30 June on the JAX IPT. For this image, I sat on the sand and employed the knee-pod technique with the hand held Sony FE 200-600mm f/5.6-6.3 G OSS lens (at 600mm) and The One, the Sony Alpha 1 Mirrorless digital camera. ISO 2000. Exposure determined via Zebras with ISO on the rear dial: 1/1000 sec. at f/7.1 (stopped down 1/3-stop) in Manual mode. RawDigger showed that the raw file brightness to be dead-solid perfect. AWB at 5:56pm on a cloudy afternoon. Tracking: Flexible Spot/AF-C with Bird-Eye Detection performed well. With the bird’s eye pretty much shut, the AF point grabbed the cheek just below and right on the same plane as the bird’s eye. Image #2: Large Laughing Gull chick after attack by Herring Gull |
The “Dead” Laughing Gull Chick
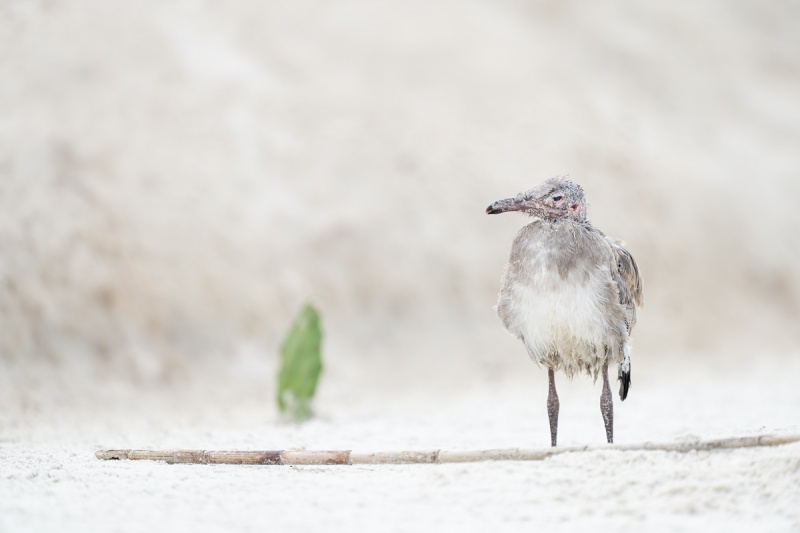
This time, when I suggested that the rest of the group join me to photograph the “dead” Laughing Gull chick, everyone did. We were all stunned when the well-beaten-up bird raised its head just two minutes after it had been left for dead by the Herring Gull. It seemed as shocked as we were when it realized that it was alive. Note the blood on the chick’s head where it had been battered by the larger gull.
|
|
|
This image was also created on 30 June on the JAX IPT. Sitting on the beach using the knee-pod technique, I used the hand held Sony FE 600mm f/4 GM OSS lens and The One, the Sony Alpha 1 Mirrorless digital camera. ISO 500. Exposure determined via Zebras with ISO on the rear dial: 1/800 sec. at f/4 (wide open). RawDigger showed that the raw file brightness to be perfect.AWB at 6:04pm on a cloudy afternoon. Tracking Flexible Spot/AF-C with Bird-Eye Detection performed perfectly Image #3: The Laughing Gull chick back on its feet after the attack |
Exposure and Zebras Notes
We all cheered when the unfledged Laughing Gull stood up. Note that in the space of about ten minutes, the exposure parameters changed significantly. Though just two minutes separated Image #1 to Image #2, I added 1/3 stop of light by rising the ISO from 1600 to 2000. And with that, the raw file for #2 was still a bit darker than with #1 (dead-solid-perfect vs. perfect). The exposure for Image #3 was identical to the exposure for Image #2 (despite large differences in all three parameters).
So how is it possible with SONY to pretty much nail the exposures every time in changing light while significantly varying the exposure settings? The answer is a simple one: Zebras. By setting up Zebras correctly and learning to use them properly as detailed in the SONY Camera User’s Guide, it is a simple matter of dialing the ISO up or down using the Thumb Wheel until you see faint Zebras on the highlights. The result: a perfect or a dead-solid perfect exposure every time. Note that folks in the SONY a1 Setup and Info group receive a free copy of the SONY Camera User’s Guide upon request.
Those using the SONY a7r iii, a7r iv, a9, or a9 ii who do not own the SONY Camera User’s Guide, are — simply put — living in the Dark Ages.
|
|
|
120 sold to rave reviews. The SONY e-Guide by Patrick Sparkman and Arthur Morris |
The Sony Camera User’s e-Guide (and Videos)
Click here to purchase the guide with one Camera Set-up Video. Be sure to e-mail us by clicking here to specify your camera body so that we can send you a link for the correct video.
Click here to purchase the guide with two Camera Set-up Videos. Be sure to e-mail us by clicking here to specify your two camera bodies so that we can send you links for the correct videos.
Click here to learn more about the SONY e-Guide.
Typos
With all blog posts, feel free to e-mail or to leave a comment regarding any typos or errors.


Incredible pics, thank you!
I think image 3 tells the story the best. You can tell this bird has been badly attacked, but it is still standing and looking proud. The first image tells a different story about the attack, but you would never have know the chick survived. Same for the second image.
“On Getting Lower” – the debris line behind the subject would not have intersected the subjects right I. The middle of the image. It would likely have been close to the feet. Also, the debris “line” would have been “narrower” in the image due to perspective.
Enjoy Long Island and Jamaica Bay.