What’s Up?
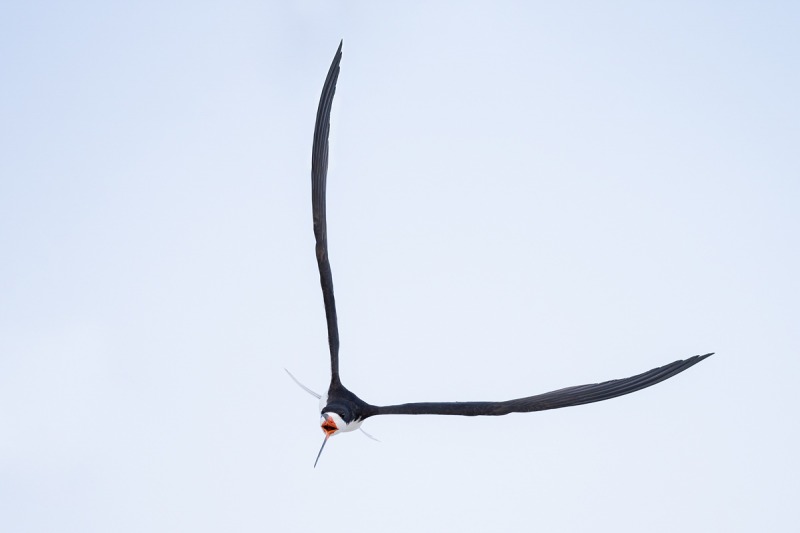
Yesterday, we enjoyed one last morning (for now) at Nickerson Beach. Grey skies and a stiff wind off the ocean led to some great opportunities for skimmer flight and midair fights. We saw the first flying young skimmers of the season, and even managed a few good frames. Be sure to scroll down to the tight face crop and see if you can figure out what bugs me about today’s featured image.
Today is Wednesday 18 August 2021. I have lots of work to catch up on and lots of laundry to do to get ready for my JBWR weekend. I am thrilled that the Homer Bald Eagle IPT is now a go as there are now just two spots left, one on each segment. Wherever you are, and whatever you are doing, I hope that you too have a great day.
Please note that it is best to click on each blog image to view it larger. For unknown reasons, the images — even the verticals that are not rendered larger, look sharper once they’ve been clicked on.
Remember that you can find some great photo accessories (and necessities!) on Amazon by clicking on the Stuff tab on the orange/yellow menu bar above. On a related note, it would be extremely helpful if blog-folks like me, who spend too much money on Amazon, would get in the habit of clicking on the Amazon logo link on the right side of each blog post when they shop online. As you might expect, doing so will not cost you a single penny, but would be appreciated tremendously by yours truly. And doing so works seamlessly with your Amazon Prime account.
This blog post took about two hours to prepare and makes 230 consecutive days with a new one. Please remember that if an item — a Delkin flash card, or a tripod head — for example, that is available from B&H and/or Bedfords, is also available in the BAA Online Store, it would be great, and greatly appreciated, if you would opt to purchase from us. We will match any price. Please remember also to use my B&H affiliate links or to save 3% at Bedfords by using the BIRDSASART discount code at checkout. Doing either often earns you free guides and/or discounts. And doing so always earns my great appreciation.
|
|
|
This image was created on 10 August 2021 at Nickerson Beach. I used the hand held Sony FE 200-600mm f/5.6-6.3 G OSS lens (at 280mm) and The One, the Sony Alpha 1 Mirrorless digital camera. ISO 3200. Exposure determined via Zebras with ISO on the rear dial: 1/3200 sec. at f/6.3 (wide open) in Manual mode. AWB at 6:35pm on a cloudy afternoon. Tracking: Center Zone/AF-C Bird/Eye Detection AF was active at the moment exposure and created a sharp-on-the-eye image. Be sure to click on the image to enjoy the larger version. Image #1: Black Skimmer screaming in flight
|
Flight Photography at Nickerson Beach
Not counting my scouting walk in the rain on the afternoon of July 29, I have visited the east skimmer colony at Nickerson eleven times. During those outings, I have created somewhere between 10,000 and 20,000 flight images. Though I have made many thousands of sharp flight images, my keeper rate has hovered between two and five percent. Of those, I will process only a handful of the very best, all for the primary purpose of being featured in a blog post. As detailed here previously you need to edit stringently if you are using a high frame-rate camera with a science-fiction-like AF system. If not, your storage capacity will be maxed out quite soon. Razor sharp on the eye with the whole bird (usually :)) in the frame, are just the tip of the iceberg. In addition you are looking at the light, the sky, the subject-to-sensor plane juxtapositions, and the flight poses and wing positions, along with the intangibles: the It factor. As always, different is good and really different is great. For me, today’s featured image has the It factor.
Anyhoo, when I saw the clipped wing on this one, I knew that I would get to it eventually and that it would be featured on the blog. Today is the day.
Dead-Solid Perfect?
RawDigger showed that the raw file brightness for today’s featured image was about 1/3-stop under. As you learn in the RawDigger e-Guide, under-exposing a bit with ISOs greater than 800 will not hurt you very much if at all.
The G channel here made it only 1/3 of the way from the 8000 line to the 16000 line. Images where the G channel gets 2/3rds of the way from the 8000 to the 16000 line are perfect exposures. Images where the G channel gets right up to the line are dead-solid perfect. So we can call the exposure for today’s image very good to excellent.
RawDigger — not for the faint of heart …
Nothing has ever helped me learn to create consistently perfect exposures the way that RawDigger has. I think that many folks are reluctant to learn that most of their images are underexposed by one or more full stops and that highlight warnings in Photoshop, Lightroom, Capture One, and your in-camera histogram are completely bogus as they are based on the embedded JPEGs. Only your raw files tell the truth all the time. Heck, I resisted RawDigger for several years … Once you get over that feeling, RawDigger can become your very best exposure friend no matter what system you are using. On the recent IPTs and In-the-Field sessions, we have demonstrated that fact. Convincingly.
The RawDigger (pink) Adapted Histogram
In the RawDigger e-Guide, you will learn exactly how to set up the Adapted “pink” RawDigger Histogram and how to use it to quickly and easily evaluate the exposure or raw file brightness of images from all digital cameras currently in use. RawDigger was especially helpful to me when I struggled with R5 exposures and when learned my new camera body, the Sony Alpha a1.
|
|
RawDigger e-Guide with Two Videos |
The RawDigger e-Guide with Two Videos
by Arthur Morris with Patrick Sparkman
The RawDigger e-Guide was created only for serious photographers who wish to get the absolute most out of their raw files.
Patrick and I began work on the guide in July 2020. At first we struggled. We asked questions. We learned about Max-G values. We could not figure out why the Max G values varied by camera system. IPT veteran Bart Deamer asked lots of questions that we could not answer. We got help from RawDigger creator Iliah Borg. We learned. In December, Patrick came up with an Adapted Histogram that allows us to evaluate the exposures and raw file brightness for all images created with all digital camera bodies from the last two decades. What we learned each time prompted three complete beginning to end re-writes.
The point of the guide is to teach you to truly expose to the mega-Expose-to-the-Right so that you will minimize noise, maximize image quality, best utilize your camera’s dynamic range, and attain the highest possible level of shadow detail in your RAW files in every situation. In addition, your properly exposed RAW files will contain more tonal information and feature the smoothest possible transitions between tones. And your optimized images will feature rich, accurate color.
We teach you why the GREEN channel is almost always the first to over-expose. We save you money by advising you which version of RawDigger you need. We teach you how to interpret the Max G values for your Canon, Nikon, and SONY camera bodies. It is very likely that the Shock-your-World section will shock you. And lastly — thanks to the technical and practical brilliance of Patrick Sparkman — we teach you a simple way to quickly and easily evaluate your exposures and raw file brightness using an Adapted RawDigger histogram.
The flower video takes you through a session where artie edits a folder of images in Capture One while checking the exposures and Max-G values in RawDigger. The Adapted Histogram video examines a series of recent images with the pink histograms and covers lots of fine points including and especially how to deal with specular highlights. The directions for setting up the Adapted Histogram are in the text.
If we priced this guide based on how much effort we put into it, it would sell it for $999.00. But as this guide will be purchased only by a limited number of serious photographers, we have priced it at $51.00. You can order yours here in the BAA Online Store.
|
|
AF Point screen capture for the Black Skimmer screaming in flight image |
The AF Point Screen Capture
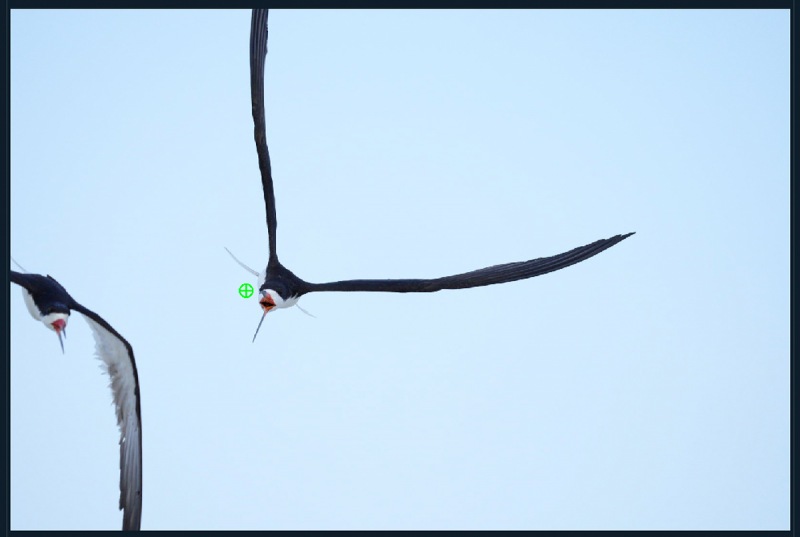
As with the Canon R5, you will run across many a1 images where the AF point is not squarely on the bird’s eye, yet the image is razor-sharp (on the eye). Sometimes the AF point is in the middle of the sky, yet your flight image is more than sharp enough. These two bodies feature fabulous eye tracking AF systems. My thoughts are that although the AF system is fast enough to track the bird’s face or eye but that the system that records the AF system is not quite fast enough to keep up with the real time AF. Perhaps …
See the screen capture below to see how well the AF tracking worked with today’s image.
|
|
An unsharpened tight crop of the face from the Black Skimmer screaming in flight image |
Sharp Enough for You?
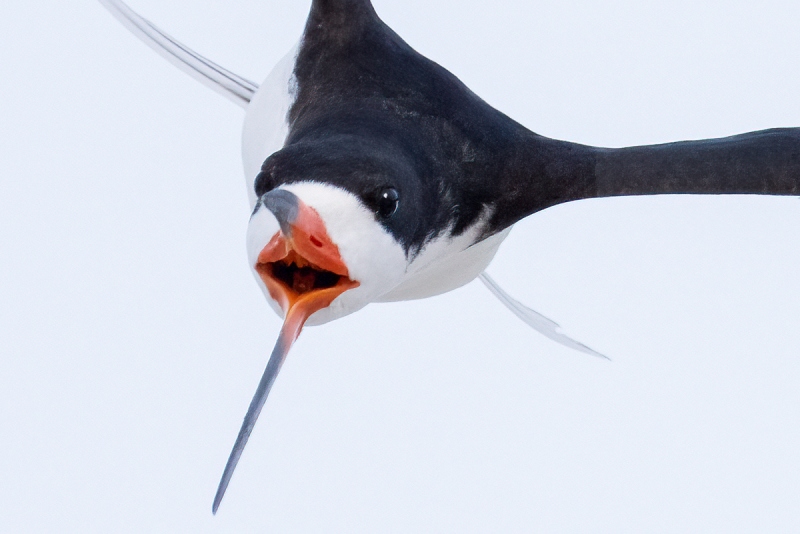
Is this image sharp enough for you? Folks who routinely view their images by zooming in to 100% and beyond will can answer this question from a good perspective. It is well more than sharp enough for me.
Eye Doctor Work
Note the neat Eye Doctor work on an image made on a dreary day. I added a catchlight and lightened the light crescent at the back of the bird’s left eye. The trick is to blow the eye up so that you can get a good idea of where the natural reflections are, and work from there. All and tons more as detailed in Digital Basics II.
What Bugs Me?
In this extreme close-up, you can see the only thing about this image that bugs me. And no, it is not the white sky. The flaw is the result of a bit of bad luck. If you think that you know what it is, please leave a comment and share your thoughts.
SONY a1 AF: Beyond Belief …
As Bird-Eye/Face Detection has gotten much better since the V1.10 firmware update that completely eliminated the EVF Blackout problems, it has become easier to trust the AF system whether doing flight photography or when working off the tilted rear screen with the tripod almost at ground level.
SONY and artie
Switching to SONY, first with the a9 and the a9 II, and then to the remarkable a1, has enabled me (and others, like Mike De Rosa as seen a while ago in the blog post here), to create images of birds in flight and in action that I could not have even dreamed of when using Canon for 33 years and then Nikon for more than two. Most of the time I am using one of two AF methods that together, cover about 99% of the commonly-encountered bird photography situations. At present, I am experimenting beyond those … Learn more by joining the group!
From Long-ago IPT veteran Keith Kennedy via e-mail
Absolutely great information. I am calling Jim in a few minutes to order a couple of Delkin 128GB UHS-II cards. Your timely email has saved me a ton of money! Many thanks
In the same vein, via e-mail from John LeClair
Well, e-mail #21 alone was worth the price of admission!
From Pamela Viale, after receiving artie’s a1 settings along with detailed instructions on how to copy them to her SONY a1 via e-mail
This e-mail group has been an incredible boon to me! Thank you so much!
From Joe Barranco via e-Mail
Thanks for your great ideas on the A1 set up. I have been getting MANY more keepers doing things your way!
From Barbara White via e-Mail
Wow, I just gotta say – I learn so much from the SONY Alpha a1 Set-up and Info group! My camera is on my desk, and I’m always picking it up and changing something that I’ve read about in the e-mails.
Thanks, Barbara
From Janet Horton via e-Mail
Hi Artie, Mystery solved. Yes, I was able to replicate what you did. I forgot that you have to set self-timer using the upper dial. I am used to that being a MENU selection.
Thanks much, Janet
SONY Alpha a1 Set-up and Info Group
The SONY Alpha a1 Set-up and Info Group is going great guns as more and more folks chime in with thoughtful questions and experience-based answers. As the a1 is becoming more readily available, more and more folks are getting their hands on this amazing body. With two folks joining yesterday, we are now up to an astounding 67 lucky and blessed photographers! Early on, we discussed the myriad AF options. I gave my opinion as to the best one for flight and general bird photography. More recently, we have been in contact with folks at SONY sharing our thoughts, experiences, and frustrations with the EVF blackout problem.
All who purchased their Alpha a1 bodies via a BAA affiliate link will receive a free subscription to the Sony Alpha a1 Set-Up and Info Updates after shooting me their receipts via e-mail. (Note: it may take me several days to confirm B&H orders.) This same service may be purchased by anyone with an a1 body via a $150.00 PayPal sent to birdsasart@verizon.net indicating payment for Alpha a1 Info Updates. Alternatively, folks can call Jim weekdays at 1-863-692-0906 to pay via credit card. New members will receive composite e-mails that summarize all previous discussions.
Typos
With all blog posts, feel free to e-mail or to leave a comment regarding any typos or errors.


Hi Artie, I think the upper bill tip is a bit hard to distinguish as it just barely merges with the darker area of feathers. Does that bug you? Just a fraction before or after that frame may have been better for the bill tip. maybe not so much for something else.
That is it.
With love, a
I’d guess you’d like to see the tip of the upper mandible against the sky, not the bird. Thus a tiny turn of the birds head to its right.
Or against the white forehead …
with love, a
ps: how are you liking your 600GM?
Bill merge with right eye.
Also, is the lighter portion of the left wing part of the bird’s natural plumage? I think I can see it on the right wing also, in image #1.
Good work. Bill tip merge with black cap would be a bit more accurate.
with love, artie
ps: all of the tones and colors on the wing look natural to me. Nothing out of the ordinary was done.
Looking closely, there just seems to be a sharp division between the darker grey near the bird and the lighter grey out on the wing
Same thing that Kevin mentioned, though it doesn’t bug me, or maybe the damaged (?) or irregular tail feather on the bird’s left side? You’re killing on skimmers, and make good points on what makes a keeper.
Thanks, and spot on with your comments as usual.
with love, artie
Upper mandible intersecting the eye the black feathers meeting the white feathers on the face. Would have helped if mouth wasn’t so wide open. Have a great day Artie.
Thanks, Kevin. Folks sure learn a lot on BirdPhotographer’s.Net 🙂 See you in Homer.
with love, artie