Wanted to Buy
If you have a Canon EF 500mm f/4L IS II Lens that is sitting on a shelf and would like to sell it for a decent price, please shoot me an e-mail.
|
|
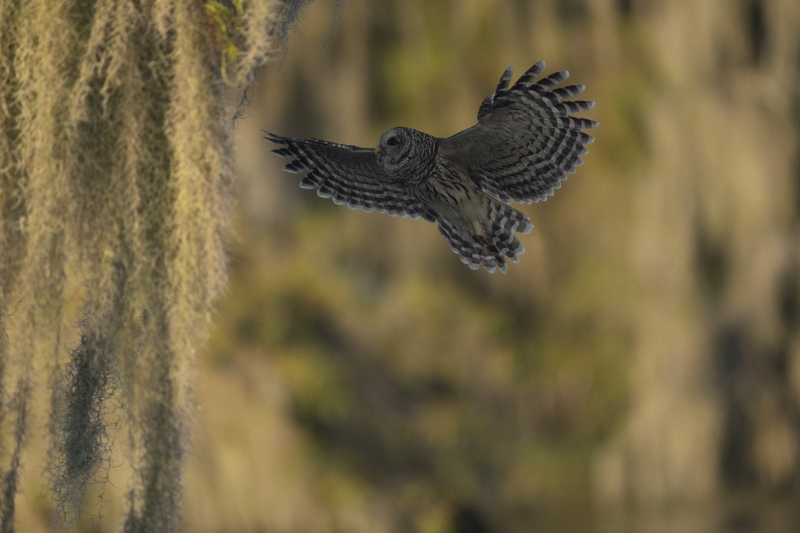
Image 1C: This JPEG represents the raw file for the Barred Owl in flight image |
By Popular Request
The JPEG above is an accurate representation of the raw file as it came out of the camera … Keep reading to see the optimized version. Be sure to note how well a sharp a1 image stands up to a relatively large crop.
What’ Up?
On Sunday, we had some good chances on Pileated Woodpecker in flight using audio down by the lake. You will see a Jackpot image or two here soon. On Tuesday, I just about finished my 2020 tax return. I was glad to learn yesterday that Pete Meyers will be joining the third DeSoto IPT.
Today is Wednesday 29 September.
Wherever you are, and whatever you are doing, I hope that you too have a great day. This blog post more than two hours to prepare including the time spent on the image optimization.
Remember that you can find some great photo accessories (and necessities, like surf booties!) on Amazon by clicking on the Stuff tab on the orange/yellow menu bar above. On a related note, it would be extremely helpful if blog-folks who, like me, spend too much money on Amazon, would get in the habit of clicking on the Amazon logo link on the right side of each blog post when they shop online. As you might expect, doing so will not cost you a single penny, but would be appreciated tremendously by yours truly. And doing so works seamlessly with your Amazon Prime account.
Please remember that if an item — a Delkin flash card, or a tripod head — for example, that is available from B&H and/or Bedfords, is also available in the BAA Online Store, it would be great, and greatly appreciated, if you would opt to purchase from us. We will match any price. Please remember also to use my B&H affiliate links or to save 3% at Bedfords by using the BIRDSASART discount code at checkout for your major gear purchases. Doing either often earns you free guides and/or discounts. And always earns my great appreciation.
|
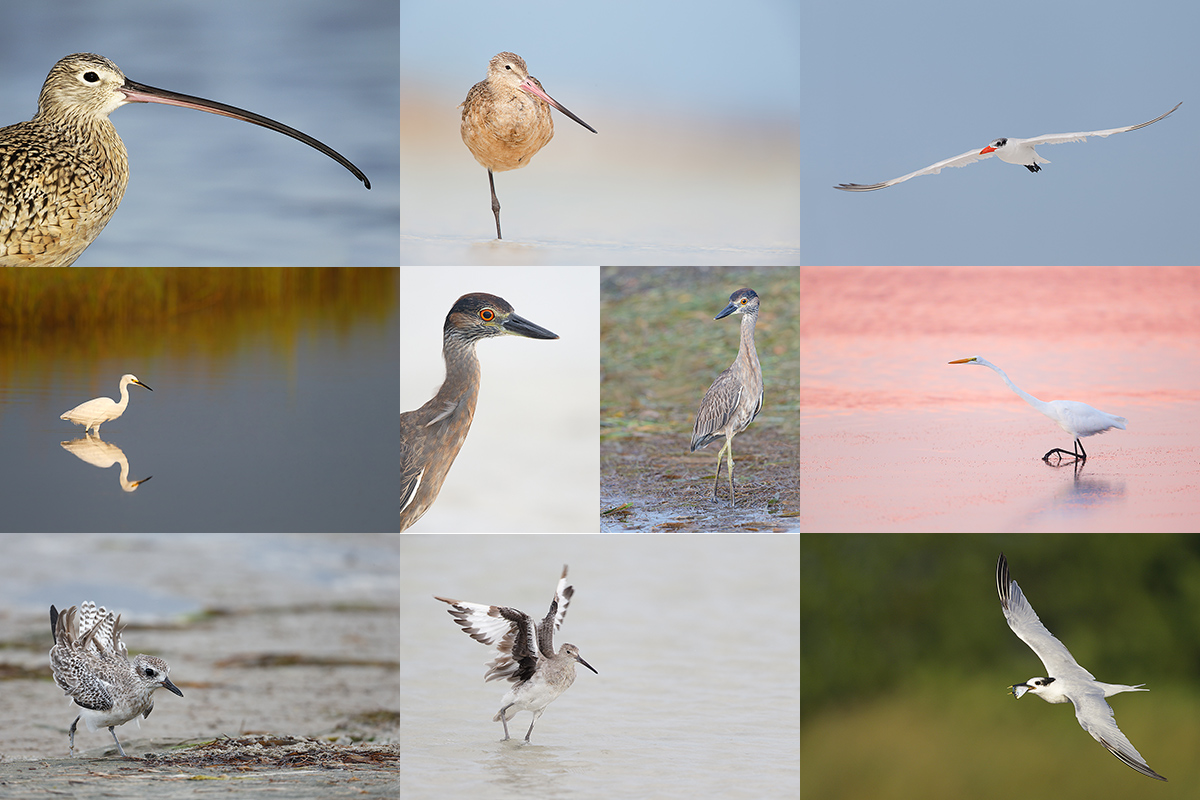
Fort DeSoto in fall is rife with tame birds. All of the images in this card were created at Fort DeSoto in either late September or very early October. I hope that you can join me there this fall. Click on the composite to enjoy a larger version. Clockwise from upper left to center: Long-billed Curlew, Marbled Godwit, Caspian Tern, Great Egret, Sandwich Tern with fish, Willet, Black-bellied Plover threat display, Snowy Egret, 2-year old Yellow-Crowned Night-Heron, juvenile Yellow-Crowned Night-Heron. |
The Fall 2021 Fort DeSoto Instructional Photo-Tours
Fall 2021 Fort DeSoto Instructional Photo-Tour #2
3 1/2 Days: Tuesday 5 October through the morning session on Friday 8 October. $1999.00 includes three working lunches. Limit six photographers/Openings 3.
Fall 2021 Fort DeSoto Instructional Photo-Tour #3
3 1/2 Days: Tuesday 19 October through the morning session on Friday 22 October. $1999.00 includes three working lunches. Limit six photographers/Openings 3.
Fort DeSoto in Fall
Fort DeSoto, located just south of St. Petersburg, FL, is a mecca for migrant shorebirds and terns in fall. There they join hundreds of egrets, herons, night-herons, and gulls that winter on the T-shaped peninsula. With any luck at all, we should get to photograph one of Florida’s most desirable shorebird species: Marbled Godwit. Black-bellied Plover and Willet are easy, American Oystercatcher is pretty much guaranteed. Great Egret, Snowy Egret, Great Blue Heron, Tricolored Heron, and White Ibis are easy as well and we will almost surely come up with a tame Yellow-crowned Night-Heron or two. And we will get to do some Brown Pelican flight photography. In addition, Royal, Sandwich, Forster’s, and Caspian Terns will likely provide us with some good flight opportunities as well. Though not guaranteed, Roseate Spoonbill and Wood Stork might well be expected. And we will be on the lookout for a migrant passerine fallout in the event of a thunderstorm or two.
On this IPT, all will learn the basics and fine points of digital exposure. Nikon and Canon folks will learn to get the right exposure every time after making a single test exposure, and SONY folks will learn to use Zebras so that they can be sure of making excellent exposures before pressing the shutter button.. Everyone will learn how to approach free and wild birds without disturbing them, to understand and predict bird behavior, to identify many species of shorebirds, to spot the good situations, to choose the best perspective, to see and understand the light, and to design pleasing images by mastering your camera’s AF system. Most importantly, you will surely learn to evaluate wind and sky conditions and understand how they affect bird photography. And you will learn how and why to work in Manual mode (even if you’re scared of it). The best news is that you will be able to take everything you learn home with you so that you will be a better photographer wherever and whenever you photograph.
There will be a Photoshop/image review session during or after lunch (included) each full day. That will be followed by Instructor Nap Time.
These IPTs will run with only a single registrant (though that is not likely to happen). The best airport is Tampa (TPA). Once you register, you will receive an e-mail with Gulfport AirBnB information.
A $500 deposit is due when you sign up and is payable by credit card. Balances must be paid by check after you register. Your deposit is non-refundable unless the IPT sells out with six folks, so please check your plans carefully before committing. You can register by calling Jim or Jennifer during weekday business hours at 863-692-0906 with a credit card in hand, or by sending a check as follows: make the check out to: BIRDS AS ART and send it via US mail here: BIRDS AS ART, PO BOX 7245, Indian Lake Estates, FL 33855. You will receive a confirmation e-mail with detailed instructions, clothing, and gear advice. Please shoot me an e-mail if you plan to register or if you have any questions.
|
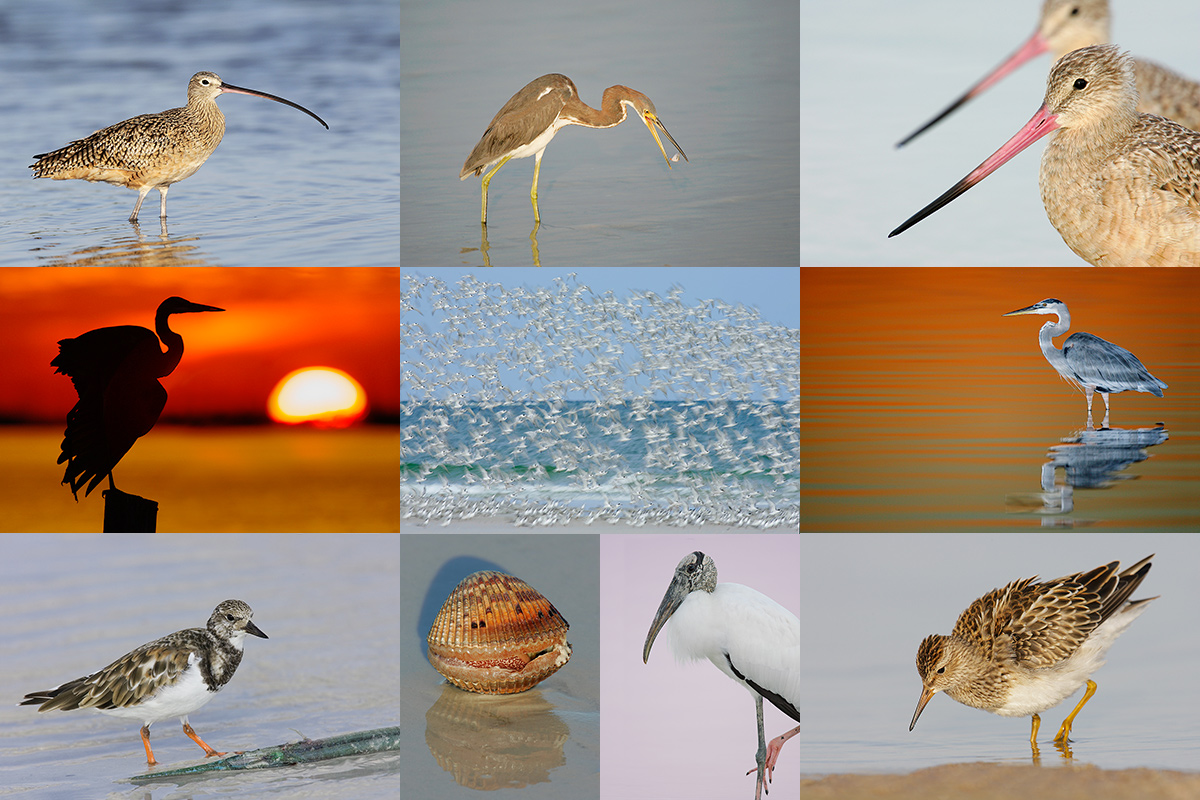
Clockwise from upper left to center: Long-billed Curlew, juvenile Tricolored Heron, Marbled Godwits, Great Blue Heron, juvenile Pectoral Sandpiper, Wood Stork, smiling Sea Scallop, Ruddy Turnstone scavenging needlefish, Great Blue Heron sunset silhouette at my secret spot, and southbound migrant tern flock blur. |
Up Early, Stay Out Late!
Obviously folks attending an IPT will be out in the field early and stay late to take advantage of the sweetest light and sunrise and sunset colors (when possible). The good news is that the days are relatively short in early fall. I really love it when I am leaving the beach on a sunny morning after a great session just as a carful or two of well-rested photographers are arriving. The length of cloudy morning sessions will often be extended. Click on the composite to enjoy a larger version.
|
|
|
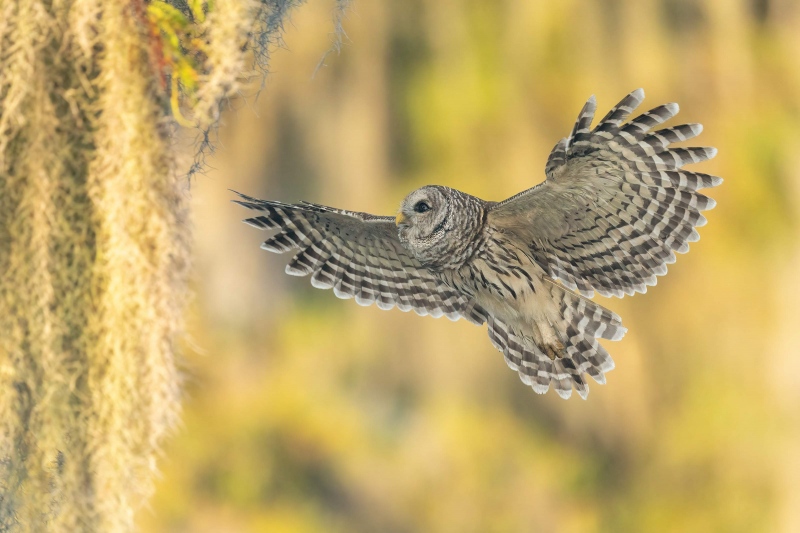
This image was created on 24 September 2021 at Lake Blue Cypress aboard Clemens Van der Werf’s flats boat. I used the hand held Sony FE 600mm f/4 GM OSS lens and the beyond amazing Sony Alpha 1 Mirrorless Digital Camera (Body Only). ISO 1250. RawDigger showed that the raw file was just about two stops too dark at: 1/2500 sec. at f/4 (wide open) in Manual mode. AWB at 7:49am on sunny morning. Center Zone/AF-C with Bird-Eye/Face Detection performed perfectly and produced a sharp-on-the-eye image. Be sure to click on the image to view the spectacular hi-res version. Image 1: Barred Owl in flight |
And then the beautiful owl flew into the shade …
I was set up to photograph the owl lit by the sun. When it jumped off its perch, I acquired focus and fired off a burst. Today’s featured image was created after the owl flew into the shadow of the tree that it would land in. As expected, RawDigger showed that the raw file was just about two stops too dark. Keep reading for more on RawDigger and to learn how the image was saved in Photoshop.
|
|
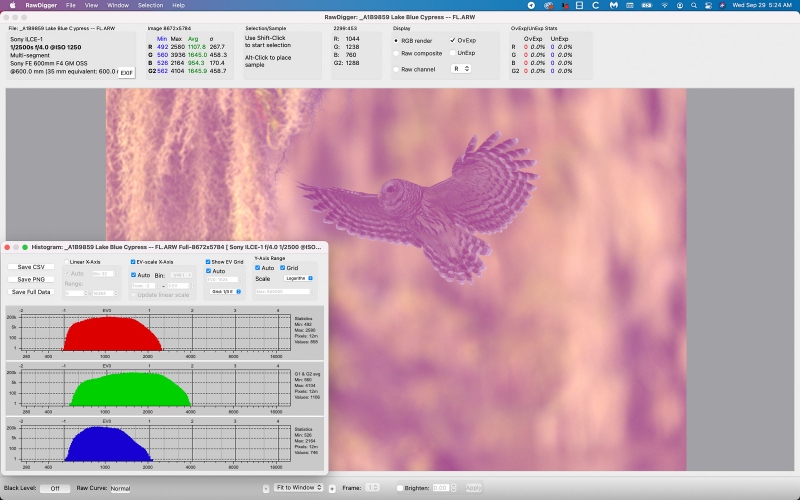
Image 1A: The RawDigger screen capture for the Barred Owl in flight image |
The RawDigger Screen Capture
I analyze every raw file that I process in RawDigger. I knew that this image would be well under-exposed, but was surprised that it showed as almost two full stops too dark, especially since the foreground and background foliage was lit by the sun. Do remember that a perfect exposure shows the G channel almost reaching the 16000 line.
The analysis in RawDigger gives me a good idea of how to set the Exposure slider in Adobe Camera Raw. See below for more on the ACR raw conversion.
RawDigger — not for the faint of heart …
Nothing has ever helped me learn to create perfect exposures to the degree that RawDigger has. I think that many folks are reluctant to learn that most of their images are underexposed by one or more full stops and that highlight warnings in Photoshop, Lightroom, Capture One, and your in-camera histogram are completely bogus as they are based on the embedded JPEGs. Only your raw files tell the truth all the time. Heck, I resisted RawDigger for several years … Once you get over that feeling, RawDigger can become your very best exposure friend no matter what system you are using. On the recent IPTs and In-the-Field sessions, we have demonstrated that fact. Convincingly.
The RawDigger (pink) Adapted Histogram
In the RawDigger e-Guide, you will learn exactly how to set up the Adapted “pink” RawDigger Histogram and how to use it to quickly and easily evaluate the exposure or raw file brightness of images from all digital cameras currently in use. RawDigger was especially helpful to me when I struggled with R5 exposures and when learned my new camera body, the Sony Alpha a1.
|
|
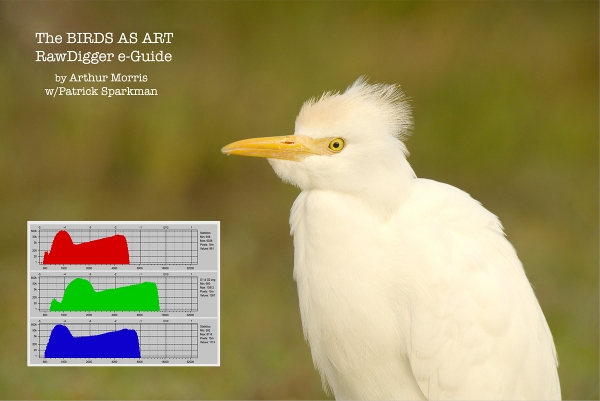
RawDigger e-Guide with Two Videos |
The RawDigger e-Guide with Two Videos
by Arthur Morris with Patrick Sparkman
The RawDigger e-Guide was created only for serious photographers who wish to get the absolute most out of their raw files.
Patrick and I began work on the guide in July 2020. At first we struggled. We asked questions. We learned about Max-G values. We could not figure out why the Max G values varied by camera system. IPT veteran Bart Deamer asked lots of questions that we could not answer. We got help from RawDigger creator Iliah Borg. We learned. In December, Patrick came up with an Adapted Histogram that allows us to evaluate the exposures and raw file brightness for all images created with all digital camera bodies from the last two decades. What we learned each time prompted three complete beginning to end re-writes.
The point of the guide is to teach you to truly expose to the mega-Expose-to-the-Right so that you will minimize noise, maximize image quality, best utilize your camera’s dynamic range, and attain the highest possible level of shadow detail in your RAW files in every situation. In addition, your properly exposed RAW files will contain more tonal information and feature the smoothest possible transitions between tones. And your optimized images will feature rich, accurate color.
We teach you why the GREEN channel is almost always the first to over-expose. We save you money by advising you which version of RawDigger you need. We teach you how to interpret the Max G values for your Canon, Nikon, and SONY camera bodies. It is very likely that the Shock-your-World section will shock you. And lastly — thanks to the technical and practical brilliance of Patrick Sparkman — we teach you a simple way to quickly and easily evaluate your exposures and raw file brightness using an Adapted RawDigger histogram.
The flower video takes you through a session where artie edits a folder of images in Capture One while checking the exposures and Max-G values in RawDigger. The Adapted Histogram video examines a series of recent images with the pink histograms and covers lots of fine points including and especially how to deal with specular highlights. The directions for setting up the Adapted Histogram are in the text.
If we priced this guide based on how much effort we put into it, it would sell it for $999.00. But as this guide will be purchased only by a limited number of serious photographers, we have priced it at $51.00. You can order yours here in the BAA Online Store.
|
|
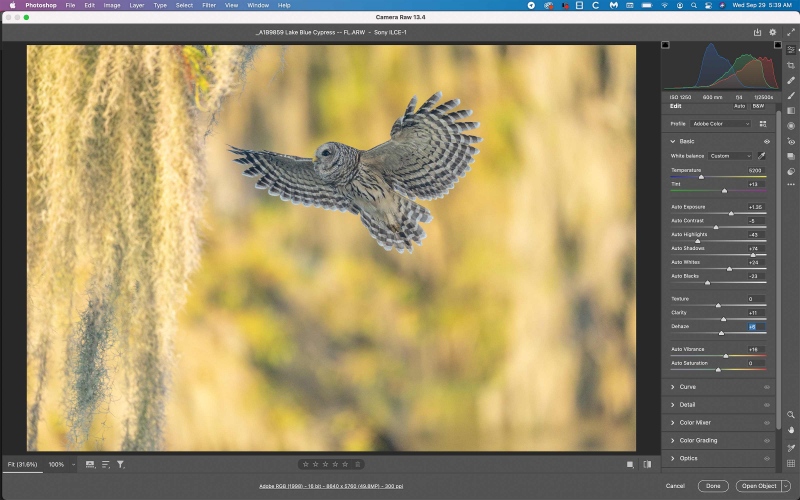
Image 1b: The ACR settings for the Barred Owl in flight image |
The ACR Settings
Above you can see how I adjusted the sliders for the raw conversion of today’s featured image. If you convert in Capture One or DPP 4, the principles will be the same.
First, understand that the setting show as Auto only because of a glitch in the screen capture process. All of the sliders were and always are adjusted manually.
I increased the overall exposure to the tune of +1.35. I reduced the contrast five points to tone down the sunlit moss and pulled the Highlights down for the same purpose. I moved the Shadow slider to +74 to open up the under-exposed owl. I moved the White slider to the right to brighten the Highlights on the bird. I moved the Black slider to the left to set the black point. I rarely touch the Dehaze slider, but +6 here helped. I increased the Vibrance by 16 points and hit Open.
After the substantial crop — you gotta love sharp a1 files, I ran Topaz DeNoise on Auto. Next I made a careful selection of the owl, feathered it one pixel, saved the selection, and placed it on its own layer. I used Viveza on that layer to lighten the owl and heighten the details on the bird. I saved the first version of the image only to realize that the owl was too cool. I loaded the saved selection, opened Hue-Saturation, selected the BLUE channel, and reduced the Saturation to -80. Still not happy, I opened the ACR filter and upped the color temperature. I had not done that during the raw conversion as that would have affected the sunlit foliage.
It was lots of work, but I felt that this flight shot was worth saving.
|
|
The BIRDS AS ART Current Workflow e-Guide (Digital Basics II).You can order your copy from the BAA Online Store here, by sending a PayPal for $40 here, or by calling Jim or Jennifer weekdays at 863-692-0906 with your credit card in hand. Be sure to specify Digital Basics II. |
The BIRDS AS ART Current Workflow e-Guide (Digital Basics II)
The clean-up techniques mentioned above, making raw conversions in ACR, and tons more great Photoshop tips and techniques — along with all of my personalized Keyboard Shortcuts — are covered in detail in the BIRDS AS ART Current Workflow e-Guide (Digital Basics II), an instructional PDF that is sent via e-mail. Learn more and check out the free excerpt in the blog post here. While the new e-Guide reflects my MacBook Pro/Photo Mechanic/DPP 4/Photoshop workflow, folks using a PC and/or BreezeBrowser will also benefit greatly by studying the material on DB II. Note: folks working on a PC and/or those who do not want to miss anything Photoshop may wish to purchase the original Digital Basics along with DB II while saving $15 by clicking here to buy the DB Bundle.
Folks who learn well by following along rather than by reading can check out the complete collection of MP 4 Photoshop Tutorial Videos by clicking here. Note: all of the videos are now priced at an amazingly low $5.00 each.
You can learn how and why I converted all of my Canon digital RAW files in DPP 4 in the DPP 4 RAW Conversion Guide here. More recently, I became proficient at converting my Nikon RAW (NEF) files in Adobe Camera Raw. About two years ago I began converting my Nikon and Sony RAW files in Capture One Pro 12 and continue to do so today.
To purchase Capture One, please use this link. Then you can learn more about Capture One in the Capture One Pro 12 Simplified MP4 Video here. The next step would be to get a copy of Arash Hazeghi’s “The Nikon Photographers’ Guide to Phase One Capture One Pro e-Guide” in the blog post here.
You can learn advanced Quick Masking and advanced Layer Masking techniques in APTATS I & II. You can save $15 by purchasing the pair.
Typos
With all blog posts, feel free to e-mail or to leave a comment regarding any typos or errors.



Art,
I like the crop and composition a lot, but I wonder how it would look with the darker, original background (which looks great, and more owlish) combined with the brightened owl? Maybe it wouldn’t look right, but if you already have a mask for the owl, it would be easy to try.
Good idea. I would have tried it but I did not save it as Layers and did not save the selection (that was done arduously). I have learned too many times that I is always best to save the selection …
With love, artie
It was worth Saving it. Nice work Indeed.
One question : would you have gotten a better exposure if auto ISO would have Been activated?
Working in what mode with what function on the rear dial?
with love, artie
You are the man! Thanks, super capture and your digital processing never ceases to amaze me. Thanks for all your tips & tricks.
Thanks for your kind words. See you on an IPT 🙂
with love, artie
David and Yves,
Done. See the first image that I added.
with love, artie
Love barred owls and agree it was a shot worth saving. I’m still amazed at digital – imagine trying to make that save in the days of film! Also, have to agree with Yves that seeing the original RAW file would hammer home the point.
HI Artie,
I would have liked to see the original raw file in order to better appreciate the difference between it and the processed one.
thanks!