What’s Up?
As were the first two mornings, the third morning of the second DeSoto IPT was fantastic. Again, we photographed until well after noon so that you could enjoy more amazing flight photography with the incoming Sandwich and Royal Terns. With the wind behind us us, we employed the sitting on the flock technique that allowed for tons of action and gorgeous sky and/or Gulf backgrounds. The fourth morning? Not so great, but we did have many good chances. We started at Hidden Lagoon with a tame Green Heron in low light. Newbie Nancy Thornblad got to work on a real tripod with the Levered-clamp FlexShooter Pro for the first time.
Next were bright-sky/perched Osprey branch-scape silhouettes that allowed everyone to fine-tune their compositional and exposure skills. We spent the reminder of the session with lots of tame shorebirds that included Black-bellied and Semipalmated Plovers, adult Western Sandpiper, and Marbled Godwit. Nancy got to work off a Panning Ground-Pod for the first time. We said our goodbyes, and after a few shopping stops, I was home just before 6pm.
Do consider joining us for the sure-to-be-fantastic third Fort DeSoto IPT.
The Fall 2021 Fort DeSoto Instructional Photo-Tours
3 1/2 Days: Tuesday 19 October through the morning session on Friday 22 October. $1999.00 includes three working lunches. Limit six photographers/Openings 4.
Today is Saturday 9 October 2020. Wherever you are, and whatever you are doing, I hope that you too have a great day. This blog post well more than three hours to prepare including the time spent on the image optimizations and screen captures.
Remember that you can find some great photo accessories (and necessities, like surf booties!) on Amazon by clicking on the Stuff tab on the orange/yellow menu bar above. On a related note, it would be extremely helpful if blog-folks who, like me, spend too much money on Amazon, would get in the habit of clicking on the Amazon logo link on the right side of each blog post when they shop online. As you might expect, doing so will not cost you a single penny, but would be appreciated tremendously by yours truly. And doing so works seamlessly with your Amazon Prime account.
Please remember that if an item — a Delkin flash card, or a tripod head — for example, that is available from B&H and/or Bedfords, is also available in the BAA Online Store, it would be great, and greatly appreciated, if you would opt to purchase from us. We will match any price. Please remember also to use my B&H affiliate links or to save 3% at Bedfords by using the BIRDSASART discount code at checkout for your major gear purchases. Doing either often earns you free guides and/or discounts. And always earns my great appreciation.
Wanted to Buy
If you have a Canon EF 500mm f/4L IS II Lens and or a Canon 100mm f/2.8 Macro lens that is sitting on a shelf and would like to sell one or both for a decent price, please shoot me an e-mail.
|
|
|
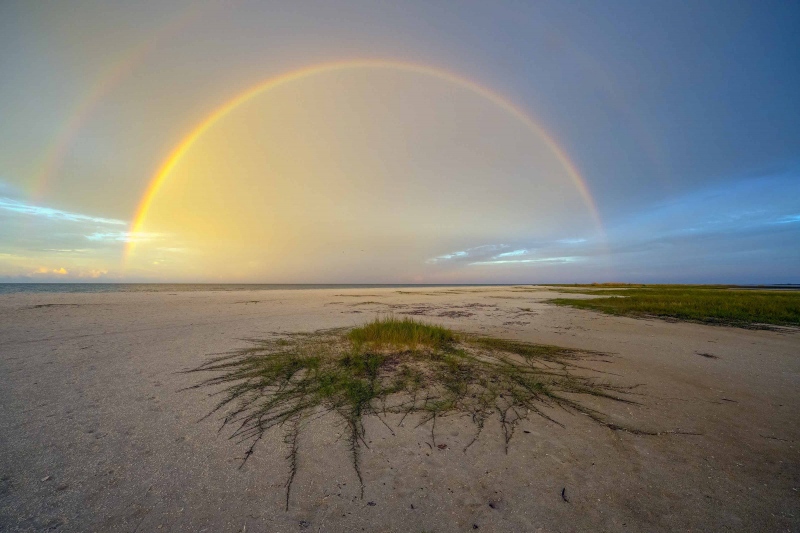
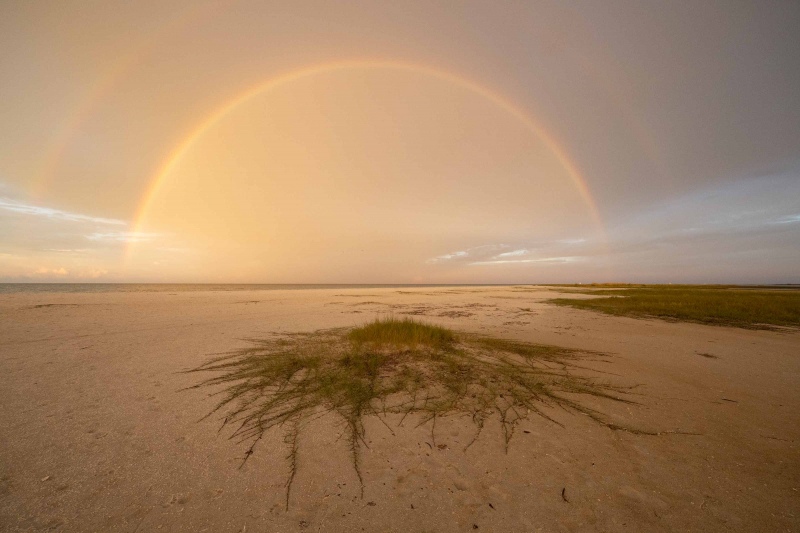
I created this image on 6 October 2021, the first morning of the DeSoto IPT. I used the hand held Sony FE 12-24mm f/2.8 GM lens Sony FE 12-24mm f/2.8 GM Lens and The One, the Sony Alpha 1 Mirrorless digital camera. ISO 5000. Exposure determined via Zebras with ISO on the rear dial: 1/640 sec. at f/6.3 (stopped down 2 1/3 stops) in Manual mode. RawDigger showed that the raw file brightness was about 2/3 stop too dark. AWB at 7:31am on cloudy morning. Tracking: Spot S (moved well down in the frame)/AF-C Bird/Eye Detection AF was active at the moment exposure and performed perfectly. Click on the image to view a hi-res version. Image #1: Beach Vegetation and Rainbow, Version I
|
The First Miracle
As always, we were on the beach early. The sun was fighting its way through some clouds on the eastern horizon and some light clouds above the Gulf to the west. Here comes a rainbow, I called out. I had left my 24-105 in the car, but it would not have been nearly wide enough. And then the beginnings of a second rainbow began to appear …
The Beach Vegetation
If you can identify the beach vegetation, please leave a comment. It is very common at DeSoto, is low growing, and often spreads out like a huge spider web. It is quite beautiful; I have photographed it often with various 24-105mm lenses.
|
|
|
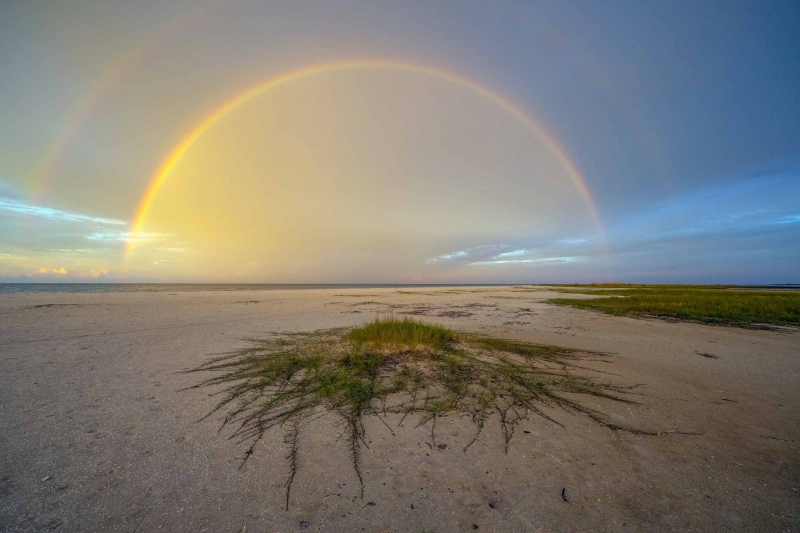
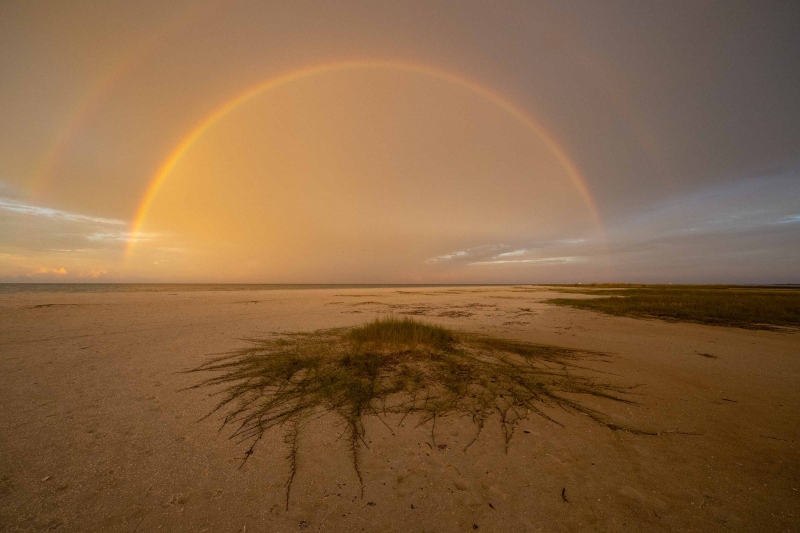
I created this image on 6 October 2021, the first morning of the DeSoto IPT. I used the hand held Sony FE 12-24mm f/2.8 GM Lens and The One, the Sony Alpha 1 Mirrorless digital camera. ISO 5000. Exposure determined via Zebras with ISO on the rear dial: 1/640 sec. at f/6.3 (stopped down 2 1/3 stops) in Manual mode. RawDigger showed that the raw file brightness was about 2/3 stop too dark. AWB at 7:31am on cloudy morning. Tracking: Spot S (moved well down in the frame)/AF-C Bird/Eye Detection AF was active at the moment exposure and performed perfectly. Click on the image to view a hi-res version. Image 1A: Beach Vegetation and Rainbow, Version II
|
The Second Miracle
Multiple IPT veteran Jim Miller said, I have the Sony FE 12-24mm f/2.8 GM lens in my backpack. I usually have my 24-105 in my pack, and am not sure why I switched to the 12-24. I said, That’s really great. Get close to the beach vegetation to use it as a strong foreground element. He did, and — as the rainbow lasted about ten minutes, kindly shared the lens with the other SONY folks. Including me 🙂
Version I and Version II
Both versions are quite similar. With Version II, I used the Shadow slider to open up the beach vegetation a bit. Which version do you prefer? Why? Be sure to keep reading to learn about the image optimization.
The f/4 Version
If you love wide angle landscape photography and find the Sony FE 12-24mm f/2.8 GM Lens a bit beyond your budget, do consider the Sony FE 12-24mm f/4 G lens priced more than $1200 lower. Like the 200-600 G lens, the image quality with the f/4 version will likely be astounding. Most folks cannot tell the difference in a sharp are file made with the Sony FE 200-600mm f/5.6-6.3 G OSS lens and the far more expensive Sony FE 600mm f/4 GM OSS lens. The 200-600 costs only $1,998.00 as compared to $12,998.00 for the big gun. And the zoom focuses closer and is a lot more versatile than the 600 f/4 GM.
All of the lenses above are available at B&H by clicking on the links or from Bedfords (with 3% savings plus free second day air Fed-Ex earned by using the BIRDSASART code at checkout).
|
|
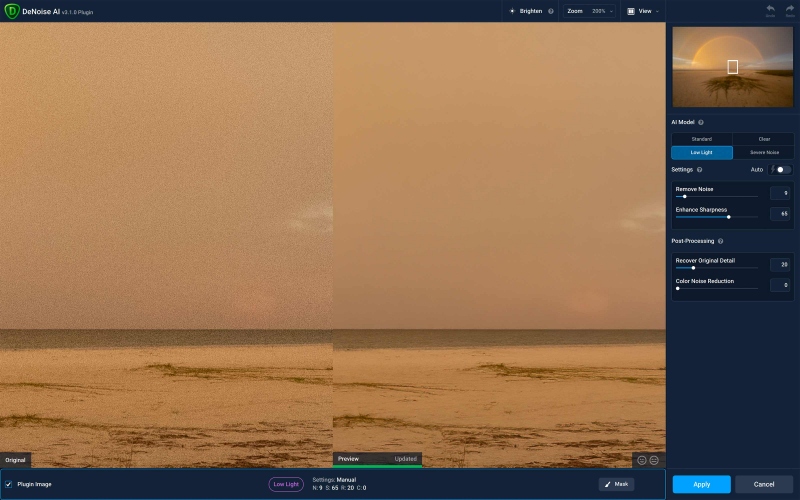
Image 1B: The Topaz DeNoise screen capture for the Beach Vegetation and Rainbow, Version II image |
The Topaz DeNoise Screen Capture
Folks often e-mail suggesting that this or that noise reduction program is probably better than Topaz DeNoise AI. I run DeNoise AI as the first step with every TIF file that I process. I use Standard with images made in sunny conditions, and Low Light for images made in low light. ISO 5000 qualifies. DeNoise is fast, the noise is completely eliminated, the details are enhanced, and the images are sharpened ever-so-slightly. With results like those seen above (be sure to click on the screen capture to view the hi-res version), why would I ever want to switch?
Great Topaz News!
Folks who use the BAA Topaz link to purchase Sharpen AI, DeNoise AI, or the Utility Bundle (or any other Topaz plug-ins), will receive a 15% discount by entering the ARTHUR15 code at checkout. If the stuff is on sale (as it usually is), you save 15% off of the sale price! To get the discount you must use my link and you must enter the discount code. Be sure to start with this link.
Those who purchase Sharpen AI, DeNoise AI, or any other Topaz plug-ins using my link and then entering the ARTHUR15 code at checkout can e-mail to request a short Getting Started with Topaz e-Guide. Please include a copy of your Topaz receipt that shows the discount. Aside from the basics, the guide explains how to install the plug-ins so that they appear in the Photoshop Filter Menu.
|
|
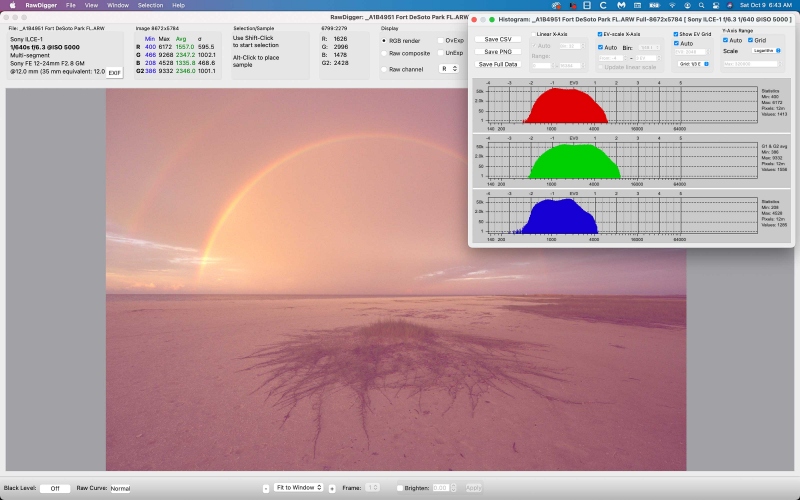
Image 1C: The RawDigger screen capture for the Beach Vegetation and Rainbow, Version II image |
RawDigger Screen Capture
I remember distinctly that the analog exposure scale on the a1 was showing +1 stop as I framed this image. I was getting some Zebras on the brightest parts of the sky so, out of fear of over-exposing, I did not want to push the exposure any further. Not to mention that rainbows always look better on the back of the camera when they are darker 🙂 In any case, checking with RawDigger helps me to set the Exposure slider correctly when I begin the raw conversion. In fact, this image was about 2/3 stop too dark. That, in part, led to the large amount of noise seen on the left (before) side of Image #1C above.
Dead-Solid Perfect!
Images where the G channel gets 2/3rds of the way from the 8000 to the 16000 line are perfect exposures. Images where the G channel gets right up to the line are dead-solid perfect. With 195 OvExp pixels out of 51,000,000 this is a dead-solid perfect exposure.
RawDigger — not for the faint of heart …
Nothing has ever helped me learn to create perfect exposures to the degree that RawDigger has. I think that many folks are reluctant to learn that most of their images are underexposed by one or more full stops and that highlight warnings in Photoshop, Lightroom, Capture One, and your in-camera histogram are completely bogus as they are based on the embedded JPEGs. Only your raw files tell the truth all the time. Heck, I resisted RawDigger for several years … Once you get over that feeling, RawDigger can become your very best exposure friend no matter what system you are using. On the recent IPTs and In-the-Field sessions, we have demonstrated that fact. Convincingly.
The RawDigger (pink) Adapted Histogram
In the RawDigger e-Guide, you will learn exactly how to set up the Adapted “pink” RawDigger Histogram and how to use it to quickly and easily evaluate the exposure or raw file brightness of images from all digital cameras currently in use. RawDigger was especially helpful to me when I struggled with R5 exposures and when learned my new camera body, the Sony Alpha a1.
|
|
RawDigger e-Guide with Two Videos |
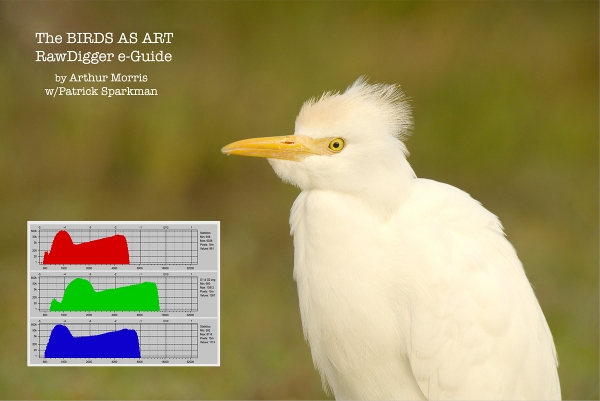
The RawDigger e-Guide with Two Videos
by Arthur Morris with Patrick Sparkman
The RawDigger e-Guide was created only for serious photographers who wish to get the absolute most out of their raw files.
Patrick and I began work on the guide in July 2020. At first we struggled. We asked questions. We learned about Max-G values. We could not figure out why the Max G values varied by camera system. IPT veteran Bart Deamer asked lots of questions that we could not answer. We got help from RawDigger creator Iliah Borg. We learned. In December, Patrick came up with an Adapted Histogram that allows us to evaluate the exposures and raw file brightness for all images created with all digital camera bodies from the last two decades. What we learned each time prompted three complete beginning to end re-writes.
The point of the guide is to teach you to truly expose to the mega-Expose-to-the-Right so that you will minimize noise, maximize image quality, best utilize your camera’s dynamic range, and attain the highest possible level of shadow detail in your RAW files in every situation. In addition, your properly exposed RAW files will contain more tonal information and feature the smoothest possible transitions between tones. And your optimized images will feature rich, accurate color.
We teach you why the GREEN channel is almost always the first to over-expose. We save you money by advising you which version of RawDigger you need. We teach you how to interpret the Max G values for your Canon, Nikon, and SONY camera bodies. It is very likely that the Shock-your-World section will shock you. And lastly — thanks to the technical and practical brilliance of Patrick Sparkman — we teach you a simple way to quickly and easily evaluate your exposures and raw file brightness using an Adapted RawDigger histogram.
The flower video takes you through a session where artie edits a folder of images in Capture One while checking the exposures and Max-G values in RawDigger. The Adapted Histogram video examines a series of recent images with the pink histograms and covers lots of fine points including and especially how to deal with specular highlights. The directions for setting up the Adapted Histogram are in the text.
If we priced this guide based on how much effort we put into it, it would sell it for $999.00. But as this guide will be purchased only by a limited number of serious photographers, we have priced it at $51.00. You can order yours here in the BAA Online Store.
|
|
Image 1D: This is the raw file processed at the default settings in ACR |
The Straight-Up Raw Conversion
This is the raw file processed at the default settings in ACR. The purpose of sharing it here was to show how light I shoot. Remember that this image was actually about 2/3 stop under-exposed; a properly exposed image would have looked even lighter and more washed out …
|
|
Image 1E: This is the raw file processed with my settings |
The Straight-Up Raw Conversion
This is the raw file converted after I adjusted the relevant sliders. It is beginning to show some life, but still looked nothing like what I saw on the beach; the sky was much bluer and the colors of the rainbow were greatly enriched, at least as I remembered things.
Rainbow Color Magic Trick
So how did I get from the sickly, much-too-yellow version seen in Image 1E to the spectacular color seen in 1A and 1B? I used a quick and dirty photoshop trick that improves many of the images that I process. It is always the last step in my workflow.
If you own Digital Basics II, please e-mail us some form of proof of purchase by clicking here to open an e-mail. Proof of purchase would include a copy of your e-mail with the link or a cut and paste of page one of the guide.
Folks who do not own Digital Basics II (DB II) are invited to purchase a copy and then send their request for the Rainbow Color Magic Trick as above. DB II includes dozens of great Photoshop Tips and Techniques along with all of my Keyboard Shortcuts. Learn more by clicking on the preceding link. Folks who do not wish to purchase Digital Basics II are invited to send a PayPal for $20 to us at birdsasart@verizon.net and include the words Rainbow Color Magic Trick in the e-mail. Be forewarned that you might feel cheated as the tip is a simple (but very powerful) one. Your call 🙂
Typos
With all blog posts, feel free to e-mail or to leave a comment regarding any typos or errors.



1A for me. The opening of the foreground shadows is subtle, but it adds just enough life and detail to make a difference. It may sound odd, but it feels like you can more easily walk right into the scene.
Thanks, Pugs. I agree. It does not sound odd to me. Speaking of walking into the scene I removed lots of foreground footprints.
with love, artie