Do you Like the Feather?
Why or why not?
What’s Up?
Life goes on. I am feeling and doing well. And I got lots of work done on Tuesday.
Today is Wednesday 20 April 2022 and I will continue to take it easy. Wherever you are and whatever you are doing, I hope that you too have a great day. This blog post took about an hour to prepare and makes forty days in a row with a new one.
Please remember to use the B&H and Amazon links that are found on most blog pages and to use the BIRDSASART discount code at checkout when purchasing your new gear from Bedfords. Please, also, consider joining a BAA IPT. You will be amazed at how much you will learn!
BIRDS AS ART Image Optimization Service (BAA IOS)
Send a PayPal for $62.00 to birdsasart@verizon.net or call Jim at 863-692-0906 and put $62.00 on your credit card. Pick one of your best images and upload the raw file using a large file sending service like Hightail or DropBox and then send me the link via e-mail. I will download and save your raw file, evaluate the exposure and sharpness, and optimize the image as if it were my own after converting the raw file in Adobe Camera Raw. Best of all, I will make a screen recording of the entire process and send you a link to the video to download, save and study.
|
|
|
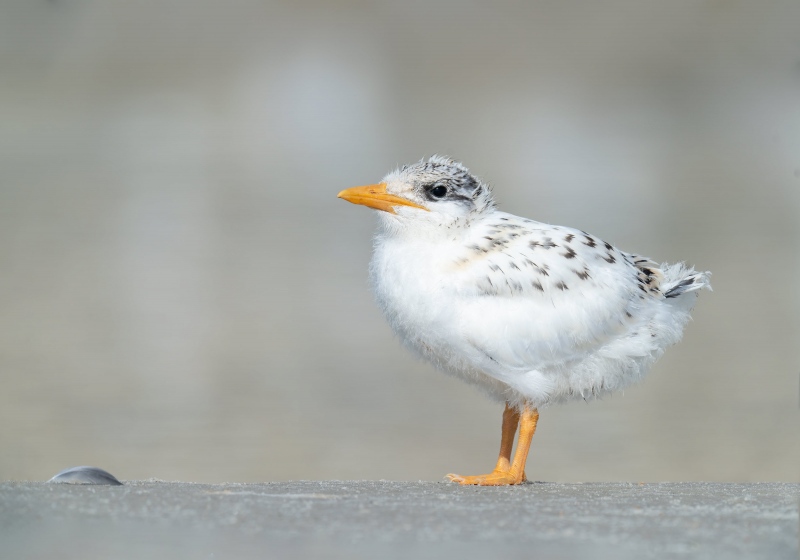
This image was created on 15 July 2021 at Jacksonville, FL. Working off the rear monitor with the tripod flattened I used the no-longer-available Induro GIT 304L/Levered-Clamp FlexShooter Pro-mounted Sony FE 600mm f/4 GM OSS lens with the Sony FE 1.4x Teleconverter, and The One, the Sony Alpha 1 Mirrorless Digital Camera.. ISO 640. The exposure was determined using Zebra technology with ISO on the rear wheel: 1/1600 sec. at f/9 (stopped down 1 1/3 stops) in Manual mode. RawDigger showed that the exposure was perfect. AWB at 9:21:11am on a sunny morning. Tracking: Zone AF-C with Bird-Eye/Face Detection performed very well. Click on the image to enjoy the high-res version. Image #1: Royal Tern — 3-week-old chick |
Getting Low and Looking for an Edge …
One of tricks of learning to spot good and great situations is to constantly be on the lookout for birds sitting in spots with relatively distant backgrounds. Those can include birds sitting along the edge of a tidal pool or creek, birds resting or preening or feeding on small rises, hills, or ridges. That done, getting low makes things even better. The farther you can place the background from the bird, the more pleasingly out-of-focus the background will be.
Today’s featured chick was standing on the edge of a long, skinny tidal pool.
Placing the lens right on the ground can often yield the bird-in-heaven look, but many folks prefer a good look at both feet. There are several options for getting really low:
- 1- Flattening the tripod completely will get you about six inches above the ground. Lying flat will allow you to best frame the image, to acquire AF, and to follow the action more easily. But it will usually get you filthy and wet (if you are the beach) and can be tough on your back. Working off the rear screen is way more comfortable but generally is not as effective. If the latter, be sure to wear your reading glasses so that you can see the titled monitor.
- 2- When I am planning on using the Panning Ground Pod, I will leave the tripod at home thus saving a ton of weight and making my life easier. You can get down to about 1 1/2 inches above the ground. And again, you have a choice of getting flat down on the mud or sand or sitting and working with the rear screen. I use both the 600 f/4 and the 200-600 on the Panning Ground Pod.
- 3- Using the Ankle- or Lower Leg-pod technique allows you to control the perspective. Resting the lens on your ankle and working off the rear screen gets you three or four inches off the ground without having to carry any extra gear. Doing the same with the lens resting on your lower left allows for a bit more height. Working off the rear monitor requires practice and some degree of dexterity. And keeping the camera level requires even more practice.
- 4- Placing the bottom of the camera body or the lens barrel (depending on the slope of the terrain) right on the ground (when seated) will obviously get you as low as is practically possible. Sometimes I place the back of my left hand on the ground and use my right hand on the camera body to frame the shot. And at times I will place the front of the lens right on the ground and control the framing with my right hand on the camera and my left hand below it.
None of these techniques are as easy as the proverbial pie, but all pay large artistic dividends.
|
|
|
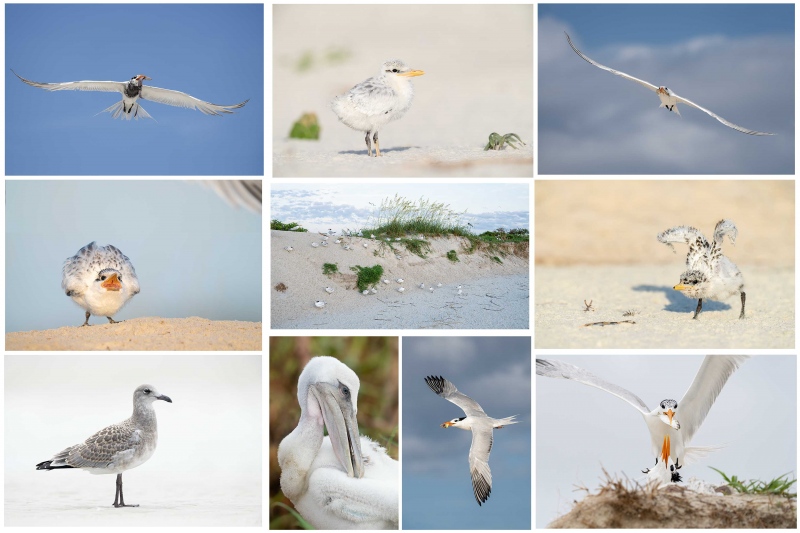
Click on the composite image to enjoy the incredible quality of the hi-res JPEG. Clockwise from upper left clockwise and back around to the center: Royal Tern in flight with squid for chick; Royal Tern chick on beach; Royal Tern in flight with shrimp for young; Royal Tern chick — double overhead wing stretch; Royal Tern landing with greenback for chick; Royal Tern in flight with juvenile mahi mahi for chick; Brown Pelican — large chick preening; Laughing Gull in fresh juvenal plumage; Royal Tern chick begging; Many Royal Terns with many chicks on face of dune. |
Jacksonville IPT: #1: 4 FULL DAYS — the afternoon of 16 June thru the morning of MON 20 June 2022: $2,099.00. (Limit 6 photographers)
Jacksonville IPT #2: the afternoon of FRI 1 JULY thru the morning of TUES 5 July 2022: $2099.00 (Limit 6 photographers)
Jacksonville IPT #3: the afternoon of FRI 15 JULY thru the morning of TUES 19 July 2022: $2099.00 (Limit 6 photographers)
Ride with me: add $200.00. I do not like to disappoint: each trip will run with one participant. If necessary.
I first visited the breeding bird colony at Jacksonville in late June 2021. I was astounded. There were many thousands of pairs of Royal Terns nesting along with about 10,000 pairs of Laughing Gulls. In addition to the royals, there were some Sandwich Terns nesting. And there are several dozen pairs of Brown Pelicans nesting on the ground. Flight photography was non-stop astounding. And photographing the tern chicks was relatively easy. Folks could do the whole trip with the Sony 200-600, the Canon 100-500 RF, or the Nikon 500 PF or 200-500 VR. With a TC in your pocket for use on sunny days. Most of the action is within 100 yards of where we park (on the beach). As with all bird photography, there are times when a super-telephoto lens with either TC is the best tool for the job.
Morning sessions will average about three hours, afternoon sessions about 1 1/2 hours. On cloudy mornings with favorable winds, we may opt to stay out for one long session and skip the afternoon, especially when the afternoon forecast is poor. Lunch is included on the first three days of the IPT and will be served at my AirBnB. After the first lunch there will be an introductory program. On days two and three we will do image review and Photoshop after lunch.
We will be based somewhere west and a bit north of Jacksonville where there are many AirBnB possibilities. The deposit is $599.00. Call Jim at the office any weekday at 863-692-0906 to pay by credit card. Balances must be paid by check.
What You Will Learn on a Jacksonville IPT
- 1- First and foremast you will learn to become a better flight photographer. Much better.
- 2-You will learn the basics and fine points of digital exposure. Nikon and Canon folks will learn to get the right exposure every time after making a single test exposure, and SONY folks will learn to use Zebras so that they can be sure of making excellent exposures before pressing the shutter button.
- 3- You will learn to work in Manual exposure mode even if you fear it.
- 4- You will learn to evaluate wind and sky conditions and understand how they affect bird photography, especially the photography of birds in flight.
- 5- You will learn several pro secrets (for each system) that will help you to become a better flight photographer.
- 6- You will learn to zoom out in advance (because the birds are so close!) 🙂
- 7- You will learn how to approach free and wild birds without disturbing them.
- 8- You will learn to spot the good and the great situations.
- 9- You will learn to understand and predict bird behavior.
- 10- You will learn to design pleasing images by mastering your camera’s AF system.
- 11- You will learn to choose the best perspective.
- 12- You will learn to see and control your backgrounds.
- 13- You will learn to see and understand the light.
- 14- You will learn to see and create pleasing blurs in pre-dawn situations.
- 15- You will learn to be ready for the most likely event.
And the best news is that you will be able to take everything you learn home with you so that you will be a better photographer wherever you are and whenever you photograph.
Typos
With all blog posts, feel free to e-mail or to leave a comment regarding any typos or errors.


What feather?
On the beach, on the left side of the frame.
with love, artie
Yes adds does not subtract. Glad your feeling well.
Love the feather.
+1 on the feather. It adds interest, narrative, and perspective (depth) to the image.
Thanks, all. The date was fixed by Jim. There have been some of those photos Ray, but I will look to have some more made on the DeSoto IPT next week.
with love, artie
Great image . Like the feather ,adds interaction to the image
Pics of your position/methods of getting low might be quite helpful
Great shot and demonstration that an image is almost always more appealing if you get on eye level with your subject.
You are so amazing Artie that you even manage to post images taken in the future!
Image #1 : Taken on “15 july 2022”???