What’s Up?
Jim and I left early on Tuesday morning for Stick Marsh and arrived at 6:15am. The forecast NE wind was replaced by a west wind. With clear skies, that is the kiss of death for bird photography. But it did not matter. I only saw four spoonbills, a few Anhingas, and a single Great Egret in flight. Even the vultures were not flying. It quickly became obvious that it was going to be a tough morning. I took a walk with the 200-600 G lens and came up with today’s two featured images.
Today is Wednesday 11 May 2022. The forecast for this morning at ILE is for sunny with an 8mph wind from the NW. In other words, pretty bad. I will likely head down to the lake just because. Wherever you are and whatever you are doing, I hope that you too have a great day. This blog post took about 90 minutes to prepare and makes sixty-one days in a row with a new one.
BAA will be announcing the publication of Warren Hatch’s Nikon Z9 Camera User’s Guide this week. Edited for clarity and readability by yours truly.
Please remember to use the B&H and Amazon links that are found on most blog pages and to use the BIRDSASART discount code at checkout when purchasing your new gear from Bedfords. Please, also, consider joining a BAA IPT. You will be amazed at how much you will learn!
|
|
|
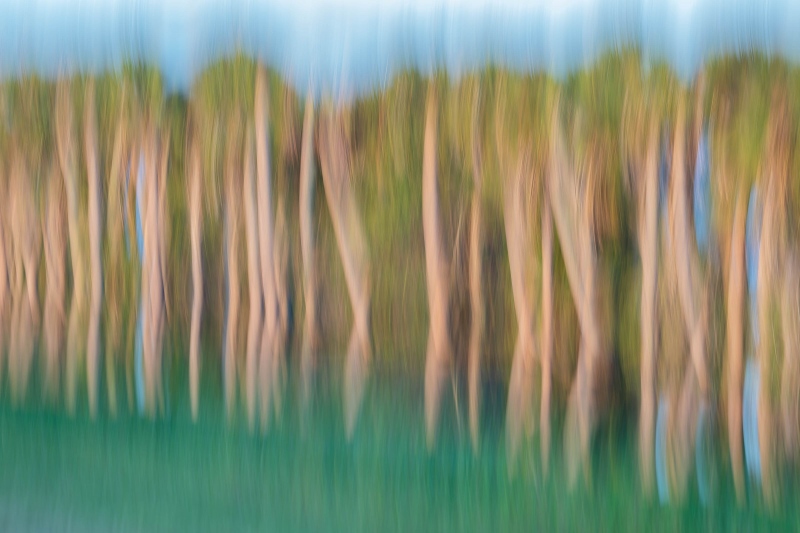
This image was created on 10 May 2022 at Stick Marsh, Fellsmere, FL. I used the hand held Sony FE 200-600mm f/5.6-6.3 G OSS lens (at 200mm) and The One, the Sony Alpha 1 Mirrorless digital camera. ) The exposure was determined using Zebra technology with ISO on the Thumb Dial. ISO 64: 1/8 second at f/8 (stopped down 2/3 stop) in Manual Mode. AWB at 6:56:26am on a clear morning. RawDigger showed the exposure to be dead-solid perfect. Tracking: Spot S and then locked focus by pressing and holding the AF-ON button. Be sure to click on the image to enjoy a high-res version. Image #1: Cabbage Palm stand: vertical pan blur
|
Why Pleasing Blurs?
1- Necessity is often the mother of design. When the light levels are so low that making sharp images would require ridiculous high ISOs, going the blur route is often the obvious (and only choice).
2- That was not the case with Image #2. But the strong vertical lines of the Cabbage Palms lining a canal caught my eye and the light levels were still low. The trick with images like this is the top-to-bottom framing. It is really difficult to judge when to press the shutter button so that you have a border of green on the bottom and a strip of sky at the top. So what’s the answer? Make lots of frames and replay the images occasionally to see how you are doing. I saw on the back of the camera that the framing for this one was perfect and it looked to me like a Monet X Picasso hybrid.
3- In many situations when the sun is shining and there is lots of light, sharp images of big flocks of birds have little appeal to me. Such images are often ruined by shadows. My answer is to add a 3- to 5-stop ND into the equation and create pleasing blurs.
4- Pleasing blurs that are well done can be quite artistic while implying a sense of motion. They often do quite well in international and other photo contests.
5- I have fun doing them and often love the results.
|
|
A Guide to Pleasing Blurs
Learn everything there is to know about creating pleasingly blurred images in A Guide to Pleasing Blurs by Denise Ippolito and yours truly. This 20,585-word, 271-page PDF is illustrated with 144 different, exciting, and artistic images. The guide covers the basics of creating pleasingly blurred images, the factors that influence the degree of blurring, the use of filters in creating pleasing blurs, and a great variety of both in-the-field and Photoshop techniques that can be used to create pleasingly blurred images.
Artie and Denise teach you many ways to move your lens during the exposure to create a variety of pleasingly blurred images of flowers and trees and water and landscapes. They will teach you to recognize situations where subject movement can be used to your advantage to create pan blurs, wind blurs, and moving water blurs. They will teach you to create zoom-blurs both in the field and during post-processing. Artie shares the techniques that he has used and developed for making blurred images of flocks of geese in flight at his (formerly) beloved Bosque del Apache and Denise shares her flower blur magic as well as a variety of creative Photoshop techniques that she has developed.
With the advent of digital capture creating blurred images has become a great and inexpensive way to go out with your camera and have fun, especially when there is not much light. And while many folks think that making successful blurred images is the result of being a sloppy photographer, nothing could be further from the truth. In “A Guide to Pleasing Blurs” Artie and Denise will help you to unleash your creative self.
|
|
|
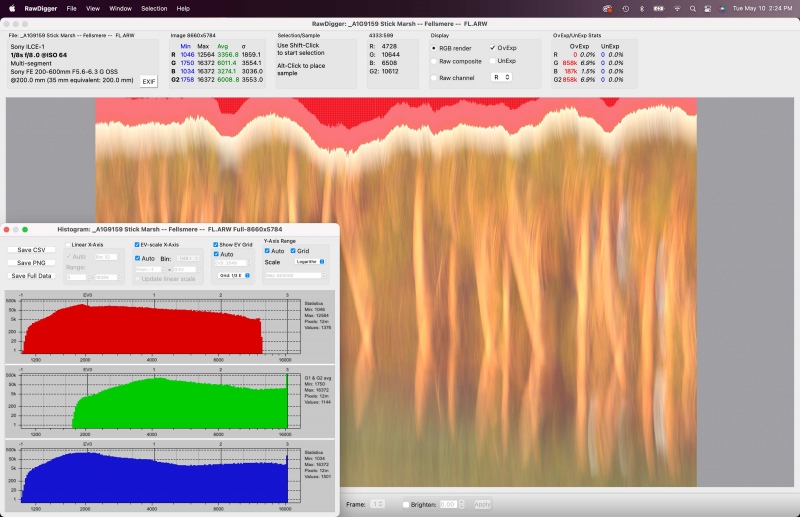
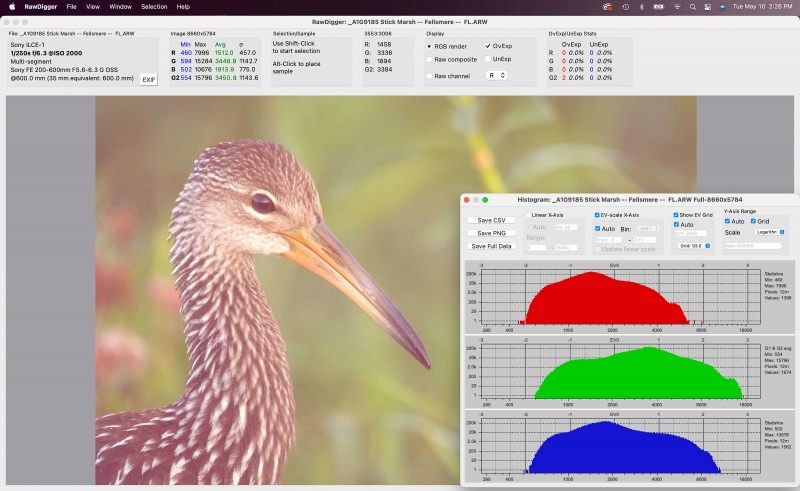
Click on the image to better read the fine print. Image #1A: RawDigger screen capture for the Cabbage Palm stand: vertical pan blur image
|
Can an Image with 1,903,000 OverExposed Pixels be a Perfect Exposure?
In a word, yes. There are many instances where you need to completely blow out the sky to avoid under-exposing the subject, be it a row of trees (as above) or a dark-toned bird in flight or perched against a light sky. The key to exposure success here was to adjust the exposure parameters so that I had a few Zebras on the light-toned trunks of the cabbage palms (and forget about the over-exposed sky). RawDigger rocks. See more below.
|
|
|
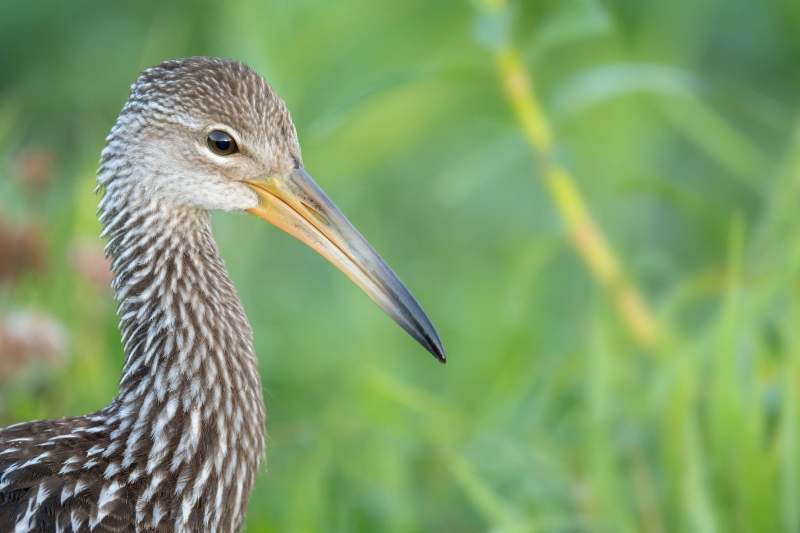
This image was also created on 10 May 2022 at Stick Marsh, Fellsmere, FL. Seated on the damp grass, I used the knee-pod technique with the handheld Sony FE 200-600mm f/5.6-6.3 G OSS lens (at 600mm) and The One, the Sony Alpha 1 Mirrorless digital camera. ) The exposure was determined using Zebra technology with ISO on the Thumb Dial. ISO 2000: 1/250 second at f/6.3 (wide open) in Manual Mode. AWB at 7:03:23am in the shade of a raised roadway on a clear morning. RawDigger showed the exposure to be dead-solid perfect. Tracking: Spot S AF-C with Bird Face//Eye Detection performed perfectly. Be sure to click on the image to enjoy a high-res version. Image #2: Limpkin recently-fledged juvenile
|
Getting the Right Exposure with Sony
It is so easy that it is almost funny. You set the aperture — with the 200-600 that is almost always f/6.3. Then you set the shutter speed. Knowing that I would be trying for a head portrait at 600mm, I went with 1/250 sec. I could have pushed that to 1/125 as I was using the knee pod technique. But Topaz DeNoise is so effective at ISO 2000 that it really did not matter. Once you have set the aperture and the shutter speed you raise the shutter speed with the thumb dial. When you start to see Zebras on the highlights — in this case the whitish chin and feather centers, you know that you have a perfect exposure (as long as you have your camera set up correctly). It’s that simple — dial up the ISO till you see and few blinkies and you are good to go. Perfect exposures every time with little effort.
The Limpkin Family
I had seen the Limpkin family with four large young on my previous visit to Stick Marsh. I found them early on Tuesday along the edge of a canal. Thought they were tame, they were not cooperative subjects. I was lucky to have this juvenile stand still in the marsh grasses for a few seconds. Topaz DeNoise is so effective that I have no concerns while raising the ISO to get perfect exposures. The combination of Zebra’s and RawDigger has made my exposure life a lot easier.
|
|
|
Click on the image to better read the fine print. Image #2A: RawDigger screen capture for the Limpkin recently-fledged juvenile image
|
RawDigger
It would be impossible to over-state how much I have learned by studying RawDigger and how much better my exposures have become since I started with the program almost two years ago. The raw file brightness for Image #2 is dead solid perfect with the G channel just inside the 16000 line. The 2 OvExp pixels out of 51,000,000 are not exactly going to hurt the image. In other words, the raw file brightness is perfect.
RawDigger — not for the faint of heart …
Nothing has ever helped me learn to create perfect exposures to the degree that RawDigger has. I think that many folks are reluctant to learn that most of their images are underexposed by one or more full stops and that highlight warnings in Photoshop, Lightroom, Capture One, and your in-camera histogram are bogus as they are based on the embedded JPEGs. Only your raw files tell the truth all the time. Heck, I resisted RawDigger for several years … Once you get over that feeling, RawDigger can become your very best exposure friend no matter what system you are using. On the recent IPTs and In-the-Field sessions, we have demonstrated that fact. Convincingly.
The RawDigger (pink) Adapted Histogram
In the RawDigger e-Guide, you will learn exactly how to set up the Adapted “pink” RawDigger Histogram and how to use it to quickly and easily evaluate the exposure or raw file brightness of images from all digital cameras currently in use. RawDigger was especially helpful to me as I have struggled with R5 exposures and learned my new camera body, the Sony Alpha a1.
|
|
RawDigger e-Guide with Two Videos |
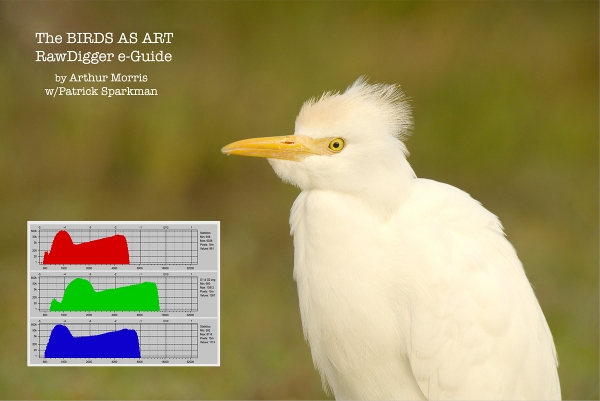
The RawDigger e-Guide with Two Videos
by Arthur Morris with Patrick Sparkman
The RawDigger e-Guide was created only for serious photographers who wish to get the absolute most out of their raw files.
Patrick and I began work on the guide in July 2020. At first, we struggled. We asked questions. We learned about Max-G values. We puzzled as to why the Max G values for different cameras were different. IPT veteran Bart Deamer asked lots of questions that we could not answer. We got help from RawDigger creator Iliah Borg. We learned. In December, Patrick came up with an Adapted Histogram that allows us to evaluate the exposures and raw file brightness for all images created with all digital camera bodies from the last two decades. What we learned each time prompted three complete beginning to end re-writes.
The point of the guide is to teach you to truly expose to the mega-Expose-to-the-Right so that you will minimize noise, maximize image quality, best utilize your camera’s dynamic range, and attain the highest possible level of shadow detail in your RAW files in every situation. In addition, your properly exposed RAW files will contain more tonal information and feature the smoothest possible transitions between tones. And your optimized images will feature rich, accurate color.
We teach you why the GREEN channel is almost always the first to over-expose. We save you money by advising you which version of RawDigger you need. We teach you how to interpret the Max G values for your Canon, Nikon, and SONY camera bodies. It is very likely that the Shock-your-World section will shock you. And lastly — thanks to the technical and practical brilliance of Patrick Sparkman — we teach you a simple way to evaluate your exposures and the raw file brightness quickly and easily the Adapted RawDigger histogram.
The flower video takes you through a session where artie edits a folder of images in Capture One while checking the exposures and Max-G values in RawDigger. The Adapted Histogram video examines a series of recent images with the pink histograms and covers lots of fine points including and especially how to deal with specular highlights. The directions for setting up the Adapted Histogram are in the text.
If we priced this guide based on how much effort we put into it, it would sell it for $999.00. But as this guide will be purchased only by a limited number of serious photographers, we have priced it at $51.00. You can order yours here in the BAA Online Store.
|
|
|
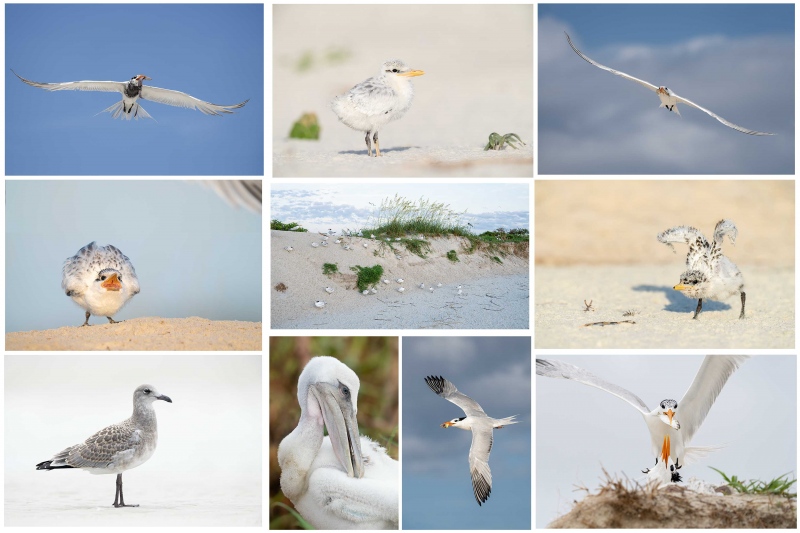
Click on the composite image to enjoy the incredible quality of the hi-res JPEG. Clockwise from upper left clockwise and back around to the center: Royal Tern in flight with squid for chick; Royal Tern chick on beach; Royal Tern in flight with shrimp for young; Royal Tern chick — double overhead wing stretch; Royal Tern landing with greenback for chick; Royal Tern in flight with juvenile mahi mahi for chick; Brown Pelican — large chick preening; Laughing Gull in fresh juvenal plumage; Royal Tern chick begging; Many Royal Terns with many chicks on face of dune. |
Jacksonville IPT: #1: 4 FULL DAYS — the afternoon of 16 June thru the morning of MON 20 June 2022: $2,099.00. (Limit 6 photographers)
Jacksonville IPT #2: the afternoon of FRI 1 JULY thru the morning of TUES 5 July 2022: $2099.00 (Limit 6 photographers)
Jacksonville IPT #3: the afternoon of FRI 15 JULY thru the morning of TUES 19 July 2022: $2099.00 (Limit 6 photographers)
Ride with me: add $200.00. I do not like to disappoint: each trip will run with one participant. If necessary.
I first visited the breeding bird colony at Jacksonville in late June 2021. I was astounded. There were many thousands of pairs of Royal Terns nesting along with about 10,000 pairs of Laughing Gulls. In addition to the royals, there were some Sandwich Terns nesting. And there are several dozen pairs of Brown Pelicans nesting on the ground. Flight photography was non-stop astounding. And photographing the tern chicks was relatively easy. Folks could do the whole trip with the Sony 200-600, the Canon 100-500 RF, or the Nikon 500 PF or 200-500 VR. With a TC in your pocket for use on sunny days. Most of the action is within 100 yards of where we park (on the beach). As with all bird photography, there are times when a super-telephoto lens with either TC is the best tool for the job.
Morning sessions will average about three hours, afternoon sessions about 1 1/2 hours. On cloudy mornings with favorable winds, we may opt to stay out for one long session and skip the afternoon, especially when the afternoon forecast is poor. Lunch is included on the first three days of the IPT and will be served at my AirBnB. After the first lunch there will be an introductory program. On days two and three we will do image review and Photoshop after lunch.
We will be based somewhere west and a bit north of Jacksonville where there are many AirBnB possibilities. The deposit is $599.00. Call Jim at the office any weekday at 863-692-0906 to pay by credit card. Balances must be paid by check.
What You Will Learn on a Jacksonville IPT
- 1- First and foremast you will learn to become a better flight photographer. Much better.
- 2-You will learn the basics and fine points of digital exposure. Nikon and Canon folks will learn to get the right exposure every time after making a single test exposure, and SONY folks will learn to use Zebras so that they can be sure of making excellent exposures before pressing the shutter button.
- 3- You will learn to work in Manual exposure mode even if you fear it.
- 4- You will learn to evaluate wind and sky conditions and understand how they affect bird photography, especially the photography of birds in flight.
- 5- You will learn several pro secrets (for each system) that will help you to become a better flight photographer.
- 6- You will learn to zoom out in advance (because the birds are so close!) 🙂
- 7- You will learn how to approach free and wild birds without disturbing them.
- 8- You will learn to spot the good and the great situations.
- 9- You will learn to understand and predict bird behavior.
- 10- You will learn to design pleasing images by mastering your camera’s AF system.
- 11- You will learn to choose the best perspective.
- 12- You will learn to see and control your backgrounds.
- 13- You will learn to see and understand the light.
- 14- You will learn to see and create pleasing blurs in pre-dawn situations.
- 15- You will learn to be ready for the most likely event.
And the best news is that you will be able to take everything you learn home with you so that you will be a better photographer wherever you are and whenever you photograph.
Typos
With all blog posts, feel free to e-mail or to leave a comment regarding any typos or errors.



Ditto, you know I absolutely hate blurs and refuse to take them, but I like this image!
Well, considering I do not like blurs, even your “pleasing blurs” normally, I do quite like image 1!!
Go figure 🙂
a