What’s Up?
The forecast for Monday morning had been for clear skies with a breeze from the west, bad for bird photography. The reality was that it was totally sunny at 7:00am with no wind at all. By 7:15, a breeze from the south/southeast had developed — excellent for bird photography. I spent most of an hour trying to get in position to make some good images of a of three large almost-flying Limpkin chicks. They did not make it easy for me as they foraged first on one side of the pier and then on the other. I surprised myself by creating a small number of very nice images.
Kudos to the New York Rangers who came from a three games to one deficit to eliminate Sidney Crosby and the Pittsburg Penguins from the Stanley Cup Playoffs in overtime of Game 7. And good riddance to the Phoenix Suns, the alleged “best team in the NBA.” The Suns were vanquished by the Dallas Mavericks who also overcame a three games to one deficit and prevailed in Game 7. The Mavs were led by the incomparable Slovenian, Luka Dončić. Did I mention that the final score was 123-90? The truth is that it was not really that close!
Two things on today’s content:
1- Even if you do not like blurs, the Photoshop techniques detailed below will enable you to improve your photography.
2- Digital Basics II will teach you how to use the Photoshop Tools efficiently and outline the techniques that I have used and developed over the past two decades. As I did twice below with today’s featured image, there will be many times when you solve image optimization problems by coming up with new ways to use the tools, by inventing new techniques. DB II will teach you the basics so that you are well-equipped to bring your Photoshop game to new levels.
Today is Tuesday 17 May 2022. The forecast for ILE for this morning is calling for sunny skies with a soft breeze from the NNW. I will be heading down to the lake early as usual. Wherever you are and whatever you are doing, I hope that you too have a great day. This blog post took about 90 minutes to prepare and makes sixty-seven days in a row with a new one.
Please remember to use the B&H and Amazon links that are found on most blog pages and to use the BIRDSASART discount code at checkout when purchasing your new gear from Bedfords. Please, also, consider joining a BAA IPT. You will be amazed at how much you will learn!
BIRDS AS ART Image Optimization Service (BAA IOS)
Send a PayPal for $62.00 to birdsasart@verizon.net or call Jim at 863-692-0906 and put $62.00 on your credit card. Pick one of your best images and upload the raw file using a large file sending service like Hightail or DropBox and then send me the link via e-mail. I will download and save your raw file, evaluate the exposure and sharpness, and optimize the image as if it were my own after converting the raw file in Adobe Camera Raw. Best of all, I will make a screen recording of the entire process and send you a link to the video to download, save and study.
|
|
|
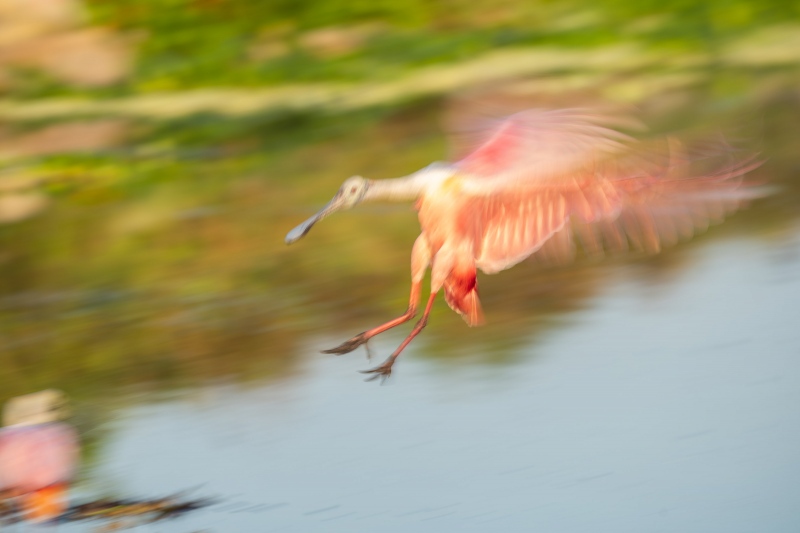
This image was created on 5 May 2022 at Stick Marsh in Fellsmere, FL. I used the hand held Sony FE 200-600mm f/5.6-6.3 G OSS lens (at 422mm) and The One, the Sony Alpha 1 Mirrorless digital camera. ) The exposure was determined using Zebra technology with ISO on the Thumb Dial. ISO 50: 1/30 second at f/8 (stopped down 2/3 stop) in Manual Mode. AWB at 8:02:35am in the shade of a shelter on a clear morning. RawDigger showed the exposure to be a bit beyond perfect, i.e., the brightest WHITEs were over-exposed. Tracking: Zone AF-C with Bird/Eye-Face Detection enabled. Be sure to click on the image to enjoy the high-res version. Image #1: the original for the Roseate Spoonbill incoming blur image
|
What are the Big Problems With This Image?
- 1- The WHITEs on the upper back of the spoonbill are seriously over-exposed.
- 2- The extra bird and the black squiggles in the lower left corner are distracting at best.
- 3- I don’t care for the pink blur above the inner portion of the far wing.
- 4- The vegetation and the the rock jetty make for a butt-ugly background.
- 5- The eye of the incoming bird could be a lot sharper.
I did, however, love the framing and the degree of blurring and decided to address each of the problems above in Photoshop. The raw file was converted twice. See below for a description of what I did to create the digital painting below.
|
|
|
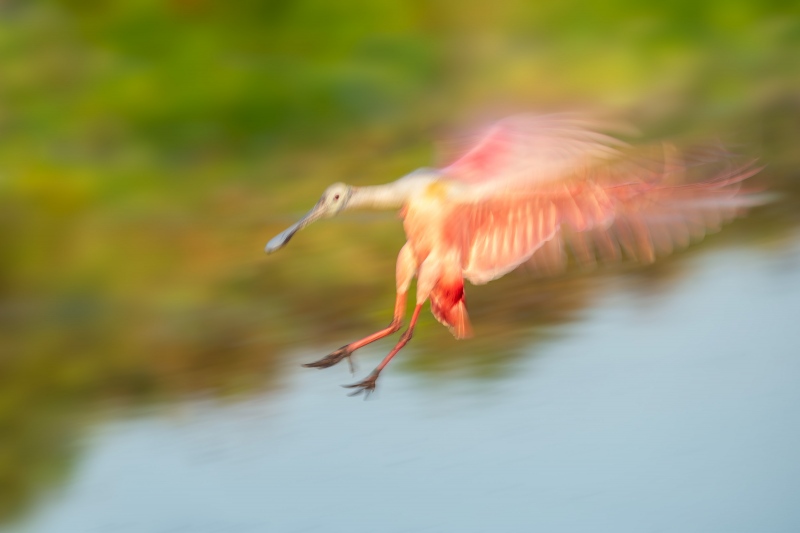
This image was created on 5 May 2022 at Stick Marsh in Fellsmere, FL. I used the hand held Sony FE 200-600mm f/5.6-6.3 G OSS lens (at 422mm) and The One, the Sony Alpha 1 Mirrorless digital camera. ) The exposure was determined using Zebra technology with ISO on the Thumb Dial. ISO 50: 1/30 second at f/8 (stopped down 2/3 stop) in Manual Mode. AWB at 8:02:35am iii the shade of a shelter on a clear morning. RawDigger showed the exposure to be a bit beyond perfect. i.e., the brightest WHITEs were over-exposed. Tracking: Zone AF-C with Bird/Eye-Face Detection enabled. Be sure to click on the image to enjoy the high-res version. Image #1A: the digital creation: Roseate Spoonbill incoming blur
|
Creating the Digital Painting
1- With the WHITEs on the upper back of the spoonbill seriously over-exposed (to the tune of 50,000 OvExp pixels), I used a new technique that I have been working on to restore detail to the over-exposed highlights. It worked to perfection. Folks who own the Saving the Whites Video are invited to send proof of purchase via e-mail to receive a short tutorial via e-mail detailing this new technique.
2- To begin, the lower left corner was cleaned up with a small crop from the left and from below. Then I used the Clone Stamp Tool (a rarity for me) at 10% Hardness. Lastly, the look of this area was improved when I ran a 65-pixel Gaussian blur on the whole image as detailed below.
3- I eliminated the pink blur above the inner portion of the far wing using the Patch Tool and then cleaned up the edge up with the Clone Stamp Tool (sized to 400 px) set at 50% Hardness.
4- To begin the cleanup of the vegetation and the rock jetty background, I used the Patch Tool, Content-Aware Fill, and again, the Clone Stamp Tool at 10% Hardness. Next, I applied a 65-pixel Gaussian Blur to the whole image, added a Hide-All (Black or Inverse) Layer Mask, and painted in the effect with a white brush — shortcut B, D. Lastly, I made sure to eliminate any spill-over blur from the bird by hitting X and painting the edges of the bird with a small, relatively hard (50%), black brush — shortcut B, D, X.
5- I tried a brand-new Eye Doctor technique: I painted a Quick Mask of a spoonbill eye from a sharp image, moved it into place on the blurred image, and simply reduced the Opacity of the eye layer to 50%. It worked like the proverbial charm.
|
|
The BIRDS AS ART Current Workflow e-Guide (Digital Basics II).You can order your copy from the BAA Online Store here, by sending a PayPal for $40 here, or by calling Jim or Jennifer weekdays at 863-692-0906 with your credit card in hand. Be sure to specify Digital Basics II. |
The BIRDS AS ART Current Workflow e-Guide (Digital Basics II)
The techniques mentioned above (except for the two new ones) and tons more great Photoshop tips and techniques — along with all of my personalized Keyboard Shortcuts — are covered in detail in the BIRDS AS ART Current Workflow e-Guide (Digital Basics II), an instructional PDF that is sent via e-mail. Learn more and check out the free excerpt in the blog post here. While the new e-Guide reflects my MacBook Pro/Photo Mechanic/DPP 4/Photoshop workflow, folks using a PC and/or BreezeBrowser will also benefit greatly by studying the material on DB II. Note: folks working on a PC and/or those who do not want to miss anything Photoshop may wish to purchase the original Digital Basics along with DB II while saving $15 by clicking here to buy the DB Bundle.
Folks who learn well by following along rather than by reading can check out the complete collection of MP 4 Photoshop Tutorial Videos by clicking here. Note: of the videos are now priced at an amazingly low $5.00 each.
You can learn how and why I converted all of my Canon digital RAW files in DPP 4 in the DPP 4 RAW Conversion Guide here. More recently, I became proficient at converting my Nikon RAW (NEF) files in Adobe Camera Raw. About three years ago I began converting my Nikon and Sony RAW files in Capture One and did that for two years. You can learn more about Capture One in the Capture One Pro 12 Simplified MP4 Video here. The next step would be to get a copy of Arash Hazeghi’s “The Nikon Photographers’ Guide to Phase One Capture One Pro e-Guide” in the blog post here.
You can learn advanced Quick Masking and advanced Layer Masking techniques in APTATS I & II. You can save $15 by purchasing the pair.
Typos
With all blog posts, feel free to e-mail or to leave a comment regarding any typos or errors.


Is there a reason for not underexposing when converting the file?
If you under-expose using the Exposure or Brightness slider, then the rest of the image is too dark and becomes noisy. Not to mention that if the WHITEs are toasted, which they were badly in this image (255, 255, 255), reducing the exposure will not bring up the detail. There is none. I did the Saving the Whites video to help as much as possible in those situations. Then, I discovered the new trick that I talked about above.
with love, artie
No comment!