What’s Up?
Wednesday morning seemed slow, but I created more than 1000 images. Those included today’s featured image, so it could not have been that bad. Two out of three of the young Ospreys in the low pole nest just left of the pier are now flying. And I am betting that the third one will be flying soon as it was flapping above the nest for 20 minutes as I fired away.
Today is Thursday 2 June 2022. The forecast for this morning is again for mostly sunny skies with a breeze from the ENE. I will be heading early to Lake Kissimmee for a session on Clemens Van der Werf’s Flats boat. Wherever you are and whatever you are doing, I hope that you too have a great day. This blog post took about an hour to prepare and makes seventy-nine days in a row with a new one.
Please remember to use the B&H and Amazon links that are found on most blog pages and to use the BIRDSASART discount code at checkout when purchasing your new gear from Bedfords. Please, also, consider joining a BAA IPT. You will be amazed at how much you will learn! Shoot me an e-mail for Jackson IPT#1 late registration details.
Induro GIT 304L Price Drop
Amazingly, we have two, brand-new-in-the-box Induro GIT 304L tripods in stock. They are $749.00 (was $799.00) and now includes the shipping to lower 48 states. Weekday phone orders only: 863-692-0906.
Wanted to Buy
If you have any Canon Series III teleconverters (the 1.4X III or the 2X III) that you’d like to get rid of, please shoot me an e-mail if you are interested in turning them into cash. I have an interested buyer.
BIRDS AS ART Image Optimization Service (BAA IOS)
Send a PayPal for $62.00 to birdsasart@verizon.net or call Jim at 863-692-0906 and put $62.00 on your credit card. Pick one of your best images and upload the raw file using a large file sending service like Hightail or DropBox and then send me the link via e-mail. I will download and save your raw file, evaluate the exposure and sharpness, and optimize the image as if it were my own after converting the raw file in Adobe Camera Raw. Best of all, I will make a screen recording of the entire process and send you a link to the video to download, save and study.
|
|
|
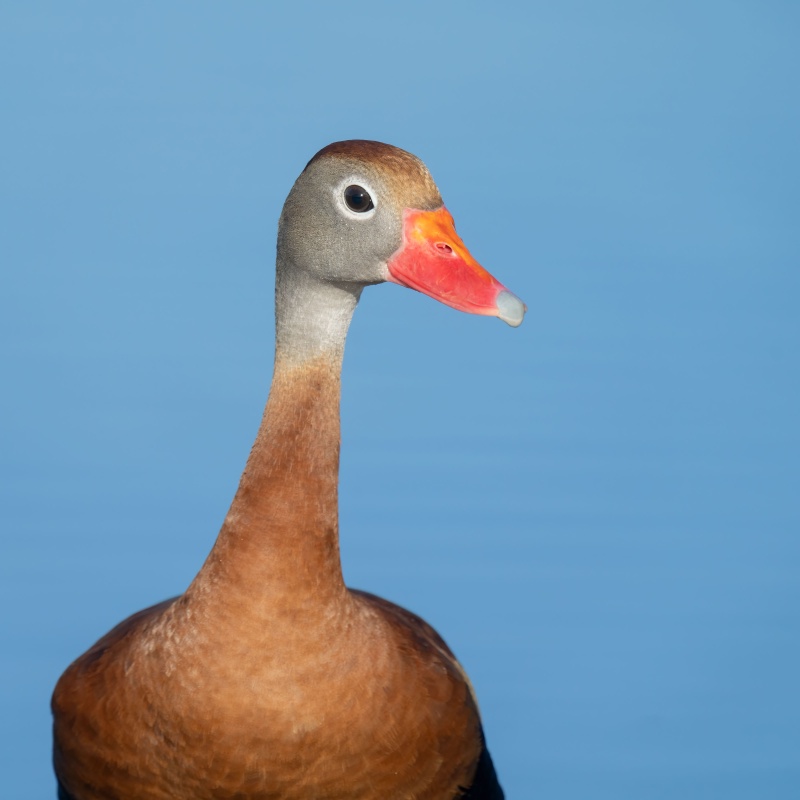
This image was created on 1 June 2022 down by the lake near my home at Indian Lake Estates, FL. Standing at full height, I used the no-longer available Induro GIT304L Stealth Carbon Fiber Tripod/Levered-Clamp FlexShooter Pro-mounted-Sony FE 600mm f/4 GM OSS lens, the Sony FE 2.0x Teleconverter, and The One, the Sony Alpha 1 Mirrorless Digital Camera). The exposure was determined via Zebra technology with ISO on the Thumb Dial. ISO 800. 1/1000 sec. at f/8 (wide open) in Manual mode. When evaluated in RawDigger, the raw file brightness was determined to be dead-solid perfect. AWB at 7:57:11am on sunny morning. Tracking: Spot S AF-C with Bird Face/Eye detection enabled performed to perfection. Be sure to click on the image to enjoy a high-res version. Image #1: Black-bellied Whistling Duck — square crop |
Black-bellied Whistling Luck!
There was a Snowy Egret and a Tricolored Heron hunting just to the left of the pier, so I grabbed the big lens with the 2X and got into position near the shore. A pair of Black-bellied Whistling Ducks (BBWDs) landed well to the left. Then some Limpkin walked by several times, and pair of Mottled Ducks landed right down sun angle. The BBWDs swam slowly right at me. That led to my favorite image of the morning.
|
|
|
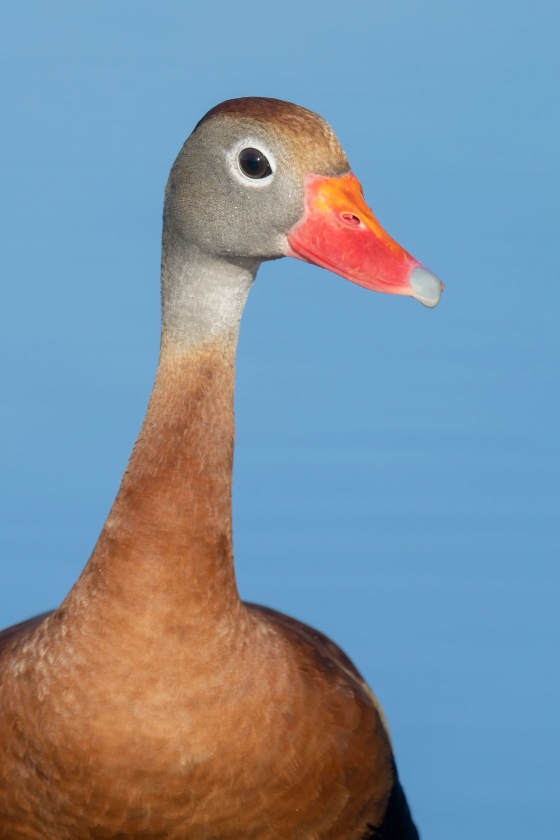
This is a different crop of the image above. Image #1A: Black-bellied Whistling Duck — tight vertical crop |
Square or Vertical???
Which crop do you prefer, the perfect square crop with Image #1, or the higher vertical crop — Image #2? If you leave a comment, please let us know why you made your choice.
Perspective Question
If I was standing at full height behind my tripod, why does it seem that I was much lower?
|
|
|
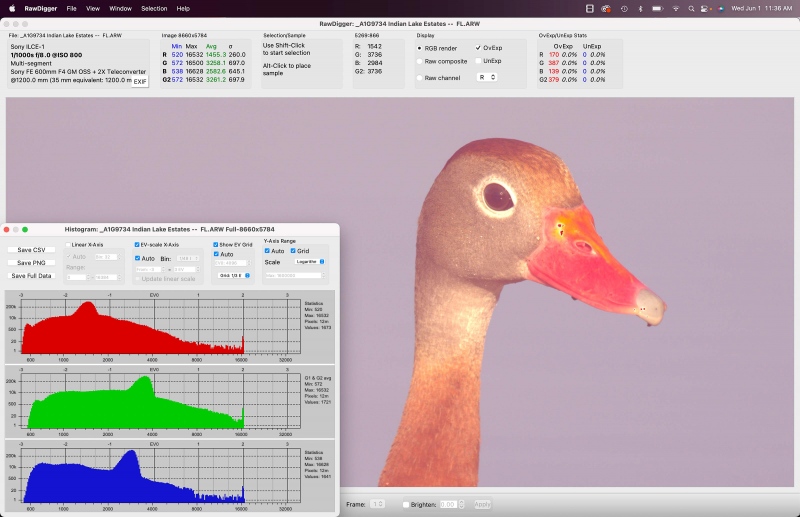
Click on the screen capture to better read the small print. Image #1C: RawDigger screen capture for the Black-bellied Whistling Duck image |
Ho Hum, Another Perfect Exposure
Note that all the 1075 OvExp pixels are in the specular highlights. They are profited by the red OvExp warnings on the upper base and the tip of the bill. You never want to expose so that specular highlights do not show as over-exposed. If you do that, the image will be grossly under-exposed with tons of noise and muddy colors. Thus, the exposure for today’s featured image is dead solid perfect with data in all three channels going right up to the 16000 line.
What can I say? The combination of Zebras live in the viewfinder (with your Sony a1 properly set up) and post-capture study of the raw files in RawDigger makes it pretty much child’s play to come up with perfect exposure after perfect exposure. It would be impossible to overstate how much I have learned by studying RawDigger and how much better my exposures have become since I started with the program almost two years ago. The raw file brightness for today’s featured image is perfect with the G channel almost making the 16000 line. In other words, the raw file brightness is perfect.
RawDigger — not for the faint of heart …
Nothing has ever helped me learn to create perfect exposures to the degree that RawDigger has. I think that many folks are reluctant to learn that most of their images are underexposed by one or more full stops and that highlight warnings in Photoshop, Lightroom, Capture One, and your in-camera histogram are bogus as they are based on the embedded JPEGs. Only your raw files tell the truth all the time. Heck, I resisted RawDigger for several years … Once you get over that feeling, RawDigger can become your very best exposure friend no matter what system you are using. On the recent IPTs and In-the-Field sessions, we have demonstrated that fact. Convincingly.
The RawDigger Adapted (pink) Histogram
In the RawDigger e-Guide, you will learn exactly how to set up the Adapted “pink” RawDigger Histogram and how to use it to quickly and easily evaluate the exposure or raw file brightness of images from all digital cameras currently in use. RawDigger was especially helpful to me as I have struggled with R5 exposures and learned my new camera body, the Sony Alpha a1.
|
|
RawDigger e-Guide with Two Videos |
The RawDigger e-Guide with Two Videos
by Arthur Morris with Patrick Sparkman
The RawDigger e-Guide was created only for serious photographers who wish to get the absolute most out of their raw files.
Patrick and I began work on the guide in July 2020. At first, we struggled. We asked questions. We learned about Max-G values. We puzzled as to why the Max G values for different cameras were different. IPT veteran Bart Deamer asked lots of questions that we could not answer. We got help from RawDigger creator Iliah Borg. We learned. In December, Patrick came up with an Adapted Histogram that allows us to evaluate the exposures and raw file brightness for all images created with all digital camera bodies from the last two decades. What we learned each time prompted three complete beginning to end re-writes.
The point of the guide is to teach you to truly expose to the mega-Expose-to-the-Right so that you will minimize noise, maximize image quality, best utilize your camera’s dynamic range, and attain the highest possible level of shadow detail in your RAW files in every situation. In addition, your properly exposed RAW files will contain more tonal information and feature the smoothest possible transitions between tones. And your optimized images will feature rich, accurate color.
We teach you why the GREEN channel is almost always the first to over-expose. We save you money by advising you which version of RawDigger you need. We teach you how to interpret the Max G values for your Canon, Nikon, and SONY camera bodies. It is very likely that the Shock-your-World section will shock you. And lastly — thanks to the technical and practical brilliance of Patrick Sparkman — we teach you a simple way to evaluate your exposures and the raw file brightness quickly and easily the Adapted RawDigger histogram.
The flower video takes you through a session where artie edits a folder of images in Capture One while checking the exposures and Max-G values in RawDigger. The Adapted Histogram video examines a series of recent images with the pink histograms and covers lots of fine points including and especially how to deal with specular highlights. The directions for setting up the Adapted Histogram are in the text.
If we priced this guide based on how much effort we put into it, it would sell it for $999.00. But as this guide will be purchased only by a limited number of serious photographers, we have priced it at $51.00. You can order yours here in the BAA Online Store.
|
|
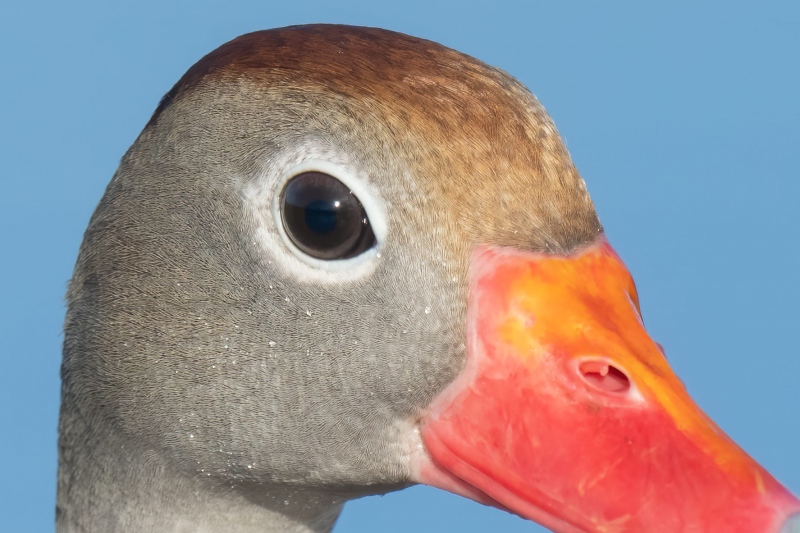
Image #1D: Unsharpened tight face crop of the Black-bellied Whistling Duck image |
Amazing FFD!
Click on the screen capture to view the high-resolution JPEG and note the incredible fine feather detail (FFD). It really is hard to believe that this image was created at 1200mm.
|
|
|
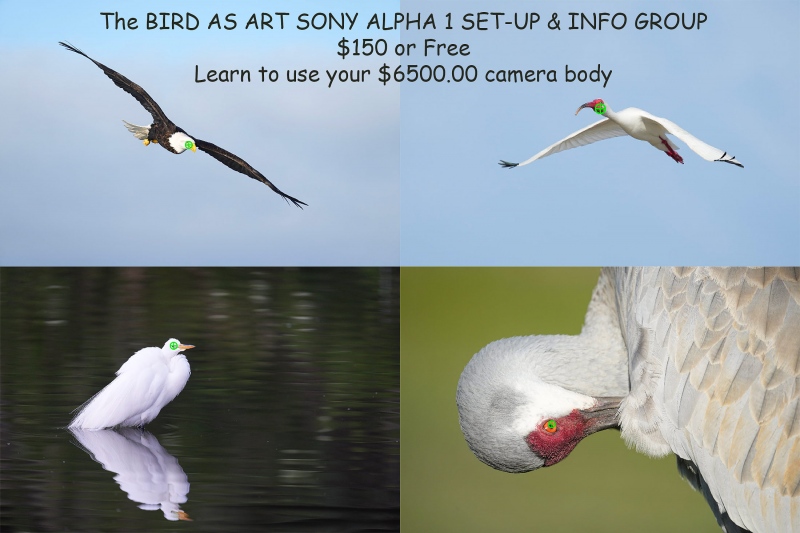
Click on the image to better see the green eye-AF boxes in action. Sony Alpha 1 Flight Photography AF Points! |
The SONY Alpha a1 Set-up Guide and Info Group: $150.00 (or Free)
The SONY Alpha a1 Set-up Guide and Info Group is going great guns as more and more folks chime in with thoughtful questions and experience-based answers. As the a1 is becoming more readily available, more and more folks are getting their hands on this amazing body. By June 1, 2022, the group was up to an astounding 123 lucky and blessed folks. Early on, we discussed the myriad AF options. I gave my opinion as to the best one for flight and general bird photography. The best news is that everyone in the group receives an e-mail that includes a .DAT file with my a1 settings on it, and explicit directions on how to load my settings onto your a1; talk about convenience! I am now offering a .DAT file compatible with firmware update 1.20. Your entry into the group includes a consolidated Sony a1 CAMSETA2 INFO & GUIDE. New a1 folks will now receive four e-mails instead of the previous 28! You will see new e-mails as they are published. Simply put, this e-mail guide is an incredible resource for anyone with an a1.
All who purchased their Alpha 1 bodies via a BAA affiliate link — B&H or Bedfords — will receive a free Sony Alpha a1 Set-Up Guide and free entry into the Info Updates group after shooting me their receipts via e-mail. (Note: it may take me several days to confirm B&H orders.). Others can purchase their guide here in the BAA Online Store.
Typos
With all blog posts, feel free to e-mail or to leave a comment regarding any typos or errors.



I prefer the vertical crop. I find the head of the whistling duck absolutely endearing, in both of
the images. However, the chest itself, although pretty much necessary, doesn’t add much. So
having it emphasized a bit less in the vertical makes the overall image more appealing to me.
Is there a looser crop that shows the black belly at all? The lower border of the image falls in a funny spot since it seems to cut through the brown of the chest. If it were able to fall below the brown of the chest, it may make a more complete image of this bird as it would clearly show its namesake.
Thanks, Ryan. Not in this series. The sucker walked right at me.
with love, artie
I prefer the square crop although both images are really nice.
Prefer square crop, more of the duck body is visible
I much prefer the vertical as well. It makes the duck look tall and commanding, while the square makes the duck look squished down and thin-necked as if a wide angle lens were used.
Because you were so far from the duck (at 1200 mm), standing photographer and duck appeared eye level with each other.
I prefer the square crop. In the narrow vertical crop the bird looks confined. Perhaps something in between also would work?
I much prefer the vertical crop — it gives the impression of the bird moving into the frame. In the horizonatal crop, the squared off look of the bird’s body, on the left side of the frame, looks unnatural.
Wow! What a beauty… we don’t get these in the UK of course. What we did see this morning was a black-necked Grebe with red eyes. Quite a rarity here.