July 4th Weekend in Central Florida
If you live or will be in Central Florida (or anywhere near Duval county) on the long July 4th weekend and would like to explore the possibility of doing some amazing photography with me on a shared-cost basis, please get in touch with me immediately via e-mail.
What’s Up?
Every day that I head down to the lake I see or learn something new — often both. I’ve seen Purple Gallinule in the marsh almost every day. I’ve seen the young Ospreys in fresh juvenal plumage dive off the pier railings into the lake and come up empty every time. On Thursday morning, I saw one on a power pole with a large, fresh-caught fish. I’ve been seeing a hen Mottled Duck with two tiny ducklings. I’ve studied the patterns of the roosting young Anhingas and the fishing adult green herons on the short pilings. I’ve tried a variety of lighting situations with both species. I’ve worked on my early morning silhouette images made from the pier. And I’ve learned that when the adult Limpkins grab a big snail, they will extract the meat and feed it to their now large chicks while standing in the water. But when the adults and the young are foraging on their own, they will walk to nearest vegetation, place the prey item on a leaf or the stalks in the center of the plants, and work it then to avoid dropping their meal in the water. In many but not all these cases, the additional knowledge leads to better images.
I was glad to learn that the sale of Sandra Calderbank’s Canon Flash/Battery/Macro 30-item Package is now pending.
Be sure to check out Images #1, 1A, 1B, and 1C as there is a ton to learn in today’s post.
Today is Friday 24 June. The forecast was for clear skies with a SW breeze, so I tried something new. More on that tomorrow. Wherever you are and whatever you are doing, I hope that you too have a great day. This blog post took more than two hours to prepare and makes ninety-eight days in a row with a new one.
Please remember to use the B&H and Amazon links that are found on most blog pages and to use the BIRDSASART discount code at checkout when purchasing your new gear from Bedfords to get 3% back on your credit card and enjoy free second-day air FedEx. Please, also, consider joining a BAA IPT. You will be amazed at how much you will learn!
BIRDS AS ART Image Optimization Service (BAA IOS)
Send a PayPal for $62.00 to birdsasart@verizon.net or call Jim at 863-692-0906 and put $62.00 on your credit card. Pick one of your best images and upload the raw file using a large file sending service like Hightail or DropBox and then send me the link via e-mail. I will download and save your raw file, evaluate the exposure and sharpness, and optimize the image as if it were my own after converting the raw file in Adobe Camera Raw. Best of all, I will make a screen recording of the entire process and send you a link to the video to download, save and study.
Induro GIT 304L Price Drop
Amazingly, we have two, brand-new-in-the-box Induro GIT 304L tripods in stock. They are $699.00 each (were $799.00) and the price now includes the insured ground shipping to the lower 48 states. Weekday phone orders only: 863-692-0906.
|
|
|
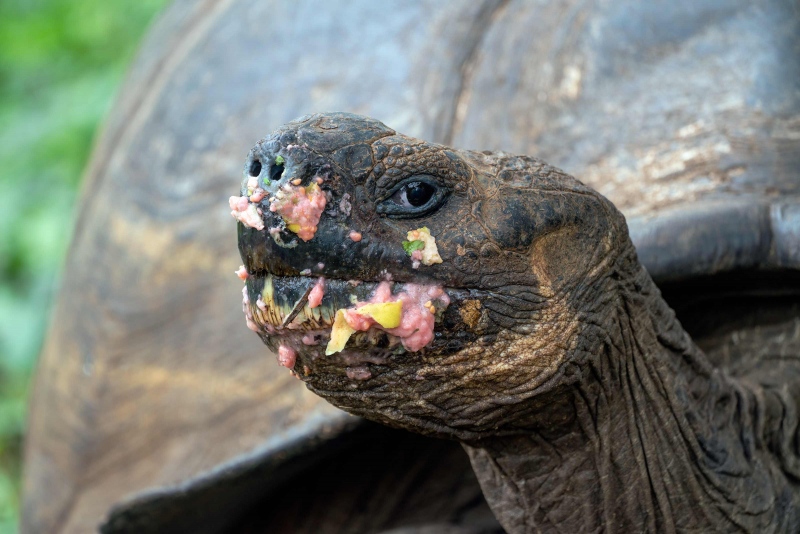
This image was created in the Highlands of Puerto Ayora, Santa Cruz, Galapagos. I used the Induro GIT-204L/Levered-clamp FlexShooter Pro-mounted Sony FE 100-400mm f/4.5-5.6 GM OSS lens with the Sony FE 1.4x teleconverter (at 560mm) and the Sony Alpha a7R III Mirrorless Digital camera body. ISO 640: 1/125 second at f/9 (stopped down 1/3 stop) in Manual mode. AWB at 10:44:39 on a cloudy, misty morning. Image #1: Galapagos Tortoise enjoying a guava fruit brunch |
Tortoise Day!
We land early at the town dock, take a bus up to the highlands, photograph for many hours, enjoy a catered lunch, and then spend the afternoon tooling around town. For those who have not had enough photography, there are some good opportunities by the bay. We end with a fine thank you dinner on the main street of Puerto Ayora. Did I mention great shopping?
As we head up the hill by bus, the weather invariably becomes foggy and misty, perfect weather for photographing the ancient and often huge tortoises. In addition, we usually have some good chances on songbirds. These include Galapagos Flycatcher, the rufous-capped race of Yellow Warbler, and several species of Darwin’s finches. Tortoise Day comes smack in the middle of the Photo-cruise and offers a chance to have some laundry done. It is one of the many great highlights of the trip. There is an option to head back to the ship to change and/or nap before dinner.
The tortoises are not tame. In our pre-landing briefing, on the bus en route, and again in the field, we instruct you on how to get close to these amazing animals without disturbing them. As you might expect, low and very slow is the ticket. A pair of light rain pants is a plus.
|
|
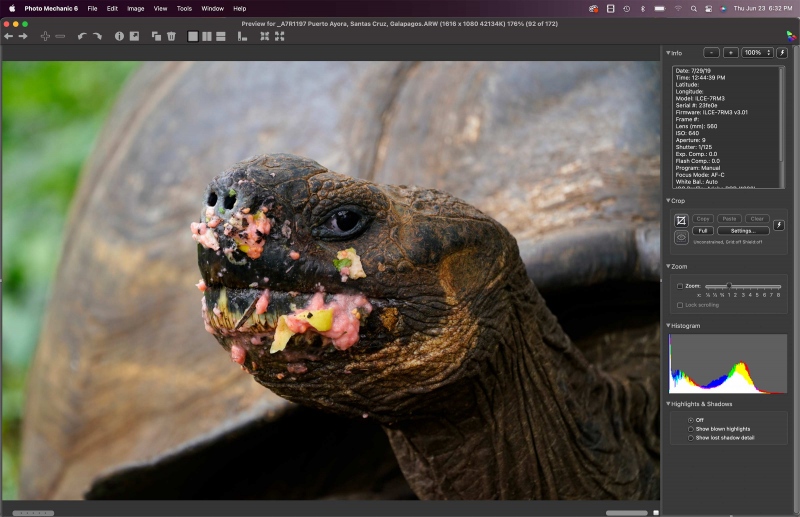
Image #1A: the Photo Mechanic screen capture for the Galapagos Tortoise enjoying a guava fruit brunch image |
Blocked Up Dark Tones
Whether using film or digital, we must always expose to the right without over-exposing the highlights. The result is that the dark tones will be rendered several stops too dark. With film, it is what it is. Your dark tones will be too dark and you just have to live with it. In addition, the colors are muddy. But with digital, it is easy to open up the dark tones and to adjust the color balance as well. The trick is do most of the adjustments during the raw conversion and to be sure to do that judiciously. Remember, the further you expose to the right without over-exposing the highlights, the easier it will be to open up the darker tones. Why? Because you are rendering them as light as possible in the raw file.
|
|
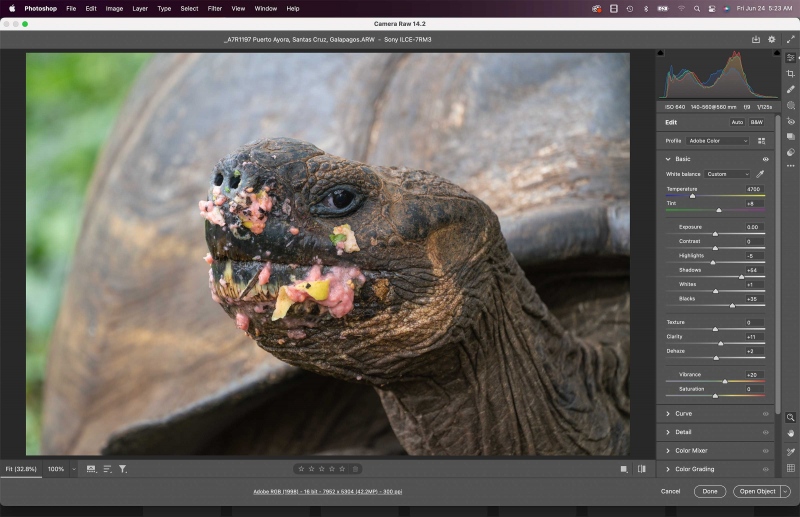
Image #1B: the Camera Raw sliders used to convert the Galapagos Tortoise enjoying a guava fruit brunch image |
Opening Up the Dark Tones During the Raw Conversion
First, be sure to click on both Image #1 and Image #1A to see how nicely the dark tones were opened up by properly adjusting the sliders in Camera Raw, as in Image #1B. The key adjustments here were reducing to color temperature to eliminate the red cast, moving the Shadow slider to +54, and moving the Black slider to +35. The latter is done by rote while holding down the Alt key until the under-exposure warnings disappear. I moved the Vibrance slider to +20 to bring up the colors of the smashed guava bits.
Compare Image #1 with Image #1B and note the clean-up work done on the face. Most of that involved removing dirt from the fruit. I used my usual cadre of clean-up tools and techniques, the Patch Tool, Content-Aware Fill, the Clone Stamp, and Divide and Conquer. Last was to lighten the white portion of the iris just a bit using Tim Gray Dodge and Burn.
|
|
The BIRDS AS ART Current Workflow e-Guide (Digital Basics II).You can order your copy from the BAA Online Store here, by sending a PayPal for $40 here, or by calling Jim or Jennifer weekdays at 863-692-0906 with your credit card in hand. Be sure to specify Digital Basics II. |
The BIRDS AS ART Current Workflow e-Guide (Digital Basics II)
The techniques mentioned above and tons more great Photoshop tips and techniques — along with my complete digital workflow, Digital Eye Doctor Techniques, and all my personalized Keyboard Shortcuts — are covered in detail in the BIRDS AS ART Current Workflow e-Guide (Digital Basics II), an instructional PDF that is sent via e-mail. Note: folks working on a PC and/or those who do not want to miss anything Photoshop may wish to purchase the original Digital Basics along with DB II while saving $15 by clicking here to buy the DB Bundle.
Folks who learn well by following along rather than by reading can check out the complete collection of MP 4 Photoshop Tutorial Videos by clicking here. Note: most of the videos are now priced at an amazingly low $5.00 each.
You can learn how and why I converted all of my Canon digital RAW files in DPP 4 in the DPP 4 RAW Conversion Guide here. More recently, I became proficient at converting my Nikon RAW (NEF) files in Adobe Camera Raw. About three years ago I began converting my Nikon and Sony RAW files in Capture One and did that for two years. You can learn more about Capture One in the Capture One Pro 12 Simplified MP4 Video here. The next step would be to get a copy of Arash Hazeghi’s “The Nikon Photographers’ Guide to Phase One Capture One Pro e-Guide” in the blog post here. Today, I convert my Sony raw files in Photoshop with Adobe Camera Raw.
You can learn advanced Quick Masking and advanced Layer Masking techniques in APTATS I & II. You can save $15 by purchasing the pair.
|
|
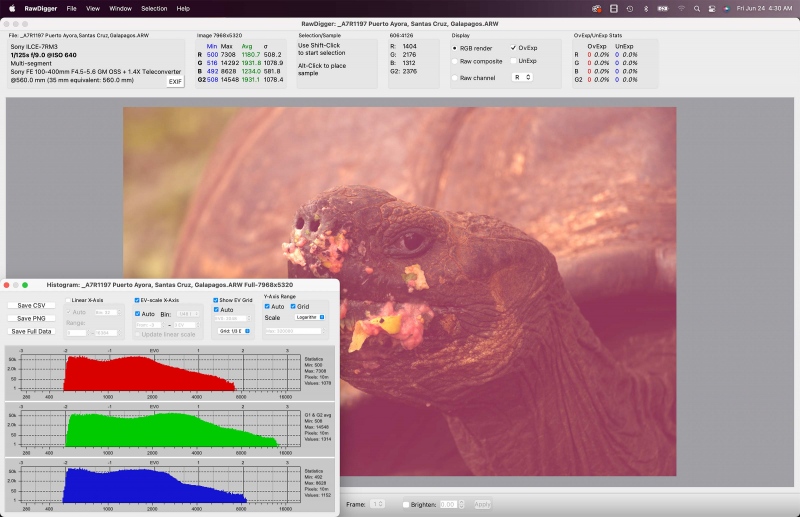
Image #1C: The RawDigger screen capture for the Galapagos Tortoise enjoying a guava fruit brunch image |
Getting the Right Exposure
Though this image was made a year before I learned about RawDigger, I did a very good job with the exposure. Compare the Photo Mechanic histogram with the RawDigger adapted histogram. Both look pretty darned good. That is often not the case. As seen in the RawDigger screen capture, the exposure here is perfect with the green channel approaching the 16000 line.
What can I say? The combination of Zebras live in the viewfinder (with your camera set up properly) and post-capture study of the raw files in RawDigger makes it pretty much child’s play to come up with perfect exposure after perfect exposure. It would be impossible to overstate how much I have learned by studying RawDigger and how much better my exposures have become since I started with the program almost two years ago. The raw file brightness for today’s featured image is perfect with the G channel almost making the 16000 line. In other words, the raw file brightness is perfect.
RawDigger — not for the faint of heart …
Nothing has ever helped me learn to create perfect exposures to the degree that RawDigger has. I think that many folks are reluctant to learn that most of their images are underexposed by one or more full stops and that highlight warnings in Photoshop, Lightroom, Capture One, and your in-camera histogram are bogus as they are based on the embedded JPEGs. Only your raw files tell the truth all the time. Heck, I resisted RawDigger for several years … Once you get over that feeling, RawDigger can become your very best exposure friend no matter what system you are using. On the recent IPTs and In-the-Field sessions, we have demonstrated that fact. Convincingly.
The RawDigger Adapted (pink) Histogram
In the RawDigger e-Guide, you will learn exactly how to set up the Adapted “pink” RawDigger Histogram and how to use it to quickly and easily evaluate the exposure or raw file brightness of images from all digital cameras currently in use. RawDigger was especially helpful to me as I have struggled with R5 exposures and learned my new camera body, the Sony Alpha a1.
|
|
RawDigger e-Guide with Two Videos |
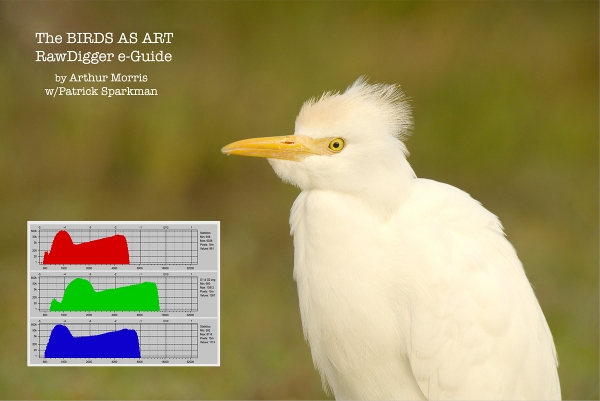
The RawDigger e-Guide with Two Videos
by Arthur Morris with Patrick Sparkman
The RawDigger e-Guide was created only for serious photographers who wish to get the absolute most out of their raw files.
Patrick and I began work on the guide in July 2020. At first, we struggled. We asked questions. We learned about Max-G values. We puzzled as to why the Max G values for different cameras were different. IPT veteran Bart Deamer asked lots of questions that we could not answer. We got help from RawDigger creator Iliah Borg. We learned. In December, Patrick came up with an Adapted Histogram that allows us to evaluate the exposures and raw file brightness for all images created with all digital camera bodies from the last two decades. What we learned each time prompted three complete beginning to end re-writes.
The point of the guide is to teach you to truly expose to the mega-Expose-to-the-Right so that you will minimize noise, maximize image quality, best utilize your camera’s dynamic range, and attain the highest possible level of shadow detail in your RAW files in every situation. In addition, your properly exposed RAW files will contain more tonal information and feature the smoothest possible transitions between tones. And your optimized images will feature rich, accurate color.
We teach you why the GREEN channel is almost always the first to over-expose. We save you money by advising you which version of RawDigger you need. We teach you how to interpret the Max G values for your Canon, Nikon, and SONY camera bodies. It is very likely that the Shock-your-World section will shock you. And lastly — thanks to the technical and practical brilliance of Patrick Sparkman — we teach you a simple way to evaluate your exposures and the raw file brightness quickly and easily the Adapted RawDigger histogram.
The flower video takes you through a session where artie edits a folder of images in Capture One while checking the exposures and Max-G values in RawDigger. The Adapted Histogram video examines a series of recent images with the pink histograms and covers lots of fine points including and especially how to deal with specular highlights. The directions for setting up the Adapted Histogram are in the text.
If we priced this guide based on how much effort we put into it, it would sell it for $999.00. But as this guide will be purchased only by a limited number of serious photographers, we have priced it at $51.00. You can order yours here in the BAA Online Store.
The Galapagos 2023 Photo-Cruise of a Lifetime IPT
As a child, you dreamed of getting to the Galapagos. As a nature photographer, you’ve dreamed of getting to the Galapagos. If you’ve been, you’ve dreamed of getting back — with your mirrorless gear. International travel is now a reality. And you’ve come to realize that life is short. And that a dream deferred is a dream denied.
Dreams by Langston Hughes
Hold fast to dreams
For if dreams die
Life is a broken-winged bird
That cannot fly.
Hold fast to dreams
For when dreams go
Life is a barren field
Frozen with snow
If you want to make your dream to come true, read everything below carefully, and then get in touch.
|
|
|
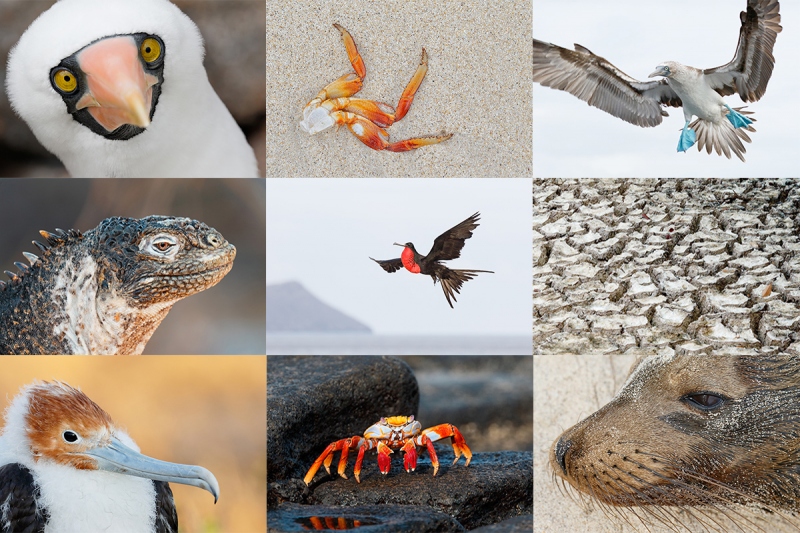
Clockwise from upper left corner and back to center: Nazca Booby staring, Sally Lightfoot Crab legs, Blue-footed Booby braking to land, dried mud patterns/Floreana, face of Galapagos Sea-Lion, Sally Lightfoot Crab, Great Frigatebird — large chick, Land Iguana, Magnificent Frigatebird, male in flight with pouch distended. |
The Galapagos 2023 Photo Cruise of a Lifetime IPT/The Complete Galapagos Archipelago Photographic Experience
August 29 – September 12, 2023, on the boat. 13 FULL and two half-days of photography: $15,999.00 double occupancy. Single cabin: $28,999.00. Strict Limit: 13 photographers (plus the leader)
For this trip to run, I need ten deposit checks in hand by August 30, 2022. If this trip does not run, your deposit will, of course, be refunded in full — no questions asked. Five folks plus the leader are already committed.
If you are considering this trip, be sure to check out the Galapagos Gallery here. Please shoot me an e-mail if you are interested or if you have any questions.
|
|
|
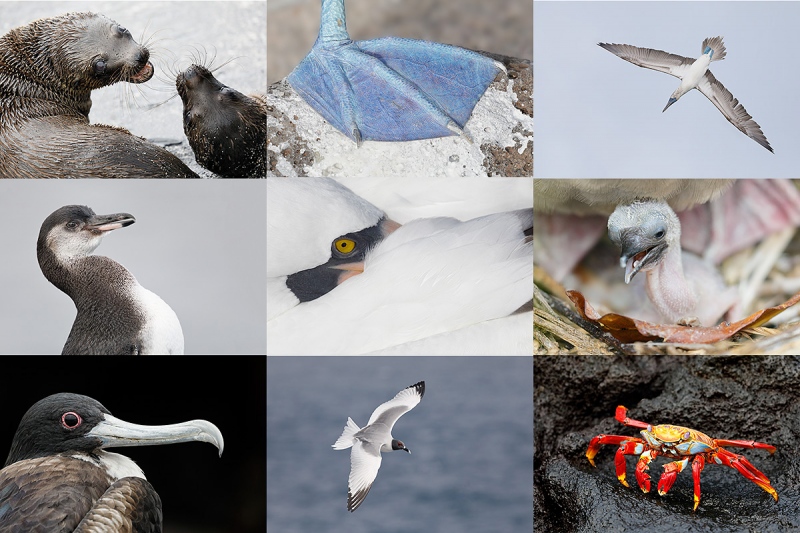
Clockwise from upper left corner and back to center: Galapagos Sea-Lions squabbling; Blue-footed Booby foot; Blue-footed Booby in flight; seabird chick; Sally Lightfoot Crab; Swallow-tailed Gull in flight; Great Frigatebird head portrait; Galápagos penguin — juvenile; Nazca Booby resting. |
The Best
This trip is THE best Galapagos Photo-Cruise in the world. By far. No one offers a trip that visits the top three world-class landings twice each (pending National Park Service approval as below). What does this trip offer? The world’s best Galapagos guide, a killer itinerary, a great boat (the Samba), a great crew, and me, with thirteen Galapagos Photo-cruises under my belt. Pre-trip gear suggestions and advice, and twice-daily, pre-landing, location-specific briefings. In-the-field photo instruction and guidance. Jeez, I almost forgot: fine dining at sea! Do know that there are one-week Galapagos trips (six full and two half- days on the boat) “from $9995”! Thus, this trip represents a tremendous value; why go all that way and miss half of the great photographic locations? And why not visit the three very best spots twice each? Additionally, there are two-week trips for less money where the itineraries include several waste-of-time “tourist landings” that offer little in the way of wildlife and nature photography.
Important notes: approval of the itinerary that allows for our extra visits is customarily approved right by the Galápagos National Park Service just before departure. We have never been turned down before. If by some chance the itinerary change is not approved, each participant will receive a $200 rebate.
The great spots that we will visit include Tower Island — including Darwin Bay (almost surely twice!) and Prince Phillips Steps, Hood Island (including Punta Suarez, the world’s only nesting site of Waved Albatross (almost surely twice!), and Gardner Bay -— each of the preceding locations are world-class wildlife photography destinations that rank right up there with the best of Antarctica, South Georgia, the Falklands, Africa, and Midway. We will also visit Fernandina, Puerto Ayora for the tortoises and Darwin’s Finches, Puerto Egas—James Bay, and North Seymour (twice!) for nesting Blue-footed Boobies and both frigatebird species in most years, South Plaza for Land Iguanas and seabirds (including Red-billed Tropicbird), Floreana for Greater Flamingoes, and Urbina Bay (for Land Iguanas. Each is spectacular in its own right. We visit every great spot on a single trip. Plus lots more.
There will be opportunities to snorkel on sunny middays for those who (like me) who wish to partake. We will be the first boat on each island in the morning and the last boat to leave each island every afternoon. If we are blessed with overcast skies, we will often spend 5+ hours at the best sites. And as noted above, mid-day snorkeling is an option on most sunny days depending on location and conditions. On the 2015 trip we snorkeled with thousands of dolphins.
Note that some of the walks are on the difficult side. Great images are possible on all landings with a hand-held 70-200mm lens and a 1.4X teleconverter or an 80-or 100-400mm lens, a 100-500, or a 200-600 lens. In the past, I have taken a longer lens ashore on most landings as they better fit my style. In 2019 I did the whole trip with my Nikon 500PF and my SONY 100-400. In 2023, it is likely that I will do the whole trip with The Sony 70-200mm f/2.8 II (with both TCs) and the 200-600. I just might bring the 400mmm f/2.8 along …
|
|
|
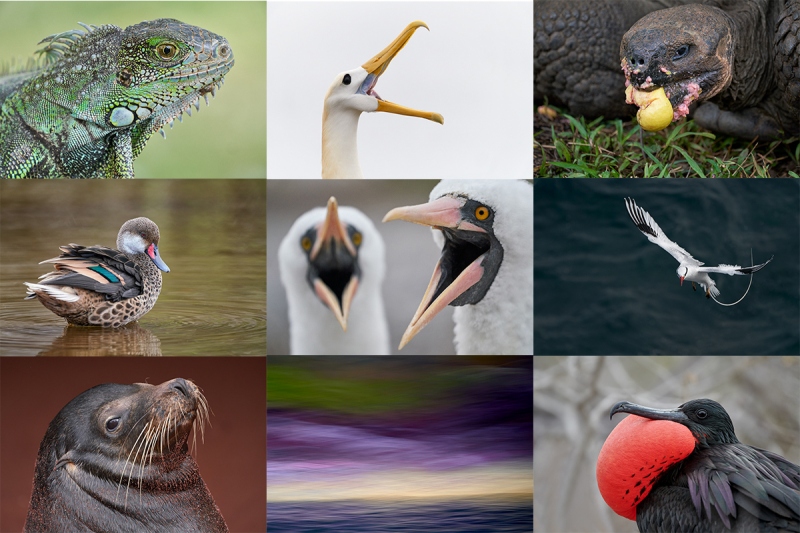
Clockwise from upper left corner and back to center: Green Iguana – Guayaquil; Waved Albatross clicking display; Galapagos Tortoise eating passionfruit: Red-billed Tropicbird: male frigatebird with pouch distended; cave wall blur; face of Galapagos Sea-Lion with red sand background — Rabida: White-cheeked Pintail; Nazca Boobies calling. |
The Logistics & Tentative Itinerary
Please note: All itineraries, routings, and visitor sites on the Galápagos Islands are subject to change by the Galápagos National Park Service to minimize traffic and impact.
SUN August 27, 2023: Arrive in Guayaquil a day early to ensure that we do not miss the boat.
MON August 28, 2023: Introductory sessions.
TUES August 29, 2023: We fly to the archipelago (Baltra) and board the Samba. Heck, on some trips, folks make great images from the dock in Baltra while our luggage is being loaded!
TUES September 12, 2023: We disembark the Samba in mid-morning and fly back to Guayaquil midday; most will overnight there.
Most will fly home on the early morning of Wednesday, September 13, 2023, unless they are staying on or going elsewhere (or catching a red-eye flight on the evening of the TUES September 12.).
$15,999 includes just about everything: all transfers, guide and park fees, all food on the boat, transfers and ground transportation, your flights to and from the archipelago, and three nights (double occupancy) in a top-notch hotel in Guayaquil. If you are good to go, your non-refundable (except as previously noted) deposit of $7,000 per person is due immediately. The second payment of $5,000 is not due until 1/15/2023. The final payment of $3,999 per person will be due on 5/15/2023. All payments must be made by checks made out to BIRDS AS ART and mailed to Arthur Morris/BIRDS AS ART, PO BOX 7245, Indian Lake Estates, FL 33855. Deposits are double for single supplements.
Again, this trip needs ten participants registered by August 30, 2022, to run, so please do not book your flights until you learn that we are good to go.
Travel insurance for both big international trips and US-based IPTs is highly recommended as we never know what life has in store for us. I strongly recommend that you purchase quality travel insurance. Do note that many plans require that you purchase your insurance within 14 days of our cashing your deposit check or running your credit card. Whenever purchasing travel insurance, be sure to read the fine print carefully.
Not included: your round-trip airfare from your home to and from Guayaquil, beverages on the boat, phone calls, your meals in Guayaquil, personal items, and an $800/person cash tip to be shared by the crew and the guide. These folks will be waiting on us hand and foot every day for two weeks. The service on the boat is so wonderful that many folks opt to tip extra.
Please note: the current fuel surcharge of $300/person is included in the cost of the trip. If there is a significant increase in the price of diesel fuel in the next 14 months, the cost will be shared on a per/person basis (payable by check after you get home).
|
|
|
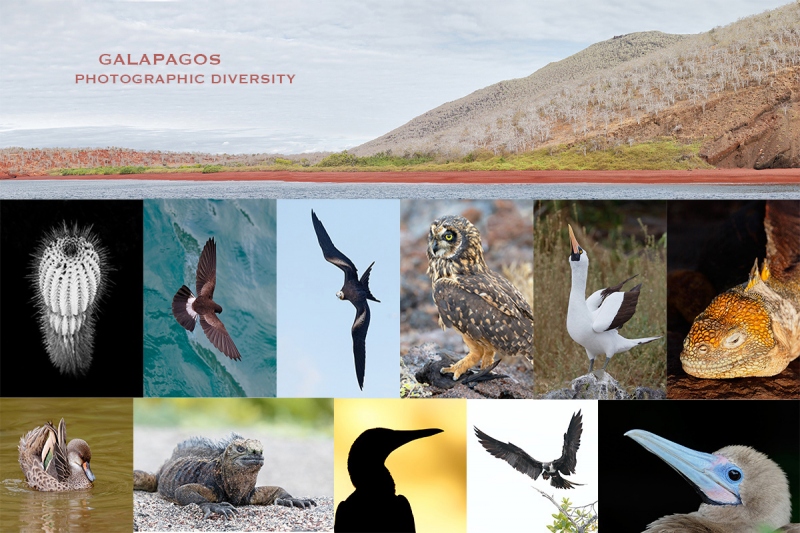
Clockwise from upper left corner and back to center: barrel cactus — infrared; Galapagos Storm Petrel — dorsal view; juvenile frigatebird banking; Short-eared Owl withe Wedge-rumped (Galapagos) Petrel; Nazca Booby displaying; immature frigate bird landing; booby sunset silhouette; Marine Iguana; White-cheeked Pintail displaying drake. |
The Itinerary
The Logistics
SUN August 27, 2023: Arrive in Guayaquil a day early to ensure that we do not miss the boat.
MON August 28, 2023: Introductory sessions.
TUES August 29, 2023: We fly to the archipelago (Baltra) and board the Samba.
On the Boat
Day 1: Tuesday, August 29 — PM North Seymour
Day 2: Wednesday, August 30 — Genovesa: AM Darwin Bay, PM Prince Phillips´ Steps
Day 3: Thursday, August 31 — Marchena: AM Playa Negra, PM Navigation to Isabela
Day 4: Friday, September 1 — Isabela: AM Punta Albemarle, PM Punta Vicente Roca
Day 5: Saturday, September 2 — AM Fernandina: Punta Espinoza, PM Isabela: Bahía Urbina
Day 6: Sunday, September 3 — Isabela: AM Elizabeth Bay, PM Punta Moreno
Day 7: Monday, September 4 — Floreana: AM Post Office Bay, PM Punta Cormorant
Day 8: Tuesday, September 5 — Santa Cruz: AM Highlands and Lunch, PM free time in the city with some usually poor internet access.
Day 9: Wednesday, September 6 — Española: AM Gardner Bay, PM Punta Suárez
Day 10: Thursday, September 7 — Española: AM Punta Suarez, PM Navigation to San Cristóbal
Day 11: Friday, September 8 — San Cristóbal. AM Isa Lobos (until 9 am), PM Punta Pitt
Day 12: Saturday, September 9 — AM Santa Fe, PM South Plaza
Day 13: Sunday, September 10 — Genovesa: AM Darwin Bay, Navigation to Santiago
Day 14: Monday, September 11 — AM: James Bay, PM Rábida
Day 15: Tuesday, September 12 — North Seymour from 6 to 9am. We disembark late morning and fly back to Guayaquil midday; most will overnight there.
Wednesday, September 13, 2023: Fly home.
I do hope that you can join us on what will surely be a rich and rewarding photographic voyage.
Typos
With all blog posts, feel free to e-mail or to leave a comment regarding any typos or errors.



It may be an older 2019 image, but it is well captured! A Tortoise is such an amazing creature! Fun fact: wild tortoises can live up to 150 years and beyond! 🙂
Nelson, Don’t forget: I have been photographing for more than 38 years 🙂 The trick is to find a teenage tortoise!
with love, artie
Can’t wait for tortoise day! A dream since I was a child.
Arthur – i thought you sold off your 100-400GM for the new 70-200MKII? or is this an older photo of the Tortoise ?
Correct on both counts. Sold the a7r III long ago. This is a 2019 image.
with love, artie