What’s Up?
Muhammad Arif joined me for a second In-the-Field session, this time at Nickerson on Monday morning. Conditions were near-perfect with a NE breeze and cloudy bright conditions. We each created almost 3,000 images, many of them of Common Terns in flight, fishing for sand crabs, and flying into their nests. Sunrise was a challenge. We had some gorgeous red light but isolating a single bird square to the back of the camera was difficult at best with the NE breeze. We did our image review session at Bagel Chalet in Merrick. A good time was had by all.
Oh, BTW, I never found my mis-placed flash card. Bummer, but every once in a while I need a reminder lesson on being more careful.
Today is Tuesday 16 August. I will be headed back to Nickerson for more of the same weather and action, perhaps with the addition of some skimmers skimming right at me. Wherever you are, and whatever you are doing, I hope that you too have a great day. This blog post took about 90 minutes to prepare and makes one hundred forty-five days in a row with a new one.
So far, many folks are scheduled to join me at either Nickerson or JBWR in the coming weeks for an In-the-Field session or two. The first window for doing shorebirds at the East Pond at Jamaica Bay Wildlife Refuge has closed. The second window is from 24-26 August. See the additional details below. Muhammad Arif is joining me for a third session this morning, and Carlotta Grenier is coming for her third session on Wednesday morning. Marc Wortsman will be coming for lessons on his Sony a6400 as soon as we get an afternoon west wind. First timer Sanjeev Nagrath is joining me for two afternoons and a morning at Nickerson with the first session on 17 August. And Sandy Brown is flying in from Seattle for an afternoon at Nickerson and a morning on JBWR.
Please remember to use the B&H and Amazon links that are found on most blog pages and to use the BIRDSASART discount code at checkout when purchasing your new gear from Bedfords to get 3% back on your credit card and enjoy free second-day air FedEx. Please, also, consider joining a BAA IPT. You will be amazed at how much you will learn!
|
|
|
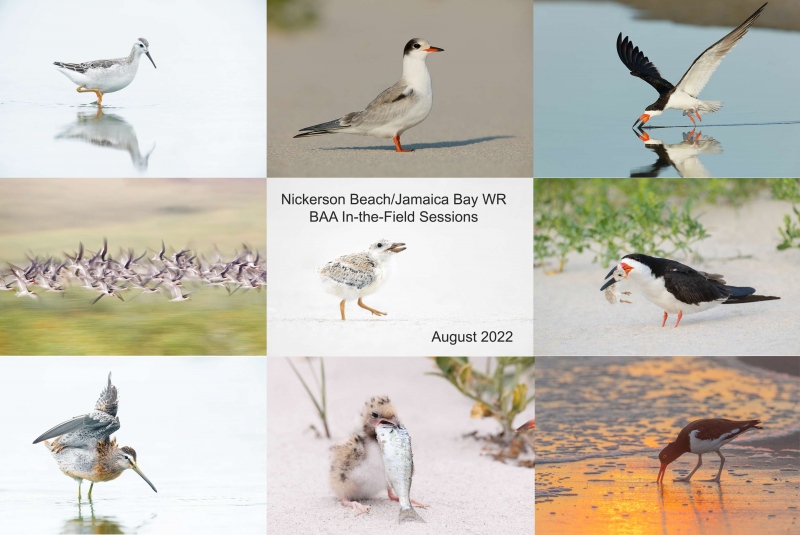
Clockwise from the upper left corner back around to the center: Wilson’s Phalarope, JBWR; just fledged Common Tern, Nickerson; Black Skimmer, adult skimming, Nickerson; Black Skimmer killing tiny skimmer chick, Nickerson; American Oystercatcher foraging at sunrise, Nickerson; Common Tern chick swallowing baby bluefish, Nickerson; Short-billed Dowitcher, juvenile, double overhead wing stretch, JBWR; Black Skimmers, predawn flock blur, Nickerson; Black Skimmer, 10-day old chick, Nickerson. Click on the card to view a larger version. Nickerson Beach/East Pond JBWR composite |
Nickerson Beach/East Pond at Jamaica Bay (JBWR) In-the Field Workshops
Both Nickerson Beach and the East Pond at JBWR offer some of the best midsummer bird photography on the planet. Hundreds of pairs or Black Skimmers and Common Terns along with more than a dozen pairs of American Oystercatchers breed at Nickerson each season so there are lots of chicks of all sizes and handsome fledged young to photograph. Provided that the water levels are low, hundreds of young shorebirds in their handsome fresh juvenile plumages stop by the pond each August on their way south.
Nickerson often reveals nature at it rawest, most basic level. Most days we get to photograph all sorts of dramatic behaviors ranging from skimmers and terns fishing and feeding (and tending) their you. There are often chances to shoot a variety of predatory encounters — gulls eating large skimmer chicks, skimmers eating skimmer babies, and Peregrine Falcons hunting. And rarely, if we are lucky, Peregrine Falcons catching! Consider joining me to learn a ton both about bird photography and the birds.
I am taking the Auto Train north on 31 July and will happily spend all of August on Long Island. I head south on 31 August and should be back home on 1 September (barring anything unforeseen). I am offering In-the-Field sessions at both Nickerson Beach and the East Pond at Jamaica Bay Wildlife Refuge. If you are interested, please get in touch via e-mail or text me at 863-221-2372.
Whether you are a local or would like to fly in for several days of instruction — a sort of private, or small group. — at worst, IPT, LMK via e-mail so that we can work on a schedule that could possibly include both Nickerson and Jamaica Bay.
Follow me on Instagram here. I am trying to feature both new and old images, especially images that have not appeared recently on the blog. Or search for birds_as_art.
BIRDS AS ART Image Optimization Service (BAA IOS)
Send a PayPal for $62.00 to birdsasart@verizon.net or call Jim at 863-692-0906 and put $62.00 on your credit card. Pick one of your best images and upload the raw file using a large file sending service like Hightail or DropBox and then send me the link via e-mail. I will download and save your raw file, evaluate the exposure and sharpness, and optimize the image as if it were my own after converting the raw file in Adobe Camera Raw. Best of all, I will make a screen recording of the entire process and send you a link to the video to download, save and study.
Induro GIT 304L Price Drop
Amazingly, we have two, brand-new-in-the-box Induro GIT 304L tripods in stock. They are $699.00 each (were $799.00) and the price now includes the insured ground shipping to the lower 48 states. Weekday phone orders only: 863-692-0906. Order yours here while they last.
Please Remember
You can find some great photo accessories (and necessities, like surf booties!) on Amazon by clicking on the Stuff tab on the orange/yellow menu bar above. On a related note, it would be extremely helpful if blog-folks who, like me, spend too much money on Amazon, would get in the habit of clicking on the Amazon logo link on the right side of each blog post when they shop online. As you might expect, doing so will not cost you a single penny, but would be appreciated tremendously by yours truly. And doing so works seamlessly with your Amazon Prime account.
Please remember that if an item — a Delkin flash card, or a tripod head — for example, that is available from B&H and/or Bedfords, is also available in the BAA Online Store, it would be great, and greatly appreciated, if you would opt to purchase from us. We will match any price. Please remember also to use my B&H affiliate links or to earn 3% cash back at Bedfords by using the BIRDSASART discount code at checkout for your major gear purchases. Doing either often earns you free guides and/or discounts. And always earns my great appreciation.
Brand-New and As-Good-As-Ever Bedfords BAA Discount Policy
Folks who have fallen in love with Bedfords can now use the BIRDSASART coupon code at checkout to enjoy a post-purchase, 3% off-statement credit (excluding taxes and shipping charges) on orders paid with a credit card. The 3% credit will be refunded to the card you used for your purchase. Be sure, also, to check the box for free shipping to enjoy free Second Day Air Fed-Ex. This offer does not apply to purchases of Classes, Gift Cards, or to any prior purchases.
Money Saving Reminder
Many have learned that if you need a hot photo item that is out of stock at B&H and would like to enjoy getting 3% back on your credit card along with free 2nd Day Air Fed-Ex Air shipping, your best bet is to click here, place an order with Bedfords, and enter the coupon code BIRDSASART at checkout. If an item is out of stock, contact Steve Elkins via e-mail or on his cell phone at (479) 381-2592 (Central time). Be sure to mention the BIRDSASART coupon code and check the box for Free Shipping. That will automatically upgrade to free 2nd Day Air Fed-Ex. Steve has been great at getting folks the hot items that are out of stock at B&H and everywhere else. The waitlists at the big stores can be a year or longer for the hard-to-get items. Steve will surely get you your gear long before that. For the past year, he has been helping BAA Blog folks get their hands on items like the SONY a 1, the SONY 200-600 G OSS lens, the Canon EOS R5, the Canon RF 100-500mm lens, and the Nikon 500mm PF. Steve is personable, helpful, and eager to please.
Important Note
As an Amazon Associate, I earn a small percentage when you purchase from Amazon after using any of the Amazon links on the blog (including the logo-link on the right side of each blog post page). My affiliate link works fine with Amazon Prime and using it will not cost you a single cent. Huge thanks, BTW 🙂
If You Enjoy the Blog …
Please, if you enjoy and learn from the blog, remember to use one of my two affiliate programs when purchasing new gear. Doing so just might make it possible for me to avoid having to try to get a job as a Walmart greeter and will not cost you a single penny more. And if you use Bedfords and remember to enter the BIRDSASART code at checkout, you will (still!) save 3% on every order and enjoy free second-day air shipping. In these crazy times — I lost about fifty thousand dollars in income due to COVID 19 — remembering to use my B&H link or to shop at Bedfords will help me out a ton and be greatly appreciated. Overseas folks who cannot order from the US because of import fees, duties, and taxes, are invited to help out by clicking here to leave a blog thank you gift if they see fit.


Gear Questions and Advice
Too many folks attending BAA IPTs and dozens of photographers whom I see in the field and on BPN, are–out of ignorance–using the wrong gear, especially when it comes to tripods and more especially, tripod heads… Please know that I am always glad to answer your gear questions via e-mail. If you are desperate, you can try me on my cell at 863-221-2372. Please leave a message and shoot me a text if I do not pick up.
|
|
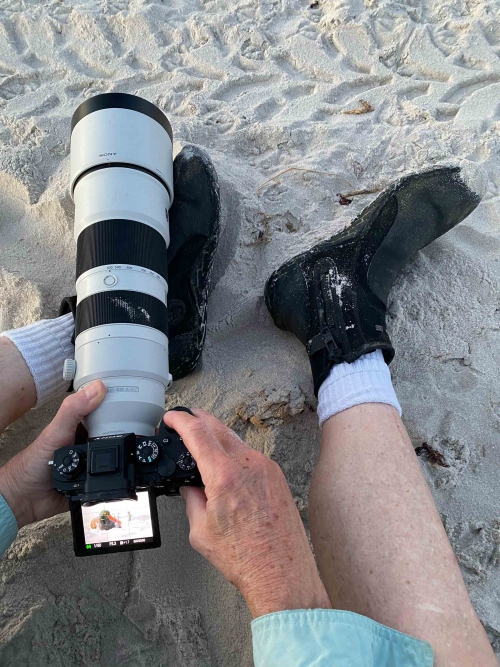
Yours truly using the ankle-pod technique to create American Oystercatcher resting on beach
|
Ankle-podding
I’ve been mentioning using the ankle-podding technique to get very low for many months. Many folks have requested an image of this technique. Now they have it. I pull out the rear monitor, make sure that my reading glasses are in place, position the lens on my left ankle, activate the level, adjust the exposure settings, acquire focus, and begin making images. II used this technique to make a series of images at 1/125th second at ISO 12800. I put admit that they looked pretty good. In general, you would like to be using a relatively fast shutter speed when ankle podding as it is not the most stable support system.
To cut the shutter speed in half, I built a little mound of sand, placed the lens hood onto the sand pile, and then continued as above. The result? A razor-sharp image at 1/60th second. Often, succeeding as a nature photographer requires coming up with new techniques on the in the field on the fly.
|
|
|
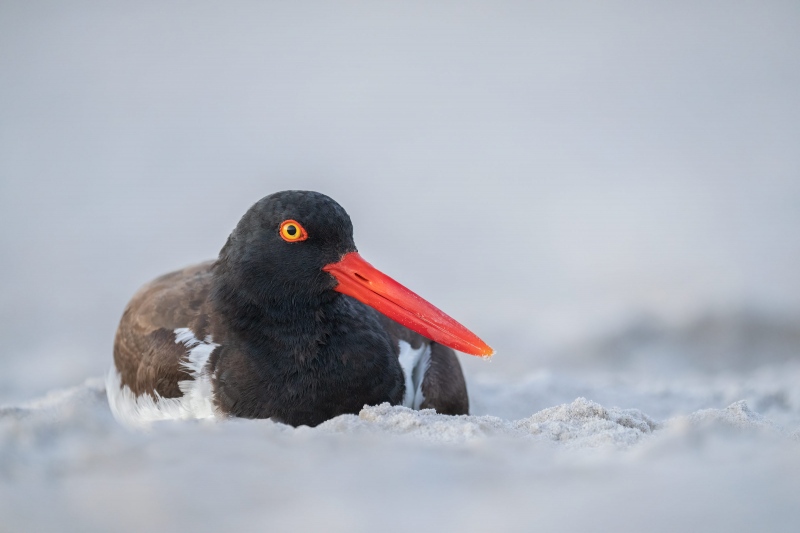
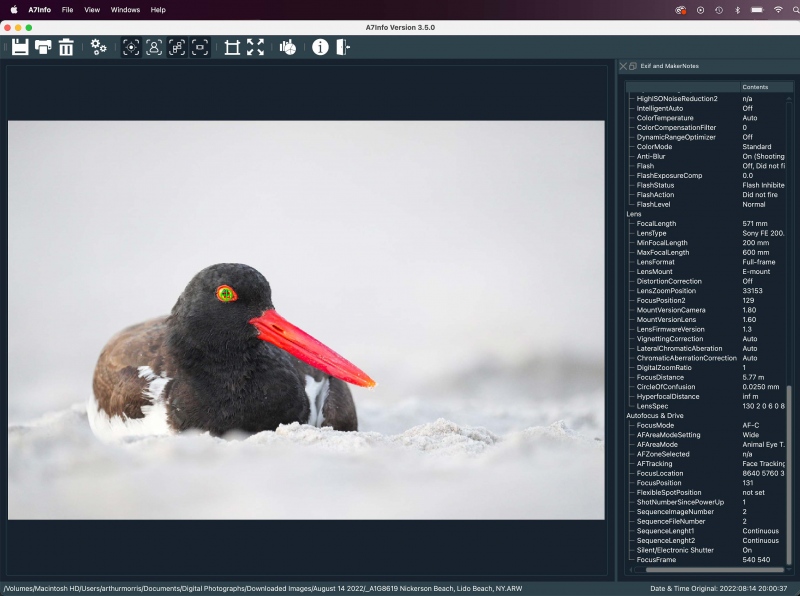
This image was created on 14 August 2022 at Nickerson Beach Park, Lido Beach, Long Island, NY. I used the ankle-pod technique with the hand held Sony FE 200-600mm f/5.6-6.3 G OSS lens (at 571mm) and The One, the Sony Alpha 1 Mirrorless digital camera. ) The exposure was determined using Zebra technology with EC on the Thumb Dial. Shutter Priority +1/7 stops. Auto ISO set ISO 6400. 1/60 second at f/6.3 (wide-open). AWB at 8:00:37pm on a mostly sunny afternoon. RawDigger showed the exposure to be dead-solid perfect — see below. Tracking: Spot S AF-C with Bird Face/Eye Detection performed perfectly. Be sure to click on the image to enjoy a high-res version. Image #1: American Oystercatcher resting on beach
|
Fun in the Dark
Sunset on Sunday evening at Lido Beach was at 8:08pm. This image was created just after 8:00pm, long after the sun had disappeared behind a large cloud on the northwestern horizon. There had been some nice sunset color, but the flocks were not blasting off in the right places for pleasing blurs. When I almost stepped on this oystercatcher in the dim light, I backed off a bit, sat down, and made a few images. Getting super-low was the key to eliminating the tire tracks and the zillions of human footprints.
|
|
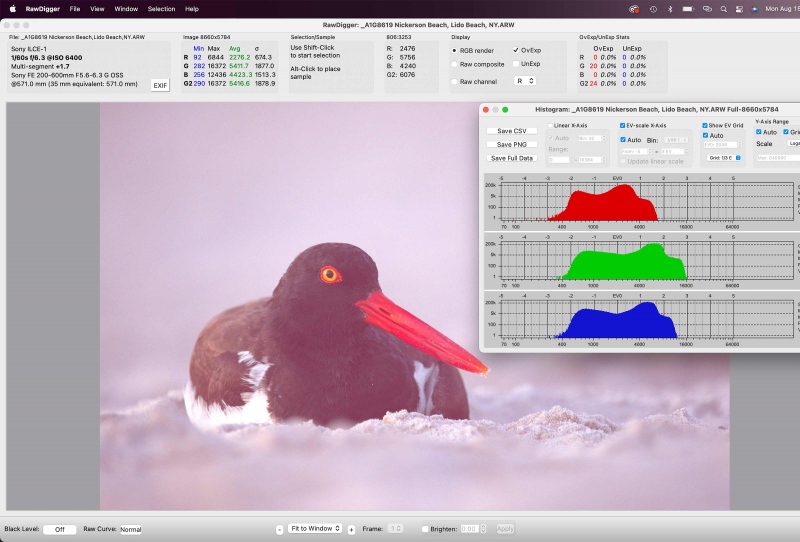
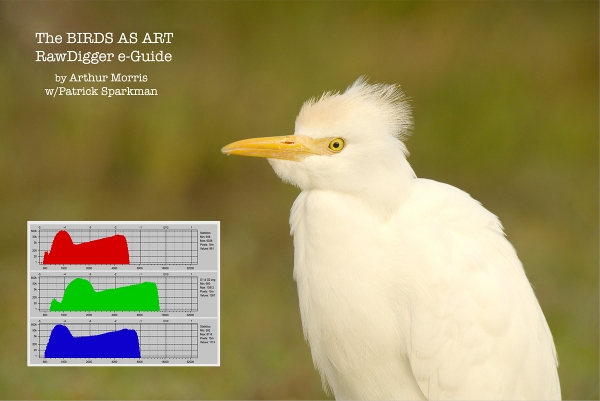
Image #1A: The RawDigger screen capture for the American Oystercatcher resting on beach image |
Ho Hum, Another Perfect Exposure
What can I say? The combination of Zebras live in the viewfinder (with your camera set up properly) and post-capture study of the raw files in RawDigger makes it pretty much child’s play to come up with perfect exposure after perfect exposure. It would be impossible to overstate how much I have learned by studying RawDigger and how much better my exposures have become since I started with the program almost two years ago. The raw file brightness for today’s featured image is dead-solid perfect with the G channel just about abutting the 16000 line. The 44 OvExp pixels out of 51,000,000 are beyond insignificant. Such is life with RawDigger.
RawDigger — not for the faint of heart …
Nothing has ever helped me learn to create perfect exposures to the degree that RawDigger has. I think that many folks are reluctant to learn that most of their images are underexposed by one or more full stops and that highlight warnings in Photoshop, Lightroom, Capture One, and your in-camera histogram are bogus as they are based on the embedded JPEGs. Only your raw files tell the truth all the time. Heck, I resisted RawDigger for several years … Once you get over that feeling, RawDigger can become your very best exposure friend no matter what system you are using. On the recent IPTs and In-the-Field sessions, we have demonstrated that fact. Convincingly.
The RawDigger Adapted (pink) Histogram
In the RawDigger e-Guide, you will learn exactly how to set up the Adapted “pink” RawDigger Histogram (as above) and how to use it to quickly and easily evaluate the exposure or raw file brightness of images from all digital cameras currently in use. RawDigger was especially helpful to me as I have struggled with R5 exposures and learned my new camera body, the Sony Alpha a1.
|
|
RawDigger e-Guide with Two Videos |
The RawDigger e-Guide with Two Videos
by Arthur Morris with Patrick Sparkman
The RawDigger e-Guide was created only for serious photographers who wish to get the absolute most out of their raw files.
Patrick and I began work on the guide in July 2020. At first, we struggled. We asked questions. We learned about Max-G values. We puzzled as to why the Max G values for different cameras were different. IPT veteran Bart Deamer asked lots of questions that we could not answer. We got help from RawDigger creator Iliah Borg. We learned. In December, Patrick came up with an Adapted Histogram that allows us to evaluate the exposures and raw file brightness for all images created with all digital camera bodies from the last two decades. What we learned each time prompted three complete beginning to end re-writes.
The point of the guide is to teach you to truly expose to the mega-Expose-to-the-Right so that you will minimize noise, maximize image quality, best utilize your camera’s dynamic range, and attain the highest possible level of shadow detail in your RAW files in every situation. In addition, your properly exposed RAW files will contain more tonal information and feature the smoothest possible transitions between tones. And your optimized images will feature rich, accurate color.
We teach you why the GREEN channel is almost always the first to over-expose. We save you money by advising you which version of RawDigger you need. We teach you how to interpret the Max G values for your Canon, Nikon, and SONY camera bodies. It is very likely that the Shock-your-World section will shock you. And lastly — thanks to the technical and practical brilliance of Patrick Sparkman — we teach you a simple way to evaluate your exposures and the raw file brightness quickly and easily the Adapted RawDigger histogram.
The flower video takes you through a session where artie edits a folder of images in Capture One while checking the exposures and Max-G values in RawDigger. The Adapted Histogram video examines a series of recent images with the pink histograms and covers lots of fine points including and especially how to deal with specular highlights. The directions for setting up the Adapted Histogram are in the text.
If we priced this guide based on how much effort we put into it, it would sell it for $999.00. But as this guide will be purchased only by a limited number of serious photographers, we have priced it at $51.00. You can order yours here in the BAA Online Store.
|
|
Image #1B: A7INFO screen capture for the American Oystercatcher resting on beach image |
AF-C with Bird Face/Eye Detection
With any of the Tracking AF modes on the Sony A1, nailing the eye is child’s play with static, large-in-the-frame subjects.
|
|
|
Click on the image to better see the green eye-AF boxes in action. Sony Alpha 1 Flight Photography AF Points! |
The SONY Alpha a1 Set-up Guide and Info Group: $150.00 (or Free)
The SONY Alpha a1 Set-up Guide and Info Group is going great guns as more and more folks chime in with thoughtful questions and experience-based answers. As the a1 is becoming more readily available, more and more folks are getting their hands on this amazing body. By June 1, 2022, the group was up to an astounding 124 lucky and blessed folks. (More than a few folks own two or more a1 bodies! Early on, we discussed the myriad AF options. I gave my opinion as to the best one for flight and general bird photography. The best news is that everyone in the group receives an e-mail that includes a .DAT file with my a1 settings on it, and explicit directions on how to load my settings onto your a1; talk about convenience! I am now offering a .DAT file compatible with firmware update 1.20. Your entry into the group includes a consolidated Sony a1 CAMSETA2 INFO & GUIDE. New a1 folks will now receive six e-mails instead of the previous 28! You will receive new e-mails as they are published. Simply put, this e-mail guide is an incredible resource for anyone with an a1.
All who purchased their Alpha 1 bodies via a BAA affiliate link — B&H or Bedfords — will receive a free Sony Alpha a1 Set-Up Guide and free entry into the Info Updates group after shooting me their receipts via e-mail. (Note: it may take me several days to confirm B&H orders.). Others can purchase their guide here in the BAA Online Store.
Typos
With all blog posts, feel free to e-mail or to leave a comment regarding any typos or errors.





Love the ankle pod! Good technique!
Artie
The image is amazing and so sharp! Good job on the ankle pod but i would be so afraid of the sand and such all over the camera, i suppose your careful to the best you can be. One grain of sand can ruin the party in the right spot though.
Curious on the Zebra technology does this work even if you are in auto iso you wouldn’t see the zebras would you? You mention auto set your iso to 6400 did you have it set because of the sundown or do you use it often?
Always with love b
Robert,
I get sand all over my camera every day. I have a soft bristle paint brush in my fanny pack. Do avoid getting one grain of sand in the Playback button for sure.
Zebras work perfectly well with Auto ISO and Exposure Compensation (EC) on the rear dial. Once I pick the shutter speed, raising the EC increases the ISO :). For this one, I went for Zebras on the white patch on the side of the bird, our left, its right.
with love, artie
Uh-oh calling me Robert!!
I did miss the 2 main words Shutter Priority, I assumed you were in manual and I should never have assumed! That is why one should go on an IPT or private lessons. Huh
Always with love b
Robert 🙂 lol
I would be so interested to know how you got on with Marc Wortsman and his relatively basic Sony a6400. Like most of us, while we love your talent and your images, the Sony A1 is beyond our wildest dreams cost wise, being an “if I win the lottery” item only! I am so pleased to learn that you are prepared to give time to help & advise Marc and those of us who have a similar model camera. I hesitate to ask whether you have any recommended settings for this series of Sony consumer cameras?!!
We will be meeting Marc in a few days. We are waiting for a west wind in the afternoon. My friend Anke Frohlich used an a6400 for a year. She will be helping Marc to set up the camera.
As fat as Zebras, all of the Sony bodies perform similarly.
with love, artie