|
|
The BIRDS AS ART Current Workflow e-Guide (Digital Basics II).You can order your copy from the BAA Online Store here, by sending a PayPal for $40 here, or by calling Jim or Jennifer weekdays at 863-692-0906 with your credit card in hand. Be sure to specify Digital Basics II. |
The BIRDS AS ART Current Workflow e-Guide (Digital Basics II)
Everything below, but for the Color Mixer stuff, and tons more great Photoshop tips and techniques — along with my complete digital workflow, Digital Eye Doctor Techniques, and all my personalized Keyboard Shortcuts — is covered in detail in the BIRDS AS ART Current Workflow e-Guide (Digital Basics II), an instructional PDF that is sent via e-mail. Note: folks working on a PC and/or those who do not want to miss anything Photoshop may wish to purchase the original Digital Basics along with DB II while saving $15 by clicking here to buy the DB Bundle.
Folks who learn well by following along rather than by reading can check out the complete collection of MP 4 Photoshop Tutorial Videos by clicking here. Note: most of the videos are now priced at an amazingly low $5.00 each.
You can learn how and why I converted all of my Canon digital RAW files in DPP 4 in the DPP 4 RAW Conversion Guide here. More recently, I became proficient at converting my Nikon RAW (NEF) files in Adobe Camera Raw. About three years ago I began converting my Nikon and Sony RAW files in Capture One and did that for two years. You can learn more about Capture One in the Capture One Pro 12 Simplified MP4 Video here. The next step would be to get a copy of Arash Hazeghi’s “The Nikon Photographers’ Guide to Phase One Capture One Pro e-Guide” in the blog post here. Today, I convert my Sony raw files in Photoshop with Adobe Camera Raw.
You can learn advanced Quick Masking and advanced Layer Masking techniques in APTATS I & II. You can save $15 by purchasing the pair.
What’s Up?
I walked early and then spent a wonderful hour at Vulture Trees. On the way back to my car on my rope flow walk, I noted several White Waterlilies in bloom. So I grabbed the incredibly versatile Sony FE 70-200mm f/2.8 GM OSS II lens and a tripod and went to work producing today’s featured image. I got in both of my swims in a gentle rain.
Today is Wednesday 28 September 2022. It was already raining hard here at 4:00am and Hurricane Ian is headed right at ILE. Wherever you are, and whatever you are doing, I hope that you too have a great day. This blog post took about two hours to prepare and makes one hundred eighty-seven days in a row with a new one.
Please remember to use the B&H and Amazon links that are found on most blog pages and to use the BIRDSASART discount code at checkout when purchasing your new gear from Bedfords to get 3% back on your credit card and enjoy free second-day air FedEx. Please, also, consider joining a BAA IPT. You will be amazed at how much you will learn!
Follow me on Instagram here. I am trying to feature both new and old images, especially images that have not appeared recently on the blog. Or search for birds_as_art.
BIRDS AS ART Image Optimization Service (BAA IOS)
Send a PayPal for $62.00 to birdsasart@verizon.net or call Jim at 863-692-0906 and put $62.00 on your credit card. Pick one of your best images and upload the raw file using a large file sending service like Hightail or DropBox and then send me the link via e-mail. I will download and save your raw file, evaluate the exposure and sharpness, and optimize the image as if it were my own after converting the raw file in Adobe Camera Raw. Best of all, I will make a screen recording of the entire process and send you a link to the video to download, save and study.
Induro GIT 304L Price Drop
Amazingly, we have two, brand-new-in-the-box Induro GIT 304L tripods in stock. They are $699.00 each (were $799.00) and the price now includes insured ground shipping to the lower 48 states. Weekday phone orders only: 863-692-0906. Order yours here while they last.
Any Port in a Storm — Tripod on Railing Tips
|
|
|
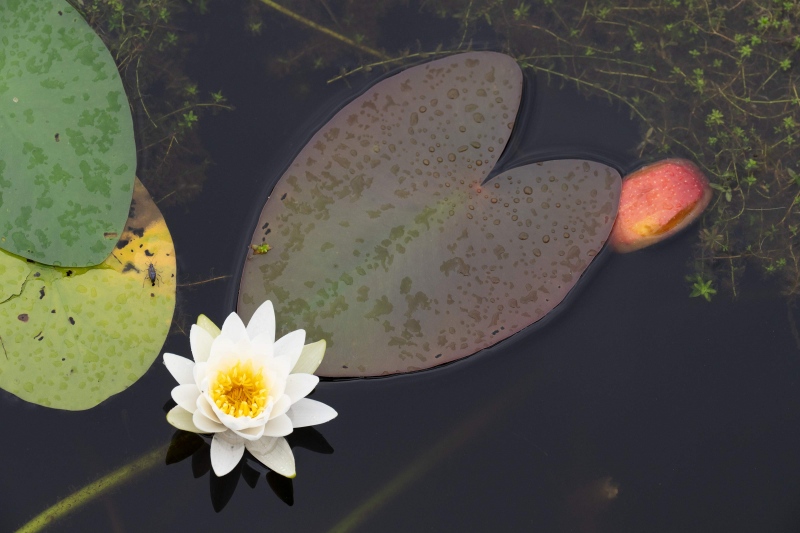
This image was created on 27 September 2022 from the pier at the lake near my home in Indian Lake Estates, FL. I used the Robus RC-5558 Vantage Series 3 Carbon Fiber Tripod/Levered-Clamp FlexShooter Pro-mounted Sony FE 70-200mm f/2.8 GM OSS II lens with the Sony FE 1.4x Teleconverter (at 238mm) and The One, the Sony Alpha 1 Mirrorless Digital Camera.. The exposure was determined via Zebras. ISO 1000: 1/125 sec. at f/.8 (stopped down two stops) in Manual mode. AWB at 8:29:25am on a still, cloudy morning. Manual Focus with Focus Peaking worked just fine, thank you very much. Click on the image to enjoy a high-res version. Image #1: The original converted straight up |
The Optimization Plans
I knew right out of the box that the image was too warm. The plethora of black and brown spots and blemishes on the lily pads and the flower itself were distracting. I did not like the stick (?) just breaking the surface in the lower right corner, nor did I like the tiny green bits on the heart-shaped lily pad in the center of the frame. I was unsure as to whether I should lose the copulating insects on the yellow in the lower left corner. I liked the overall image design, but envisioned a small crop to tighten things up.
|
|
|
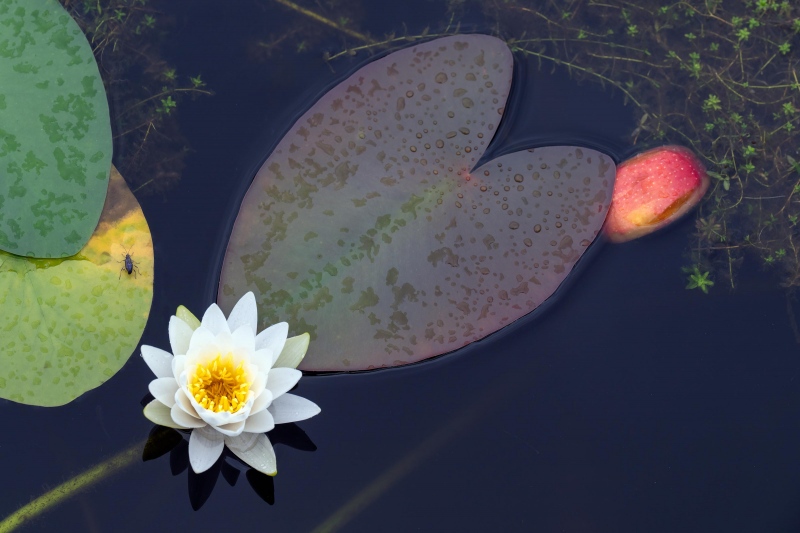
This image was created on 27 September 2022 from the pier at the lake near my home in Indian Lake Estates, FL. I used the Robus RC-5558 Vantage Series 3 Carbon Fiber Tripod/Levered-Clamp FlexShooter Pro-mounted Sony FE 70-200mm f/2.8 GM OSS II lens with the Sony FE 1.4x Teleconverter (at 238mm) and The One, the Sony Alpha 1 Mirrorless Digital Camera.. The exposure was determined via Zebras. ISO 1000: 1/125 sec. at f/.8 (stopped down two stops) in Manual mode. AWB at 8:29:25am on a still, cloudy morning. Manual Focus with Focus Peaking worked just fine, thank you very much. Click on the image to enjoy a high-res version. Image #1A: The optimized White Waterlily image |
30-Minutes of Clean-up Work!
I knew that the image was too warm, so I used Click White Balance on the brightest Whites of the flower. That lowered the Color Temperature from 5650 to a much more pleasing 5150. I set the White (+7) and Black (+28!) points, pulled down the Highlights (-49), left the Shadow slider at 0, and went with the rest of my standard adjustments. Last before converting the image was some work on the Color Mixer (HSL) tab adjusting the Saturation and Luminance sliders on the Red, Orange, and Yellow sliders. After the raw conversion I ran Topaz DeNoise with the Low Light setting. Next came a solid half-hour of work doing the image cleanup on its own layer. All the black, brown, and white spots were evicted using the Patch Tool, Content-Aware Fill, and the Spot-Healing Brush. In addition, several small Quick Masks, each refined with the Transform Tool and a Regular Layer Mask, were used to remove blemishes that merged with the bugs or with the edges of the lily pads. The final touch was a layer of Auto Tone at reduced opacity.
For me, it was time well spent.
Image Questions
1- Would you have left the copulating bugs or eliminated them? I am still not sure if I should have nixed them.
2- If you have any idea what the red object is, please leave a comment.
|
|
|
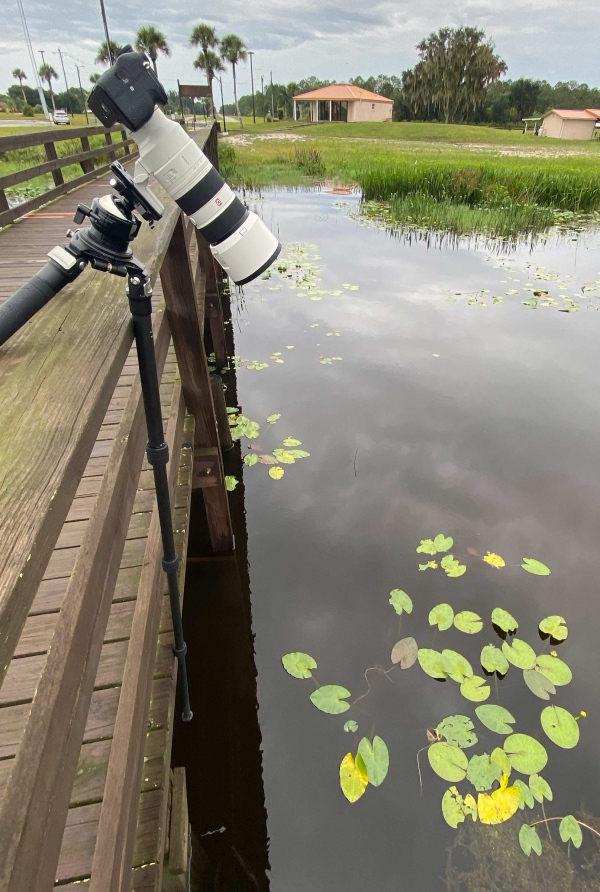
Click on the image to enjoy a high-res version. Image #2: Iphone image of tripod on railing set-up |
Tripod on Railing Set-up
After roughly framing the image with my handheld rig, I knew that I needed to be on the tripod, and that I needed to get the lens out over the railing and pointing down at the blossom. I placed the lens on the boardwalk so that I could position the tripod properly. I pulled out the stop tabs on the two rear legs and pulled the legs out. Then the tripod was placed on the pier railing and positioned so that the bottom of the forward-facing leg was pressed against the deck of the boardwalk. Though the two rear legs were up in the air, the tripod was perfectly level. Next was to mount the lens and adjust the Levered-Clamp FlexShooter Pro so that the lens was pointed at the scene with the head firmly locked down.
|
|
|
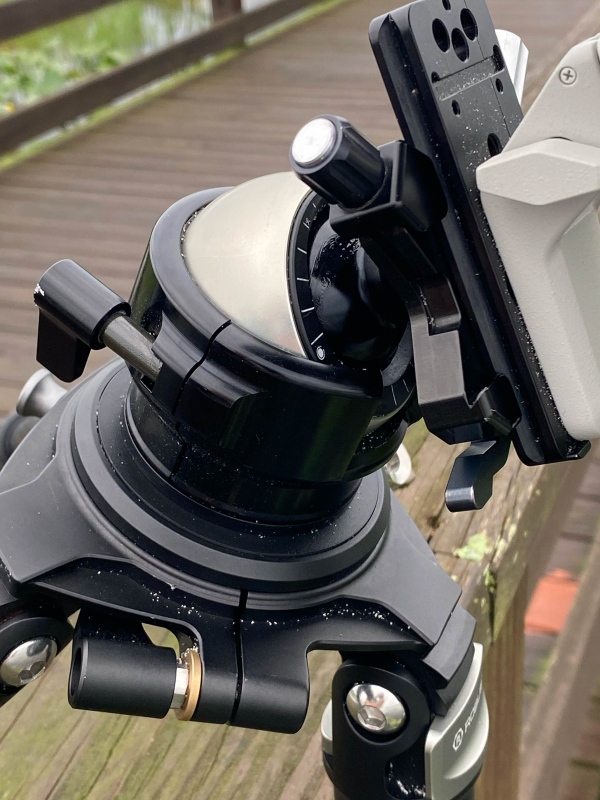
Click on the image to enjoy a high-res version. Image #2: Iphone image of the Levered-Clamp FlexShooter Pro set-up |
The Levered-Clamp FlexShooter Pro set-up
First note that I use a Wimberley P-10 Plate mounted in reverse on the 70-200 II. This is best for virtually all 70-200 and 100-400 lenses. Mounting the plate in reverse with the anti-twist nubs at the front of the lens allows you to properly balance the lens when teleconverters are added. Using expensive replacement feet with such lenses is insane for three reasons:
1- On average, they cost twice as much as a P-10 Plate.
2- They do not get you any lower.
3- They are not removable thus adding extra weight when you are handholding. Except when doing quasi-macro as above, or when creating landscapes, lenses in this class are most deadly when handheld.
The first step was to loosen the black lever and turn the black housing so that the slot that allows you to point the lens down was lined up with the forward-facing leg of the tripod. Next was to mount the lens while checking on the relative balance. The most important piece to this puzzle is to tighten the silver knob. If you attempt to frame the image and tighten the black lever the lens will move if you have failed to tighten the silver knob.
That done, you can frame the image perfectly and lock the rig in place by tightening the black lever. I first made a series of images with the blossom and the red whatever it is on the same plane. To move them to opposite corners of the frame, I simply loosened the tripod collar and turned the lens counterclockwise in the mount.
With only a slight breeze, 1/125 second produced sharp images and allowed me to work at f/8 at ISO 800.
As noted here previously, I pride myself in my ability to come up with in-the-field solutions to a great variety of unique problems that we encounter often when photographing nature. Consider joining me on an IPT to see just how that works.
Typos
With all blog posts, feel free to e-mail or to leave a comment regarding any typos or errors.




I’m wondering if the red object is a submerged lily flower bud. Typically they are above the water and the outer casing protecting the petals is reddish. An apple is a good idea, but on close inspection it would have to be an oddly shaped apple. And if it were an apple wedge, the flesh of the apple isn’t visible. As to the bugs, leave them, just nature in action.
Thanks, Keith. I agree that though it looks like an apple it is not. All of the vegetation in the area was destroyed by Ian so I will never know for sure unless and until I see another one 🙂
Your comment brought to mind “pond apples.” A search, however, revealed that they are yellow when ripe.
with love, artie
I’m wondering if a polarizing filter might have darkened the water and intensified the color saturation in the lily pad. The flower itself is gorgeous!
Me too. I had one in the car …
with love, artie
Take care during the storm! A lot of rain heading your way, not to mention the wind…
Leave the bugs because they add to the image. Hunker down for Ian and stay safe. Good luck with Ian, hope you get through the storm with no damage or loss of power.
Hi, Artie. Leave the bugs. The Red thing surely looks like an apple. Lovely image.
Funny. Dr. North thought the same thing. I assumed it was something that belongs in the lake 🙂 Or not.
with love, artie
Artie
Flowers as Art, cool. The bug does draw your eye but i would have left it as well and the clean up work was well worth the time even though I’ve never done that, truth be told i don’t really know how without making things worse.
Be safe and please don’t drive on the field or you may end up sinking!
Always with love b
Definitely keep the bugs. They are interesting and show excellent sharpness.
Thanks for leaving a comment. The sharpness and detail on the bugs is indeed astounding. I thought of including a super-tight crop of the bugs.’
with love, a