When Conditions are Tough, Don’t Quit: Be Creative and Strive to Hone Your Low Light Skills
Or you can stand around chatting with other photographers; bird photography, like life, is about choices.
Guido Bee: December 2, 2023 at 1:07pm
I’m with Joel. On-line d-o-f calculator shows 1200 mm at F/12.7 and 35 feet (just a guess, but it does not change very much) is 0.09 feet in front and also in back of the plane of focus. That’s about an inch either side. Nice shots. I’m partial to the hawk, but that’s just me.
Thanks for all your work in putting this out there for us. All the best.
Arthur Morris/BIRDS AS ART: December 3, 2023 at 8:20am
Hey Guy, Both correct on the d-o-f question.
And BTW, thanks for your kind words. I am inspired when folks are moved to leave a comment.
with love, artie
Please Remember
Please remember that the BIRDS AS ART blog is designed to be interactive. The more answers and comments that a post garners, the more you and I will learn. But only 100% of the time.
Your Call?
Which of today’s five featured bad weather images do you like best? Why?
What’s Up?
As you can tell from the title, Friday morning at Sebastian was not very good and the weather was beyond lousy for the most part. On Saturday morning, I put out the smelly rotted Black Drum carcass down by the lake. Conditions were perfect with cloudy-bright skies and a southeast winds. The vultures were slow at finding the bait but I persisted and was rewarded with one of my best ever road-kill cafe mornings. Details soon.
I took a midmorning walk with the peashooter rig, the Sony 70-200mm f/2.8 GM II lens, the 2X TC, and an a-1, and again, got a few ones.
Today is Sunday 3 December 2023. It is 7:26am and I am almost ready to publish today’s offering. It is cloudy, very dark, and foggy but I will head down to the lake in a bit to see what I can see and see what I can learn. Wherever you are and whatever you choose to do, I hope that you too have a great day.
Please remember to use the B&H and Amazon links that are found on most blog pages and to use the BIRDSASART discount code at checkout when purchasing your new gear from Bedfords to get 3% back on your credit card and enjoy free second-day air FedEx. Please, also, consider joining a BAA IPT. You will be amazed at how much you will learn!
You can find some great photo accessories (and necessities, like surf booties!) on Amazon by clicking on the Stuff tab on the orange/yellow menu bar above. On a related note, it would be extremely helpful if blog-folks who, like me, spend too much money on Amazon, would get in the habit of clicking on the Amazon logo link on the right side of each blog post when they shop online. As you might expect, doing so will not cost you a single penny, but would be appreciated tremendously by yours truly. And doing so works seamlessly with your Amazon Prime account.
If an item — a Delkin flash card, or a tripod head — for example, that is available from B&H and/or Bedfords, is also available in the BAA Online Store, it would be great, and greatly appreciated, if you would opt to purchase from us. We will match any price. Please remember also to use my B&H affiliate links or to earn 3% cash back at Bedfords by using the BIRDSASART discount code at checkout for your major gear purchases. Doing either often earns you free guides and/or discounts. And always earns my great appreciation.
|
|
|
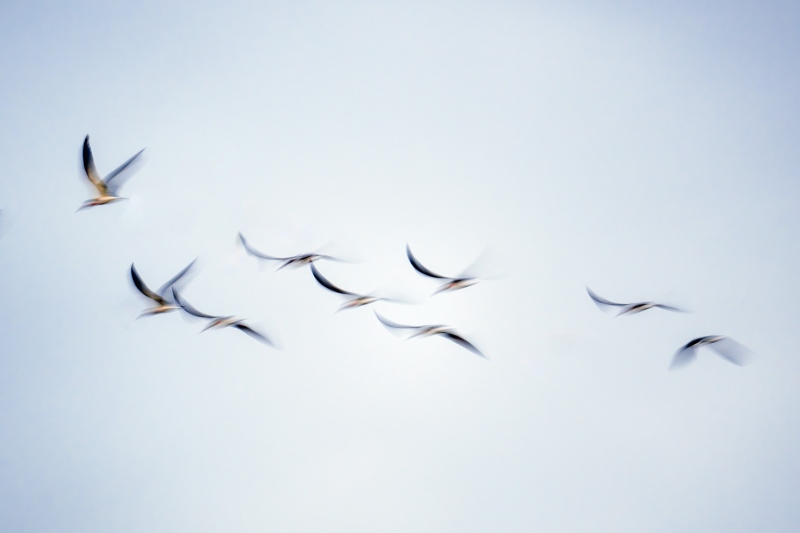
This image was also created on 1 December 2023 at Sebastian Inlet, FL. Standing at full height I used the Robus RC-5558 Vantage Series 3 Carbon Fiber Tripod/Levered-Clamp FlexShooter Pro-mounted Sony FE 600mm f/4 GM OSS lens and The One, the Sony Alpha 1 Mirrorless digital camera. The exposure was determined via Zebras with Exposure Compensation on the Thumb Dial. Multi-metering +2.7 stops in Shutter Priority mode. AUTO ISO set ISO 4000: 1/20 sec. at f/4 (wide open). Tracking: Zone/AF-C was active at the moment of exposure and performed perfectly. Be sure to click on the image to enjoy the larger version. Image #1: Black Skimmers in flight — blur |
How Dark Was It?
There were huge dark clouds to the southeast when I walked out onto the small jetty. Making sharp images of birds in flight was simply not an option. I went to my standard pre-dawn blur set-up: Shutter Priority with AUTO ISO and Exposure Compensation on the Thumb Dial. At +2.7 stops, I wound up at ISO 4000 at 1/20 second. That is dark!
Despite shooting at +2.7 stops, this image was still a bit underexposed. My understanding of the best exposures for per-dawn blurs increased astronomically when I began evaluating raw file exposures and brightness with RawDigger.
I had lots of chances as this small flock of skimmers coursed up and down the inlet. One of the nice things about Shutter Priority is that you can easily vary your shutter speeds to create a variety of looks.
|
|
A Guide to Pleasing Blurs
Learn everything there is to know about creating pleasingly blurred images in A Guide to Pleasing Blurs by Denise Ippolito and yours truly. This 20,585 word, 271 page PDF is illustrated with 144 different, exciting, and artistic images. The guide covers the basics of creating pleasingly blurred images, the factors that influence the degree of blurring, the use of filters in creating pleasing blurs, and a great variety of both in-the-field and Photoshop techniques that can be used to create pleasingly blurred images.
Artie and Denise teach you many different ways to move your lens during the exposure to create a variety of pleasingly blurred images of flowers and trees and water and landscapes. They will teach you to recognize situations where subject movement can be used to your advantage to create pan blurs, wind blurs, and moving water blurs. They will teach you to create zoom-blurs both in the field and during post-processing. Artie shares the techniques that he has used and developed for making blurred images of flocks of geese in flight at his beloved Bosque del Apache and Denise shares her flower blur magic as well as a variety of creative Photoshop techniques that she has developed.
With the advent of digital capture creating blurred images has become a great and inexpensive way to go out with your camera and have fun. And while many folks think that making successful blurred images is the result of being a sloppy photographer, nothing could be further from the truth. In “A Guide to Pleasing Blurs” Artie and Denise will help you to unleash your creative self.
|
|
|
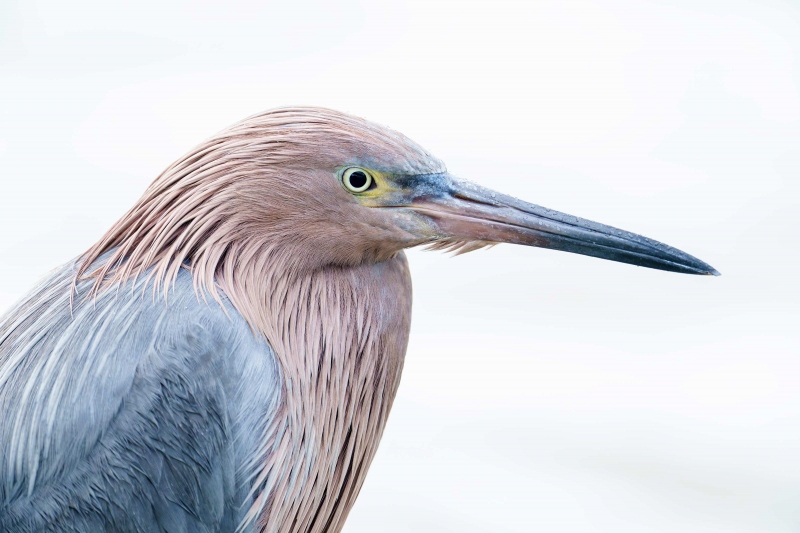
This image was also created on 1 December 2023 at Sebastian Inlet, FL. Crouching a bit behind my somewhat lowered tripod — I pulled the front leg out, I used the Robus RC-5558 Vantage Series 3 Carbon Fiber Tripod/Levered-Clamp FlexShooter Pro-mounted Sony FE 600mm f/4 GM OSS lens and The One, the Sony Alpha 1 Mirrorless digital camera. The exposure was determined via Zebras with Exposure Compensation on the Thumb Dial. Multi-metering +2.3 stops in Shutter Priority mode. AUTO ISO set ISO 2500: 1/60 sec. at f/4 (wide open). Tracking: Zone/AF-C was active at the moment of exposure and performed perfectly. Be sure to click on the image to enjoy the larger version. Image #2: Reddish Egret non-breeding head and shoulders portrait |
Honing Your Low Light Skills
When things are crappy, it is a great time to improve your low light/slow shutter speed sharpness techniques, not to mention lots of opportunities to work on high ISO exposures.
Without a ton of wind and with a still subject, I am confident of making sharp images with the 600mm f/4 on the tripod at 1/60 second. Amazingly, that is true with either the 1.4X TC or the 2X TC in the mix. There were several Reddish Egrets posing near the shore, some perched on rocks. There was a group of four or five photographers chatting, standing under the bridge to stay out of the rain. Nobody seemed at all interested in trying to be creative, improving their skills, or learning anything. Lousy weather gives you the opportunity to do all those things at once.
I did seek shelter once or twice during the morning when it began to rain really hard. But for the most part, there was a light drizzle early on that let up as the morning progressed.
The Image Optimizations
As regular readers know, properly exposed to the right raw files will look washed out and boring. I followed my current workflow and brought the images to life. With Image #2 in particular, the Luminance Targeted Adjustment Tool made it easy to juice up the colors so that they matched what I saw in real time. Learn how in The Digital Basics III Video Series. Volume I/#2 was distributed to subscribers on Tuesday past and will be available for sale on Tuesday for those who wish to purchase single videos.
|
|
|
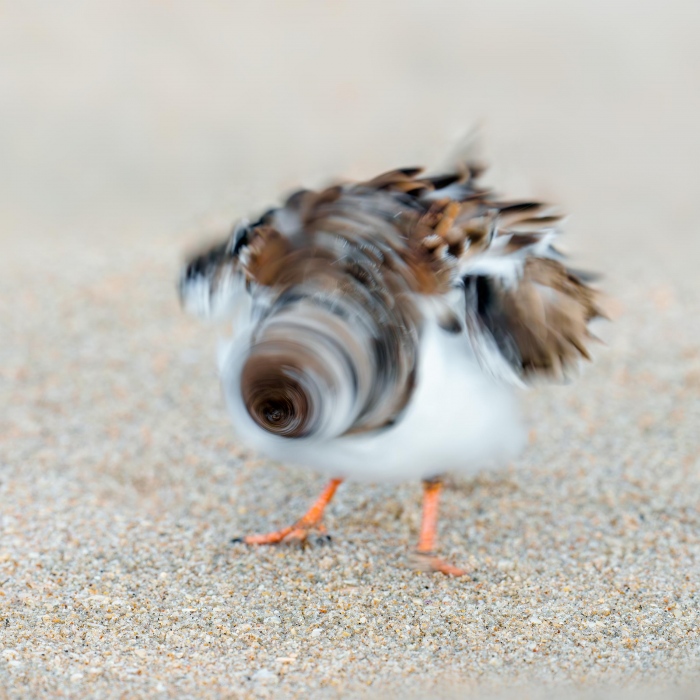
This image was also created on 1 December 2023 at Sebastian Inlet, FL. Standing at full height I used the Robus RC-5558 Vantage Series 3 Carbon Fiber Tripod/Levered-Clamp FlexShooter Pro-mounted Sony FE 600mm f/4 GM OSS lens and The One, the Sony Alpha 1 Mirrorless digital camera. ISO 1250. Exposure was determined via Zebras with ISO on the rear dial: 1/125 sec. at f/5.6 (stopped down 1-stop) in Manual mode. AWB at 7:07:01am on a cloudy, drizzly morning. Tracking: Expand Spot AF-C was active at the moment of exposure and performed perfectly. Be sure to click on the image to enjoy the larger version. Image #3: Ruddy Turnstone shaking head after bath |
The Violently Spinning Head Shot Blur
After shaking water off their feathers, most birds will spend a good deal of time preening after they bathe. On occasion, they will spin their heads violently while maintaining their feathers. I was attracted to this preening bird because of the relatively clean sand. Once the subject began ruffling its feathers, I pounded on the shutter button. The intermediate shutter speed of 1/125 second was capable of rending the eyes sharp when the bird ruffled its feathers, but with the violent head spin, it created a really neat blur effect. Though I am very selective in general, there may be some great benefits to holding the shutter button down when photographing action (and flight).
|
|
|
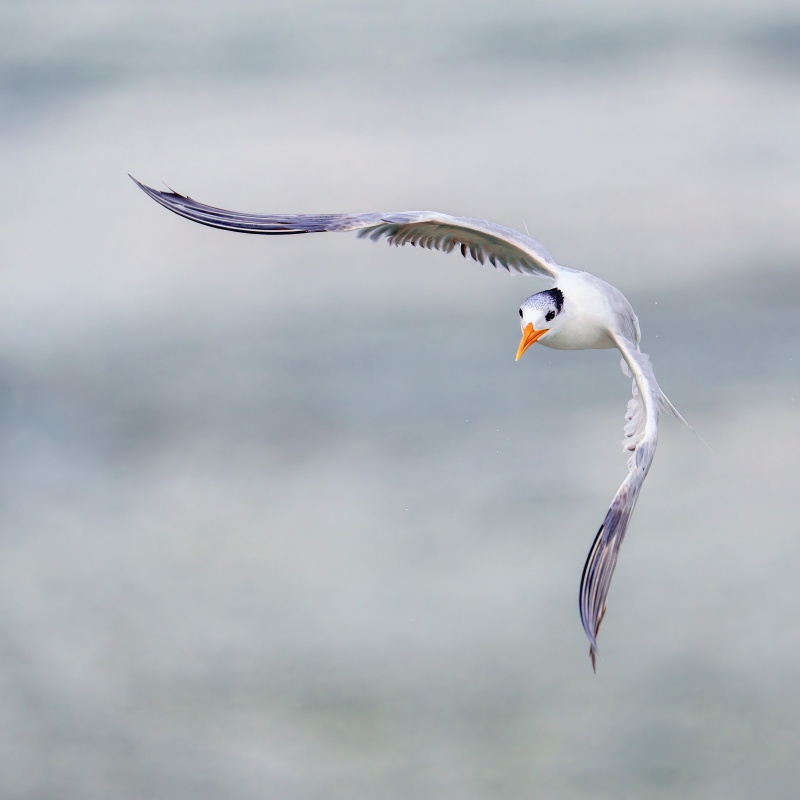
This image was also created on 1 December 2023 at Sebastian Inlet, FL. Standing at full height I used the handheld (!) Sony FE 600mm f/4 GM OSS lens and The One, the Sony Alpha 1 Mirrorless digital camera. ISO 1250. Exposure was determined via Zebras with ISO on the rear dial: 1/4000 sec. at f/4 (wide open) in Manual mode. AWB at 9:22:28am on a cloudy morning. Tracking: Zone AF-C was active at the moment of exposure and performed perfectly. Be sure to click on the image to enjoy the larger version. Image #4: Royal Tern wheeling in flight — wings fully down |
I Must Be Getting Stronger: Hand Holding the 600mm F/4 GM
When I headed back to the jetty, I went with the 600 on the tripod, but there were very few Ospreys in the air. There were, however, lots of Royal Tern fishing at relatively close range. So, I took the 600 out of the levered-clamp and hand held it for about twenty minutes without a problem. If, and only if, you are able to handhold a lens comfortably, it will always be easier to pan with a bird in flight and keep it in the center of the frame than it is when working off a tripod and attempting to do the same thing.
I was happy that when I did head back to the car I had zero right shoulder pain and zero left elbow and left wrist pain. If I had kept at it for too long, I would surely have paid a somewhat painful price.
|
|
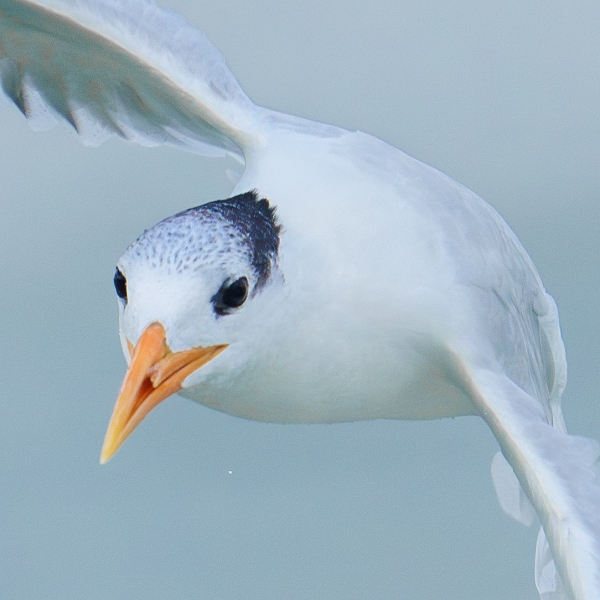
Image #4: Close-up of damaged bill — Royal Tern wheeling in flight — wings fully down |
Damaged Bill
I used the new Remove Tool (as detailed in The Digital Basics III Video Series) to repair the badly damaged bill of this tern. I continued discovering more and more about this amazing new Photoshop Tool and am including what I learn in each new video. I wind up using it only virtually every image that I process.
|
|
|
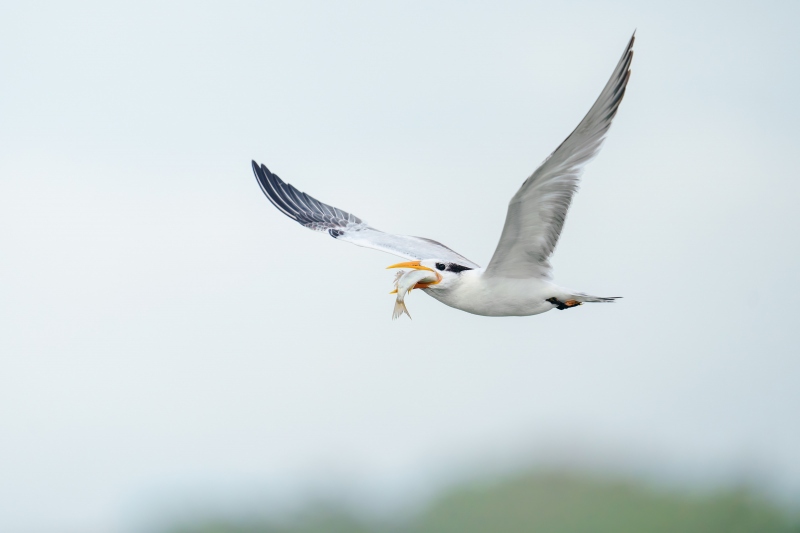
This image was also created on 1 December 2023 at Sebastian Inlet, FL. Standing at full height I used the handheld (!) Sony FE 600mm f/4 GM OSS lens and The One, the Sony Alpha 1 Mirrorless digital camera. ISO 1250. Exposure was determined via Zebras with ISO on the rear dial: 1/4000 sec. at f/4 (wide open) in Manual mode. AWB at 9:23:19am on a cloudy morning. Tracking: Zone AF-C was active at the moment of exposure and performed perfectly. Be sure to click on the image to enjoy the larger version. Image #5: Royal Tern in flight with pinfish |
Not Too Smart
I have stated for years, “If you head into the field wearing shorts or a short-sleeved shirt, only bad things can happen. You might get lucky, but …
As it had warmed up considerably as it brightened slightly, I removed my rain pants and my long-sleeved shirt. When the wind dropped away, the no-see-ums appeared and began chewing on any exposed areas of skin. That is why I lasted only 20 minutes or so. Again :-), I need to learn to listen to my own advice.
|
|
The Digital Basics III Video Series |
The Digital Basics III Video Series
I realized about a year ago that my digital workflow had changed significantly and was toying with the idea of writing a Digital Basics III. More recently, I have learned and begun working with two great new Photoshop Tools, the Remove Tool and the Luminance Targeted Adjustment Tool. The former is like a smarter Spot Healing Brush Tool on steroids and the latter is a huge step up from the fabulous Color Mixer Tool. During that same time frame, I came up with a new and improved 2-step noise reduction technique. I still use Divide and Conquer, Quick Masks, Layer Masks, an expanded array of personalized keyboard shortcuts, and tons of other stuff from both versions of Digital Basics.
As soon as I realized that I did not want to take on another large writing project, I realized that by creating a series of videos I could much more easily share all the details of my current digital workflow and much more easily incorporate additional new tips, techniques, and tools as I went. And so, The Digital Basics III Video Series was born. You can check out Volume I/#1 here.
You might opt to purchase single videos or to subscribe to Volume I and save $26 by ordering the first five videos in one fell swoop. You can purchase the five videos in Volume I by clicking here. The videos will be most valuable for folks using the latest version of Photoshop (2024) or Lightroom along with Topaz DeNoise AI and Topaz Sharpen AI.
Typos
With all blog posts, feel free to e-mail or to leave a comment regarding any typos or errors.



I have a few “drills without a bit” images such as #3 in my collection, and they always make me smile. Yours does as well 🙂 I’m a sucker for beautiful tight portraits, and for that reason the Reddish Egret takes my vote.
Love the “drills without a bit” phrasing!
Always nice when you stop by.
much love, a
Artie,
Hope you are having a great day. Prefer image 3 love the way the colors of the ruddy turnstone blend together in the blurr.
Thanks, Monte. Me too!
with love, a
Good morning, Artie, even though it’s afternoon where you are. My favorite is image 4, the wheeling tern. I like everything about it. Image 3 is hilarious but it needed explanation, and IMO the best photographic images don’t need explanations. I also love image 2, the tight portrait, but not quite as much as image 4. As for image 1, I like some blurs, and skimmers are ideal subjects for them. Indeed, a blur I made of skimmers under your tutelage at Nickerson some years ago won a top 100 award from Audubon out of 9,000 entries. And image 1 is pleasant, but not more for me.
Thanks for your comments Dr. Fish. Am I correct in thinking that you would not like any abstract photos?
For me, explanations are not needed –either I like an image or not. And BTW, #3 was my fave by far.
with love, a
Images #4 and Image #2 Reddish Egret both Images #4 and #5 of Royal Tern are interesting and well made! And Image #2 Reddish Egret is well made and interesting! Image #3 Ruddy Turnstone is not well made.
My favorite very interesting and well made image is #3 🙂
a
in #2 I like the subtle, pastel colors. but I would bring down the highlights a bit as some feathers in places have lost a bit of color and detail.
#3 makes me laugh. I wish the legs could have been sharp but I bet they were moving a lot too
#4 is my fave. Love the graceful, flowing position of the wing feathers. Nice subtle colors here too, then the contrast of the bright orange bill which you fixed perfectly.
Thanks for your comments. I do not agree on #2 🙂
The legs in #3 were completely still — they are not sharp because of insufficient d-o-f. I was very close to the bird and had already stopped down 1 stop.
Glad that you liked #4.
with love, a
Oh Bob! I really dislike that image… sorry! Not a fan of blurs anyway, but I actually quite liked Image 1. Love Image 2, but probably because these are one of my favourite birds. My preference is for Image 4…. a beautiful shot of an unusual wheeling flight pose, captured perfectly.
Maggie
I get it with the blurs what your saying however i am seeing the art behind the shot the color and the swirls on the face like how in the world did you do that, however a planned image in a blur and Arties results were amazing. I do and have always been a fan of sharp images don’t get me wrong i am just looking at this one in it’s art form. See you also like them as in image #1 as a great learning moment. If you were to try a few and experiment you may see that. It always is the one behind the camera and how one chooses to showcase the images.
Always with love b
Hey Bob,
I didn’t do it, the bird did!
with love, a
Maggie, You are free to like or dislike whatever you wish. #3 was my favorite by far 🙂
Strange that as you are “Not a fan of blurs anyway …” that you like #1. Go figure.
a
Artie
Good morning while i am not normally a fan of blurs i am learning to see the beauty of them from giving it a go a few times and your setting make it pretty easy 🙂
I LOVE todays image #3 that is the bomb a family jewel as you call it. Amazing the color and the blur is pretty neat. Well done 🙂 I am a fan.
Snowing here and so amazing the trees lit up bright and fluffy think ill wear shorts and a tee shirt, not!
In the post coming or going you never finished that to let your readers know.
Always with love b
+1 on the Ruddy shot. In my neck of the woods, the light you encountered is normal.
My favorite also. You get lots of sun in the northeast plus the occasional crappy day.
a
Thanks East Bobman,
Opening your eyes to new photographic genres is always a good thing.
with love, a