What’s Up?
Please remember that the blog is designed to be interactive, to make you think, to help you become a better photographer, to inspire you, and to help you to develop both your eye for image design and your creativity. Toward that end, while considering the fact that this blog post took more than two hours to create, please consider taking a minute or two to comment on the images or to answer the image design question below.
Your Call?
Which of today’s three featured images is your favorite? Please leave a comment and let us know why you make your choice?
What’s Up?
Photography at Nickerson Beach continues to be both challenging and productive. On Monday morning, I took the 600 and a tripod into the field for the first time in about ten days. I’d been doing most of my work with the 300mm f/2.8, either TC, and either camera body (the a-1 or the a9 iii).
Today is Tuesday 13 August 2024. I will again be heading out early to deal with allegedly clear skies and a SW wind, a very challenging situation. I hope that you too opt to have a great day. The afternoon weather looks perfect for my afternoon session with repeat private session client Marc Wortsman.
Please remember to use the B&H links that are found on most blog pages and to use the BIRDSASART discount code at checkout when purchasing your new gear from Bedfords to get 3% back on your credit card and enjoy free second-day air FedEx. Please, also, consider joining a BAA IPT. You will be amazed at how much you will learn!
If an item — a Delkin flash card, or a tripod head — for example, that is available from B&H and/or Bedfords, is also available in the BAA Online Store, it would be great, and greatly appreciated, if you would opt to purchase from us. We will match any price. Please remember also to use my B&H affiliate links or to earn 3% cash back at Bedfords by using the BIRDSASART discount code at checkout for your major gear purchases. Doing either often earns you free guides and/or discounts. And always earns my great appreciation.
Supporting My Efforts Here
If you enjoy and learn from the blog, please consider using one of my affiliate links when purchasing new gear. It will never cost you a single penny. To support my effort here, please order from B&H by beginning your search here. Or, click here, to order from Bedfords and enter the discount code BIRDSASART at checkout to receive 3% cash back to your credit card and enjoy free Second-Day Air Fed-Ex shipping. It is always best to write for advice via e-mail.
In many cases, I can help you save some serious dollars. And/or prevent you from purchasing the wrong gear.
Save 15%!
If you’d like to try out a new lens or if you need a lens for a specific trip or project (or for an IPT), LensRentals.com is the only way to go. To save 15%, simply click on the logo link above, arrange for your rental, and type in BIRDSASART15. If you type the gear you are looking for in the search box, it will pop right up. LensRentals.com offers affordable insurance. You can decline it, opt for LensCap: Damage Only, or select LensCap: Damage & Theft. Then hit PROCEED TO CHECKOUT. After you enter all of your info but before completing your order, be sure to scroll down to Promo Code box and enter the BIRDSASART15 code to save 15%.
I checked on renting a Sony FE 70-200mm f/2.8 GM OSS II lens for a week. The cost is only $122.00. LensCap: Damage Only coverage can be added for a very low $18.00. Going with LensCap: Damage & Theft would be $27.00. The shipping charge varies. They offer an interesting program called Lensrentals HD. By signing up for this shipping discount program ($99.00/year), you’ll get free Standard Shipping on all the orders you place.
Renting a Sony 600mm f/4 GM OSS lens for a week will cost you $536.00. The two coverage options come in at $76.00 or $114.00. Less your 15% discount when you enter the BIRDSASART15 code into the Promo Code box at checkout and enter the BIRDSASART15 code in the Promo Code box at checkout to save 15%.
Remember, to save the 15% on your rental you must start your search by clicking on the logo above, or on this link: LensRentals.com


B&H
To ensure that I get credit for your B&H purchases, you can always click here. The tracking is invisible but greatly appreciated. And, you can use your PayBoo card. You must use the website to order. B&H will reopen on Fri April 14. Thanking me for the past 4000 educational blog posts could not be any easier and will not cost you one penny. Please shoot me your B&H receipt for major purchases.
Many folks have written recently stating that they purchased a Sony a1 from B&H and would like their free membership in the Sony 1 Info and Updates Group, a $150.00 value. When I check my affiliate account, their orders have not been there. When I let them know that they get credit for B&H purchases only if they use one of the many B&H affiliate links on the blog or begin their searches with this link, they are always disappointed. If in doubt, please contact me via e-mail and request a BH link. I am always glad to help and to guide you to the right gear.
Bedfords Simplified
Click here to start your search. Choose standard shipping, and when you get to the payment page, enter BIRDSASART in the discount code box and hit apply. You will be upgraded to free second day air Fed-Ex and receive 3% cash back on your credit card once your stuff ships. Either is greatly appreciated by yours truly.
Bedfords Amazing BAA Discount Policy
Folks who have fallen in love with Bedfords can now use the BIRDSASART coupon code at checkout to enjoy a post-purchase, 3% off-statement credit (excluding taxes and shipping charges) on orders paid with a credit card. The 3% credit will be refunded to the card you used for your purchase. Be sure, also, to check the box for free shipping to enjoy free Second Day Air Fed-Ex. This offer does not apply to purchases of Classes, Gift Cards, prior purchases.
Visit the Bedfords website here, shoot Steve Elkins an e-mail, or text him on his cell phone at (479) 381-2592.
Gear Questions and Advice
Too many folks attending BAA IPTs and dozens of photographers whom I see in the field and on BPN, are — out of ignorance — using the wrong gear, especially when it comes to tripods and more especially, tripod heads. And the same is true in spades when ordering new camera bodies or lenses. My advice will often stave you some serious money and may help you avoid making a seriously bad choice. Please know that I am always glad to answer your gear questions via e-mail. If you are desperate, you can try me on my cell at 863-221-2372. Please leave a message and shoot me a text if I do not pick up.
|
|
|
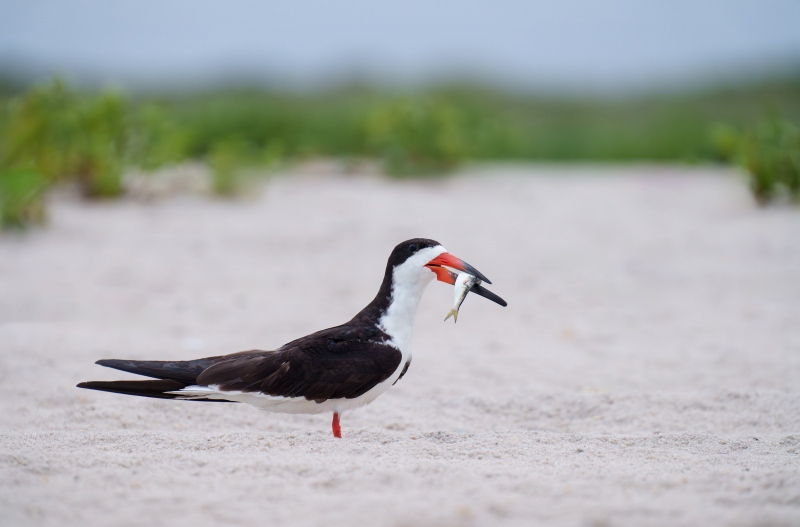
This image was created on 7 August 2024 at Nickerson Beach Park, Lido Beach, Long Island, NY. While crouching a bit on the beach below the berm, I used the handheld Sony FE 70-200mm f/2.8 GM OSS II lens with the Sony FE 2x teleconverter (at 400mm), and The One, the Sony Alpha 1 Mirrorless Digital Camera.. The exposure was determined via Zebras with Exposure Compensation on the Thumb Dial. Multi metering +1.3 stops. AUTO ISO set ISO 3200: 1/60 sec. at f/5.6 (wide open) in Shutter Priority mode. AWB at 6:20:51am on a totally cloudy morning. Tracking: Expand Spot AF/C with Bird-Eye/Face Detection performed perfectly. Click on the image to enjoy a high-res version. Image #1: Black Skimmer with baitfish for chick |
Sometimes, I am Just Plain Lazy …
The morning of August 7th dawned dark and dreary and I was feeling a bit lazy as I exited my SUV in the parking lot. So, not planning on having a great morning, I grabbed the a1, the 70-200 f/2.8 II, and both TCs. Hoping for some spectacular blastoffs, I set up in Shutter Priority mode. But the skimmers had other thoughts. So I looked to the north at the birds on the beach with the berm serving as sort of a hide for me and was able to get fairly close to this skimmer without bugging it.. I had only to crouch a bit to get eye level with the birds. I created about a dozen images before it flew off in search of its chick. Working at 400mm, I had chosen the borderline shutter speed of 1/60 second; only two were sharp.
|
|
|
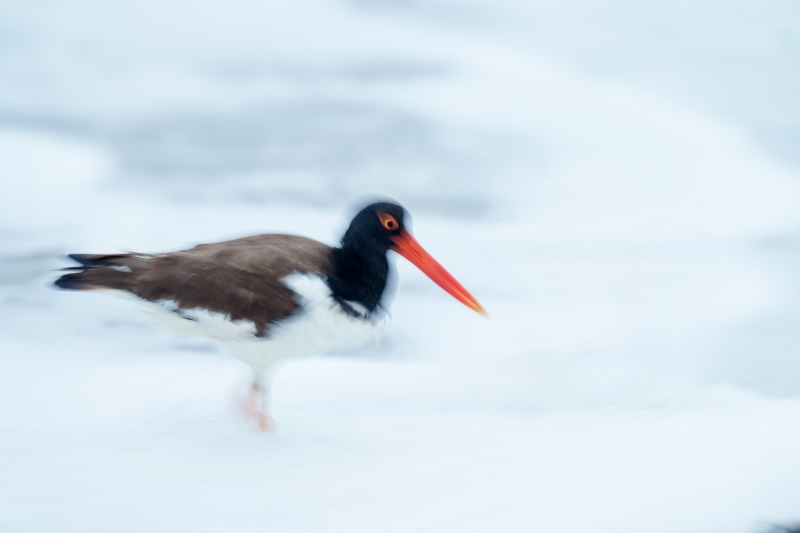
This image was also created on 7 August 2024 at Nickerson Beach Park, Lido Beach, Long Island, NY. Seated on damp sand, I employed the knee-pod technique with the handheld Sony FE 70-200mm f/2.8 GM OSS II lens with the Sony FE 2x teleconverter (at 308mm), and The One, the Sony Alpha 1 Mirrorless Digital Camera.. The exposure was determined via Zebras with Exposure Compensation on the Thumb Dial. Multi metering +2.3 stops. AUTO ISO set ISO 800: 1/13 sec. at f/5.6 (wide open) in Shutter Priority mode. AWB at 6:23:30am on a totally cloudy morning. Tracking: Expand Spot AF/C with Bird-Eye/Face Detection performed perfectly. Click on the image to enjoy a high-res version. Image #2: American Oystercatcher in surf |
A Quasi Jiggle Blur
When handholding at 500mm with a very slow shutter speed, like 1/13 second, it is virtually impossible to create sharp images (unless the lens is firmly supported as it would be by placing the lens hood on the ground with your left hand on the ground beneath the camera body — I made some neat images with blurred wave backgrounds recently using this technique at 1/15 second and will share one or two of them with you here soon.)
Back to the oystercatcher blur — as I could not keep the lens perfectly still for this image, I got the effect of a jiggle blur, usually created by a slight circular shaking of the lens. In any case, I like the result but for the double eye in the original. So, I did some neat Eye Doctor work with the Clone Stamp Tool and a series of small Quick Masks each resized and Warped and then refined by the addition of a Regular Layer Mask. That after easily removing a young oystercatcher that had been standing next to the adult. You can see the original in the new YouTube video that was featured here in the last blog post.
I love the streamlined swoosh-shape of the re-crafted eye as it seems to suggest speed and forward motion.
|
|
A Guide to Pleasing Blurs
Learn everything there is to know about creating pleasingly blurred images in A Guide to Pleasing Blurs by Denise Ippolito and yours truly. This 20,585 word, 271 page PDF is illustrated with 144 different, exciting, and artistic images. The guide covers the basics of creating pleasingly blurred images, the factors that influence the degree of blurring, the use of filters in creating pleasing blurs, and a great variety of both in-the-field and Photoshop techniques that can be used to create pleasingly blurred images.
Artie and Denise teach you many different ways to move your lens during the exposure to create a variety of pleasingly blurred images of flowers and trees and water and landscapes. They will teach you to recognize situations where subject movement can be used to your advantage to create pan blurs, wind blurs, and moving water blurs. They will teach you to create zoom-blurs both in the field and during post-processing. Artie shares the techniques that he has used and developed for making blurred images of flocks of geese in flight at his beloved Bosque del Apache and Denise shares her flower blur magic as well as a variety of creative Photoshop techniques that she has developed.
With the advent of digital capture creating blurred images has become a great and inexpensive way to go out with your camera and have fun. And while many folks think that making successful blurred images is the result of being a sloppy photographer, nothing could be further from the truth. In “A Guide to Pleasing Blurs” Artie and Denise will help you to unleash your creative self.
|
|
|
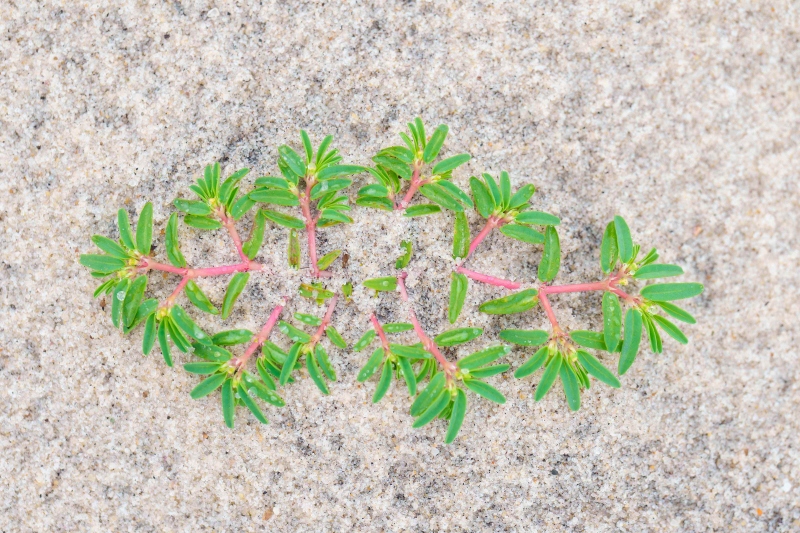
This image was also created on 7 August 2024 at Nickerson Beach Park, Lido Beach, Long Island, NY. Standing at full height, I used the handheld Sony FE 70-200mm f/2.8 GM OSS II lens (at 200mm), and The One, the Sony Alpha 1 Mirrorless Digital Camera.. The exposure was determined via Zebras with ISO on the Thumb Dial. ISO 1250: 1/80 sec. at f/5.6 (stopped down two stops) in Manual mode. AWB at 7:25:56am on a then cloudy morning. Tracking: Expand Spot AF/C with Bird-Eye/Face Detection performed perfectly. Click on the image to enjoy a high-res version. Image #3: Euphorbia polygonifolia |
Captivated by a Low Growing Plant
I had been looking at this specific plant for more than a week before I created the successful image above. I loved the oval shape and the soft vibrant colors. I first photographed it with my iPhone 15; I optimized the raw file but the resulting image simply did not cut it. On my lazy 7 August morning, as I headed back to my car early, I made it a point to swing by the tiny (about 5 inches in width) sandmat plant. The soft light was perfect. With its fabulous close focus, the amazingly versatile 70-200mm lens at 200mm turned out to be the very best tool for the job. Note that I needed ISO 1250 to get to +2 stops of light on the analogue scale and that I stopped down two full stops from f/2.8 to f/5.6 to provide enough depth-of field to cover the leaves and the stems.
As you saw or can see in the above-mentioned video, the original for this image looked dull and washed out as it should have been. The relatively new Luminance Targeted Adjustment Tool allowed me to easily juice up the colors to taste in a matter of moments.
An Image Design Question
Does the centered image design for this oval-shaped subject work for you or would you have preferred a more angular approach by rotating the plant or a different crop?
Euphorbia Polygonifolia
Euphorbia polygonifolia, known by the common names of seaside sandmat and seaside spurge, is a member of the spurge family, Euphorbiaceae. It is an annual herb, native to the east coast of the United States where it grows on coastal sand dunes of the Atlantic Ocean as well as along the shores of the Great Lakes. This plant is potentially threatened by development, coastal erosion, recreational activities, invasive species, and succession. Contact with the latex of seaside sandmat can cause poison ivy-like symptoms.
Typos
With all blog posts, feel free to e-mail or to leave a comment regarding any typos or errors.


Hi, Artie. The plant is my favorite and I like the composition; I wouldn’t crop or re-frame it. I like the color and detail. Skimmers are tough because it’s so often hard t see their eye. I like the first image but would like it more if the eye were more visible. On the blur, you mentioned the “double eye” in the original. Oystercatchers look as if they have double pupils; in addition to the real pupil there’s a black spot in the yellow iris. Every oystercatcher I’ve photographed had eyes like this. Could that have been what you saw and replaced? And I don’t understand this from you: “…blurs, usually created by a slight circular sharing of the lens.” That word “sharing,” was that what you meant to say?
Thanks David. My understanding is that only the female American Oystercatchers have the smudged pupil. The males do not. I have lots of photos of males with perfectly round pupils.
So no, not what I saw and replaced. You can see the original in the video.
with love, artie
Ha, interesting. I’ll have to go back and look at my oystercatcher photos. Shaking. I should have figured that out.
Hi Artie,
The plant gets my vote, but the blurs are interesting from time to time.
All the best.
Guido
Thanks, Guy!
with love, artie
The blurred Skimmer with the captivating eye gets my vote.
Glad that you liked it too :-). Thanks for leaving a comment.
artie
It’s Tuesday 13th here across the pond!!