Your Call?
Which two of today’s six featured images are your favorites? Please let us know why you made your choices.
My Call
In the last blog post, Longs Lens Lessons From the Worst Morning in Two Weeks, here, my favorite by a mile was the Black-bellied Whistling Duck. Why? The reddish-brown feathers and the pink bill (with a touch of yellow) were set off beautifully by the background — light blue water lit by early morning sun. I had not had a good chance on one and in addition, I loved the leaning-forward pose.
What’s Up?
I sent my tax stuff to Chip the accountant on Monday. 2023 was the worst year ever for BIRDS AS ART. By far. As we used to say in AEPi, ICCL –I could care less.
The weather in the mornings has been great. The bird photography? Fair to good.
Today is Tuesday 24 September 2024. The forecast is for partly cloudy with an east wind so I will grab the gar from the extra fridge, put it out for the vultures, and try for some flight. Whatever you are doing, I hope that you too choose to have fun and to enjoy life.
Please remember to use the B&H links that are found on most blog pages and to use the BIRDSASART discount code at checkout when purchasing your new gear from Bedfords to get 3% back on your credit card and enjoy free second-day air FedEx. Please, also, consider joining a BAA IPT. You will be amazed at how much you will learn!
If an item — a Delkin flash card, or a tripod head — for example, that is available from B&H and/or Bedfords, is also available in the BAA Online Store, it would be great, and greatly appreciated, if you would opt to purchase from us. We will match any price. Please remember also to use my B&H affiliate links or to earn 3% cash back at Bedfords by using the BIRDSASART discount code at checkout for your major gear purchases. Doing either often earns you free guides and/or discounts. And always earns my great appreciation.
Supporting My Efforts Here
If you enjoy and learn from the blog, are all set for gear, or live overseas, consider leaving a BAA Blog Thank You Gift here.
If you enjoy and learn from the blog, please consider using one of my affiliate links when purchasing new gear. It will never cost you a single penny. To support my effort here, please order from B&H by beginning your search here. Or, click here, to order from Bedfords and enter the discount code BIRDSASART at checkout to receive 3% cash back to your credit card and enjoy free Second-Day Air Fed-Ex shipping. It is always best to write for advice via e-mail.
In many cases, I can help you save some serious dollars. And/or prevent you from purchasing the wrong gear.
A Rare Chance: Photographing Bathing Black Vultures
It was sunny, hot, and very still on the morning of September 16, perfect I thought, for bathing vultures. Despite the fact that in 25 years at Indian Lake Estates, I had never gotten to photograph a vulture bathing. Why not? They are very, very shy. But that morning was bingo! Sit next to me as I evaluate and comment on the 69 images that I kept. My six favorites follow. Be sure to check out the image optimizations by comparing the exposed to the right raw files in the video with the optimized images below.
The biggest take-away from the video? Photographing bathing Black Vultures on a sunny morning is a difficult challenge.
|
|
|
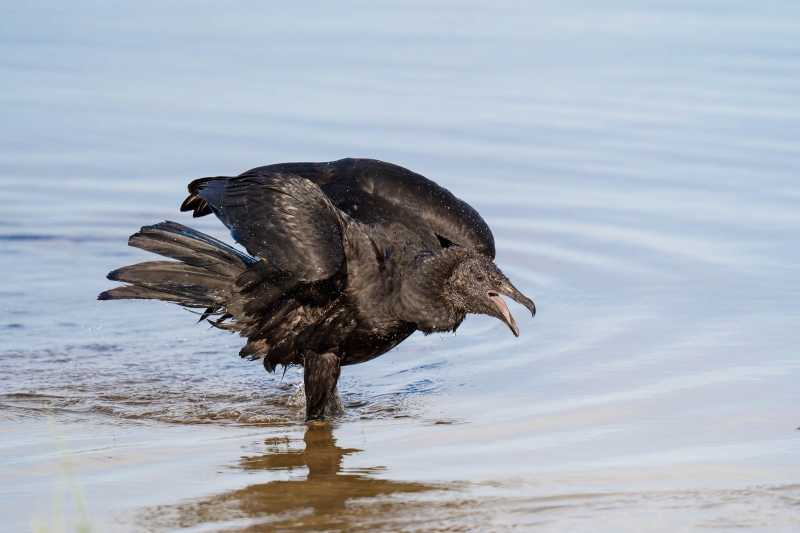
This image was created on 16 September 2024 down by the lake near my home at Indian Lake Estates, FL. Working from the driver’s seat of my SUV and resting the lens hood on the door frame, I used Sony FE 200-600mm f/5.6-6.3 G OSS lens (at 559mm) and the ridiculously amazing Sony a9 III Mirrorless Camera. The exposure was determined using Zebra technology with ISO on the Thumb Dial. ISO 1600. 1/3200 second at f/6.3 (wide-open) in Manual Mode. AWB at 8:38:50am on a sunny morning. RawDigger showed the exposure to be dead-solid perfect. Tracking: Zone/AF-C with Bird Face/Eye Detection performed perfectly. Be sure to click on the image to enjoy a high-res version. Image #1: Black Vulture after bath with bill open |
Why The Open Bill?
After bathing while leaving the water, most of the Black Vultures would open their bills. They were not drinking, and they were not making any of their grunting or hissing sounds. Why were they consistently opening their bills? I have no idea and my research turned up nothing.
|
|
|
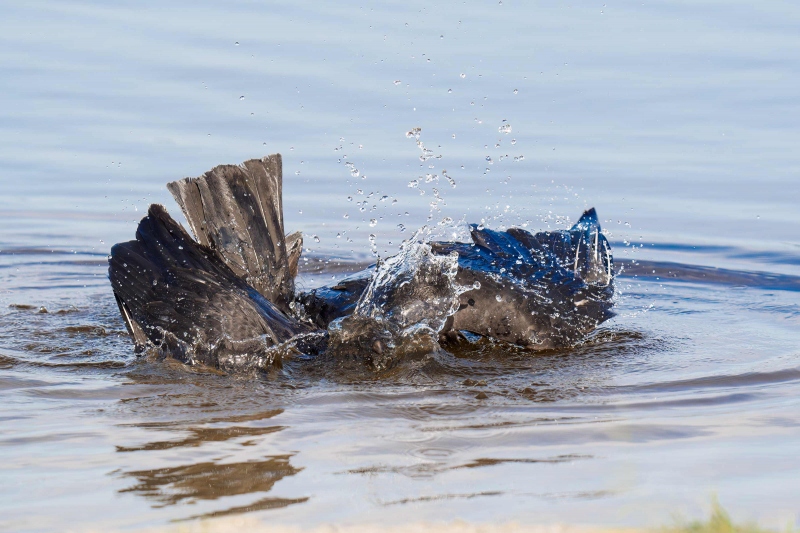
This image was created on 16 September 2024 down by the lake near my home at Indian Lake Estates, FL. Working from the driver’s seat of my SUV and resting the lens hood on the door frame, I used Sony FE 200-600mm f/5.6-6.3 G OSS lens (at 437mm) and the ridiculously amazing Sony a9 III Mirrorless Camera. The exposure was determined using Zebra technology with ISO on the Thumb Dial. ISO 1600. 1/3200 second at f/6.3 (wide-open) in Manual Mode. AWB at 8:38:59am on a sunny morning. RawDigger showed the exposure to be dead-solid perfect. Tracking: Zone/AF-C with Bird Face/Eye Detection performed perfectly. Be sure to click on the image to enjoy a high-res version. Image #2: Black Vulture bathing |
The Bath
From The Birds of North America No. 411
Black Vulture will bathe in shallow water. (Rea 1983) described the bathing behavior or cathartic vultures: The birds enter the water and “drop the carpal end of one wing at a time as far as possible into the water, lower and dunk the head forward, then splash themselves vigorously with a sideways roll of the body while ruffling the body feathers.” The plumage, particularly head, neck, breast, and belly — may become quite wet. (Neil J. Buckley.)
|
|
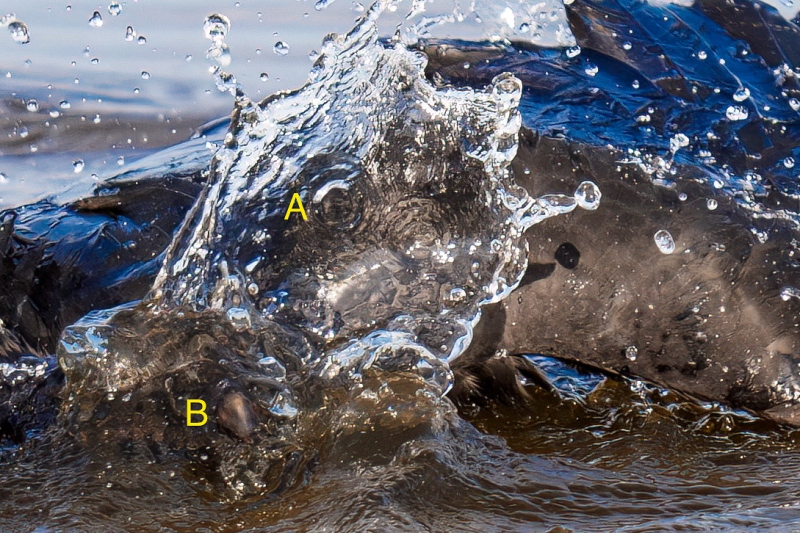
Image #2A: A tight crop of the Black Vulture bathing image immediately above |
What’s What?
Is that the left eye of the vulture just right of the letter A or the tip of the bill just to the right of letter B? I am pretty sure that it cannot be both …
|
|
|
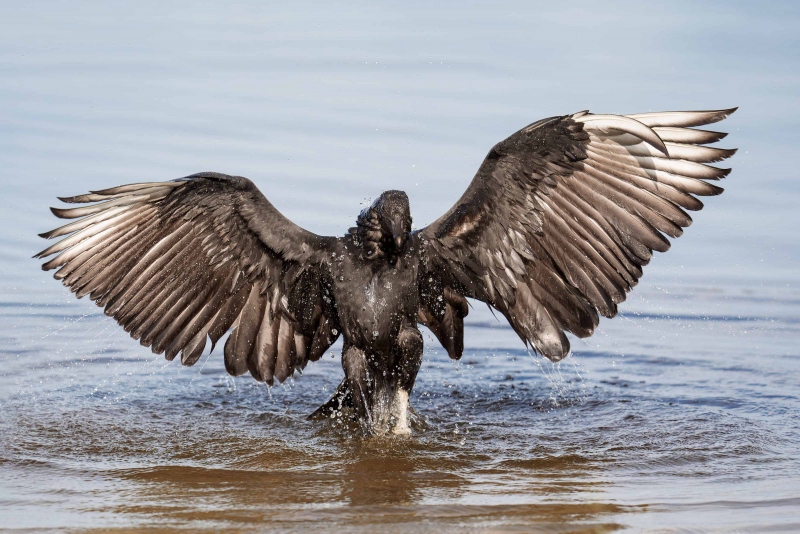
This image was also created on 16 September 2024 down by the lake near my home at Indian Lake Estates, FL. Working from the driver’s seat of my SUV and resting the lens hood on the door frame, I used Sony FE 200-600mm f/5.6-6.3 G OSS lens (at 553mm) and the ridiculously amazing Sony a9 III Mirrorless Camera. The exposure was determined using Zebra technology with ISO on the Thumb Dial. ISO 1600. 1/3200 second at f/6.3 (wide-open) in Manual Mode. AWB at 8:39:02am on a sunny morning. RawDigger showed the exposure to be dead-solid perfect. Tracking: Zone/AF-C with Bird Face/Eye Detection performed perfectly. Be sure to click on the image to enjoy a high-res version. Image #3: Black Vulture mid-bath |
Eye Replaced
With the nictitating membrane covering 2/3 of the vulture’s eye, I opted to grab the perfect eye from a frame further on in the series. Eye replacements are easy if you know Quick Masking, especially warping the selection to attain the perfect size, shape, and match.
Nictitating Membrane
Adapted from Wikipedia
The nictitating membrane (from Latin nictare, to blink) is a transparent or translucent third eyelid present in some animals that can be drawn across the eye to protect and moisten it while maintaining vision.
Birds can actively control their nictitating membrane. In birds of prey (and many other bird families as well), the membrane serves to protect the parents’ eyes from their chicks while they are feeding them> When a Peregrine goes into their 200-mile-per-hour (320 km/h) dives, they will blink repeatedly with their nictitating membranes to clear debris and spread moisture across the eyes. Woodpeckers tighten their nictitating membrane a millisecond prior to their beak impacting the trunk of a tree to prevent shaking-induced retinal injury.
Note: Unlike an eyelid that travels from the top of the eye to the bottom, the nictitating membrane travels sideways from the front of the eye to the back.
|
|
|
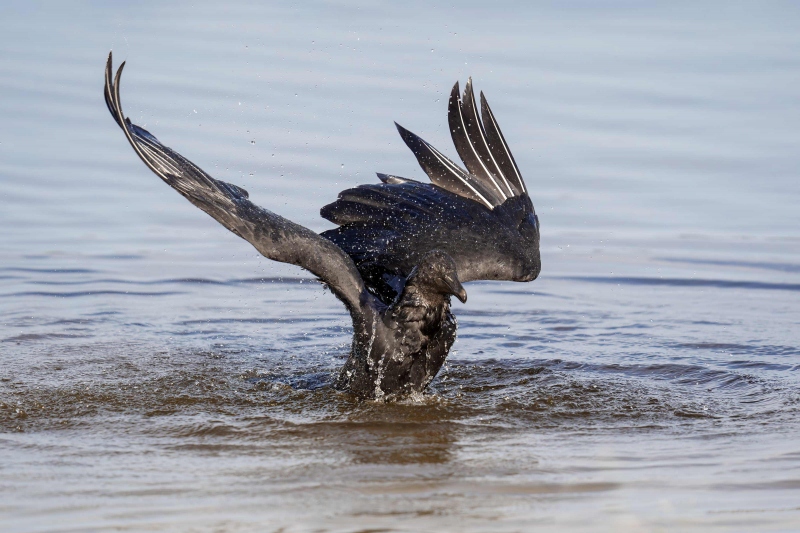
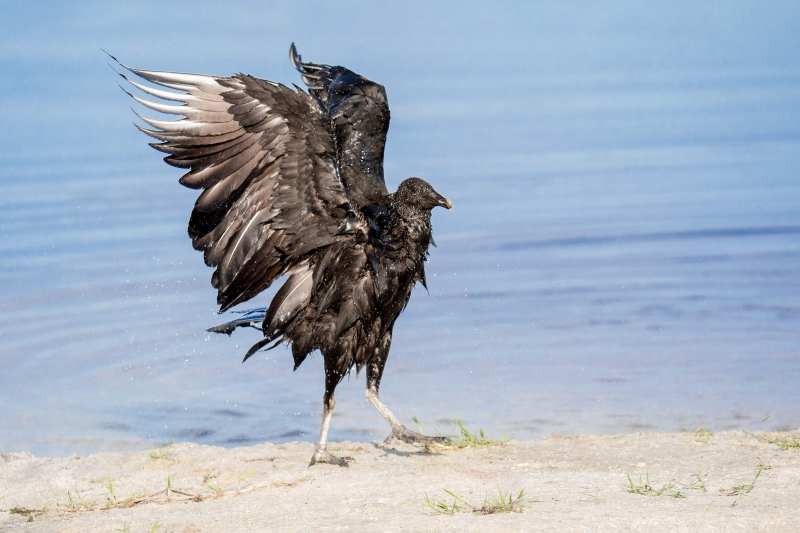
This image was created on 16 September 2024 down by the lake near my home at Indian Lake Estates, FL. Working from the driver’s seat of my SUV and resting the lens hood on the door frame, I used Sony FE 200-600mm f/5.6-6.3 G OSS lens (at 553mm) and the ridiculously amazing Sony a9 III Mirrorless Camera. The exposure was determined using Zebra technology with ISO on the Thumb Dial. ISO 1600. 1/3200 second at f/6.3 (wide-open) in Manual Mode. AWB at 8:38:59am on a sunny morning. RawDigger showed the exposure to be dead-solid perfect. Tracking: Zone/AF-C with Bird Face/Eye Detection performed perfectly. Be sure to click on the image to enjoy a high-res version. Image #4: Black Vulture flapping after bath |
The Key to This Image Optimization
I did some Eye Doctor work on the bird’s right eye, enhancing the highlight along the edge of the iris while darkening the pupil and lightening the iris. Then, again using Tim Grey Dodge and Burn, I lightened the entire right half of the vulture’s face with a (very high) 50% opacity brush.
In combination, the improvement over the raw file was vast.
|
|
|
This image was created on 16 September 2024 down by the lake near my home at Indian Lake Estates, FL. Working from the driver’s seat of my SUV and resting the lens hood on the door frame, I used Sony FE 200-600mm f/5.6-6.3 G OSS lens (at 385mm) and the ridiculously amazing Sony a9 III Mirrorless Camera. The exposure was determined using Zebra technology with ISO on the Thumb Dial. ISO 2000. 1/3200 second at f/6.3 (wide-open) in Manual Mode. AWB at 8:47:06am on a sunny morning. RawDigger showed the exposure to be dead-solid perfect. Tracking: Zone/AF-C with Bird Face/Eye Detection performed perfectly. Be sure to click on the image to enjoy a high-res version. Image #5: Black Vulture flapping after bath |
Why Not Get Lower For All of These Images?
When the vultures are bathing, they are very sensitive to any movement at all. Though the bird in Image #3 about 25 feet to the right of sun angle, I did not want to risk moving the car forward as the bird would likely have quit mid-bath.
The thought of getting out of my vehicle and onto the ground for a more intimate perspective never even entered my mind.
Why No BLUBB?
Once the vultures began bathing I put the 600 with the 2X on the pillows on the passenger seat, took the BLUBB off the door frame, and grabbed the 200-600 with a a9 iii. I raised the window about 5 inches and placed the lens hood on the window. With the very fast shutter speeds, I did not have to worry about stability. Most importantly, it was much easier to zoom in and out as needed. I shot the a9 iii at half speed, 60 frames per second. In retrospect, 120 fps would have been a better choice.
|
|
|
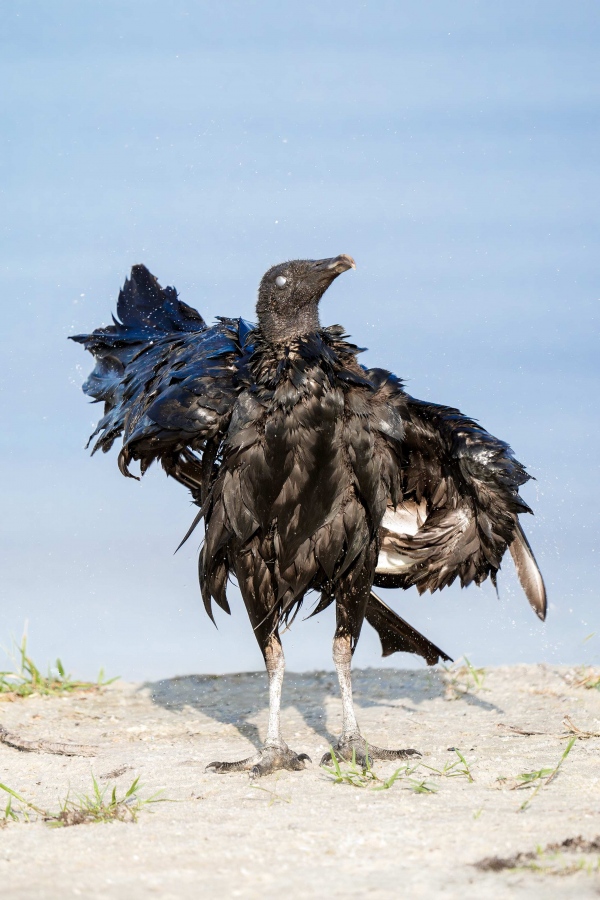
This image was created on 16 September 2024 down by the lake near my home at Indian Lake Estates, FL. Working from the driver’s seat of my SUV and resting the lens hood on the door frame, I used Sony FE 200-600mm f/5.6-6.3 G OSS lens (at 600mm) and the ridiculously amazing Sony a9 III Mirrorless Camera. The exposure was determined using Zebra technology with ISO on the Thumb Dial. ISO 2000. 1/3200 second at f/6.3 (wide-open) in Manual Mode. AWB at 8:47:41am on a sunny morning. RawDigger showed the exposure to be dead-solid perfect. Tracking: Zone/AF-C with Bird Face/Eye Detection performed perfectly. Be sure to click on the image to enjoy a high-res version. Image #6: Black Vulture ruffling after bath |
Should I Have Replaced the Eye?
With the light blue nictitating membrane completely covering the bird’s visible eye, should I have replaced the eye with an open one from the same series? Why or why not?
It does not seem possible to me that the Black Vultures can “maintain vision” when the light blue, seemingly opaque nictitating membrane covers the eye completely. What do you think?
|
|
The BIRDS AS ART Current Workflow e-Guide (Digital Basics II).You can order your copy from the BAA Online Store here, by sending a PayPal for $40 here, or by calling Jim or Jennifer weekdays at 863-692-0906 with your credit card in hand. Be sure to specify Digital Basics II. |
The BIRDS AS ART Current Workflow e-Guide (Digital Basics II)
The techniques mentioned above and tons more great Photoshop tips and techniques — along with my complete digital workflow, Digital Eye Doctor Techniques, and all my personalized Keyboard Shortcuts — are covered in detail in the BIRDS AS ART Current Workflow e-Guide (Digital Basics II), an instructional PDF that is sent via e-mail. Note: folks working on a PC and/or those who do not want to miss anything Photoshop may wish to purchase the original Digital Basics along with DB II while saving $15 by clicking here to buy the DB Bundle.
Please note: the Divide and Conquer technique was inadvertently omitted from DB II. It is detailed in a free excerpt in the blog post here.
Folks who learn well by following along rather than by reading can check out the complete collection of MP 4 Photoshop Tutorial Videos by clicking here. Note: most of the videos are now priced at an amazingly low $5.00 each.
You can learn how and why I converted all of my Canon digital RAW files in DPP 4 in the DPP 4 RAW Conversion Guide here. More recently, I became proficient at converting my Nikon RAW (NEF) files in Adobe Camera Raw. About three years ago I began converting my Nikon and Sony RAW files in Capture One and did that for two years. You can learn more about Capture One in the Capture One Pro 12 Simplified MP4 Video here. The next step would be to get a copy of Arash Hazeghi’s “The Nikon Photographers’ Guide to Phase One Capture One Pro e-Guide” in the blog post here. Today, I convert my Sony raw files in Photoshop with Adobe Camera Raw.
You can learn advanced Quick Masking and advanced Layer Masking techniques in APTATS I & II. You can save $15 by purchasing the pair.
|
|
The Digital Basics III Video Series |
The Digital Basics III Video Series
I realized more than a year ago that my digital workflow had changed significantly and was toying with the idea of writing a Digital Basics III. More recently, I learned and begun working with two great new Photoshop Tools, the Remove Tool and the Luminance Targeted Adjustment Tool. The former is like a smarter Spot Healing Brush Tool on steroids and the latter is a step up from the fabulous Color Mixer Tool. During that same time frame, I came up with a new and improved 2-step noise reduction technique. I still use Divide and Conquer, Quick Masks, Layer Masks, an expanded array of personalized keyboard shortcuts, and tons of other stuff from both versions of Digital Basics.
As soon as I realized that I did not want to take on another large writing project, I realized that by creating a series of videos I could much more easily share all the details of my current digital workflow and much more easily incorporate additional new tips, techniques, and tools as I went. And so, The Digital Basics III Video Series was born.
You can save $26 by ordering the first five videos in Volume I by clicking here. The videos will be most valuable for folks using the latest version of Photoshop (2024) or Lightroom along with Topaz DeNoise AI and Topaz Sharpen AI.
Typos
With all blog posts, feel free to e-mail or to leave a comment regarding any typos or errors.




Hi Artie,
Very interesting to see this behaviour, the mouth opening after bathing and the bathing itself.
I looked hard at the image 2A and it looks to me like the Birds Eye is located at B. the A location may just be an air pocket in the water as it is being splashed around.
Overall I like the number 6 image best even though the nictitating membrane is covering the eye.
I do find it a bit distracting from an otherwise nice pose.
Kind regards
David.
Well, there’s a name from the past. Nice to see you here. Yeah, the open mouth business is puzzling.
What I am seeing to the right of the B seems clearly to be the tip of the bill. To the right of the A is just an illusion as far as I can figure. The “eye” there is much too large.
At some point I will post one with the eye replaced.
much love, artie
ps: do you hand out on BPN at all?
Artie:
#6 would have been my absolute favorite if you had replaced the eye — it’s a great view of the whole bird “ruffling” up after it’s bath. Since you didn’t replace the eye, #5 is my favorite followed by #3 (although I could hardly find the head/eye when I first looked at it).
Thanks you Ms Fishburne 🙂
with love, a