B&H Holiday Book
There are some great buys in this holiday “book.” Click on the logo-link above to view it online. Use the left and right arrow keys to access the pages in the book. To purchase an item, you must click on the SKU, the stock-keeping unit #, the number just to the left of the price. Check out the great buys on the SanDisk 4TB Extreme Portable SSD (Solid State) V2 (Black) External Hard Drives that I use every day for only $259.99 each. Happy shopping.
What’s Up?
Tuesday morning was so-so. The most fun I had was photographing an adult and a young crane picking bugs off of my SUV. Tuesday evening was so-so. We did photograph the silhouetted cranes on the hill just south of the parking circle but spent most of our time talking to a young ILE mother and her young (aspiring gymnast) daughter, Ramsey about the cranes. Sharing avian info with others always leaves you with a warm glow.
Yesterday, with Bob doing most of the work, we planted The Perch III in the marsh adjacent to the South Peninsula. Two days before, Bob, again doing most of the work by himself, erected Bob’s Skinny Perch in the same location. He had a Red-shouldered Hawk on that perch the first afternoon. On Monday there was a Great Egret on The Perch II at sunset. On Tuesday, it was an Osprey. Both birds flew as we began our slow approach in my SUV :-(.
Today is Wednesday 4 December 2024. Bob Eastman and I are headed to Lakeland to see if the American White Pelicans are at the lakes. Whatever you choose to do, we hope that like us, you choose to be happy and have fun.
Please remember to use the B&H links that are found on most blog pages and to use the BIRDSASART discount code at checkout when purchasing your new gear from Bedfords to get 3% back on your credit card and enjoy free second-day air FedEx. Please, also, consider joining a BAA IPT. You will be amazed at how much you will learn!
If an item — a Delkin flash card, or a tripod head — for example, that is available from B&H and/or Bedfords, is also available in the BAA Online Store, it would be great, and greatly appreciated, if you would opt to purchase from us. We will match any price. Please remember also to use my B&H affiliate links or to earn 3% cash back at Bedfords by using the BIRDSASART discount code at checkout for your major gear purchases. Doing either often earns you free guides and/or discounts. And always earns my great appreciation.
Supporting My Efforts Here
If you enjoy and learn from the blog, are all set for gear, or live overseas, consider leaving a BAA Blog Thank You Gift here.
If you enjoy and learn from the blog, please consider using one of my affiliate links when purchasing new gear. It will never cost you a single penny. To support my effort here, please order from B&H by beginning your search here. Or, click here, to order from Bedfords and enter the discount code BIRDSASART at checkout to receive 3% cash back to your credit card and enjoy free Second-Day Air Fed-Ex shipping. It is always best to write for advice via e-mail.
In many cases, I can help you save some serious dollars. And/or prevent you from purchasing the wrong gear from the wrong shop.
It’s Safe to go in the Water Now
Sony a-1 Firmware Update Update
Last spring, Sony announced firmware update v2.00 for the a-1, its flagship camera body. In short order the firmware story became an embarrassing fiasco. Over time, they announced v2.01 that caused terrible problems when the camera was used with the hugely popular 200-600 G lens. After some time, they released v2.02. About six weeks ago, with some trepidation, I purchased a used a-1 and updated it to v.2.01, and then to 2.02. I am happy to report that it is now possible to go back into the water.
The last update, v2.02, offers some great stuff for bird photographers.
v.2.02 Benefits
Battery life with 2.02 is fine. There are no issues with the 200-600 G lens. Bird Face-Eye AF is significantly improved. Wide AF with Bid Face-Eye tracking has improved drastically. Formatting a card takes about two seconds as compared to 10 seconds or more with previous firmware versions. But the very best news is a brand new feature called Focus Recall. Huge thanks to Arash Hazeghi for pointing it out to me as we worked on an update to the Sony a-1 (a9 iii) flight guide. I took what he taught me about programming Preset Focus/Zoom to a single button for flight photography and turned it into what will surely turn out to be a huge game-changer for general bird photography.
I call it “double button focus recall.” I programmed two easy-to-reach (previously unassigned) buttons to PRESET Focus Distance. I can then register a close focusing distance to one button and a far focusing distance to the other. A tap of either button instantly brings me to either as needed.
Here is a practical, real life example. I am walking out on the pier. There are some very tame Turkey Vultures and a Limpkin perched on the railing. As I slowly approach the birds, I focus on the nearest one and then press and hold the near-focus button. Th camera registers the focus distance my current close focus distance. I might or might not create a few images. Before continuing my approach, however, I take a moment to focus on the end of the pier and this time I press and hold the far focus button. That becomes my far focus distance. Then I tap the close focus button for the birds on the railings and go to work.
I glance up and see an Osprey carrying a large Crappie in its talons flying over the end of the pier. I tap the AEL button to get to my pre-registered far focusing distance. The AF system will have a relatively easy time of seeing the subject. And once the bird is framed, initial focusing acquisition will be virtually instantaneous. Had the AF system been left at the close focusing distance (while working the birds on the pier railing), there is a good chance that the system would have been temporarily blind when I attempted to acquire focus on the Osprey in flight.
Understand that neither the close nor the far focusing distances need to be anywhere near precise. As long as the AF system is in the general neighborhood (as far as focusing distance is concerned), it will not struggle to acquire focus. Once the Osprey flies by, Artie simply taps the AF-On button to instantly get back to the approximate focusing distance for the birds on the railing.
Yesterday I sent the SONY Alpha a1 Set-up and Info Notes e-Mail J (23 OCT 2024) Firmware Update Update item to the entire group; it began like this:
Dear a1 Gang,
I hope that all of you are well, having fun, and making some great images. Big time thanks and congrats to the twenty folks in the group who have gotten my v2.02 settings onto their a-1 bodies. Many of them helped by letting me know of typos and other errors in the two instructional e-mails. After ten full days or working every morning with my v2.02 Firmware a-1, the 600mm f/4, and the 300mm f/2.8 (each with either TC), I can wholeheartedly recommend that most everyone with an a-1 would be best to update to Firmware v2.02.
If you are a member of the a-1 group and have not received e-Mail J, please e-mail me with your current and correct e-mail address 🙂
a-1 Group members can receive the two e-mails by sending a PayPal for $50.00 (with the words a-1 v2.021/v2.02 Firmware updates in the Subject line) to birdsasart@verizon.net or by calling the office at 863-692-0906 with a credit card to pay the $50.00. No worries if you have already updated to v2.02 — pay the $50.00 and I’ve got you covered.
If you are not a member of my a-1 group and would like to update your camera body and get all of my current setting on it, you will need to either send a PayPal for $125.00 (with the words a-1 v2.021/v2.02 Firmware updates in the Subject line) to birdsasart@verizon.net or call Jim at 863-692-0906 with a credit card to pay the $125.00.
All of the images in today’s blog post were created with my v2.02 CAMST202.DAT on my α-1 mirrorless camera body.
|
|
|
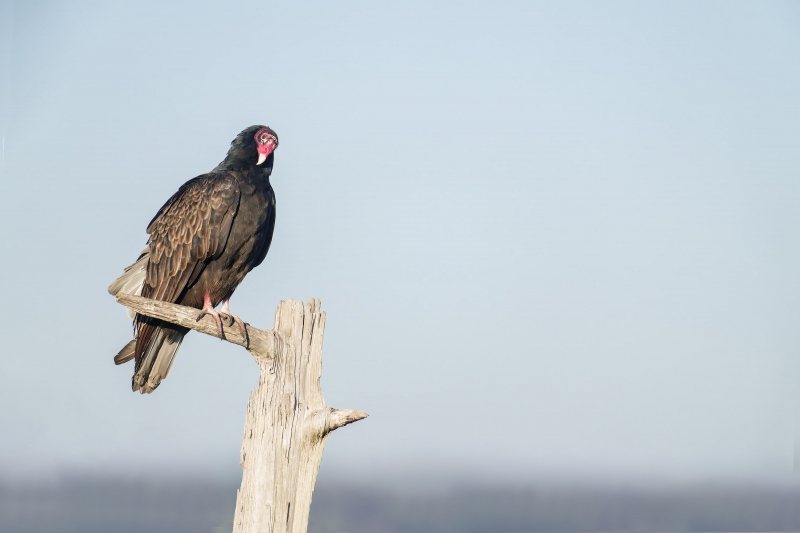
This image created on 2 December 2024 down by the lake at Indian Lake Estates, FL. Seated in the driver’s seat of my SUV, I used the BLUBB-supported Sony FE 600mm f/4 GM OSS lens with the Sony FE 1.4x Teleconverter, and The One, the Sony Alpha 1 Mirrorless Digital Camera.. The exposure was determined by Zebras with ISO on the rear wheel: ISO 1250. 1/3200 second at f/5.6 (wide open) in Manual mode. RawDigger showed that the exposure was dead solid perfect. AWB at 8:18:45am on a sunny morning. Tracking: Expand Spot/AF-C with Bird-Eye/Face Detection performed perfectly. Click on the image to enjoy the high-res version. Image #1 Turkey Vulture (TV) sitting on The Perch II minding its own business |
It Had Been a Very Cold and Slow Morning
We began before dawn, but at 8:15am we had little to show for our efforts. With the guys replacing some of the rotted boards on the pier, the vultures on the railings took flight into the north wind. We decided to check The Perch II one last time before heading home for breakfast. I was not surprised that one of the Turkey Vultures had landed on it. It was nothing to get excited about, but as we had been practically skunked all morning, we approached in my SUV and stopped to make a few images.
|
|
|
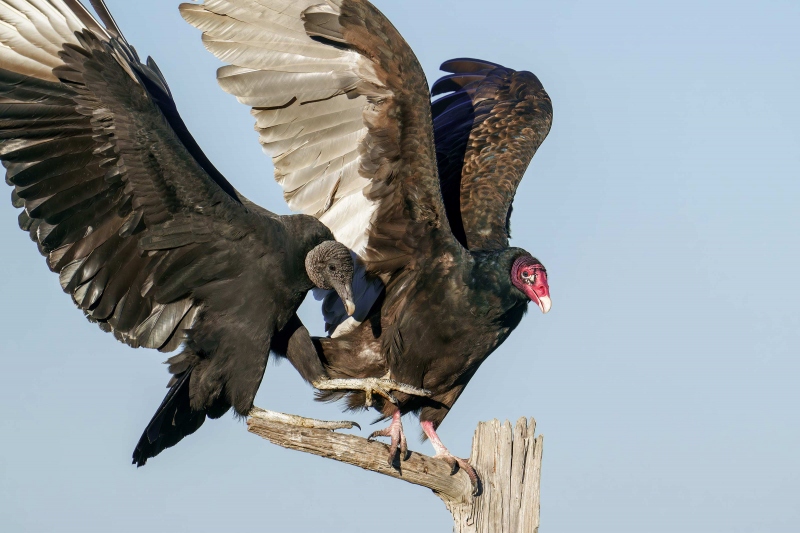
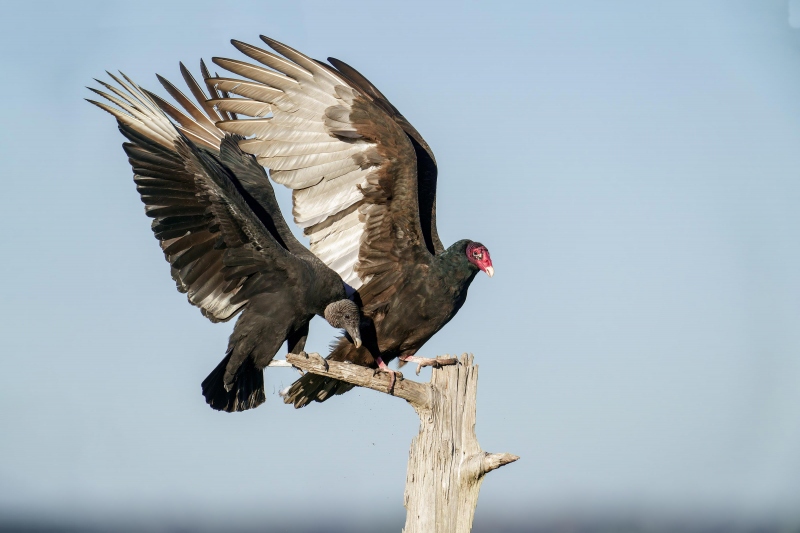
This image also created on 2 December 2024 down by the lake at Indian Lake Estates, FL. Still seated in the driver’s seat of my SUV, I used the BLUBB-supported Sony FE 600mm f/4 GM OSS lens with the Sony FE 1.4x Teleconverter, and The One, the Sony Alpha 1 Mirrorless Digital Camera.. The exposure was determined by Zebras with ISO on the rear wheel: ISO 1250. 1/4000 second at f/5.6 (wide open) in Manual mode. RawDigger showed that the exposure was dead solid perfect. AWB at 8:19:31am on a sunny morning. Wide AF-C with Bird-Eye/Face Detection performed perfectly. Click on the image to enjoy the high-res version. Image #2: Excuse me! Black Vulture (BV) expecting the Turkey Vulture to give up its spot |
Incoming Left!
“Black Vulture flying in from our left,” I shouted. Bob Eastman had seen the bird approaching the perch with the TV on it. As he was hand holding the 200-600, he got on the incoming BV and panned with it as it attempted to drive the TV off the perch. His problem was that when the BV hit the perch, he could not stop panning quickly enough. So, even though he was working a lot wider than I was — 600mm vs. 840mm, he wound up clipping most of the action shots badly with the left frame edge. A similar problem occurs when a diving bird hits the water, you naturally keep on panning 🙁
Working at 840mm on the BLUBB-, I opted to stay on the bird on the perch. As the intruding vulture entered the frame I followed my own oft-given advice by holding the shutter button down until things settled down about 3 seconds later. I was not concerned with the framing or the performance of the AF system. I just shot. In short order, I created more than 100 images of the action. At first glance, I was disappointed as dozens and dozens of the early images had severely clipped wings. I was shocked, however, at how well Wide AF-C had done. The Bird Face-Eye tracking was dramatically improved with Firmware v2.02. The wings of both birds were so badly clipped in Image #2 that there was no chance of making repairs. But as this was the absolute peak of the action and was plenty sharp, I went with an aggressive crop.
I was fortunate that I had decreased the exposure by 1/3-stop as compared to Image #1 by increasing the shutter speed from 1/3200 to 1/4000 sec. That change helped render the action sharp.
|
|
|
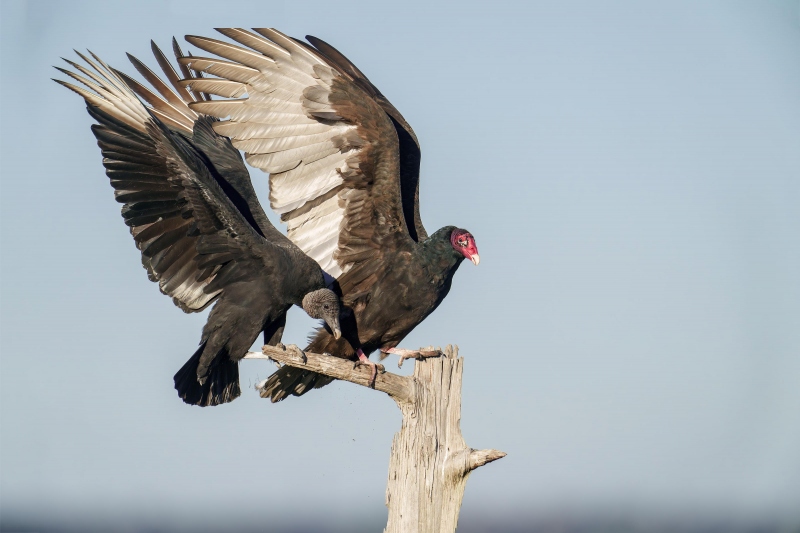
This image also created on 2 December 2024 down by the lake at Indian Lake Estates, FL. Still seated in the driver’s seat of my SUV, I used the BLUBB-supported Sony FE 600mm f/4 GM OSS lens with the Sony FE 1.4x Teleconverter, and The One, the Sony Alpha 1 Mirrorless Digital Camera.. The exposure was determined by Zebras with ISO on the rear wheel: ISO 1250. 1/4000 second at f/5.6 (wide open) in Manual mode. RawDigger showed that the exposure was dead solid perfect. AWB at 8:19:32am on a sunny morning. Wide AF-C with Bird-Eye/Face Detection performed perfectly. Click on the image to enjoy the high-res version. Image #3: Clipped! |
Clipped!
The original frame here was my very favorite of the long sequence. Image #3 shows that I clipped the ends of the first and second primaries of the TV and then added canvas above to lay the foundation that I would need to complete the wing tip repairs.
|
|
|
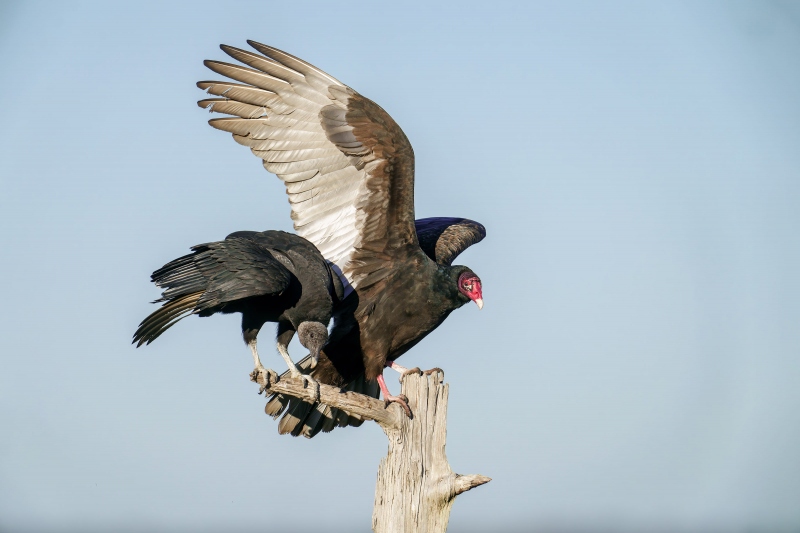
This image also created on 2 December 2024 down by the lake at Indian Lake Estates, FL. Still seated in the driver’s seat of my SUV, I used the BLUBB-supported Sony FE 600mm f/4 GM OSS lens with the Sony FE 1.4x Teleconverter, and The One, the Sony Alpha 1 Mirrorless Digital Camera.. The exposure was determined by Zebras with ISO on the rear wheel: ISO 1250. 1/4000 second at f/5.6 (wide open) in Manual mode. RawDigger showed that the exposure was dead solid perfect. AWB at 8:19:33am on a sunny morning. Wide AF-C with Bird-Eye/Face Detection performed perfectly. Click on the image to enjoy the high-res version. Image #4: The Source Material |
Nice, But Better as Source Material
Though Image #4 is fine as a standalone photo, it is nowhere near as strong as Image #3. While reviewing the sequence in Photo Mechanic, I had my eye out for an image that I could use to grab the two missing primaries. Created a second or less after the clipped image, I knew at first glance that this one would be perfect and would provide the two needed primary tips. Therefore, I pressed the 2 key to give this image a Yellow color code in Photo Mechanic.
|
|
|
This image also created on 2 December 2024 down by the lake at Indian Lake Estates, FL. Still seated in the driver’s seat of my SUV, I used the BLUBB-supported Sony FE 600mm f/4 GM OSS lens with the Sony FE 1.4x Teleconverter, and The One, the Sony Alpha 1 Mirrorless Digital Camera.. The exposure was determined by Zebras with ISO on the rear wheel: ISO 1250. 1/4000 second at f/5.6 (wide open) in Manual mode. RawDigger showed that the exposure was dead solid perfect. AWB at 8:19:32am on a sunny morning. Wide AF-C with Bird-Eye/Face Detection performed perfectly. Click on the image to enjoy the high-res version. Image #5: Wing Tips Repaired |
The Repair
It made a lot more sense to work on one of the missing wingtips at a time. So that is what I did. Working on the source material image, I painted a Quick Mask of the 2nd primary of the Turkey Vulture’s near (right) wing. After putting it on its own layer, I used the Move Tool (V) to drag it roughly in place atop Image #3. I hit T to Transform the layer then rotated and warped it until it fit perfectly. Lastly, I added a regular layer mask to refine the overlap. After merging that layer, I repeated the process with missing 1st primary tip. It was my very best wingtip repair ever (he said modestly).
|
|
The BIRDS AS ART Current Workflow e-Guide (Digital Basics II).You can order your copy from the BAA Online Store here, by sending a PayPal for $40 here, or by calling Jim or Jennifer weekdays at 863-692-0906 with your credit card in hand. Be sure to specify Digital Basics II. |
The BIRDS AS ART Current Workflow e-Guide (Digital Basics II)
The techniques mentioned above and tons more great Photoshop tips and techniques — along with my complete digital workflow, Digital Eye Doctor Techniques, and all my personalized Keyboard Shortcuts — are covered in detail in the BIRDS AS ART Current Workflow e-Guide (Digital Basics II), an instructional PDF that is sent via e-mail. Note: folks working on a PC and/or those who do not want to miss anything Photoshop may wish to purchase the original Digital Basics along with DB II while saving $15 by clicking here to buy the DB Bundle.
Please note: the Divide and Conquer technique was inadvertently omitted from DB II. It is detailed in a free excerpt in the blog post here.
Folks who learn well by following along rather than by reading can check out the complete collection of MP 4 Photoshop Tutorial Videos by clicking here. Note: most of the videos are now priced at an amazingly low $5.00 each.
You can learn how and why I converted all of my Canon digital RAW files in DPP 4 in the DPP 4 RAW Conversion Guide here. More recently, I became proficient at converting my Nikon RAW (NEF) files in Adobe Camera Raw. About three years ago I began converting my Nikon and Sony RAW files in Capture One and did that for two years. You can learn more about Capture One in the Capture One Pro 12 Simplified MP4 Video here. The next step would be to get a copy of Arash Hazeghi’s “The Nikon Photographers’ Guide to Phase One Capture One Pro e-Guide” in the blog post here. Today, I convert my Sony raw files in Photoshop with Adobe Camera Raw.
You can learn advanced Quick Masking and advanced Layer Masking techniques in APTATS I & II. You can save $15 by purchasing the pair.
|
|
The Digital Basics III Video Series |
The Digital Basics III Video Series
I realized two years ago that my digital workflow had changed significantly and was toying with the idea of writing a Digital Basics III. More recently, I learned and begun working with two great new Photoshop Tools, the Remove Tool and the Luminance Targeted Adjustment Tool. The former is like a smarter Spot Healing Brush Tool on steroids and the latter is a step up from the fabulous Color Mixer Tool. During that same time frame, I came up with a new and improved 2-step noise reduction technique. I still use Divide and Conquer, Quick Masks, Layer Masks, an expanded array of personalized keyboard shortcuts, and tons of other stuff from both versions of Digital Basics.
As soon as I realized that I did not want to take on another large writing project, I realized that by creating a series of videos I could much more easily share all the details of my current digital workflow and much more easily incorporate additional new tips, techniques, and tools as I went. And so, The Digital Basics III Video Series was born.
You can order your copy here. The videos will be most valuable for folks using the latest version of Photoshop (2024) or Lightroom along with Topaz DeNoise AI and Topaz Sharpen AI.
|
|
|
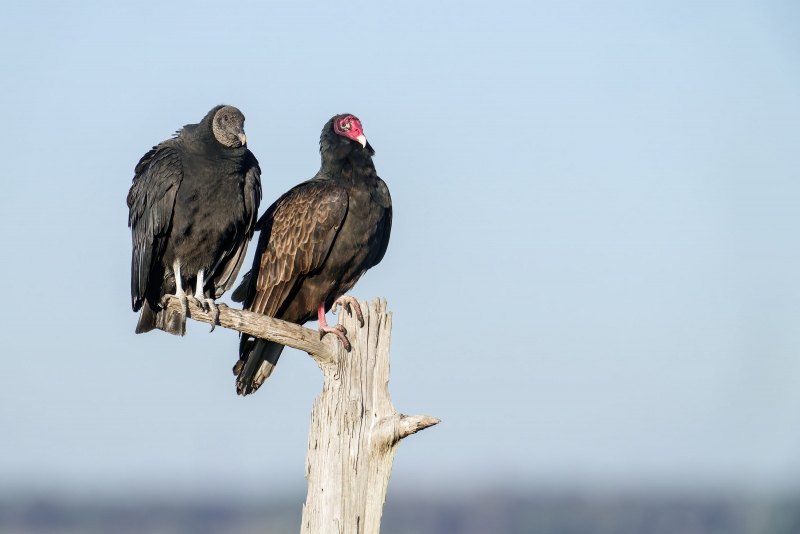
This image also created on 2 December 2024 down by the lake at Indian Lake Estates, FL. Still seated in the driver’s seat of my SUV, I used the BLUBB-supported Sony FE 600mm f/4 GM OSS lens with the Sony FE 1.4x Teleconverter, and The One, the Sony Alpha 1 Mirrorless Digital Camera.. The exposure was determined by Zebras with ISO on the rear wheel: ISO 1250. 1/2500 second at f/7.1 (stopped down 2/3 stop) in Manual mode. RawDigger showed that the exposure was dead solid perfect. AWB at 8:20:06am on a sunny morning. Tracking: Expand Spot AF-C with Bird-Eye/Face Detection performed perfectly. Click on the image to enjoy the high-res version. Image #6: Brotherly Love |
When the Dust Cleared
When the action subsided, I was stunned to see that the Turkey Vulture had not given up the perch to the incoming Black Vulture. Though smaller, the BVs almost always dominate a carcass, forcing the larger, shyer, less aggressive TVs to wait patiently in the background for a few scarps of leftovers. In 25 years of observing the vultures at ILE, I had never before seen the two species sitting side by side, so close to each other, so peacefully.
Note that I lowered the shutter speed two clicks while stopping down two clicks for a bit of additional depth of field. It was more than enough to render the eyes of both vultures sharp.
|
|
|
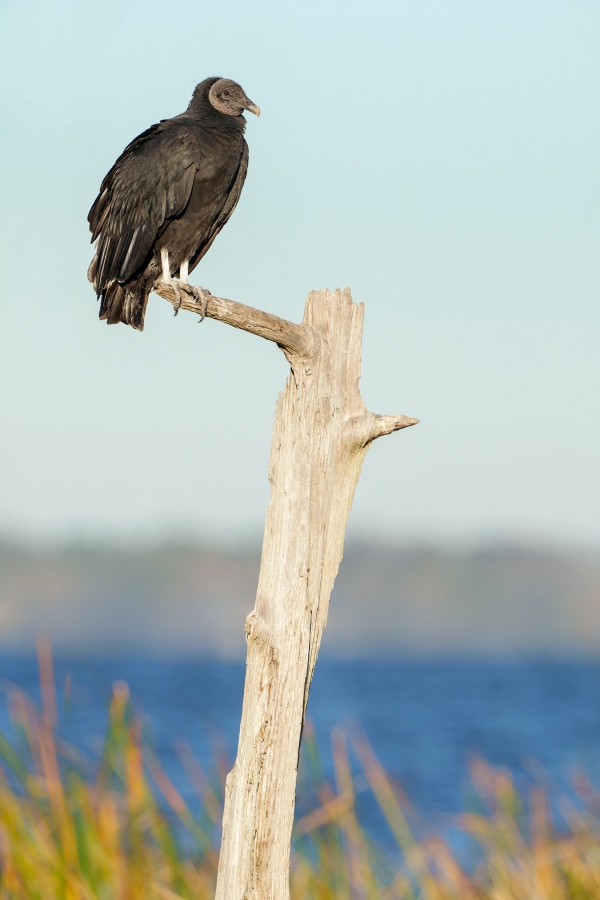
This image also created on 2 December 2024 down by the lake at Indian Lake Estates, FL. Still seated in the driver’s seat of my SUV, I used the BLUBB-supported Sony FE 600mm f/4 GM OSS lens with the Sony FE 1.4x Teleconverter, and The One, the Sony Alpha 1 Mirrorless Digital Camera.. The exposure was determined by Zebras with ISO on the rear wheel: ISO 1250. 1/2500 second at f/7.1 (stopped down 2/3 stop) in Manual mode. RawDigger showed that the exposure was dead solid perfect. AWB at 8:20:06am on a sunny morning. Tracking: ExpandSpot A-C with Bird-Eye/Face Detection performed perfectly. Click on the image to enjoy the high-res version. Image #7: Alone at Last |
Alone at Last
After perhaps three or four minutes of peaceful coexistence on the perch, the Turkey Vulture decided to fly away on its own free will and volition. The Black Vulture was left sitting alone on The Perch II.
Typos
With all blog posts, feel free to e-mail or to leave a comment regarding any typos or errors.




Leave a Reply