Ask Tim Grey eNewsletter
Several times a week I get an “Ask Tim Grey eNewsletter” on my personal laptop. Though I am very, very busy I often find the topics so interesting and relevant that I read the whole thing, study it carefully, and save it in a “Tim Grey Speaks” folder. Tim has been a good friend for years and has been the Photoshop Guru for a lot longer than that. His knowledge of Photoshop is encyclopedic, he is a skilled teacher and speaker, and his extremely dry sense of humor will leave you smiling. If I were you, I would subscribe. See item last.
ps: Tim has co-led several BIRDS AS ART Instructional Photo-Tours with me; I need to invite him to another.
Everything below the image is Tim speaking. Thanks Tim for letting me share this with the group here.
|
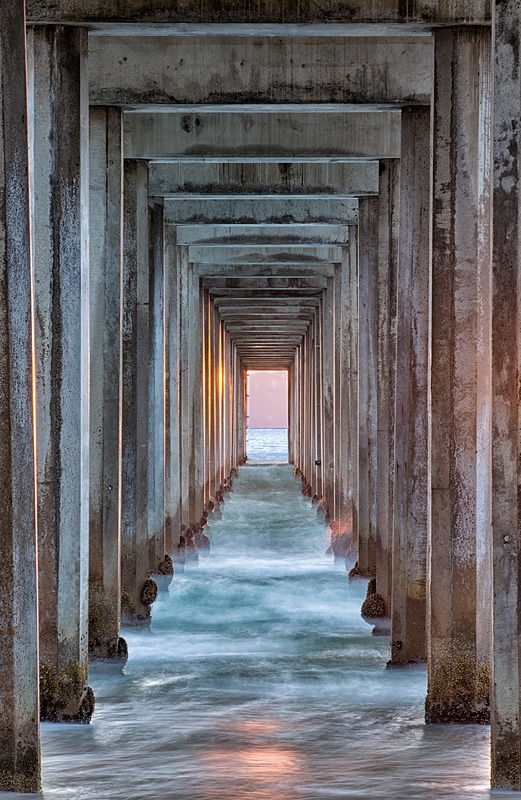
“Under the Pier.” Image copyright 2012: Arthur Morris/www.BIRDSASART.com. This image was created with the tripod-mounted Canon 70-200mm f/2.8L IS II lens (at 160mm), and the Canon EOS-5D Mark III. ISO 100. Evaluative metering +1 stop: 1/8 sec. at f/32 in Manual mode. Upper Central Sensor/AI Servo Rear Focus AF active at the moment of exposure. Click here if you missed the Rear Focus Tutorial. Click on the image to enjoy a larger, more spectacular version of this image. In the original image the “light at the end of the tunnel” was huge over-exposed. With the tripod locked up I created a second identically framed image three stops darker and used a regular Layer Mask to paint in the detail as Tim describes below as the “third option.” There will be lots more on the creation of this image in a blog post soon. |
Guest Blog Post by Tim Grey/Photographer, Author, Educator
New Video Title: “Photoshop CS6: New Features Workshop”
I’m happy to announce that my latest video training title is now available, helping you get a detailed look at all of the new features in Photoshop CS6. And if you order this week, you can get 20% off this new title. Simply enter PNEW20 in the Coupon Code field during checkout from my video2brain online store. You can get started here.
Today’s Question: Dealing with Contrast
I would like to ask you about your views on using the HDR [high dynamic range] method versus takeing a single undexposed photo in order to capture highlights and then post edit it to get a proper exposure? I find photos made by the HDR method a bit dull, while those with added presets or adjusted a bit cartoonish and sureal. On the other hand, following a method of underexposing photo and then post edit it I found to get better results to my liking. What are your experiences?
Tim’s Answer
The underlying issue here is how to deal with a scene that exhibits high contrast, and of course there are several possible ways to approach such a scene.
The first (and perhaps more “traditional”) method of dealing with a high contrast scene is to do your best to achieve a single good exposure. That often means trying to retain highlight detail, but in some cases you might want to expose for the shadows to retain good detail there, even though that means you’ll have highlights that are blown-out. Think, for example, of a high-key portrait, where lost highlights aren’t a problem. If you do underexpose in order to retain highlight detail, just keep in mind that underexposure can lead to noise. If you later brighten up shadow details that had been underexposed, you’ll likely be making the noise (the lack of information, in effect) more visible, which can lead to image quality problems (even with the use of noise-reduction software).
A common solution to dealing with a scene exhibiting high contrast is to take the HDR approach. This involves capturing multiple images (preferably with a tripod) at different exposure settings (preferably by adjusting only shutter speed) so that through those multiple captures you cover the full dynamic range of the scene. You can then use Photoshop (via HDR Pro) or other software (such as Photomatix) to assemble those images into a single result. This enables you to compress the tonal range from a high-contrast scene into a single photo, which at least based on current image sensor technology wouldn’t otherwise be possible.
There is also a third option available to you in such a situation, which is to capture two images and blend them together into a single composite exposure. One exposure should be for the brighter areas of the image, and the other for the darker areas of the image. You don’t necessarily need to cover the full range of tonal values in the scene with these two exposures. Instead, you can typically divide the image into to sections (the sky versus the foreground, for example) and capture an exposure ideally suited for each of those areas. You can then blend the two exposures into a single composite image that provides you with the intended result. This is similar in concept to using a graduated split neutral density filter during the capture, but with much greater control over the process.
I use all three of these methods under different circumstances. I agree that HDR images can often look a bit “flat” since the tonal range is being compressed, and can look a bit cartoonish when pushed too far in post-processing. But sometimes I like the look you get with HDR processing, so I do use it from time to time.
In other cases I’m simply trying to achieve something that looks more realistic for a scene that exhibits a high dynamic range, and in those cases I’ll often blend two exposures together. And sometimes I just accept the limitations of my camera and capture a single exposure, even though detail will be lost in the shadows or highlights (depending on my exposure).
I encourage you to try all three of these methods to get a better sense of what’s possible. But I also encourage you to listen to your instinct as a photographer. If you’re generally not pleased with the results of an HDR capture, don’t take that approach just because it has become a popular solution. I believe you’ll be happiest with the final photo if you feel good about the approach you’re taking. First and foremost you should focus on creating a photograph that you’re happy with. If others enjoy it as well, that’s a bonus.
You can learn more about high dynamic range imaging in an article from the Autumn 2011 issue of Digital Darkroom Quarterly. If you’re not already a subscriber you can sign up for a subscription starting with the Autumn 2011 issue through my online store here.
Tell Your Friends…
Recommend the Ask Tim Grey eNewsletter to your photographer friends by pointing them here.
Tim Grey
Photographer, Author, Educator, Friend
Shopper’s Guide
Below is a list of the gear used to create the images in today’s post. Thanks a stack to all who have used the Shopper’s Guide links to purchase their gear as a thank you for all the free information that we bring you on the Blog and in the Bulletins. Before you purchase anything be sure to check out the advice in our Shopper’s Guide.
Canon 70-200mm f/2.8L IS II lens. Man, I am loving this lens on my shoulder with the 2XIII teleconverter. I also use it a lot–depending on the situation–with the 1.4X III TC.
Canon EOS-5D Mark III. Man, I am in love with this camera body. Both the files and the AF system are superb. I cannot wait to get to Morro Bay.
And from the BAA On-line Store:
LensCoats. I have a LensCoat on each of my big lenses to protect them from nicks and thus increase their re-sales value. All my big lens LensCoat stuff is in Hardwood Snow pattern.
LegCoat Tripod Leg Covers. I have four tripods active and each has a Hardwood Snow LegCoat on it to help prevent further damage to my tender shoulders 🙂 And you will love them in mega-cold weather….
GT3532 LS. This one replaces the GT3530LS Tripod and will last you a lifetime. I’ll be commenting on this new model soon. In short, I like it.
Mongoose M3.6 Tripod Head. Right now this is the best tripod head around for use with lenses that weigh less than 9 pounds. For heavier lenses, check out the Wimberley V2 head.
Double Bubble Level. You will find one in my camera’s hot shoe whenever I am not using flash.
The Lens Align Mark II. I use the Lens Align Mark II pretty much religiously to micro-adjust all of my gear an average of once a month and always before a major trip. Enjoy our free comprehensive tutorial here.
BreezeBrowser. I do not see how any digital photographer can exist without this program.


Thanks Artie, I do subscribe to Ask Tim Grey.