|
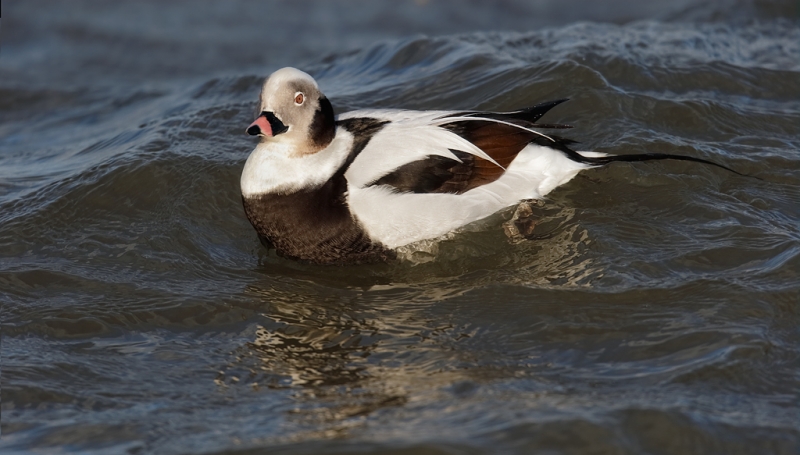
This is the final optimized image. This drake Long-tailed Duck image was photographed on the recently concluded Barnegat Jetty IPT with the tripod-mounted Canon EF 800mm f/5.6L IS USM Autofocus lens, the Canon 1.4x EF Extender III (teleconverter), and the Canon EOS-1D X digital SLR . ISO 800. Evaluative metering +1/3 stop: 1/1000 sec. at f/9 in Manual mode. Central sensor (by necessity)/AI Servo Expand/Rear Focus AF active at the moment of exposure. The AF sensor was on the water below the side of the bird’s breast where the black meets the white; don’t ask me why the eye is sharp…. Click here if you missed the Rear Focus Tutorial. Click on the image to see a larger version. |
Happy New Year!
All here at BAA–Jim Litzenberg, my right-hand man, daughter/CEO/BAA accountant Jennifer Morris, and I would like to wish all of you a happy and healthy 2013 filled with family, friends, travel, wonderful images, and of course, good health. Thanks to all who have made this another great year for all of us.
Free Photoshop Tutorial Video: I How Did That!
Eagle-eyed viewers might note that the image above is actually a slight improvement as compared to the optimized image posted on Saturday in How Did I Get From A to B? . Click on the link to see the original image. As I was preparing the video tutorial below I noticed that I had carelessly cropped a bit too much off the bottom and lost the top of the wave in the center that I had wanted to include in the frame. I repaired the optimized TIFF to create the image above.
So how did I get from A to B? Nick Clayton gave an excellent but incomplete answer as he failed to address how to make the reflection below the bird smaller. All are invited to click on the play video triangle below and enjoy the free video tutorial below.
You can watch the video as it pops up or click on the opposite facing diagonal arrows in the lower right corner to view it full screen. You can adjust the volume with the horizontal thermometer next to the speaker symbol. Enjoy, and let us know if you learned anything.
As you watch the video remember that the goal was to create a bit more room above the bird’s head while keeping it looking natural and to reduce the size of the reflection below the bird while keeping that looking natural. All in the name of improving the compositional balance. One final thought: the tools that you need to accomplish this task are all described in detail in Digital Basics yet only a single person came close to figuring out what to do. As you become more proficient at using the basic tools you will–over time–become more proficient at solving seemingly complex problems using these same basic tools. The video tutorials are designed to help you learn to solve these more complex problems with the tools that you have already mastered in Digital Basics.
MP4 Photoshop Tutorial Videos
The first of what will become many MP4 screen-capture Photoshop Tutorial videos was “King Penguin Image Clean-up.” We decided to go to screen capture video tutorials because many folks have expressed a desire to see me at work in Photoshop doing all the great stuff described in detail in Digital Basics and to hear my voice as I work at my laptop and explain each step along the way. The topics covered in this first video include the use of the Patch Tool, the Spot Healing Brush, Content Aware Fill, and the basics of creating and using both Quick Masks and Layer Masks. This 16 minute, 50 second MP4 video will be sent to your e-mail address via YouSendIt. Save it to your computer and then simply click and play. We have long thought about creating Apps but they are quite costly and you need something special to play them on. MP4 videos are ideal for us and likely for you. If you learn best by seeing and doing this series will really help you to improve your Photoshop skills.
To see the original capture and learn more, see “A Rare Side-lit Image…” here.
Here is the first comment that we received (via e-mail from John Mostert):
Hi Arthur, I have just watched your first MP4 Video–King Penguin Clean-up–and was blown away. I am looking forward to many more in the same style.
Regards, John
King Penguin Image Clean-up MP4 Photoshop Tutorial Video
If you learned a lot from the free tutorial above consider order a copy of the King Penguin Image Clean-up MP4 Photoshop Tutorial Video. It is still available for the ridiculously low introductory price of $3.00. To order yours through the BAA store, click here. Or call Jim weekdays between 9am and 5pm (3pm on Fridays) at 863-692-0906 with your credit card in hand. Or send us a Paypal for $3.00 to birdsasart@verizon.net with the words King Penguin Image Clean-up in the e-mail. For some reason most folks used Paypal to order their King Penguin Clean-up MP4.
Coming Soon
By the end of this week I hope to have two more video tutorials to offer. The first will be “Digital Eye Doctor” by yours truly. The second will be “Creative Multiple Exposures” by Denise Ippolito. Details will follow soon. Right now it is looking as if each will sell for $4.00.
Weekend Creative Nature Photography Seminar, Tampa, FL: February 23 & 24, 2013: $149 Limit: 50/Openings: 20
Join Denise Ippolito and me on the weekend of February 23-24 on the outskirts of Tampa, FL for a great weekend of fun and learning. Learn to improve your photography skills, your skill at designing images in the field, your creative vision, and your image optimization skills. Sunday critiquing session. Click here for additional details and the complete schedule.
Best to register soon as the seminar is filling up nicely.
Support the BAA Blog. Support the BAA Bulletins
We want and need to keep providing you with the latest free information, photography and Photoshop lessons, and all manner of related information. Show your appreciation by making your purchases immediately after clicking on any of our B&H (or Amazon.com) Affiliate links in this blog post. Remember, B&H ain’t just photography!


Shop Amazon
You can find other types of Muck Boots by simply typing “muck boots” in the little white box below and hitting Go. Thanks!


Amazing tutorial.how easily you use the rectangular marquee tool.it’s very easy and useful for learning.thanks for sharing.
Many thanks! artie
Artie: At around the 2:30 minute mark, did I understand you to say that one must get the Marquee tool selection exactly right the first time as there is no way to adjust it afterwards, like there is with the crop tool? One can, in fact, adjust a Marquee box after the initial selection by choosing “Select>Transform Selection” from the top menu bar.
As stated below by Kevin S, you are correct. Many thanks as this makes my life simpler. artie
Thanks for the video on adding canvas. I have read your posts about that before but never quite figured it out. The video method really made it clear.
Thanks again, hope 2013 is a great year for you.
Thanks and ditto and glad to help. I think I am gonna do another free on on adding canvas soon….. Using the John Haedo method.
Great video Artie! I’ve always been a big fan of the transform tool for adding canvas, however, I’ve never thought to use it to contract reflections, etc. I may have to take another look at some of my waterfowl images to see if this tool can make them better. Thanks for sharing!
YAW. Did I ever send you that great shot of you with the 400DO from the Galapagos trip? I use it in slide programs all the time.
I was able to save an image that i liked a lot, http://mjspringett.wordpress.com/2013/01/03/before-and-after/, thanks artie, MJ
Good job on the improvement and thanks for the plug. Actually, the techniques from APTATS II, which are similar, are a bit more on-target.
What a great video, just want to say thanks for sharing Artie.
I was wondering if “How I did that” will be available as a direct download to sit next to your “King penguine clean up” tutorial.. I can see in years to come people hunting for this…
That is a good idea Ian. We will add it to the store soon for $2.00.
If I get The Art of Bird Photgraphy II, does it include all the information that is in Digital Basics?
No. See the complete info here. Thanks for your interest. artie
Many thanks to sharing nice tool.
YAW. artie
keep up the great work, i have learned so much, and will keep learning, thanks and happy new year artie, MJ
Many thanks! 🙂 And will do.
Great video Guru Artie,
Clear and precise instructions on improving images. You make learning
easy and fun.
Thanks.
Thanks Gaurav, Thanks! What, you liked my “Ping Kenguin” comment?
See you on the SW FLA IPT and in the Galapagos! later and love, artie
Great video.
Sorry to be (seem) out of it, but, I cannot find the search link (referred to above) to find the Amazon link that will benefit the BAA Blog.
Thanks Joel, and thanks for asking. Simply start your Amazon search by typing in the small white box in the logo link above and then clicking on Go.
Wow, great video! I learned a lot, even though I have Digital Basics. I think a picture (or video) is worth a thousand words sometimes…! Thank you so much!
Thanks Andrea. And yes, lots of folks learn better by seeing than by reading.
Happy New Year Artie! Great job with the video. The quality and content is great, and it is very quick and easy to follow along. I really look forward to seeing more videos.
Thanks and ditto Patrick. Are you doing much photography with the 600 II? I am still on the fence….
This was great. I learned a lot and hope to see more of these in the future. I don’t know of anyone else who does so much to share his knowledge with aspiring nature photographers…so thanks! I think this goes a long way to showing you are the premier nature photography educator on the planet. Well done!
Many thanks for your kind words Dennis. Did you have a look at the Complete Digital Eye Doctor?
PS you might want to change the title to How I did that.
Good point. Done!
Thanks for the video!! Yes it is much easier to follow a video and see how you procede through the various corrections! Happy New Year, Jerry
Thanks a stack Jerry. And ditto! artie
Great tutorial. Never would have thought about stretching instead of attempting to just fill or clone stamp the added canvas.
You can adjust the rectangular marquee tool, after the fact, if you go to select-transform selection.
Thanks Kevin. You are correct and helpful!