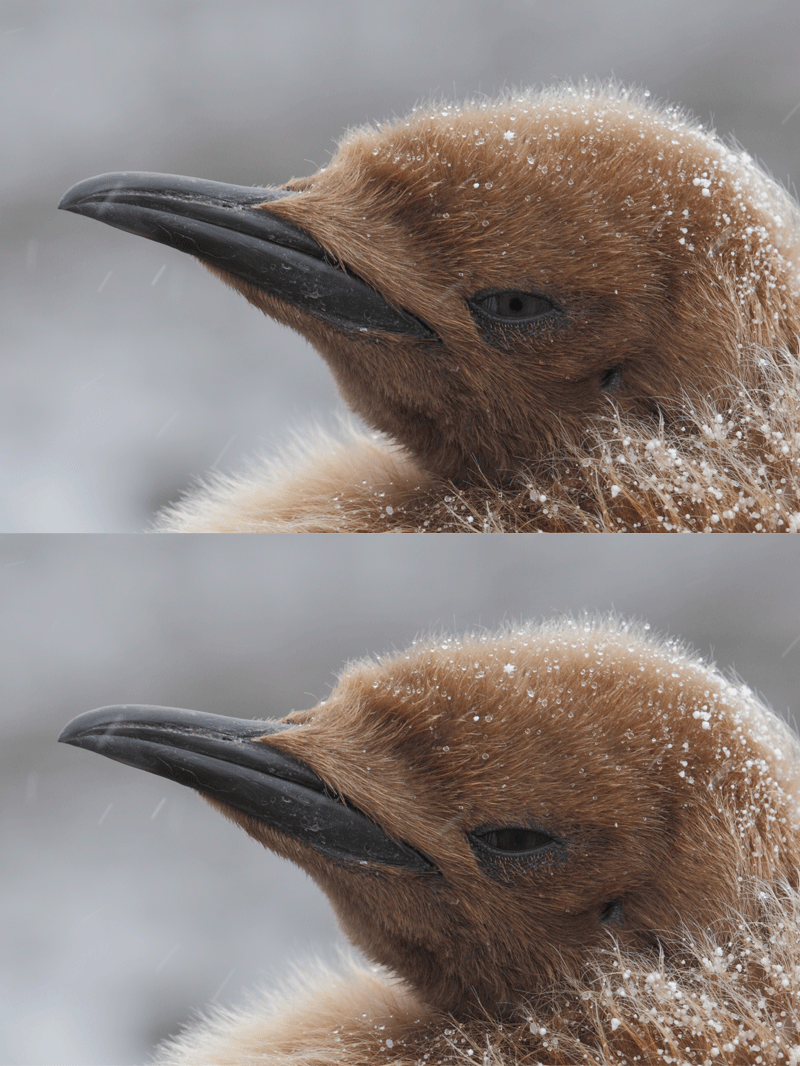
Give the animated GIF a few moments to play. Note the darkened pupil, the lightened iris, and the more open eye. The Digital Eye Doctor tutorial for this image |
MP4 Video Tutorial Riot
The Complete Digital Eye Doctor MP4 Video Photoshop Tutorial: $9 (save a buck!)
When we view photographs of birds or of wildlife, the first thing that we do is make eye contact. If the eye of the creature is sharp, then the entire image will look sharp. Trust me, not every image that I create is razor sharp on the eye. But every image that I post is razor sharp on the eye. Why? Because I do at least some Digital Eye Doctor work on the eyes of the birds in more than 90% of the images that I create. This work often includes darkening the pupil, lightening the iris, and sharpening the eye (or the entire face). More advanced techniques include dealing with nictitating membranes (the translucent third eyelids that so often ruin our best images), eliminating flash eye (including purple eye and steel eye), and dealing with over-saturated eye-skin colors like the red one on a drake Wood Duck.
In “The Complete Digital Eye Doctor MP4 Video Photoshop Tutorial” you will see me working in Photoshop while you hear my voice guiding you along the way step by step; all of the techniques mentioned above are included. You can purchase this eye opening (no pun intended) 1 hour, 3 minute video for only $9.00. To order yours through the BAA store, click here. Or call Jim or Jen weekdays between 9am and 5pm (3pm on Fridays) at 863-692-0906 with your credit card in hand. We will be short-handed in the office until January 21 so please leave a message and we will call you back. Easier is to send us a Paypal for $9.00 to birdsasart@verizon.net with the words “Complete Digital Eye Doctor MP4 Video” cut and pasted into the Subject line of your e-mail. Sorry, no checks are accepted for the MP4 videos.
You will receive download instructions via YouSendIt. Be sure to check your spam folder if you do not receive it. Once you download it and save it to your computer then simply click and play after adjusting the volume. You can hit pause, rewind, and play as needed so that you can completely master the covered techniques.
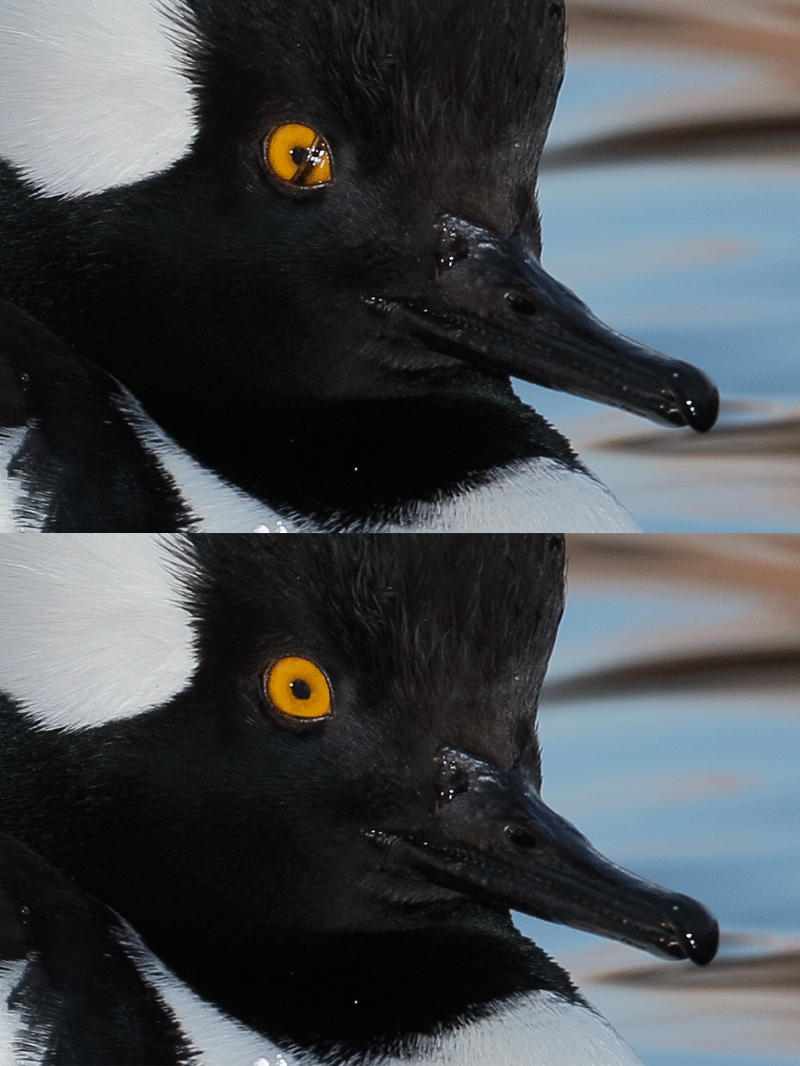
Give the animated GIF a few moments to play. Note that in the before image the nictitating membrane covers the forward part of the iris and part of the pupil and that in the after image the eye has been repaired and looks completely natural. The Digital Eye Doctor tutorial for this image is included in both the Complete Digital Eye Doctor Tutorial and in Part II. |
Digital Eye Doctor MP4 Video Photoshop Tutorials Parts I & II: $5 each
Digital Eye Doctor MP4 Video Photoshop Tutorials Part I contains the basics Digital Eye Doctor techniques: $5.
Digital Eye Doctor MP4 Video Photoshop Tutorial Part II details the more advanced Digital Eye Doctor techniques: $5.
In each, you will see me working in Photoshop while you hear my voice guiding you along the way step by step. You can purchase Part I (25 1/2 minutes) by clicking here. You can purchase Part II (38 minutes) by clicking here. Or you can call Jim or Jen weekdays between 9am and 5pm (3pm on Fridays) at 863-692-0906 with your credit card in hand. Be sure to let them know Part I or Part II. We will be short-handed in the office until January 21 so please leave a message and we will call you back. If you opt to send us a Paypal for $5.00 be sure to note Digital Eye Doctor Part I or Digital Eye Doctor Part II and send your PayPal to us via birdsasart@verizon.net. You will receive download instructions via YouSendIt. Be sure to check your spam folder if you do not receive it. Once you download it and save it to your computer then simply click and play after adjusting the volume. You can hit pause, rewind, and play as needed so that you can completely master the covered techniques.
Note: Part I and Part II make up the Complete Version so it is better to buy “The Complete Digital Eye Doctor MP4 Video Photoshop Tutorial” than to buy Part I and Part II separately.
|
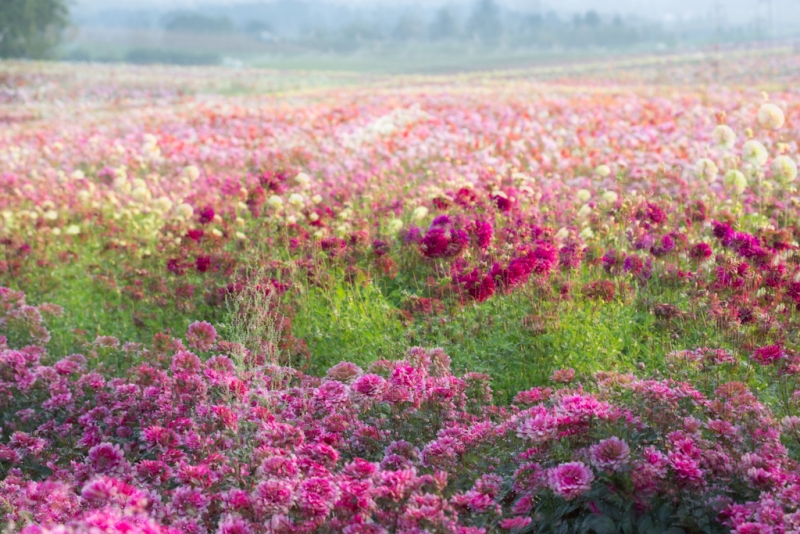
Dahlia field in-camera multiple exposure. When Denise shared this spectacular image at the Staten Island Seminar folks were oohing and aahing and one lady fell off her chair! Image courtesy of and copyright Denise Ippolito/A Creative Adventure. Denise and I will be announcing a Dahlia Instructional Photo-Tour that we will be co-leading south of Portland Oregon next fall. Stay tuned for details or e-mail to have your name placed on the interested list. |
Multiple Exposure MP4 Video Tutorial by Denise Ippolito: $4.00
There is a lot more to creating pleasing multiple exposures in camera than pushing the shutter button 2, 3, 5, or 7 times. Denise’s Multiple Exposure video is designed to show you the many different looks that can be achieved in-camera by using the Multiple Exposure feature that is present in some digital camera bodies today and how you can create them. The relatively new Canon 5D EOS-5D Mark III has a great in-camera Multiple Exposure feature with lots of options. Many folks that use Nikon gear have had this feature for years but have never explored the possibilities; they need to consult their camera body manual. In this 19-minute video tutorial she shares with you several of the techniques that she uses to create different looks with her in-camera multiple exposures. The image above is just one great example.
In the “Multiple Exposure MP4 Video Tutorial” Denise teaches you step by step how to create a variety of looks with your in-camera multiple exposures. As always, her creativity will amaze you. You can purchase the educational eGuide for only $4.00. To order yours through the BAA store, click here. Or call Jim or Jen weekdays between 9am and 5pm (3pm on Fridays) at 863-692-0906 with your credit card in hand. We will be short-handed in the office until January 21 so please leave a message and we will call you back. Easier is to send us a Paypal for $4.00 to birdsasart@verizon.net with the words “Multiple Exposure Video” cut and pasted into the subject line. Sorry, no checks accepted for the MP4 videos.
You will receive download instructions via YouSendIt. Be sure to check your spam folder if you do not receive it. Once you download it and save it to your computer then simply click and play after adjusting the volume. You can hit pause, rewind, and play as needed so that you can completely master the various techniques.
|
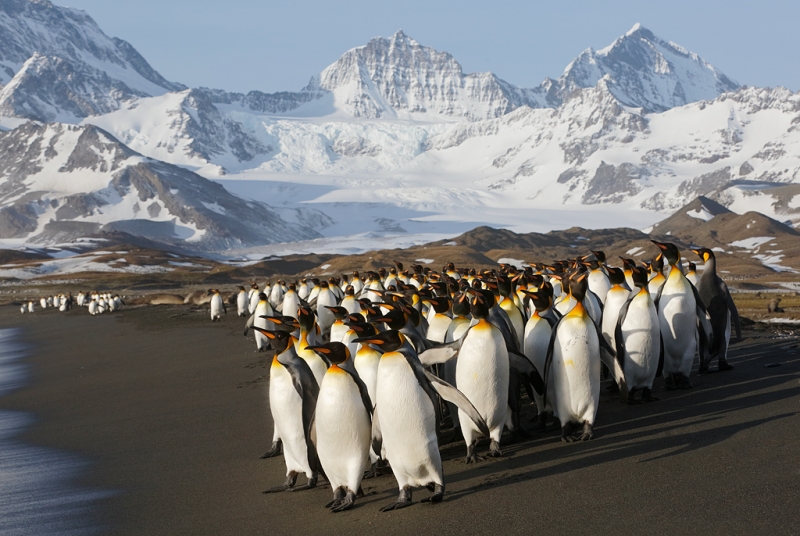
This optimized image of a group of adult King Penguins about to enter the ocean was created on an early morning (6:04am) landing at St. Andrews Bay with the hand held Canon EF 70-200mm f/2.8L IS II USM Telephoto Zoom Lens (at 70mm) and the Canon EOS 5D Mark III Digital camera body. ISO 400. Evaluative metering at zero: 1/800 sec. at f/11 in Av mode. Lowest Central sensor/AI Servo/Rear Focus AI Servo Suround AF active at the moment of exposure. Click here if you missed the Rear Focus Tutorial. Be sure to click on the image to see a larger version. |
King Penguin Image Clean-up MP4 Photoshop Tutorial Video
The King Penguin Image Clean-up MP4 Photoshop Tutorial Video is available right now for the ridiculously low price of $3.00. For more into on this video and to see the original image (before the extensive clean-up), please click here. To order yours through the BAA store, click here. Or call Jim or Jen weekdays between 9am and 5pm (3pm on Fridays) at 863-692-0906 with your credit card in hand. We will be short-handed in the office until January 21 so please leave a message and we will call you back. Easier is to send us a Paypal for $3.00 to birdsasart@verizon.net with the words “King Penguin Image Clean-up Video” cut and pasted into the subject line. Sorry, no checks are accepted for the MP4 videos.
|
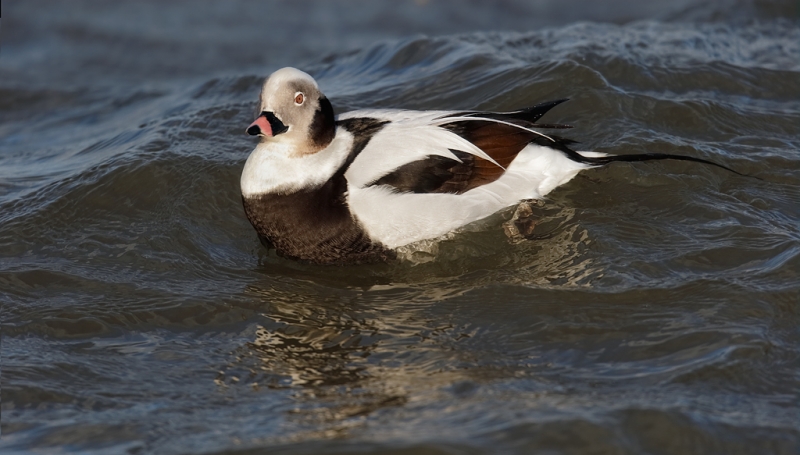
This is the final optimized image. This drake Long-tailed Duck image was photographed on the recently concluded Barnegat Jetty IPT with the tripod-mounted Canon EF 800mm f/5.6L IS USM Autofocus lens, the Canon 1.4x EF Extender III (teleconverter), and the Canon EOS-1D X digital SLR . ISO 800. Evaluative metering +1/3 stop: 1/1000 sec. at f/9 in Manual mode. Central sensor (by necessity)/AI Servo Expand/Rear Focus AF active at the moment of exposure. The AF sensor was on the water below the side of the bird’s breast where the black meets the white; don’t ask me why the eye is sharp…. Click here if you missed the Rear Focus Tutorial. Click on the image to see a larger version. In the original image, the bird was very close to the top frame edge. The “Add Canvas/Expand Contract MP4 Photoshop Tutorial Video” shows exactly how I improved the composition. See details on this video immediately below. |
Add Canvas/Expand Contract MP4 Photoshop Tutorial Video: $2
The “Add Canvas/Expand Contract MP4 Photoshop Tutorial Video” (aka the Long-tailed Duck Video)–9 1/2 minutes, is available for free here but it cannot be downloaded. Several folks requested that we make this great improve composition video available for download; we do that here. If you would like to have this tutorial on your computer you can order a copy through the BAA store herebirdsasart@verizon.net with the words “Add Canvas/Expand Contract MP4 Video” cut and pasted into the subject line. Sorry, no checks are accepted for the MP4 videos.
BIRDS AS ART/A Creative Adventure Barnegat Jetty II IPT
We had so much fun at the jetty in the wild weather in December–see the following blog posts here, here, here, and here, that I am flying back to New Jersey for more. Since there were lots of Harlequins, Long-tailed Ducks, and Purple Sandpipers we decided to put together another small group. Do consider joining us. As for me, I can’t wait to get back.
BIRDS AS ART/Barnegat Jetty IPT II, Barnegat Light, NJ: 2 1/2 DAYS. JAN 18 (1:30pm), 19, and 20, 2012: $999. Limit 8/Openings: 4. Includes 5 photo-sessions, both lunches, introductory slide program, image review, sharing, editing, and Photoshop.
Note: On cloudy days we grab a quick lunch and spend most of the day photographing. 🙂
Join Denise Ippolito and Arthur Morris for a 2 1/2 Day Instructional Photo-Tour at the infamous Barnegat Jetty in Barnegat Light, New Jersey. You will learn how to get close to the ducks and shorebirds that frequent this famed winter birding and photography hotspot, how to get the right exposure every time, and how to see, understand, and tackle a variety of photographic situations. We should have some excellent chances with Harlequin Duck and Purple Sandpiper, the two headliner species. With any luck we should get to photograph most of these species: Long-tailed Duck (formerly Oldsquaw), Common Loon, Red-throated Loon, Red-breasted Merganser, Surf Scoter, Black Scoter, Common Eider, Brant, Dunlin, Ruddy Turnstone, Black-bellied Plover, and Sanderling. Great Black-backed, Herring, and Ring-billed Gulls are also likely. Sunning Harbor Seals are possible. With the right winds we may have some good flight photography with the sea ducks.
Having at least a 500mm f/4 lens with a 1.4X teleconverter is recommended. Participants should be in good physical condition with a good sense of balance. $500 non-refundable credit card deposit by phone: 1-863-692-0906. Weekends OK.
Can’t Make the Whole Thing?
If you can’t make the whole thing, you can join what will likely be a small group as follows: Full Day with lunch: $400. Afternoon (1:30-dusk): $250. Call to arrange: 1-863-692-0906. Weekends OK.
Weekend Creative Nature Photography Seminar, Tampa, FL: February 23 & 24, 2013: $149 Limit: 50/Openings: 12
Join Denise Ippolito and me on the weekend of February 23-24 on the outskirts of Tampa, FL for a great weekend of fun and learning. Learn to improve your photography skills, your skill at designing images in the field, your creative vision, and your image optimization skills. Sunday critiquing session. Click here for additional details and the complete schedule.
Best to register soon as the seminar is filling up nicely.
Typos
On all blog posts, feel free to e-mail or leave a comment regarding any typos, wrong words, misspellings, or grammatical errors. Just be right. 🙂
Support the BAA Blog. Support the BAA Bulletins
We want and need to keep providing you with the latest free information, photography and Photoshop lessons, and all manner of related information. Show your appreciation by making your purchases immediately after clicking on any of our B&H (or Amazon.com) Affiliate links in this blog post. Remember, B&H ain’t just photography!


Shop Amazon
And from the BAA On-line Store:
LensCoats. I have a LensCoat on each of my big lenses to protect them from nicks and thus increase their re-sales value. All my big lens LensCoat stuff is in Hardwood Snow pattern.
LegCoat Tripod Leg Covers. I have four tripods active and each has a Hardwood Snow LegCoat on it to help prevent further damage to my tender shoulders 🙂 And you will love them in mega-cold weather….
Gizo GT3532 LS CF Tripod. This one replaces the GT3530LS Tripod and will last you a lifetime. Learn more about this great tripod here.
Mongoose M3.6 Tripod Head. Right now this is the best tripod head around for use with lenses that weigh less than 9 pounds. For heavier lenses, check out the Wimberley V2 head.
Double Bubble Level. You will find one in my camera’s hot shoe whenever I am not using flash.
The Lens Align Mark II. I use the Lens Align Mark II pretty much religiously to micro-adjust all of my gear an average of once a month and always before a major trip. Enjoy our free comprehensive tutorial here.
BreezeBrowser. I do not see how any digital photographer can exist without this program.
Delkin Flash Cards. I use and depend on Delkin compact Flash Cards and card readers most every day. Learn more about their great 700X and 1000X cards here or about my favorite Delkin card here.



Artie, I had a look at the add canvas / expand contract video. Nicely done. I have used a similar approach on a few pictures. Note that by using Select>Transform Selection you can easily adjust the rectangular marquee selection to include the pixels that you missed. It’s very handy in my experience. Steve
Thanks Steve. I will try your tip and report back. I love learning new stuff.
Wowee! Learned a new one there. It’s always been a pain when selection ants were so inflexible. Adobe does good stuff for us, huh? Love it!!! Thanks Steve. And thanks Artie for having this forum!!