|
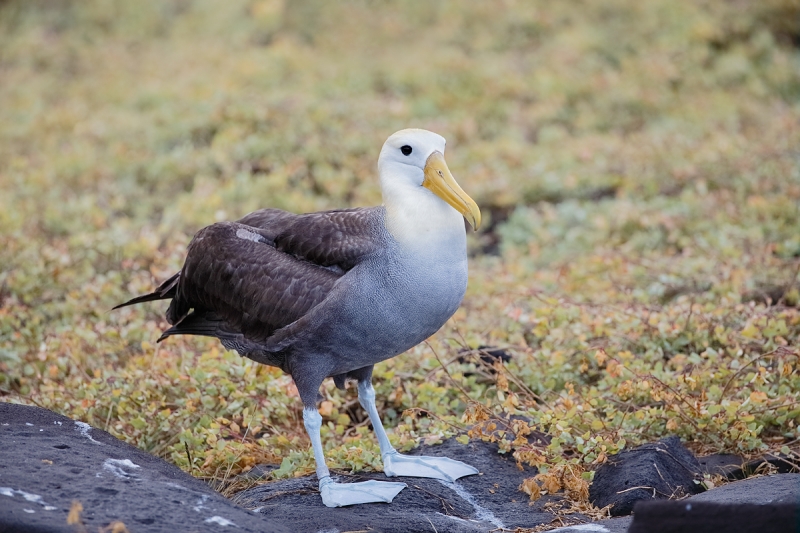
This image was created with the Canon EF 200-400mm f/4L IS USM Lens with Internal 1.4x Extender (hand held at 381mm) and the Canon EOS-1D X. ISO 800. Evaluative metering +1/3 stop; 1/1600 sec. at f/4.5 in Manual mode. Central sensor/AI Servo-Surround/Rear Focus AF active at the moment of exposure. With the bird angling towards me the eye was on the same plane as the side of the breast. Click here if you missed the Rear Focus Tutorial. Click on the image to see a larger version. |
Waved Albatross Portrait
Creating a whole bird portrait of a single bird of this species that shows the feet well is a difficult assignment. I was photographing birds in flight when I saw this guy clambering over the rocks towards the edge of the cliff from which he eventually took flight.
|
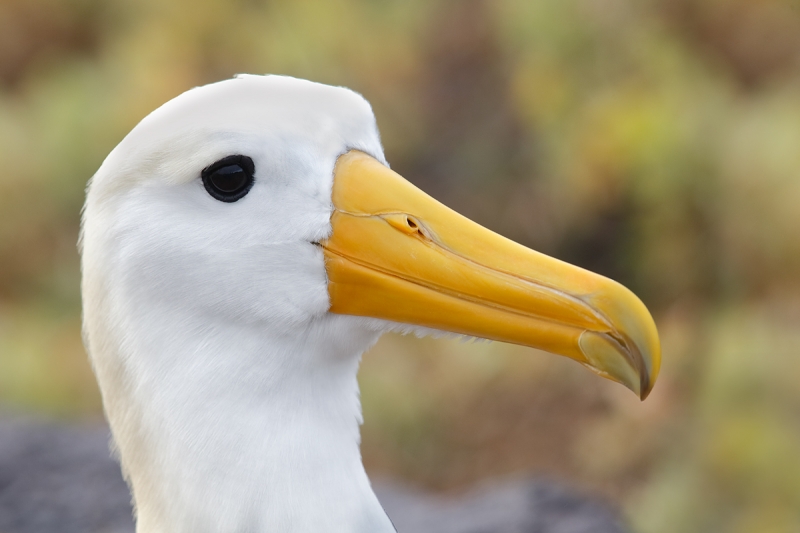
This tight head shot of a Waved Albatross was created with the tripod-mounted Canon EF 600mm f/4L IS II USM lens, the Canon 2x EF Extender III (Teleconverter), and the Canon EOS 5D Mark III Digital camera body. ISO 800. Evaluative metering +1 stop as framed: 1/200 sec. at f/9 in Manual Mode. Central sensor (by necessity) Expand/AI Servo/Rear Focus AF on the base of the bird’s large bill active at the moment of exposure. Click here if you missed the Rear Focus Tutorial. Click on the image to see a larger version. |
Full Frame Head Portrait
Creating a nearly full frame head portrait is actually a lot easier than creating a whole bird portrait that shows the feet. Here I went with the 600/2X III TC combo but I made similar portraits with various iterations of the 200-400. For the image above I sat behind my lowered tripod to effectively move the background farther away from the subject and thus render it more out of focus.
|
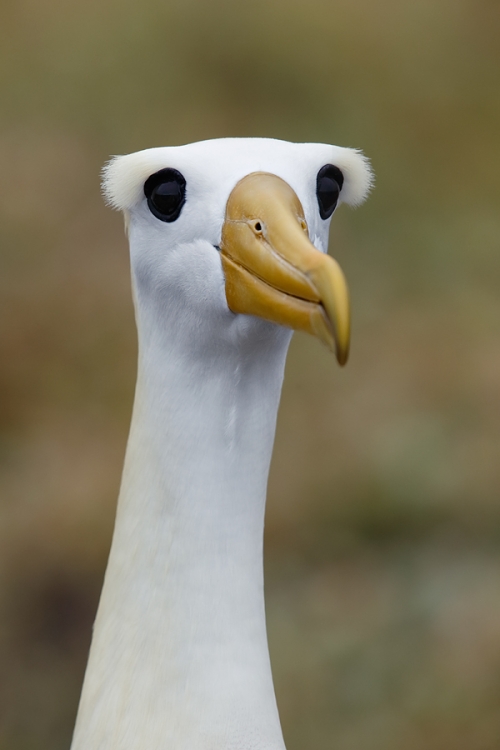
This image was created with the tripod-mounted Canon EF 600mm f/4L IS II USM lens, the Canon 2x EF Extender III (Teleconverter), and the Canon EOS 5D Mark III Digital camera body. ISO 800. Evaluative metering +1/3 stop as framed: 1/640 sec. at f/9 in Manual Mode. Central sensor (by necessity) AI Servo Expand/Rear Focus AF on the bird’s neck right below the bill ase of the bird’s large bill active at the moment of exposure. Click here if you missed the Rear Focus Tutorial. Click on the image to see a larger version. |
The Vertical Raised Eyebrow Shot
At times during the courtship display dance either bird may raise its eyebrows dramatically. This usually occurs before they begin bill-clacking. Needless to say it is quite the interesting look.
|
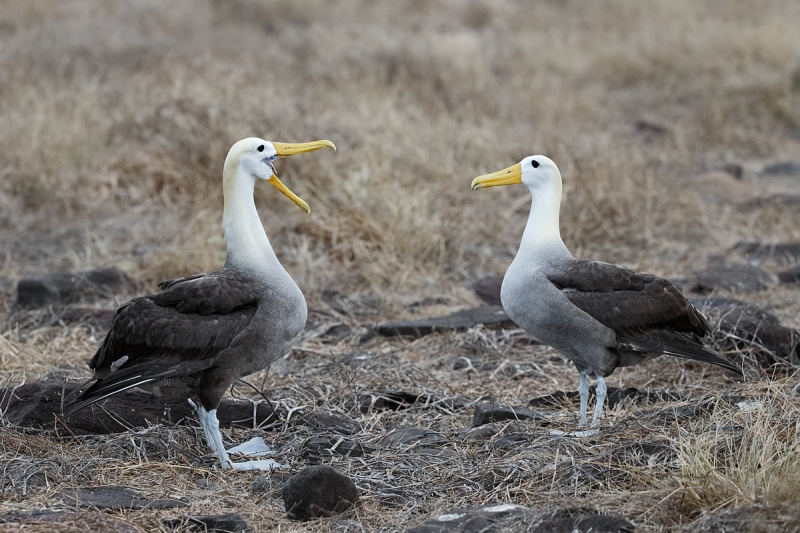
This image was created with the Canon EF 200-400mm f/4L IS USM Lens with Internal 1.4x Extender (hand held at 225mm) and the Canon EOS-1D X. ISO 800. Evaluative metering +1/3 stop; 1/640 sec. at f/5 in Manual mode. One sensor down and two to the left of the Central sensor/AI Servo-Surround/Rear Focus AF on the top of the breast of the bird on our left active at the moment of exposure. Click here if you missed the Rear Focus Tutorial. Click on the image to see a larger version. |
The “I Should Have Done Video Courtship Image”
This is just a moment in time in the amazingly intricate courtship dance. The dance includes many identifiable segments that vary depending on the ages of the birds involved and the number of years they have been together as a mated pair. When I return in July 2015 I am finally, definitely going to shoot some video of the courtship dance.
|
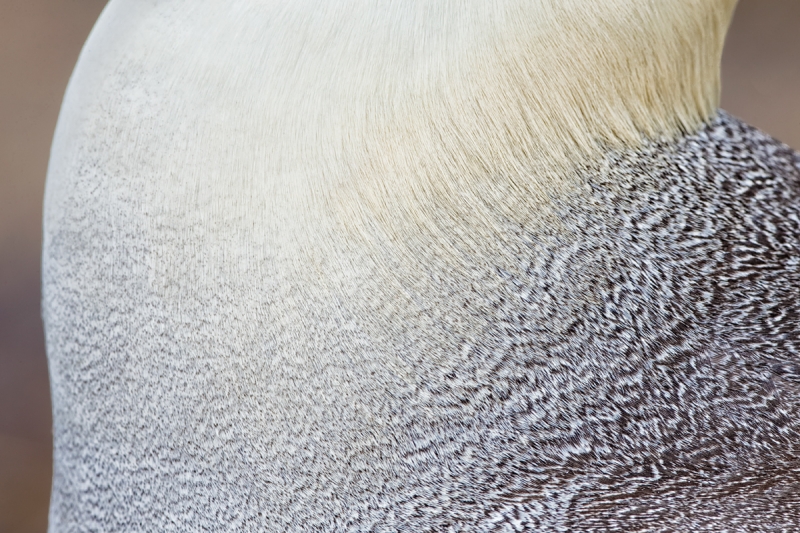
This image was created with the hand held Canon EF 200-400mm f/4L IS USM Lens with Internal 1.4x Extender (at 232mm), the Canon 1.4x EF Extender III (Teleconverter), and the Canon EOS-1D X). ISO 400. Evaluative metering +1 2/3 stops: 1/160 sec. at f/16. Central sensor (by necessity)/AI Servo-Expand/Rear Focus AF where the pattern begins active at the moment of exposure. Click here if you missed the Rear Focus Tutorial. Click on the image to see a larger version. |
The Namesake Pattern Image
Waved Albatross gets its name from the intricate wavy patterning on the feathers in the area of the forward part of the back and the and the spot where the neck and breast meet. Whenever doing tight feather pattern images be sure to stop down to at least f/16; the closer you are to minimum focusing distance the more you need to stop down to ensure sufficient depth-of-field.
The superb close focus of the 200-400 (MFD = 2 meters or 6.6 feet made it the perfect lens to use for this image. I was quickly able to sit down close to the bird that was close to the path. By getting low, I was able to come up with a much nicer background than had I been standing behind the 600 II/2X III combo. It would have been either difficult or impossible to get the big lens into position to make a similar image. In various situations the smaller size and the compact build of the 2-4 are huge pluses.
|
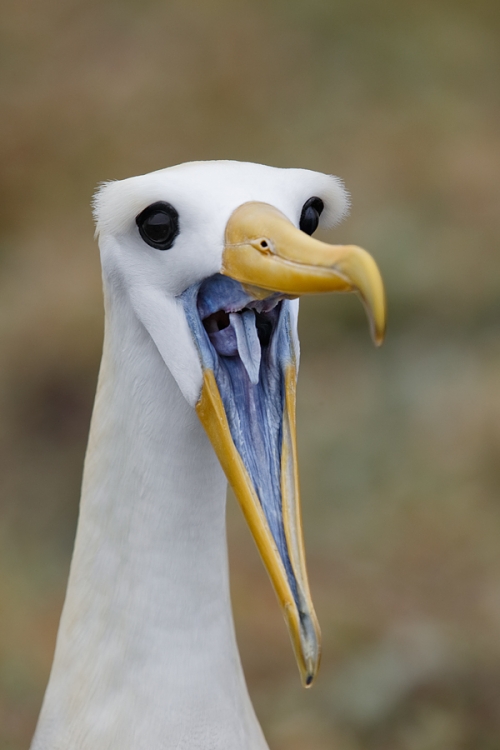
This image was created with the tripod-mounted Canon EF 600mm f/4L IS II USM lens, the Canon 2x EF Extender III (Teleconverter), and the Canon EOS 5D Mark III Digital camera body. ISO 800. Evaluative metering +1/3 stop as framed: 1/640 sec. at f/9 in Manual Mode. Central sensor (by necessity) AI Servo Expand/Rear Focus AF on the bird’s tongue active at the moment of exposure. Click here if you missed the Rear Focus Tutorial. Click on the image to see a larger version. |
Open Wide
Just an instant before the birds begin rapidly clacking their bills they open there mouth as wide as possible for just an instant. It took me many attempts to get this one just right. Fortunately this pair was an amorous one.
The Lessons
Study the behavior of your subjects. Choose and use a variety of lenses and accessories so that you have the right tool for the job in your hand. Vary your perspectives. Choose effective focal lengths that will enable you to fulfill your creative vision. When repetitive action is difficult to photograph think video. And that goes double in very low light or in very harsh light.
The Best?
Take a moment to leave a comment here and let us know which image you think is the best of the lot. Be sure to let us know the reasons for your pick.
The Mini-Flower Photography Seminar, Friday, September 13: 8:30am till 12:30pm, Canby Oregon
As part of the Swan Island Dahlia Farm Instructional Photo-Tour, September 11-15, 2013 (1 slot left; see here for details), denise and I will be presenting a 1/2-Day Mini-Flower Photography Seminar. Folks wishing to register for the mini seminar only may do so for only $49.
Denise will begin by presenting her “Bloomin’ Ideas” program, an overview of the in-the-field and post-processing techniques that she has used and developed over the past few years to create her signature look. Artie will follow with a Photoshop session that will be geared towards all levels. He’ll be sharing some of his favorite techniques and tips while working on images from the first two days of the IPT. Denise will conclude the morning seminar with a Photoshop demo; she will share her creative workflow using a variety of Photoshop filters and effects. The entire morning is designed to give you a peek into the minds of two very skilled and creative folks.
To register for the Mini-Flower Photography Seminar call Jim between Monday and Thursday or on Friday morning at 863-692-0906 with your credit card in hand.
|
All images courtesy of and copyright 2012: Denise Ippolito. Click for a larger version. |
Just one slot left!
A Creative Adventure/BIRDS AS ART Swan Island Dahlia Farm Instructional Photo-Tour, September 11-15, 2013: 5 FULL DAYS: $1649. Limit 16, Openings: 1.
Join Denise Ippolito and Arthur Morris at the Swan Island Dahlia Farm in Canby Oregon (just south of Portland) for a great learning and photography experience. Swan Island features more than 40 acres with over 350 varieties of dahlias in a plethora of colors, shapes and sizes, making it one of the largest growers in the United States.
Daily Photo Schedule
We will enjoy four morning (7:00am till 10:30am) and five afternoon (3:30pm till 6pm) photography sessions. While we will do most of our photography at the Swan Island Dahlia Farm, we will also visit the Portland Rose Garden and/or the Portland Japanese Garden on this IPT. The in-the-field instruction will include seeing the situation, the use of selective focus, creative use of depth of field, histogram and exposure guidance, designing creative images, choosing your background, isolating your subject, lens options, and the use of reflectors and diffusers. Our field sessions will include challenging photography assignments geared to make you think creatively. Both personalized and small group instruction will be provided. All times are tentative and subject to change based on the weather and on local conditions.
Seminar Morning: Friday, September 13: 8:30am till 12:30pm
Denise will begin by presenting her “Bloomin’ Ideas” program, an overview of the in-the-field and post-processing techniques that she has used and developed over the past few years to create her signature look. Artie will follow with a Photoshop session that will be geared towards all levels. He’ll be sharing some of his favorite techniques and tips while working on images from the first two days of the IPT. Denise will conclude the seminar portion of the IPT with a Photoshop demo; she will share her creative workflow using a variety of Photoshop filters and effects. The entire morning is designed to give you a peek into the minds of two very skilled and creative folks.
The group will have lunch together daily. All are invited to bring their laptops for image sharing. We hope that you can join us for an intense five days of learning and some of the best flower photography to be had in North America.
Deposit Info and Cancellation Policies:
A $449 non-refundable deposit is required to hold your slot for this IPT. Your balance is due 4 months before the date of the IPT and is also non-refundable. If the trip fills, we will be glad to apply a credit applicable to a future IPT for the full amount less a $100 processing fee. If we do not receive your check for the balance on or before the due date we will try to fill your spot from the waiting list. If your spot is filled, you will lose your deposit. If not, you can secure your spot by paying your balance.
Please print, complete, and sign the form that is linked to here and shoot it to us along with your deposit check (made out to “Arthur Morris.”) You can also leave your deposit with a credit card by calling the office at 863-692-0906. We will be short-handed in the office until January 21 so please leave a message and we will call you back. If you register by phone, please print, complete and sign the form as noted above and either mail it to us or e-mail the scan.
If you have any questions, please feel free to contact me via e-mail
Typos
On all blog posts, feel free to e-mail or leave a comment regarding any typos, wrong words, misspellings, omissions, or grammatical errors. Just be right. 🙂
Support the BAA Blog. Support the BAA Bulletins: Shop B&H here!
We want and need to keep providing you with the latest free information, photography and Photoshop lessons, and all manner of related information. Show your appreciation by making your purchases immediately after clicking on any of our B&H or Amazon Affiliate links in this blog post. Remember, B&H ain’t just photography!


Amazon
Everyone buys something from Amazon, be it a big lens or deodorant. Support the blog by starting your search by starting your search by clicking on the logo-link below. No purchase is too small to be appreciated; they all add up. Why make it a habit? Because I make it a habit of bringing you new images and information on an almost daily basis.
And from the BAA On-line Store:
LensCoats. I have a LensCoat on each of my big lenses to protect them from nicks and thus increase their re-sales value. All my big lens LensCoat stuff is in Hardwood Snow pattern.
LegCoat Tripod Leg Covers. I have four tripods active and each has a Hardwood Snow LegCoat on it to help prevent further damage to my tender shoulders 🙂 And you will love them in mega-cold weather….
Gitzo GT3532 LS CF Tripod. This one replaces the GT3530LS Tripod and will last you a lifetime. Learn more about this great tripod here.
Mongoose M3.6 Tripod Head. Right now this is the best tripod head around for use with lenses that weigh less than 9 pounds. For heavier lenses, check out the Wimberley V2 head.
Double Bubble Level. You will find one in my camera’s hot shoe whenever I am not using flash.
The Lens Align Mark II. I use the Lens Align Mark II pretty much religiously to micro-adjust all of my gear an average of once a month and always before a major trip. Enjoy our free comprehensive tutorial here.
BreezeBrowser. I do not see how any digital photographer can exist without this program.
Delkin Flash Cards. I use and depend on Delkin compact Flash Cards and card readers most every day. Learn more about their great 700X and 1000X cards here or about my favorite Delkin card here.



My favorite is the 3rd image. It just looks very funny. But all are wonderful shots. I’ve never seen an albatross in the wild. They are amazing birds.
Marks
Thanks. I like 3 and 6 myself 🙂
My favorite has to be the vertical raised eyebrow shot. It’s a somewhat comical look that reminds me of the muppets. Yes, the yawning shot does this as well, but it doesn’t give the same feeling.
Thanks. I like 3 and 6 myself 🙂
Hi Artie. For me it’s the last one. The yawning image is so natural that it seems as if I’m sitting right in front of it watching and the bird is just carefree enjoying relaxed time after a meal.
Details are also great.
Regards.
No meal involved. It is part of the courtship dance. artie
Hi Art, I’m a sucker for close ups and I easily chose the last photo as my favorite. A fantastic pose with both eyes visible as well as the mouth wide open. It’s a super ‘action’ shot and the details are superb. The facial expression on the bird is killer. I need to remember to stop down when I’m close to min focusing distance. Great tip! Another glorious batch of shots!
Can I expect the quality results you have on the last shot in a similar situation with my 500mm f4L IS II+2x III+5DM3 (assuming I execute the shot correctly as you did)? I.e., is the 500 of equal optical quality to the 600?
Absolutely yes to both questions. The optics on the 500 II are superb and you can learn to create sharp images with it and the 2X III TC. Best advice is to study the section on Advanced Sharpness Techniques in ABP II. And then practice….
Artie,
I love the photos but I see you have some with apertures of f/9 and f/16. Are you still able to have autofocus or are you focusing manually?
Ivan
Hi Ivan, Both of my cameras focus to effective apertures as small as f/8. The 600 II with the 2X III TC and the 200-400 with both the internal and an external 1.X TC work out to f/8. That means that both will autofocus. I can however, opt to set a smaller aperture. Then lenses as above will still focus.
If I stack the 2X and the 1.4X TC (with a 12mm extension tube in between) on an f/4 lens that works out to effective f/11 and I will not be able to autofocus.