And the Streak Continues
I awoke today at 4am. We are on the way to Miami Airport where I will be dropping Denise off for her hoped for flight to Newark this morning; they are expecting 5-8 inches there…. Good luck Lady D. This post marks 69 days in a row with a new educational blog post, a record by far that should be extended for at least another week or so. Or not. 🙂 To show your appreciation, we ask that use our B&H and Amazon affiliate links for all of your B&H and Amazon purchases. Please check the availability of all photographic accessories in the BIRDS AS ART Online Store. We sell only what I use and depend on. We will not sell you junk. We know what you need to make creating great images easy and fun. And we are always glad to answer your gear questions via e-mail.
You can find the following items in the store: Gitzo tripods, Mongoose M3.6 and Wimberley heads, plates, low feet, and accessories, flash brackets, , Delkin e-film Pro Compact Flash Cards, LensCoat products, and our unique line-up of educational materials including ABP I & II, Digital Basics, Site and Set-up e-Guides, Canon and Nikon Camera Users and AF e-Guides, and MP-4 Photoshop video tutorials among others.
We would of course appreciate you using our B&H and Amazon affiliate links for all of your B&H and Amazon major gear, video, electronic, household, and personal purchases. For the photographic stuff mentioned in the paragraph above we would of course greatly appreciate your business.
Thanks and enjoy today’s blog post! This one took about 2 1/2 hours to assemble. I am feeling pretty good today.

|
|
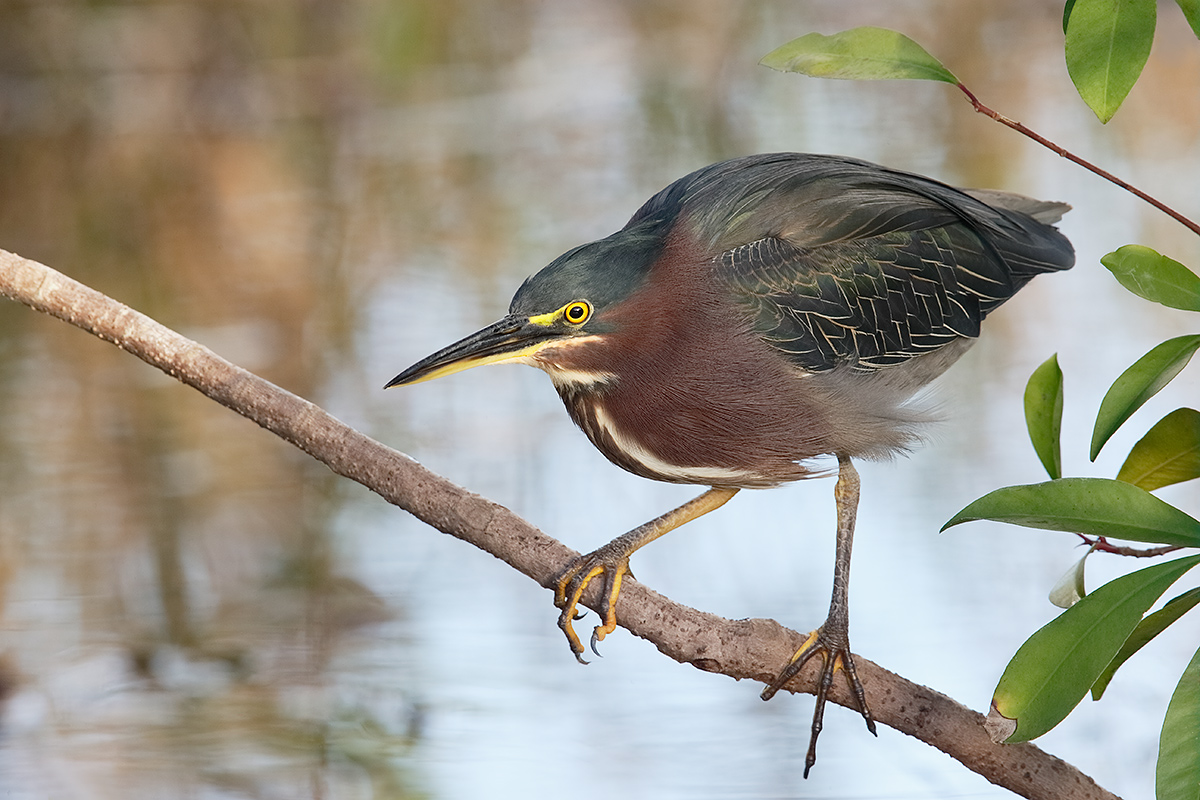
This Green Heron image was created on the Anhinga Trail IPT with the Gitzo 3532 LS carbon fiber tripod, the Mongoose M3.6 head, the Central sensor (by necessity) Expand/AI Servo/Rear Focus on the bird’s eye and re-compose. Click here if you missed the Rear Focus Tutorial. Click on the image to see a larger version.
|
Dealing with Clutter at Anhinga Trail
Green Heron is a notoriously hard to photograph species at Anhinga Trail. Though they are relatively tame and fairly common, they have a habit of choosing the most cluttered perches imaginable. To see them posing in gorgeous light but blocked by any number of twigs and branches is a pretty much daily frustration along Taylor Slough. We found this bird fishing just north of the spot where the boardwalk returns to the asphalt. It took me a while to choose a perspective that allowed a clean look at the subject. As I was working well off light angle I needed to wait for a cloud to cover the sun in order to create a pleasing image. The image presented here is un-cropped; the 24X magnification of the 600 II/2X III/1D X combo enabled me to isolate the subject nicely. Most of the images in the series had one or more leaves merging with the subject; this one did not. The bird posed so nicely that I encouraged many of the participants with shorter focal length lenses to put a card in my camera and make a few images. Many did just that.
My position is that using the 2X TC with both f/4 and f/2.8 super-telephoto lenses adds range to your bird photography efforts with negligible loss of quality. All that folks need to do is to try it and practice as making sharp images with the doublers is an acquired skill.

|
|
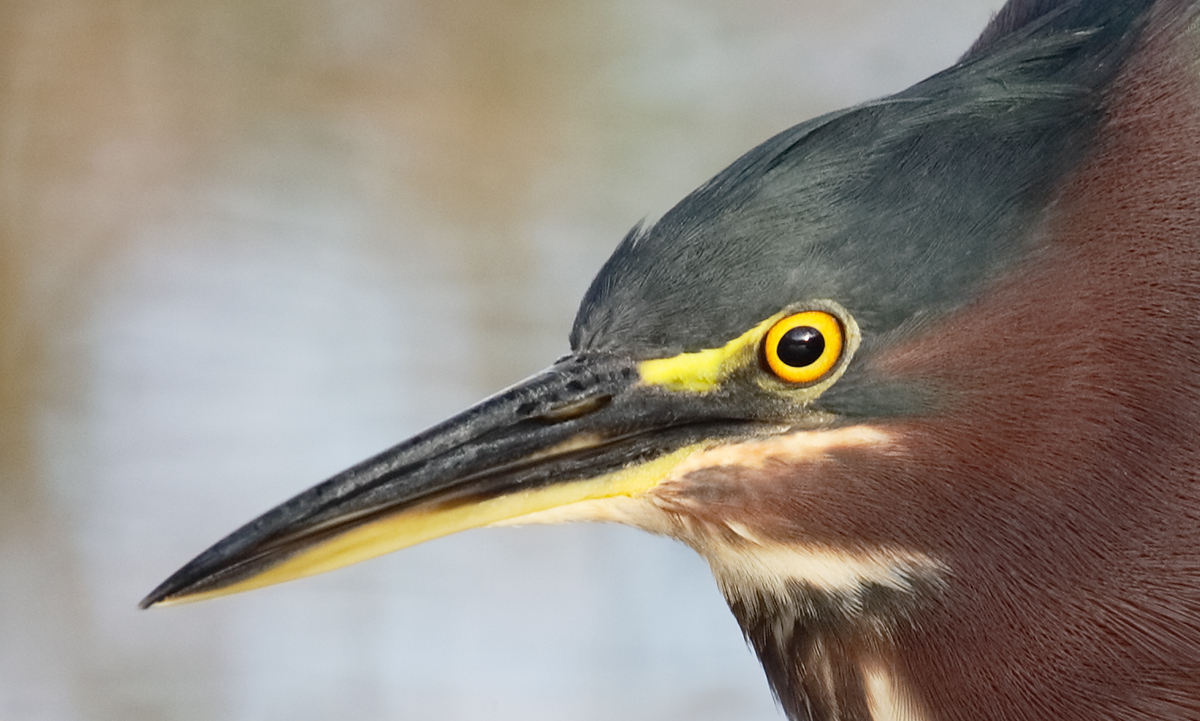
This is an unsharpened 100% crop of the Green Heron’s head. |
600 II, 1D X, 2XIII TC Insanity
There are folks who state clearly that it is not possible to create a sharp image with a 1.4X teleconverter. There are others who state that 2X teleconverters are such garbage that nobody should ever own or use one. I doubt that any successful bird photographer uses their 2X TC as much as I use mine. On our recent Florida swing probably more than half of the thousands of images that I created were made with the 600 f/4 L IS II lens with the Extender 2X III in place. I am confident that I can make professionally sharp images on a consistent basis at shutter speeds as low as 1/60 sec. My success is due in part to the superb optics of all involved parties, to my nearly impeccable sharpness techniques, and to the great 4-stop Image Stabilization system of the new Series II Super-telephoto lenses. Not to mention stopping down from f/8 to f/11.
The best way to learn my sharpness techniques is to join us for an IPT. Next best is to study the section on Advanced Sharpness Techniques in The Art of Bird Photography II (ABP II: 916 pages, 900+ images on CD only).
Support the BAA Blog. Support the BAA Bulletins: Shop B&H here!
We want and need to keep providing you with the latest free information, photography and Photoshop lessons, and all manner of related information. Show your appreciation by making your purchases immediately after clicking on any of our B&H or Amazon Affiliate links in this blog post. Remember, B&H ain’t just photography!


Amazon
Everyone buys something from Amazon, be it a big lens or deodorant. Support the blog by starting your search by clicking on the logo-link below. No purchase is too small to be appreciated; they all add up. Why make it a habit? Because I make it a habit of bringing you new images and information on an almost daily basis.
Typos
In all blog posts and Bulletins, feel free to e-mail or to leave a comment regarding any typos, wrong words, misspellings, omissions, or grammatical errors. Just be right. 🙂
IPT Info
Many of our great trips are filling up. See especially info on the South Florida, Holland, and Nickerson Beach IPTs. Two great leaders on most trips ensure that you will receive individual attention, have all of your questions answered, and learn a ton including how to think like a pro, see the situation, and get the right exposure every time. In addition you will have fun, and make lots of great images. Click here for IPT details and general information.


Rereading that rear focus tutorial for the Nth time it finally clicked for me and I’m going to give it a try. One question about it though – how does this affect image stabilization/vibration reduction? Does it still activate when the focus button is held down? If so, would it be impossible to trigger the IS/VR when recomposing?
Yes it still “works”. You don’t have to do anything!. I am an amateur and it works for me. It will work for you, believe me.
When using the shutter button to focus you have to hold down the focus in order to turn on the IS/VR. I’m still not clear on whether that would work with setting focus and recomposing with a rear focus.
My understanding is that the IS is independent of the focus. Try it to see. Use rear focus to get your subject in focus, release it, move the “frame” to achieve desired composition and press the shutter button.
After some testing it looks like the VR on a Nikon at least will work now both when I hold the shutter button and when I hold the focus button and as far as I can tell there’s no harm in half-pressing the shutter button when using rear-focus so that shouldn’t be a problem at all.
I need to go play with rear focus tomorrow and see how I feel about it!
Hey Chris, I am 99.99999% sure that that it how things are with Canon though I am not sure if IS comes back on with the press of the shutter button or if it stays on for a while after you rear focus…. If I remember, I will try listening the next time I am out in the field–that likely in Japan in Winter…. In addition, I would not be making sharp stuff at 1200mm at shutter speeds of 1/60 sec. and 1/80 sec. if IS were not engaged…. artie
Artie thanks for the info on your new Asus laptop, I bought the same make with more ram and upgraded video card. I gave you credit for this purchase at BH photo. These pictures above are absolutely stunning clarity.
Good luck. We are still having problems downgrading it to WIndows 7; problems installing the needed drivers… Thanks a stack for using our link. Let us know how you do with the laptop. artie
James, her’s a link to Artie’s rear focus tutorial: https://www.birdsasart-blog.com/baa/2011/09/13/rear-focus-tutorial/
Thanks John. artie
I made a mistake in my previous post : it was taken with my 7D.
Hi Artie!
Take a look at this : http://www.pbase.com/photosnature/image/154132158
It was taken with both TCs 1,4X and 2X (models III) and a 12 mm adapter between them with a 1DX and the 600 mm model II.
This Snowy Owl was quite far away but still you can see some feathers in his face and it was winding a lot!
The optics are too good.
Enjoy your instructions, Artie. I’m sure they have made me a better bird photographer. Thanks!
I have all your APTATS and everything else you have published, and they have been very helpful. One suggestion: while much of your basic instruction will probably never be outdated, the photoshop procedures should be updated to at least CS6 and hopefully CC. It’s now possible to accomplish many of the APTATS procedures with many less steps using the latest version of PS.
One question has been bugging me: when you mention that you focus on the “bird’s eye”, for instance, and “recompose”, what actually does this involve. It seems logical that you can’t move the camera off your focal point, so I must assume that you are zooming in or out on the subject when you “recompose”. Am I missing something?
Thanks!
Jim Graham
Thanks for your suggestions.
As for re-composing, you are simply not understanding the use of rear focus. You push the rear focus button to set focus on the eye, let go of the button, and point the lens where you want to make the best image. The focus does not change because you have let off the button.
Please go back and re-read the rear focus tutorials….
artie
I can vouch for the sharpness techniques laid out in ABP-II. Before studying that I pretty much felt like I had wasted 1000 bucks on those teleconverters, but now I’ve been able to get some keepers out of both the 1.4 and the 2.0. I’m in love with the 1.4x + 70-200 f2.8 combo! I still need way more practice (who doesn’t), but having seen that it’s possible I’m much more confident about trying. Thanks 🙂
Thanks a stack Sean! artie
Great to hear you’re feeling better.
I’m also starting to follow Denise’ blog. Any chance of convincing her to start
including her shooting data for her images? I think it would be nice to see what
her lens choice, etc. are.
Doug
Enjoy her blog. Let her know your thoughts. artie