The Streak Continues: 303
Yesterday I made more progress on my 2013 tax return. Swim, nap, meditation, ice bath, and a another good night’s sleep. And lots of boring NFL games on the big screen. This blog post, the 303rd in a row, took me about three hours to prepare. It was published at about 7:15am from my home in Indian Lake Estates, FL.
The 3rd draft of the DPP 4.0 guide is now in the hands of our skilled, amazingly-qualified group of volunteer reviewers.
To show your appreciation for my efforts here, we do ask that you use our the B&H and Amazon affiliate links on the right side of the blog for all of your purchases. Please check the availability of all photographic accessories in the BIRDS AS ART Online Store, especially Gitzo tripods, Wimberley tripod heads, and the like. We sell only what I used, tested, and can depend on. We will not sell you junk. We know what you need to make creating great images easy and fun. And we are always glad to answer your gear questions via e-mail.
GALAPAGOS Photo Cruise of a Lifetime IPT/The Complete Galapagos Photographic Experience. July 14-28, 2015 on the boat. 13 FULL and two half-days of photography: $12,499. Limit 14 including the leader:/Openings: 5.
Though my two-week Galapagos Photo-Cruises are without equal there are too many openings on the 2015 cruise. If you are at all interested, please get in touch with me via e-mail and I will shoot you the current itinerary. I would be glad to design a personalized payment plan for you.
My trip has world’s best guide, a killer itinerary, a great boat (the Samba), and the best leader with eight Galapagos cruises under his belt. Pre-trip and pre-landing location-specific gear advice. In-the-field photo instruction and guidance. Jeez, I almost forgot: fine dining at sea! See the blog post here for some great images. Scroll down here for complete details and to learn how to request the itinerary.
|
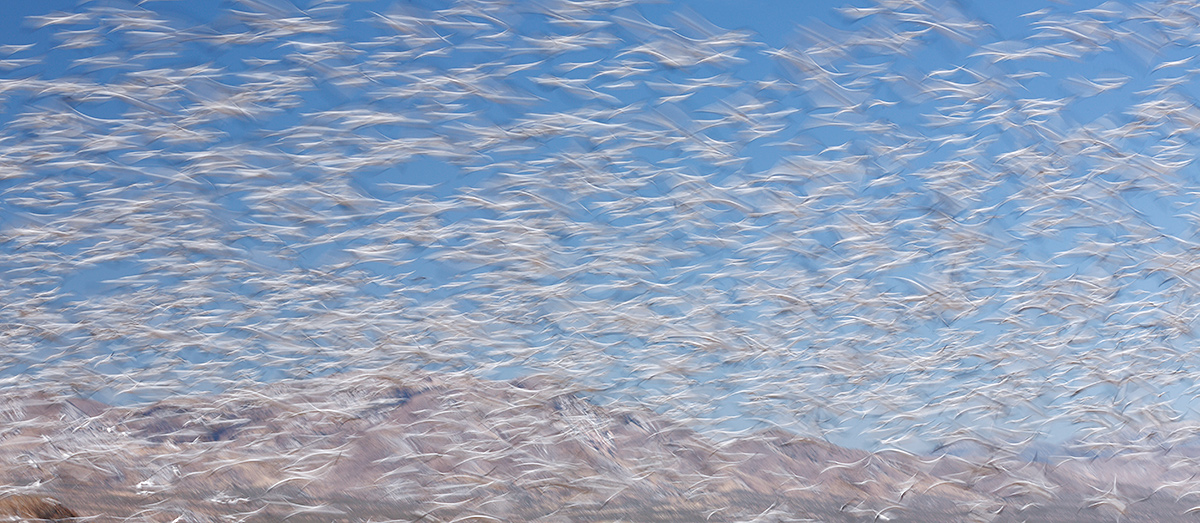
This image was created on one of last year’s Bosque del Apache Instructional Photo-Tours with the Canon EF 70-200mm f/2.8L IS II USM lens, the Canon 1.4x EF Extender III (Teleconverter) (hand held at 98mm), and the Canon EOS-1D X. ISO 50. Evaluative metering at about -2/3 stop to eliminate blinkies on the geese on the ground: 1/10 sec. at f/25 in Manual mode. AWB. Central Sensor Surround/AI Servo Rear Focus AF on the flock in flight as originally framed was active at the moment of exposure. (See the BreezeBrowser screen capture below.) Click here to see the latest version of the Rear Focus Tutorial. Be sure to click on the image to see a larger version.This is the optimized image. It was cropped to a pano from the full frame original; you can see the full frame original in the BreezeBrowser Main View screen capture below. |
The Optimized Image Cropped to a Pano
For the reasons detailed below, I could not–though I loved the degree of blurring of the flock in flight–figure out what to do with this image. Until last night. Keep on reading.
Three Stop Neutral Density Filters
In bright sun, it is impossible to get down to the really slow shutter speeds that I love to use to create pleasing blurs, even at ISO 50. To make that possible, I often employ a 3-stop (I am not sure why they call them 0.9…) Neutral Density (ND) filter. This allows me to get to a shutter speed that is three stops slower than if I were not using the ND filter. In low light conditions using the 3-stop ND allows me to work at wider apertures; that saves me lots of time when dust-spotting.
The B+W 77mm 0.9 ND MRC filters are solid neutral density filters that block three stops of light. The 0.9 density creates a darkening of the entire image, allowing you to photograph with a wider aperture or slower shutter speed than normal. By slowing your exposure time or increasing your aperture, you are able to control depth of field and convey movement more easily. Neutral density filters do not affect the overall coloration of the image and if you properly expose to the right they do not effect the brightness of the image either.
Last year I used a B+W 77mm 0.9 ND 103 filter screwed onto the 77mm front of my Canon EF 70-200mm f/2.8L IS II USM lens. This year I plan to upgrade to the MRC version: B+W 77mm 0.9 ND MRC 103M filter.
Why the upgrade to the MRC version? The Multi-Resistant Coating (MRC) is an anti-reflection coating and, in addition, offers a more protective surface. It helps to increase light transmission by reducing reflections, scattered light, and ghosting should you point your lens back towards the sun. Additionally, it offers greater protection to the filter substrate and stays cleaner for longer than uncoated filters.
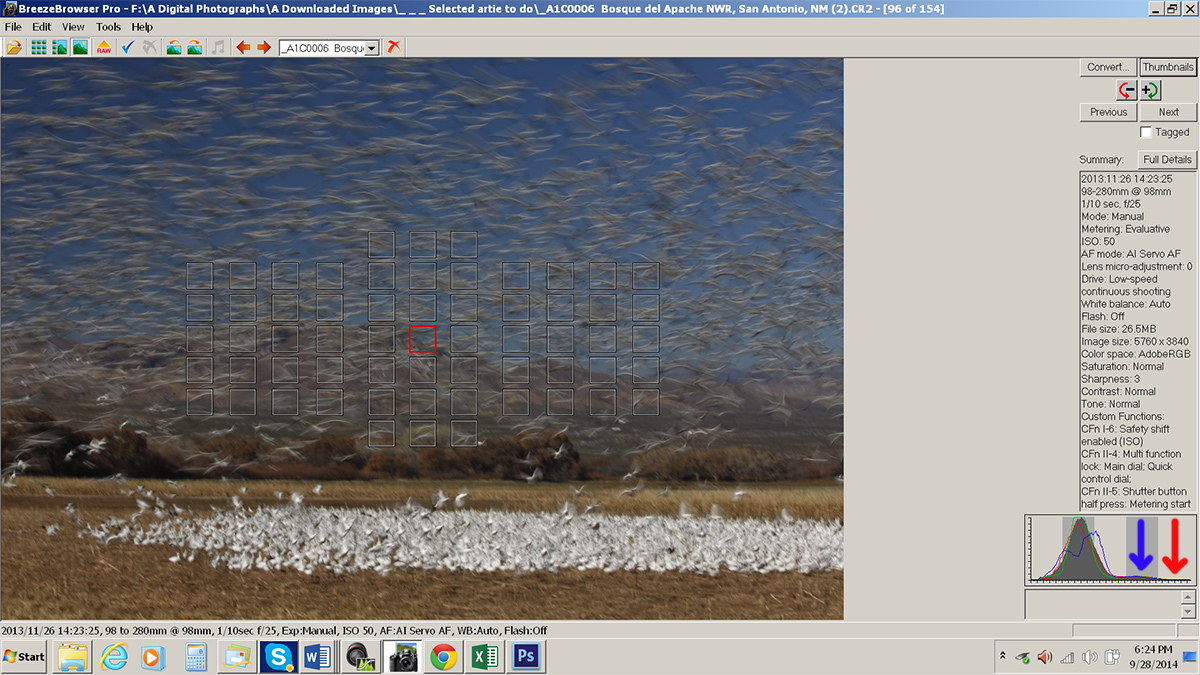
This is the Breezebrowser Main View screen capture for today’s image. |
Getting the Exposure Right for Today’s Image
While the original image looks well under-exposed, do take a close look at the histogram. The blue arrow shows that the bulk of the WHITE tones are in the fourth box of the histogram. The red arrow shows that the brightest WHITEs are well into the fifth histogram box. As they should be. As I wrote in the image caption above, “Evaluative metering at about -2/3 stop to eliminate blinkies on the geese on the ground.” The exposure for the complete image is, therefore, perfect.
The Exposure Mystery
It was a clear sunny morning. The light falling on the Snow Geese on the ground was the same as the light falling on the blurred flock in flight.
Why were the birds in flight rendered so much darker than the birds on the ground??? Hint: the slower the shutter speed in a situation like this, the darker the birds in motion will be. Can you figure out why the difference? If yes, please leave a comment and please be specific.
The Breezebrowser Main View Screen Capture
Above is the BreezeBrowser Main View screen capture that for today’s image. Note that the illuminated red AF square that shows the sensor that was of active at the moment of exposure. In BreezeBrowser you need to check “Show Focus Points” under View to activate this feature. To see the focus points in DPP V.3-point whatever check “AF Point” under View or hit Alt L. To learn how and why I use DPP (Canon Digital Photo Professional) to convert my RAW files, see the info on our DPP RAW Conversion Guide here. The DPP 4.0 RAW Conversion Guide that I am working on with Arash Hazeghi is nearing completion.
Regular readers know that I use and depend on BreezeBrowser every day of the year. It allows me to sort my keepers and delete the rejects faster than any other Windows browsing program. We use it on the main computer in the home office to catalog our images file-drawer style. And the companion program, Downloader Pro allows me to download my images quickly and conveniently. It automatically adds my IPTC data and the shooting location. I have it set up to create a folder named by the Month/date/year. The Breezebrowser/Downloader Pro combo saves me many hours each week. To learn more or to purchase this great PC only program, click here. As far as the BreezeBrowser/Downloader Pro Combo goes, if you are using a Windows platform and are not using these two great programs you are at best, wasting your valuable time. Jennifer is loading Parallels onto my new Mac laptop today, that followed by a licensed copy of Windows 7 and then BreezeBrowser Pro and Downloader Pro. See BreezeBrowswer on a Mac for additional details.
There will be lots more coming soon on my switch to the top-of-the-line, super fast, Apple 15.4″ MacBook Pro Notebook Computer with Retina Display.
|
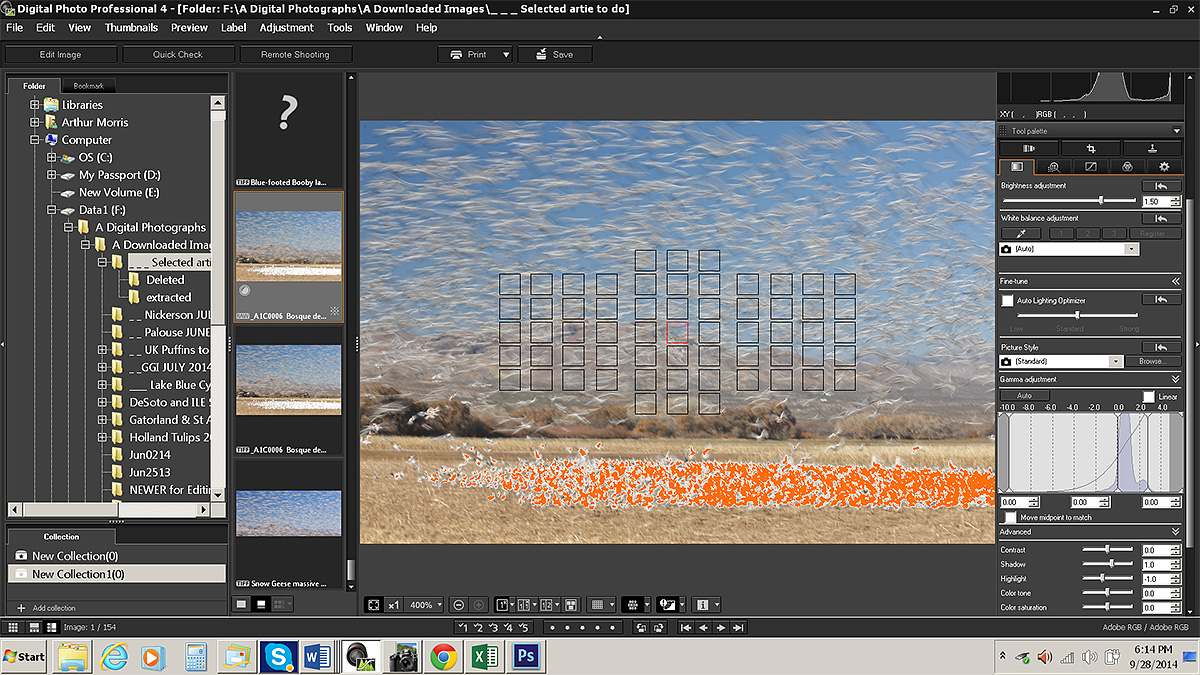
This is the DPP 4.0 screen capture for today’s image. My recipe with all of my adjustments has been applied to the RAW file. Click on the image to read the fine print. |
The RAW Conversion…
I had long realized that creating a pleasing full frame image from the original RAW capture would be nearly impossible. You would need to maintain the detail in the WHITEs of the birds on the ground while lightening the birds in the sky a ton. That could be done rather easily; the problem however would be handling the transition area….
Last night I realized that the answer was to process the RAW file for the upper two-thirds of the image only while ignoring the over-exposed birds on the ground and then cropping to a pano at the bottom of the distant low mountains. I began by moving the Brightness slider to +1.50 stops. (You can see that if you click on the screen capture to view the larger size.) With the exposure for the flock in flight now correct, note that the red highlight warning shows the birds on the ground to be well over-exposed.
The DPP RAW Conversion Guide
To learn why I use Canon’s Digital Photo Professional (DPP) to convert every image that I work on, click here. Coming very soon: The DPP 4.0 RAW Conversion Guide by Arash Hazeghi and Arthur Morris. The more that I use DPP 4.0 for my RAW conversions the more I learn about it and the more I learn about it the more I am impressed with it. Note: at present, DPP 4.0 will work only with 1D X, 5D III, and 6D images. And the early word is that it will not support the EOS-7D Mark II.
|
Learn the secrets of creating contest winning images in our “A Guide to Pleasing Blurs.” |
A Guide to Pleasing Blurs
Pleasing Blurs are not accidents. Learn pretty much everything that there is about creating them in our A Guide to Pleasing Blurs by Denise Ippolito and yours truly.
|
Get your butt on a plane and take advantage of some downright cheap instruction! Please click on the card to enjoy a larger version. |
Affordable Bosque Educational Opportunities
I will be at Bosque this year for nearly three full weeks. There are a host of affordable educational opportunities on the slate in conjunction with the Festival of the Cranes. There are four early morning in-the-field photography workshops, Thursday through Sunday, NOV 20-23, 2014. Thursday is sold out, there is some room on the Friday and Sunday sessions, and, at last count, lots of room on the Saturday workshop. Denise and I are co-leading.
We are offering a two part afternoon seminar on Thursday afternoon, NOV 20 from 2-4:30pm as follows:
Part I: Bosque del Apache Photography Basics
Artie and Denise will cover the basics of lens selection, tripod and head selection, image design, getting the right exposure, autofocus options, and the relationship between light direction and wind direction, and will give an overview of the best photographic opportunities at the refuge.
Part II: Creative Photography at Bosque del Apache
Artie and Denise will teach you to think outside the box when photographing at Bosque del Apache. You will learn to create a variety of pleasingly blurred images by using slow shutter speeds, by photographing moving subjects, by zooming during the exposure, and by panning with the lens during the exposure. They will teach you to take advantage of spectacular lighting and weather conditions. They will also cover post processing creative techniques. Limit 50.
On Friday afternoon from 1:00 to 3:00pm I will, as below, be presenting a free slide program entitled “A 20-Year Love Affair With Bosque.”
Click here to register for any of the open events above.
“Love Affair with Bosque.” Sponsored by Canon. Friday, NOV 21, 2014; 1:00 to 2:40pm. Free, at the Bodega Restaurant, Socorro.
A slide program by Arthur Morris/BIRDS AS ART. Limit 200. Please see the important registration information below.
Arthur Morris first visited Bosque del Apache Refuge in December, 1992 while on sabbatical with his late-wife Elaine While leading his first Bosque del Apache photographic workshop in December, 1994, quite soon after Elaine’s death, he created two iconic Bosque images. His “Blizzard in Blue” was honored in the prestigious 1998 BBC Wildlife Photographer of the Year Competition. “Fire in the Mist” was similarly honored in the 2001 BBC competition and soon thereafter was featured as wrap-around cover art on the coffee table book, Life on the Earth, a celebration of 30 years of the best images from the Wildlife Photographer of the Year Competitions. Those two images laid the foundation for his more than two decade love affair with the refuge. He has returned every year since then at the Thanksgiving season while leading BIRDS AS ART Instructional Photo-Tours. In addition, he has two February visits along with two September visits, the latter visits in conjunction with the Bosque del Apache Open Windows Volunteer Program that he founded. Join us for Artie’s photographic celebration of his “Love Affair with Bosque.”
Even though this is free event, you need to click here to register.
|
Join Denise Ippolito and Arthur Morris for two great days of photography, fun, and learning at one of our favorite soul places. We will surely be taking you out of the box on this workshop. Please click on the card to enjoy a larger version. |
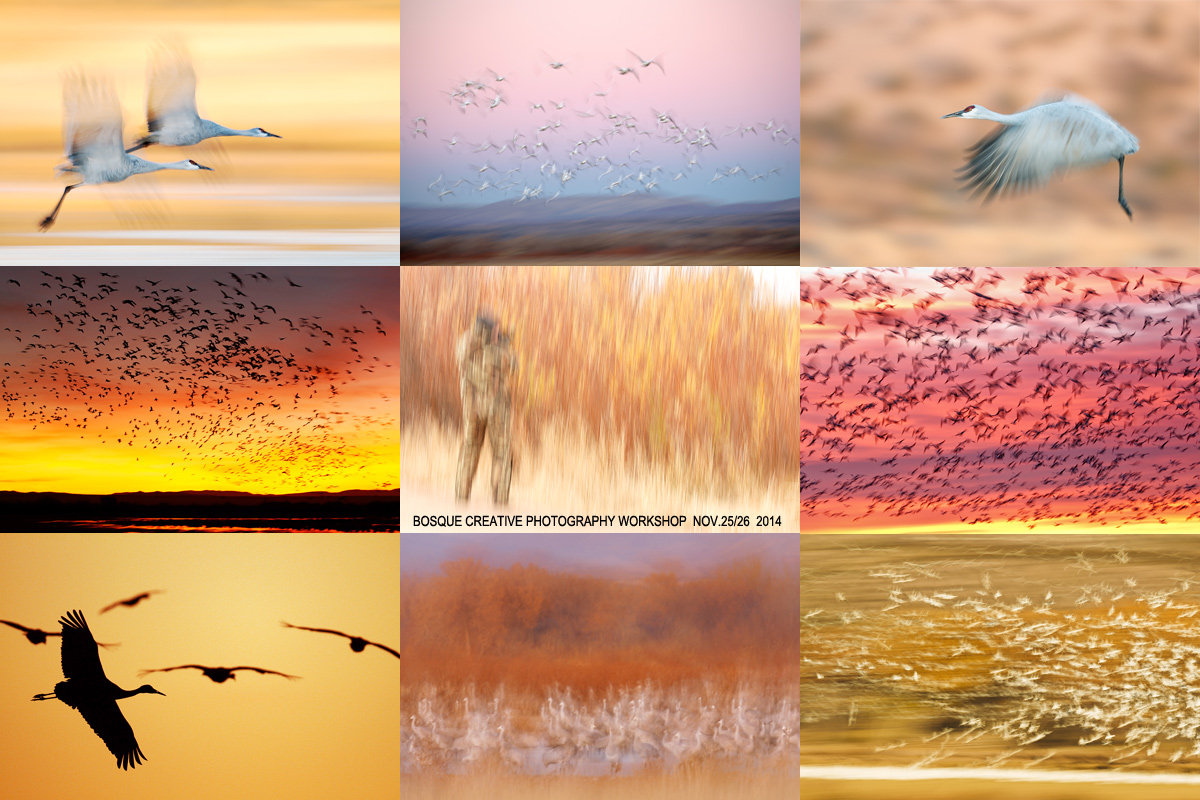
Bosque del Apache 2014 A Creative Adventure/BIRDS AS ART “Creative Photography Instructional Photo-Tour.” (IPT). NOV 24-25, 2014. 2-FULL DAYS: $729. Leaders: Denise Ippolito & Arthur Morris. Introductory Slide program: 7:00pm on Sunday 11/23.
Important Note
While the 4-DAY Bosque IPT has been sold out for some time, there is still room on the 2-DAY Bosque Creative IPT as detailed here.
Do understand that though we will cover a variety of creative techniques and photograph a variety of subjects, when conditions are perfect for traditional bird photography that is exactly what we will be doing.
Get Out of Your Box!
The Creative Bosque IPT is perfect for folks who want to learn to think outside the box, to create new and different images. This workshop is the perfect add-on for folks who are planning on attending the Festival of the Cranes. Learn to unleash your creative juices at the wondrous Bosque del Apache National Wildlife Refuge in San Antonio, New Mexico with two great leaders including the amazingly talented and creative Denise Ippolito. In-the-field instruction will include tips on gear set-up, on creating a variety of pleasing blurs, on getting the right exposure, and on designing pleasing images. And lots more. From vertical pan blurs to subject motion blurs to zoom blurs to multiple exposures we will cover it all. If conditions are perfect, we will not hesitate to take advantage of them to do some traditional bird photography. This workshop will include an inspirational introductory slide program on Sunday evening, 11/23, after dinner on your own, two morning and two afternoon photography sessions, all lunches, a digital workflow and Photoshop session after lunch on Monday, and an image critiquing session after lunch on Tuesday.
A $329 non-refundable deposit is required to hold your slot for this IPT. Your balance, payable only by check, will be due on 7/25/2014. If the trip fills, we will be glad to apply a credit applicable to a future IPT for the full amount less a $100 processing fee. If we do not receive your check for the balance on or before the due date we will try to fill your spot from the waiting list. If your spot is filled, you will lose your deposit. If not, you can secure your spot by paying your balance.
Please print, complete, and sign the form that is linked to here and shoot it to us along with your deposit check (made out to “Arthur Morris.”) You can also leave your deposit with a credit card by calling the office at 863-692-0906. If you register by phone, please print, complete and sign the form as noted above and either mail it to us or e-mail the scan. If you have any questions, please feel free to contact me via e-mail.
Be sure to like and follow BAA on Facebook by clicking on the logo link upper right. Tanks a stack!
Support the BAA Blog. Support the BAA Bulletins: Shop B&H here!
We want and need to keep providing you with the latest free information, photography and Photoshop lessons, and all manner of related information. Show your appreciation by making your purchases immediately after clicking on any of our B&H or Amazon Affiliate links in this blog post. Remember, B&H ain’t just photography!
Amazon.com
Those who prefer to support BAA by shopping with Amazon may use this link:
Amazon Canada
Many kind folks from north of the border, ay, have e-mailed stating that they would love to help us out by using one of our affiliate links but that living in Canada and doing so presents numerous problems. Now, they can help us out by using our Amazon Canada affiliate link by starting their searches by clicking here. Many thanks to those who have written.
Typos
In all blog posts and Bulletins, feel free to e-mail or to leave a comment regarding any typos, wrong words, misspellings, omissions, or grammatical errors. Just be right. 🙂



Wow Artie is switching to “More Advanced Crap”!!
Patrick’s reference was quoting my retort to folks who often stated, PCs, pieces of crap. 🙂
I think the moving birds are darker because they are not in the same spot during the entire exposure, thus no one spot on the sensor is effected by their moving parts as are the birds sitting still on the ground. The effect is much the same as a long exposure made of a street scene with people walking THROUGH the scene…..if the exposure is long enough and the people are moving all the time they can actually not show up in the final image or show up as dark blurs. White birds with only a 1/25 second exposure (as opposed to a longer exposure) only renders them darker…doesn’t make them disappear.
You were on the right track until you typed that last sentence :)…. See the back and forth with Elinor to wind up with the right answer. artie
I must have missed something…why are you not as smart as Denise (as stated in the title)?
As for why the birds in flight are darker, than the birds on the ground, had you not supplied your hint, I would have said it was, at least partly, due to the difference in the angle of light hitting each; in the birds on the ground, the light is hitting them on top of their bodies, and that is the angle we see them from, so the light is reflected. The birds in flight are also lit from above, but we are seeing them from below.
That said, based on your hint and John’s answer, I’m thinking it’s because the moving birds are not in one place long enough to be properly (or over) exposed; the exposure is spread out over the distance they travel in that 1/10th of a second.
It was Denise who first explained this concept to me. The difference in light angle has pretty close to nothing to do with why the white birds came out so dark and grey.
In your last paragraph you are headed in the right direction but you did not get all the way there. See my back and forth conversation with Elinor. artie
With a slow shutter speed, darker blue sky shows through the moving white bird blur? The dark wing tips making longer streaks along with underside shadows seem logical. And there may be shadows from higher birds as well.
The shadow stuff is bogus. With this, “With a slow shutter speed, darker blue sky shows through the moving white bird blur?” you are getting there…. What is the effect of the darker blue sky “showing through”? a
Effect is–it lessens the white?
Yes. Exactly how? Think in terms of the pixels that are being recorded….
On a particular spot in the sky, the bird records white, then moves to let some blue record in the same spot before the shutter closes?
That is correct. The blue of the sky blends with the white of the birds and is recorded by the sensor. Thus, the birds in flight that we expect to be bright white are rendered as a blend of white and blur, effectively becoming greyed out.
For those who still do not understand perhaps this might help: Had I used a fast shutter speed (most likely with a somewhat higher ISO), the birds in flight would have been rendered as white and bright as the birds on the ground :).
Well done. a
Hi, Artie. Denise is smarter than most people! I think John Rowell’s second explanation is right. The sitting geese are reflecting full white from the sun, while the flying geese, and especially their wings, change their angles with respect to the sun and reflect less light at times. There should be a point where slowing the shutter speed even more doesn’t change the brightness of the flying geese anymore. By the way, someone sent me one of those “The world’s most amazing photographs” things, and one of Denise’s was among them. Nice to see.
Partially right but mostly wrong :).
While this is true “There should be a point where slowing the shutter speed even more doesn’t change the brightness of the flying geese anymore” I am not sure that you understand why… As the shutter speed gets slower the geese will no longer be rendered distinctly and when it get even slower the entire frame will be rendered as a blur of single color…. artie
ps: Denise’s explanation is actually a quite simple one….
Thanks, Artie. I think I did understand why; you’re averaging the reflections, so you’re getting a blend of reflections and hence of color. And, of course, shapes.
Nope. Reflections have nothing to do with it 🙂 a
Artie: How can you say that? We see images in the world because they reflect light. Seems to me that reflections have everything to do with it.at
David, I can say that because while it is true that we photograph reflected light that fact has nothing to do with the answer to my question :). See the back and forth with Elinor above to wind up at the correct answer.
Artie: Thanks for the explanation, I never would have come up with that. But let me ask you to complete the lesson for me. I went back and looked a photo I’d taken using a fast shutter speed of geese sitting with flying geese overhead. The ones on the ground are uniformly bright white, while some of the flying ones aren’t, mainly because of shadows (on their underwings, on some of their bodies). Why don’t those shadows factor into making the flying birds less bright in the blur, in addition to the other explanation?
They might factor in to some degree, but with me working right on light angle it would surely account for less than 5% of the darkening, probably well less. artie
overlapping Blur of the moving black wing tips increases with the length of the exposure and at times overlaps birds.
Nope 🙂 When you are in Manual mode the only thing that influences the exposure is the photographer…. a
Now that is a catchy title!!
Glad that you liked it Miss Smarty Pants. a
Artie..
a MAC?!! Way to GO!!
WhooHoo!!
Who knew??
Yes Ma’am. With BreezeBrowser yet. The final transition should take place in a week or two. I think that all that needs to be done is to get the NIK stuff on it…. I do not want to make the switch till all is set as the keyboard is much, much smaller than the keyboards on my last few wide bodied monsters.
See you on the Fort DeSoto IPT soon! later and love, artie
Exposure is properly set to avoid blinkies in the whites at a given shutter speed. Think of each photosite area or pixel as a bucket collecting light and the exposure ends just as the bucket becomes full. Unlike the birds on the ground, the whitest areas of the flying birds will be moving, essentially spreading the same amount of light into several different buckets. The longer the exposure, the more buckets have some light collected, but none are full. Therefore, the moving birds appear darker because none of the buckets was full at the end of the exposure and the longer the exposure, the darker the birds.
Hi John, Though I think that you are on the right track and probably correct, I do believe that there is a simpler explanation. Let’s see if anyone can come up with that one. artie
OK, I’ll give it another try. The resting birds have the full sun on their backs whereas with the flying geese you’re getting a more shadowed view of the underside and/or wings. Also, the entire group may well be casting some shadow on itself.
Perhaps 1% true but not the answer. I give you credit for being the first to try and for persistence. artie